A socket is not only a mandatory functional element of electrical wiring, used to connect electrical household appliances, but also a significant interior detail.
The trouble-free operation of the outlet, as well as its neat appearance, depend to a large extent on how well the installation is done, right? To make the correct installation, it is necessary to take into account a number of nuances that are present in this work, one of which is the correct installation of socket boxes.
Have you never installed a socket box and are afraid of making mistakes? We will help you understand all the features - the article discusses in detail the types of installation boxes and the intricacies of installing each of them.
Attention is also paid to the installation of socket boxes in common types of bases - concrete, plasterboard, tiled wall. The material is supplemented with visual photos and useful videos.
Types and sizes of PR
Planting containers for electrical fittings are produced in a wide range of models and modifications. It is difficult for an inexperienced consumer to understand this variety. The sizes and types of socket boxes are designed for different installation conditions. PR is made of durable and non-flammable plastic - PVC and polypropylene. These materials have high dielectric properties and can be processed with cutting tools. Plasticity allows you to make products of complex geometry and different colors.
Kinds
There are 4 types of plastic boxes based on their shape:
- round;
- oval;
- rectangular;
- block.
Cylindrical housings are mainly used to secure the fittings of switches and point sockets in them. Oval boxes are an elongated ellipse. Several points of connection to the electrical network are placed in them at once. Rectangular PRs are used to place low-voltage fittings in them for connecting contact connectors for television, radio and high-tech equipment.
Block socket boxes Source sdvor.pro
A separate group of socket boxes are made up of block elements. Basically, these are round boxes that have side projections that fit into each other of two boxes. This feature allows you to connect socket boxes together into blocks of any number of elements. This solution eliminates the need for multi-connector extension cords.
Dimensions
Plastic glasses around the perimeter of the opening have a side. It is needed to rest against the wall surface. PRs are characterized by external and internal diameters. The outer size of the socket box (along the side) can be 68 - 71 mm. The internal diameter ranges from 60 – 66 mm. For different manufacturers, the dimensions of concrete socket boxes may vary slightly. However, all of them are designed for standard fittings of sockets and switches. The standard dimensions of the landing box are 60x45 mm, where the first number is the internal diameter, and the second numbers indicate the depth of the glass.
Dimensions of a standard socket Source kopos.ua
Inside the box, at an equal distance from each other, there are 2 or 4 longitudinal thickenings into which small self-tapping screws are screwed. After installing the socket box into the concrete wall, the heads of the screws are threaded through the holes in the terminal pad. The screws are tightened until they stop, fixing the reinforcement inside the glass.
Along with the standard height of 45 mm, the industry produces socket boxes with a depth of 60 to 80 mm. Recessed glasses are used as dispensing boxes. This makes it possible to place a large number of connecting components of the electrical network in one container.
A group of point (single) PRs is mounted on the basis that the distance between their centers will be equal to 71 mm. For block glasses, the length of the connecting elements is 5–6 mm.
The nuances of installing a multibox on a plinth
What should you do if your house has already undergone high-quality repairs, but you need another point to connect electrical household appliances?
In this case, it is not at all necessary to rip off the new wallpaper and ditch the wall; you can make a socket directly on the baseboard.
Multiboxes fit all types of standard single sockets. They can accommodate not only electrical, but also telephone sockets, as well as Internet cable connectors.
However, it should be noted that this method can only be used on collapsible plastic skirting boards with a cable channel. Before installing the socket box, it is necessary to lay the wire inside the baseboard.
To do this, remove the cover from the part where the socket will be located. This operation is performed from a corner or from a nearby plug; simply pry the cover with a screwdriver and carefully remove it.
Cut the baseboard so that there is a gap the width of which matches the size of the plastic trim. Insert the multibox into it, thread the wire through the hole in its body, and secure the socket box with dowels.
How to install a socket box in a concrete wall
Concrete base is one of the strongest bases for wall fencing. Vertical panels are reinforced concrete slabs. If a layer of plaster (2 - 3 cm) allows you to hide the wires in its mass, then to install a seat for the socket box you will need to drill into concrete. And for this you will need a special tool.
Installation of socket boxes in concrete Source prom.st
You should not trust advice on how to fix a socket box in a concrete wall using a drill and a drill bit with a Pobedit tip, or, even worse, do the work with a chisel and hammer. This can be recommended by those people who have never done it themselves. “Stubborn” concrete can only be done with a hammer drill.
Tool
Making an opening in a concrete wall for one seat without the help of a hammer drill can take a whole day of labor-intensive and dusty work. A universal power tool, equipped with a crown or a special drill, can handle small and deep holes quite easily in perforation mode. Any inhabitant of a home can easily master the control of a rotary hammer. If there is no instrument in use, then it is rented.
Hammer Source cmp24.ru
You can make many holes with a drill and knock out the concrete with a chisel, but it is best to do this with a crown with diamond attachments or pobedit teeth. They are equipped with drills that center the entrance of the cutting attachment into the concrete mass. If further passage of the hammer drill is hindered by the reinforcement of a reinforced concrete wall, then it can be cut with an old used crown.
A level will be needed to indicate the horizontal line of a group of sockets. To apply the markings you will need a pencil and a ruler.
Crown for concrete Source static-eu.insales.ru
Step-by-step instructions on how to install a socket box in a concrete wall with your own hands
- Marking.
- Drilling.
- Preparing socket boxes.
- Installation PR.
- Connection and installation of fittings.
Marking
Determining the location of switches and sockets is regulated by the Rules for the Installation of Electrical Equipment (PUE). Sockets in residential premises must be placed at a distance of at least 30 cm from the floor. For switches, this size is a minimum of 90 cm. Transfer boxes should not be closer to window and door openings than 10 cm. Connection points to the electrical network are located at a distance of at least 50 cm from gas pipes.
Marking of socket boxes on the wall is done after installing hidden wiring. The seat center points are combined into one line. It is drawn with a pencil or marker under the level. If single socket boxes are installed, the distance between the points will be 71 mm. If the glasses are combined into one block, then you need to add the length of the interblock elements, that is, the distance between the centers will be 71 mm + 6 mm = 77 mm. This is not dogma. It is better to check the dimensions yourself with a ruler.
Marking of switches, sockets and transfer boxes Source chebo.biz
Common mistakes
Common mistakes made when installing socket boxes:
- Installation of socket boxes before the walls are finished, which makes subsequent leveling of the surfaces difficult. When installing parts that are skewed, you will have to remove the mounted boxes and then seal the parts again. An additional layer of plaster reduces the likelihood of contact between the crown and the reinforcement during drilling.
- Installation of socket mechanisms in walls without transition elements. This installation method is strictly prohibited, since it does not provide insulation of the wall material from the power cables.
- Horizontal skew of the socket block and erroneous determination of the distance between the centers of the mounting boxes. Incorrect positioning leads to the formation of gaps between the wall surface and the decorative frame of the socket module.
- It is prohibited to use foam for fixing socket boxes, since the material does not meet fire safety requirements. There are non-flammable foams of class B1, but the strength of the material is inferior to gypsum or alabaster mixtures.
Video description
This video clearly shows the design of the socket boxes:
The dimensions of the standard crown coincide with the external dimensions of the socket boxes for concrete. Therefore, when drilling, the crown is completely recessed into the wall. At the end of the work, a concrete cylinder with a hole in the middle remains in the hole. It is easily knocked out with a chisel installed in the hammer drill in jackhammer mode.
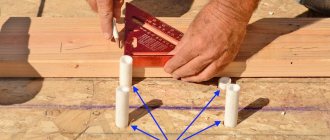
If there is no crown, proceed as follows:
- The socket box is leaned with its bottom against the central marking point and the body of the box is outlined with a pencil;
- I lean the socket box against the drill and mark the height of the glass with insulating tape;
- inside the marking contour, drill the maximum number of holes in perforation mode, recessing the drill to the insulating mark;
- knock out the opening with a chisel in the same way as in the previous case.
Drilling out a seat for a socket box Source electrikmaster.ru
See also: Catalog of companies that specialize in electrical work and installation of utility networks.
Video description
This video shows the installation of socket boxes:
Preparing socket boxes
Before installation, the side window is broken out in the box. Wires are pulled through the resulting opening to a length of about 10 cm. The ends of the wires are stripped and crimped with a terminal block. Contact elements are necessary for stranded conductors. Shaggy twists often lead to a short circuit and, even worse, can cause a fire in the wiring.
Perforated openings in the glass are located on four sides on the side of the PR. This is done so that you can pull the wire into the box from any direction without creating unnecessary twisting of the wiring.
PR installation
- The hole in the concrete is cleaned of dust and moistened with water to increase the adhesion of the concrete surface of the nest.
- Gypsum or alabaster is diluted with water in a ratio of 1:2.
- The solution is applied with a spatula in a circle inside the hole.
- The box with the stretched wire is inserted into the seat.
- The squeezed out solution is removed.
Removing excess solution Source www.sibelektrika.ru
Connection and installation of fittings
After the alabaster hardens, the following actions are performed:
- the stripped ends of the wires or terminals are secured to the switch block or socket;
- Usually the terminals are secured with screws and washers.
- There are fittings with self-clamping fasteners. The ends of the wires are inserted into the holes, and spring-loaded bars clamp them;
- the wire is laid on the bottom of the socket box and the fittings are inserted;
- The pad pad with the holes is put on the PR screws and turned until it is level. The screws are tightened with a screwdriver;
- the side screws of the block are tightened until the sliding legs reach maximum contact with the surface of the glass;
- The switch keys are inserted into the sockets of the block. Then the front frame is attached. The front panel of the socket is screwed to the block with a screw.
Fastening the socket fittings in the socket box Source sense-life.com
Socket installation
Before installing the socket box, it is strongly recommended to lay out the wiring, otherwise it will be quite problematic to squeeze through it later. Calculate the length of the wires in such a way that there is a cable reserve of about 20 cm. This is necessary for convenient installation of the socket, as well as in case of its replacement.
Having connected the wires to the corresponding contacts, make a loop from the remaining part of the cable, avoiding any breaks. Now carefully recess the socket into the niche and secure it with screws. All that remains is to fix the cladding and enjoy the result of your work.
Features of installing PR in other wall bases
It should be noted that installing socket boxes in brickwork is no different from installing a PR in a concrete wall. Brick can be easily cut with a pobedit or diamond crown. But the installation of polymer glasses in plasterboard, ceramic tiles, and hollow panels has its own characteristics.
Drywall
The facing material is quite thin gypsum panels. To install sockets and switches, specially designed plastic cups are used. The socket boxes for drywall have external side screw clamps. The outer edge of the socket rests against the surface of the drywall. By tightening the screws, they lift the tabs along the threads, which with their teeth rest against the lining from the inside.
Drywall socket box Source electroua.com.ua
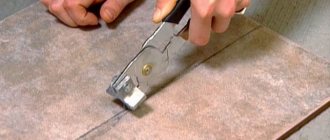
Holes in gypsum panels can be cut with a utility cutter or knife. To get a perfectly even round opening, use a drill with a special bit. It is also used to cut holes in plastic false panels of wall fences. The dimensions of socket boxes for drywall are the same as for glasses for concrete.
Drywall crown Source www.stocklots24.com.tr
Ceramic tile
A diamond bit is used to cut holes in ceramic tile walls. Before starting work, make a template with holes from plywood. It is glued to the tile with double-sided tape. During drilling, the crown is watered. Otherwise, the tile may overheat and it will crack. It is also not recommended to use an attachment with a central drill. It can cause the ceramic to crack.
The resulting openings in the ceramic tiles and the base of the wall are filled around the perimeter with alabaster or gypsum mortar. The socket boxes are inserted into the seats, having previously pulled the wires through the holes in the boxes.
Drilling holes in ceramic tiles with a diamond core Source www.1shop.lv
Hollow panels
For a group of block socket boxes, a rectangular opening is cut with a grinder, a block is inserted into it and coated on all sides with alabaster mortar. You can use a trick. If the bottom of the PR reaches the opposite surface of the void, then a hole is drilled in it and a dowel is inserted. The socket box is secured by screwing a self-tapping screw into the dowel through a hole in the bottom. If the depth of the hole is large, then you can place a wooden spacer.
Methods for transferring a connection point
There are two simple methods that allow you to transfer sockets without destroying the wall finish:
- By creating a loop - involves creating a jumper from the old “point” to the new connection point.
- By extending the wire - involves extending the electrical line in the cavity of the new groove.
If the new chosen location is much further than the previous one, you can make a complete replacement of the entire line by laying a separate wire from the distribution box located at a slight distance. But, unlike the two methods described above, laying a new line requires large-scale repair work.
An important point: it is necessary to extend the conductor with an electric cable, the cores of which have the same cross-section and are made of the same material
When choosing a daisy chain method for connecting a new outlet, keep in mind that such a connection is very unreliable for installing three or more power points. If one section or socket is damaged, the entire sequential chain of devices will be inoperative. And, according to the rules of the PUE, it is not allowed to be used to power powerful electrical appliances: microwaves, electric stoves, refrigerators, washing machines, etc.
Another negative side is that when two sockets are connected with a single cable, the current load sequentially passes from one device to another. Therefore, when several devices are plugged into sockets connected through jumpers at the same time, there may not be enough voltage for their operation.
What to do if the socket box falls out of the wall
The reason for this may be improper fastening of the PR in the socket. If this happens and the socket box is undamaged, proceed as follows:
- remove the front panel of the socket, switch keys and frame;
- unscrew the screws of the spacer legs and the pad pad;
- the fittings are removed from the socket box;
- the seat is cleaned of dust and alabaster residues;
- the nest is coated with a primer using a brush;
- the hole is filled with alabaster or gypsum mortar;
- The installation of the box is repeated.