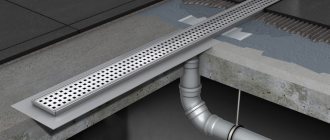
Many people are interested in such a process as laying tiles on GVL. Some people don’t even know if it can be done. In response, it should be noted that this type of installation technology has been used for many years. The popularity of the method is due to the fact that to level the surface, laying gypsum fiber sheets, in other words, dry screed, is as convenient as possible and tiles can be laid on the sheets. When arranging a dry screed, for the most part, laying tiles on GVL becomes the main solution if you need to lay floor tiles on a wooden floor. In addition, this coating can also be found in any other room. This floor is quite practical and has many advantages.
Laying tiles on a screed: step-by-step instructions
Ceramic tiles are a universal facing material that is suitable for both finishing floors and finishing walls of premises for various purposes. This material is characterized by high wear resistance, durability, and attractive appearance. Ceramic tiles are often used to decorate bathrooms and kitchen floors. It is important to take into account that such tiles must be laid on a concrete screed. Therefore, it is important to understand how a screed is made for floor tiles and how long it will take to start laying tiles on the finished screed.
ADVANTAGES OF KNAUF SUPERLIST
HIGH STRENGTH
It is successfully used in rooms with a high probability of damage to walls.
HIGH SOUND INSULATION
Protects against noise from neighboring rooms.
INCREASED FIRE RESISTANCE
Reliably protects the home from the spread of fire, which is especially important in wooden houses.
ENVIRONMENTAL SAFETY
Allows the use of the material in children's rooms and in rooms with increased requirements for environmental standards.
AN IDEAL BASE FOR ANY TYPE OF FINISH
Allows you to realize any design idea.
WIDE APPLICATION
It is used for cladding walls, erecting partitions, installing suspended ceilings and even for floors.
Features of the process of laying tiles on a concrete screed
Ceramic tiles are considered one of the most popular and versatile finishing materials. The demand for tiles is explained by its high resistance to abrasion, durability, as well as resistance to prolonged exposure to water, moisture and temperature fluctuations. Moreover, despite the apparent complexity of installing this material, it is quite possible to cope with its installation on your own, even if you do not have the necessary experience. Therefore, it is not surprising that many people who want to save on the services of professional tilers want to find out how long it takes to lay tiles on a screed. Separately, it is worth noting that modern technologies make it possible to carry out work on laying tiles on a dry screed . In this case, you will not need to wait long for the cement mortar to completely harden, which will significantly speed up the process of finishing the floors.
Special floor tiles are easy to use and resistant to constant external physical influences. The tile does not require specific care. Even the most difficult stains can be easily removed from the surface of the tile, especially if it has a glazed glossy finish.
Features of using ceramic tiles include the need to carry out preparatory work before laying the tiles on the screed . Quite often, inexperienced craftsmen decide to save time and neglect this simple recommendation. As a result, this leads to a significant deterioration in the quality of the finished floor covering and a reduction in its service life. Therefore, installation of tiles on an unprepared surface is not allowed. The same applies to laying tiles on a screed that has not completely hardened. Therefore, it is very important to know how many days after you can start laying ceramic tiles on the screed after it has been poured.
Characteristics and Features
One of the most modern technologies, which is increasingly preferred when leveling floors, is the Knauf dry screed.
After applying this method, you can immediately lay tiles, linoleum, parquet, laminate or carpet on the floor. Knauf dry screed can be used when carrying out repair work both in new apartments and in habitable premises:
- The mixture usually consists of a loose, fine-grained substance, most often expanded clay. It is thanks to this component that the best insulating properties are achieved.
- The second main component of the screed is a solid two-layer coating made of gypsum fiber or plasterboard. Inside the layers there is a layer with waterproofing material.
Drywall is a sheet with a cardboard lining. The coating is sufficiently flexible and easy to cut. However, gypsum fiber is more often used in prefabricated structures. This is due to high strength properties, fire resistance, and cost. The homogeneous surface is a mixture of cellulose and gypsum.
Knauf screeds typically use 2 types of sheets:
- Floor elements. The design consists of two layers of gypsum fiber, which are moisture-proof.
- Small-format gypsum fiber sheets. The structure is made of moisture-proof and environmentally friendly materials.
The two-layer sheet design has a slight shift to form folds over the entire area of the material. Thanks to this feature, the sheets can be easily connected using screws and mastic.
The use of this technology has a number of features that must be taken into account to obtain the best quality and desired result:
- The presence of protection for electrical wiring and heating communications using corrugation.
- Wooden or concrete base.
- Normal indoor humidity conditions.
- Avoid exposure to aggressive chemicals.
- We try to carry out all work at an optimal temperature of 5 degrees. A drop to minus 10 degrees is very undesirable.
Knowledge of the main characteristics and features of the modern method allows you to decide on the choice of material and correctly perform all the work on laying the screed. Correctly selected parameters are the key to quality and durability.
Main types of laying tiles on screed
Ceramic tiles can be laid on a concrete floor in several ways, which have individual specific features. Therefore, it is important to understand what the main types of tile layouts are when laying them on the floor.
Important: regardless of the tile layout used, the master must know after how many days the tiles can be laid on the screed , provided they have been recently poured.
Parallel
Many people prefer parallel tile laying. This layout resembles in its pattern the drawing of an ordinary checkered notebook. In this case, the floor screed must completely harden before laying the tiles and be prepared for laying the tiles.
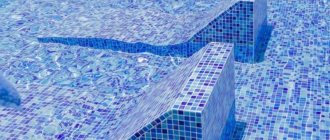
Herringbone
This is quite an interesting layout, suitable for finishing floors in bathrooms and kitchens. In this case, the floor screed for laying herringbone tiles should be as smooth as possible and pre-primed to ensure maximum quality of adhesion of the tiles to the surface being finished. This layout resembles the principle of laying parquet boards. Long and narrow rectangular tiles are ideal for this pattern.
Chess layout
This is a fairly popular layout for ceramic flooring. In this case, the tiles are laid out in a checkerboard pattern, which allows you to create an interesting floor pattern. True, laying tiles using this method can be quite difficult for beginners. Therefore, in this case, it is recommended to seek help from professionals. Experienced craftsmen not only know all the principles of such a layout, but also understand when it is possible to lay tiles after pouring a fresh screed.
Diagonal layout
The diagonal layout is very popular due to its ability to visually increase space. However, beginners are not recommended to try to lay tiles in this way on their own. This is due to the fact that without proper experience it will be difficult to maintain the selected angle of inclination of the tile.
Mosaic layout
The mosaic layout method involves the use of tiles not only of different colors and textures, but also of different sizes. At the same time, to create a successful and attractive design, it is recommended to seek help from experienced designers.
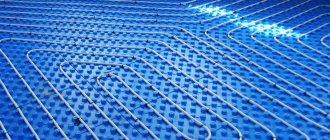
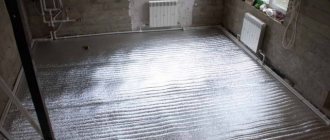
Important: when using tiles on the floor in the hallway or kitchen, it is recommended to install a heated floor system. It is important to remember that laying the heating cable in the screed should be carried out much earlier than the installation of the floor covering.
Offset installation
When using this scheme, all tiles must move vertically and horizontally. At the same time, tiles of appropriate sizes are placed in the gaps that appear. As a result, you can get an original and neat flooring pattern. True, when carrying out such work, it is extremely important to be careful and monitor the evenness of the masonry and tile joints.
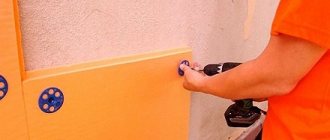
Surface preparation
Before you start laying tiles on a concrete screed, it is important to carry out the following preparatory work:
- first you will need to dismantle the flooring, old screed and waterproofing layer;
- Using a building level, the surface is carefully leveled, chips and existing cracks are eliminated;
- Next, a new layer of waterproofing is laid;
- at the next stage, a new screed is poured, the maximum thickness of which should not exceed 1.5 centimeters;
- Debris, dust and dirt are removed from the floor;
- After enough time has passed for the floor screed to dry, you can begin laying tiles , having previously primed the concrete floor.
Important: before proceeding with the final priming of the floor for subsequent flooring installation work, it is important to consider the drying time of the floor screed before laying the tiles . This will help eliminate the possibility of problems associated with peeling tiles or cracking of the screed.
Laying
Before you begin, you need to carefully prepare for the floor repair. So, in addition to the main components of the screed - bulk filler and gypsum fiber sheets, you will need a polyethylene film in the case of concrete or bituminized paper in the case of wood, as well as damper tape, edge tape, jigsaw, glue, screws, drill, tape measure, ruler, screws, putty, knife. Depending on what properties the surface should have, additional components and fillers can be used.
It must be clean, without protruding metal objects or fittings. If possible, it is better to level the surface as much as possible using the available tools. If there are cracks, they will have to be closed using putty. You can also apply a primer to the surface.
Once the thickness of the screed and the amount of unevenness of the floor have been determined, you can begin repair work.
The basic rules for laying dry screed contain the following steps:
- Flooring of polyethylene film is made with an allowance for the walls of about 100-130 mm. This allows for increased vapor barrier. Instead of polyethylene, corrugated paper can be used.
- To maintain the high quality of the appearance of the coating, as well as to compensate for deformed expansion, an edge strip is placed along the edges of the walls of the room. In height it should be equal to or exceed the layer of expanded clay sand.
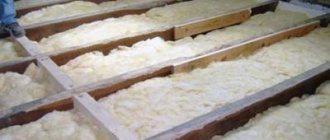
- To ensure that the screed is level, beacons are installed. To do this, apply the rule of pulling the bulk mixture towards you. In this case, the ends of the device rest against adjacent beacons. Expanded clay chips are poured between the beacons. The minimum coating layer must be at least 30 mm. It is not recommended to fill the base in large portions. This may create inconvenience during the work, which will ultimately affect the quality of the final result.
- Then the surface is leveled using a lath and the beacons are removed.
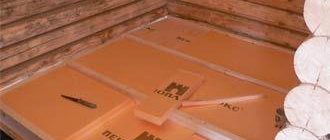
- Next, work is carried out on laying gypsum fiber material. The sheets are laid in rows, gluing the folds with a special adhesive. The flooring is made with an offset. Work begins from the wall furthest away from the front door.
- All glued surfaces are fastened using self-tapping screws. To increase strength, the joints are treated with PVA glue or connected with screws.
- After completing the work, you can immediately begin the final stage of covering the base using putty and subsequent application of finishing floors. (Fig. 1, 2)
Despite the simplicity of the technology for laying dry screed, it is important to adhere to a clear sequence of actions.
The principle of laying tiles on a concrete screed
Work on laying ceramic tiles on a concrete floor previously leveled using a self-leveling screed should be carried out according to the following scheme:
- first prepare the tile adhesive. Often it is a two-component mixture. its preparation involves pouring the dry adhesive mixture into a basin, where water is added. After this, the glue is mixed using a mixer and left for about 10 minutes to acquire maximum adhesive properties;
- The surface to be finished is carefully primed. A thin layer of tile adhesive is applied to it. This is done in order to ensure better and more reliable adhesion of the tiles to the floor;
- The tile adhesive mixture is applied to the floor surface using a special notched trowel. Here it is important to remember the need to make all movements in one direction to create the most even layer;
- After this, you can begin laying the first row of tiles. A thin layer of tile adhesive is applied to each tile before installation. The tile is tightly glued to the floor and pressed so that all air bubbles come out from under it to eliminate the possibility of voids appearing under the tile;
- It is important to ensure that the tiles are laid correctly in relation to the walls of the room and the selected horizon. For these purposes, a special building level is used;
- To form smooth and neat seams between tiles, plastic crosses are used. Subsequent tiles are pressed on one side against previously installed plastic crosses, which helps to form even seams;
- when laying tiles from its surface, you will need to remove the remaining adhesive mixture;
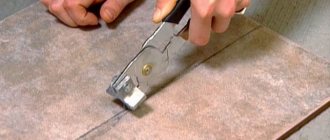
- If you need to trim tiles, you can use a tile cutter or a grinder with a diamond wheel.
Features of GVL base
First, let's figure out what GVL is. Everything here is quite simple, since these are the same sheets, the only difference being the improvement. In particular:
- The first difference is the absence of a double-sided frame.
- In addition, the gypsum itself is reinforced using special cellulose components.
- There is also a high level of moisture resistance and fire resistance, higher than that of gypsum plasterboard.
GVL sheet with an edge, for quick installation Ordinary GVL sheets, which require double flooring with overlap and gluing.
It should also be noted that it has great strength, which is why GVL sheets are used as a dry screed base. In cases where work is carried out in damp rooms, specialized gypsum plasterboard is used, which has a higher level of moisture resistance.
Directly for high-quality performance of work, it is necessary to fully comply with the technology, which involves the step-by-step implementation of the following steps for laying gypsum fiber board on the floor.
Tile screed
Very often, before facing the lower horizontal surfaces, it is necessary to fill the screed to level and strengthen them. It is thanks to it that you can obtain a smooth and reliable base on which tiles, laminate, linoleum or other decorative facing materials will subsequently be laid. If such work is carried out independently, then in order to achieve a high-quality result it is necessary to observe not only the sequence of operations performed, but also the deadlines for their completion. This is due, first of all, to the drying time of the screed. Insufficient drying can cause further deformation and destruction of the structure, and too long a period of time will be inconvenient and disadvantageous for the performer of the work and the owner of the premises. How long a poured floor should dry and when it is permissible to install tiles on it will be discussed below.
What is this article about?
How to choose?
The choice in favor of one or another type of dry floor screed should be based on several indicators. First, you need to clearly imagine the final desired result, evaluate the parameters of the room, its operational properties, microclimate, the presence and condition of neighboring rooms.
Next, you should consider the time frame for repairs and how quickly you need to get the finished surface. The budget that is expected to be spent on laying floors is also important. Quality, reliability, and durability depend on this.
In each specific case, one should take into account the totality of characteristics, and only then decide on the type of material and additional components. Before using this or that method, it is recommended to consult with professionals.
Factors affecting screed hardening
Before considering the actual time frame during which the construction mixture poured onto the floor dries, you need to determine what it was made of. There are three types of screeds:
- cement-based;
- gypsum based;
- dry screed.
The fastest drying consistency is obtained on a gypsum basis. However, in practice, when calculating the period of complete drying, experts use a general formula. For both cement and gypsum screeds up to 40 mm thick, the full drying period is calculated based on the fact that one week is needed for every 10 mm of layer. That is, 40 mm should dry for 28 days. This period is also provided for by SNiP for complete hardening of concrete mixtures, especially since according to the technology, the thickness of the cement screed should be from 40 mm.
If, in order to lay tiles, it is necessary to correct surface unevenness of less than 30 mm, then this can be done during the installation process with the tile adhesive itself. This will save on a significant amount of work and will allow you to create a monolithic floor with facing tiles.
If you still had to fill the screed, then its drying is affected
- solution humidity;
- air humidity;
- ambient temperature;
- presence of chemical additives;
- Thickness of the poured layer.
Super floor Knauf - pros and cons
Laying vinyl floor tiles
Dear forum members, we are planning to install Knauf dry screed in a new building... Has anyone encountered this, what do you think, what are the advantages and disadvantages?
Similar questions
Interesting offers
- Wavy joint between tiles and laminate. How to implement?
When remodeling the apartment, they decided to separate the hallway area. To do this, we rounded the wall so that you could enter the room bypassing the hallway area. In the hallway area there are tiles with a wavy edge, the same on the ceiling in the form of a plasterboard box. Here…August 1, 2011, 11:47 pm•9 replies• 2 expert replies• reply
- Low-quality Smart skirting board in the OBI store.
the upper part of the plinth is not adjacent to the wall July 26, 2011, 10:44 am• 4 replies• 3 expert replies• reply - Terrible smell after cats
Good evening! We bought an apartment, we are doing renovations, every day the smell of cat excrement from the floor is getting stronger. We didn’t plan to change the floor, but we already broke five boards and were horrified: everything was right through to the cement, they tried to fill it with an anti-cat odors product...July 21, 2011, 20:59•36 replies• 3 expert replies• reply
- Advice on choosing parquet boards
We bought a new apartment without finishing. The line reached the floor. We stopped on the parquet board. Tell me an inexpensive one up to 1500 rubles per sq.m. light tones. I wanted beech, but I read that it is sensitive to humidity. Who already has a beech, write yours...June 12, 2011, 03:31 pm•4 replies• reply
- Warm floors - alternative solutions
Gentlemen! Help me deal with heated floors. We built a cottage (frame-panel technology), the foundation is a poured concrete slab. The builders offer heated floors from a gas boiler, electricity in the house is 5 kW. Can you suggest something...May 16, 2011, 10:46 pm•7 replies• reply
How long does it take for tile screed to dry?
As already mentioned, a standard 40 mm layer will dry completely in four weeks. With greater thickness, each subsequent centimeter will require twice as much time. Therefore, with a thickness of 60 mm, the total drying time will be almost two months. This is due to the difficulty of passing moisture from the lower layers through the dried upper layers.
These terms are taken as conditional and calculated for average air humidity, which should be in the range of 60–70%, and temperature 20–25 degrees Celsius. However, it is not always possible to comply with such standards. After all, in a room where a large floor surface is drying, the humidity will always be higher than in a normal environment. At the same time, it is strictly forbidden to create a draft. On the contrary, it is recommended to forcibly moisten the outer surface of the screed or cover it with film. This is due to the characteristics of building mixtures. When drying, the outer layers harden first, and moisture from the lower ones comes out by soaking the drier zones. If you create conditions for rapid evaporation on some part of the screed, a crust will form, which will seal the damp areas. The exchange of water with the atmosphere will be disrupted. The crust will stop absorbing moisture and will crack. This can often be seen on concrete surfaces.
To prevent this, in addition to moistening and covering, special additives are used to slow down the setting. With such additives, depending on their concentration, the surface will take longer to dry, but the result will be stronger.
The same thing happens with high temperatures. If conditions for strong moisture are not created, then even a reading of 22–25 degrees can cause cracking of the screed surface for the reason described above. Therefore, at high temperatures, forced wetting of drying mixtures is mandatory. This is what the industrial steaming process is based on. Consequently, the drying time of surfaces filled with building compositions can be accelerated by high temperatures with the obligatory moistening of the heated zones.
Installation of ventilation systems- Pipes for internal sewerage
How to choose a window sill?
When working in cold weather, to speed up the drying of mixtures, anti-frost plasticizers are used, which allow the water inside the compositions not to freeze and allow them to fully harden and set.
As can be seen from the above, the exact period for which the screed should dry is difficult to determine. But this is not necessary for laying tiles. Some craftsmen use the old method when they cannot tell by eye whether the concrete is dry or not. They place a napkin on the flooded floor and cover it with plastic. If the paper becomes damp within 24 hours, then the dampness has not completely come out.
Air temperature
DIY kitchen tile installation
The most preferred temperature for drying the screed is considered to be 20-25 oC. If the room is warmer, the top layer of the screed may begin to crack. On the contrary, lower temperatures entail an increase in drying time. It should be borne in mind that the microclimate in the room should not change throughout the entire period of strengthening the cement floor. Any changes, be it drafts, direct sunlight or heating, can lead to damage to the coating.
In new houses under construction, which are not yet equipped with heating devices, it is worth paying special attention to how long it takes for sand concrete floor screed to dry.
This is important because it must have time to fully set before frost sets in. If a weak cement floor freezes, it will quickly collapse
To avoid this, plasticizers are sometimes added to the concrete solution to increase the frost resistance of the cement floor. However, this leads to increased repair costs
If a weak cement floor freezes, it will quickly collapse. To avoid this, plasticizers are sometimes added to the concrete solution to increase the frost resistance of the cement floor. However, this leads to increased repair costs.
How long after pouring surfaces can you start gluing tiles on them?
Experts' opinions on this matter vary. On the one hand, tile adhesive sticks better to a damp surface, and the adhesion process is stronger. Moreover, for the subsequent hardening of the glue itself, it also takes the same time as for drying the screed itself and it will not be possible to use it fully earlier.
On the other hand, the tile will completely preserve all remaining moisture in the poured surface and will not allow it to escape.
Most craftsmen believe that it is possible to correctly lay ceramic tiles in this situation one week after pouring the screed. By this time, 80% of all moisture will have already evaporated, and the process of installing the tiles will take more than one day. While it is being laid on semi-dry concrete, the remaining water will have time to leave it. Moreover, to dry the tile adhesive itself, you will need to delay the grouting for several days. This period of time will be more than enough to complete all the processes occurring in the screed.
Dry screed
More and more often, craftsmen practice laying tiles without using wet compounds. The ability to install tiles dry opens up great opportunities to simplify and speed up this work. Dry screed consists of fine-grained expanded clay and panels, which are made of two gypsum fiber boards glued together through a layer.
Such kits are good to use on wooden floors, where heavy loads on the main floor cannot be allowed and when working in the cold, since there is no need to work with liquid compounds.
Installation of PVC windows- Covering the drain hole with your own hands
- How to lay flexible tiles on the roof?
Expanded clay is poured in a layer of 40 mm, and slabs that have locks at the joints can be immediately laid on top of it. This ensures structural rigidity. Despite the apparent flimsiness of such a structure, its strength is quite comparable to plaster or cement pouring. Floor tiles laid on such a surface will last a long time.
Varieties
There are several types of dry screed, which differ slightly both in composition and installation technology.
These include:
- Alpha screed. Placed on a flat surface. Base differences of up to 30 mm are allowed. It consists of damper tape, polyethylene, and gypsum fiber sheets. It has a light weight, about 25 kg.
- Betta screed. Also lays on a flat surface. It consists of expanded polystyrene or stone wool, which are substitutes for expanded clay, as well as sheets of gypsum fiber. This type of coating has good soundproofing and high thermal insulation. Its weight is about 30 kg.
- Vega screed. This type of screed contains expanded clay, gypsum fiber sheets, and damper tape. This coating has excellent properties of thermal insulation, soundproofing, and strength. Its weight is approximately 45 kg.
- Gamma screed. Contains expanded clay, durable gypsum fiber sheets, and fiber insulation. This type of screed has the highest insulating characteristics, strength, and surface quality. Its weight is approximately 60 kg.
Each type of screed is performed in several stages. It should be noted that the greater the mass of the screed, the more stages of its installation, and the more reliable characteristics it has. A lightweight type of screed is used when the base already has a fairly flat and relatively high-quality surface.
conclusions
When choosing which screed to make under a floor with tiles, each master will determine from his preferences and the availability of materials. It is only worth noting that drying wet, flooded floors is exactly the case when “you can’t spoil the porridge with oil.” If you have time to wait until the mixture dries completely, then it is better to do this. The dry surface still needs to be treated with primer, and it will be better absorbed if there is no excess dampness in the materials. In addition, on completely dried layers of building mixtures, possible cracks will be visible, which can be repaired before laying the tiles. And if the screed is weak somewhere, it will be possible to lay a metal mesh on these areas when gluing the tiles to give additional rigidity to the floor.
A little about GVL and GKL
GVL in warehouse
The abbreviation GVL stands for Gypsum Fiber Sheet.
Comparative performance characteristics of gypsum plasterboard and gypsum fiber board
| Characteristic name | GKL | GVL |
| Compound | Homogeneous | Multilayer |
| Density kg/m3 | 650 | 720 |
| Thermal conductivity | 1,45 | 1,4 |
| Resistant to natural degradation | Short operating period | Long service life |
| Possibility of painting | Quite good effect | Oil paint is applied to the paper layer |
| Frost resistance cycles (F) | Up to 15 | Up to 4 |
| Sound insulation (db) | 35 | 25 |
Table of geometric parameters
| Name | Dimensions (mm) | |||
| Length | Width | Thickness | Flange width | |
| Ordinary gypsum fiber sheet (GVL) and moisture resistant (GVLV) | 2500* | 1200 | 10-12 | — |
| 2700** | 1200 | 10-12 | — | |
| 3000** | 1200 | 10-12 | — | |
| Small-format GVL and GVLV | 1500* | 1000 | 10-12 | — |
| 1500 | 1200 | 10-12 | — | |
| 1200*** | 1200 | 10-12 | — | |
| Elements of prefabricated dry screed | 1500* | 500 | 20 | 50 |
| 1200** | 600 | 20 | 100 | |
Explanation of the table: * - standard parameters, ** - parameters are set at the customer's request, *** - parameters are planned for release.
Overview of screed types
Before talking about how many days after pouring the screed you can lay the tiles, you need to know that the period directly depends on the type of base.
Its installation is carried out immediately after the base has been cleaned, the nature of the unevenness has been determined and the beacons have been installed. Only after this work can you decide on the method of leveling the surface on which the tiles are laid.
Semi-dry
The simplest and fastest method is dry screed. To complete this, you need to waterproof the base; for this, polyethylene is used, the seams of which are glued together with tape.
The overlap of adjacent strips on each other should be at least 20 cm. An overlap of 15 cm is made on the walls, which can be cut off after laying the tiles. The following materials can be used for manufacturing:
How to properly lay a vapor barrier on the ceiling?- Is it possible to glue wallpaper on whitewashed walls?
- Imitation of a brick wall made of gypsum plaster
- sand;
- cement;
- water;
- reinforcing mesh.
However, despite the simplicity and ease of installation, it should be taken into account that tiles can only be laid on such a screed after 1.5 - 2 weeks. Installing tiles before this time will lead to poor adhesion, peeling or cracking of the base along with the top decorative layer.
Wet
The classic type of screed pouring using a cement-sand mixture mixed with the addition of a large amount of water has been known for a long time and is considered the classic method of leveling the base.
During installation, it must be taken into account that the thickness of the layer must be at least 4 cm, otherwise there is a possibility that under load the layer may be pressed through along with the tile.
It is advisable to start laying tiles no earlier than after 3 weeks
Despite the fact that many craftsmen lay tiles 2–3 days after pouring, this technology is considered incorrect. Complete drying will require a much longer period of time, so installing tiles on such a base is not allowed even for 10 days.
The optimal drying period for a layer of cement-sand mixture 5 cm thick is considered to be a three-week period. It is after this exposure that the tiles can be laid. Although the composition gains maximum strength only on the 28th day.
The exact amount of time depends on the thickness of the layer and the amount of water added to the solution, so a lot of liquid to facilitate stirring in this situation is not always positive. Especially if you need to do the installation as quickly as possible.
Installing tiles on a base that is not completely hardened, which some people practice, explaining their effect by better adhesion, is erroneous.
In fact, tile adhesive and cement-sand mixture are different in chemical composition, so they practically do not interact with each other. Thus, tiles laid on such a base can be peeled off without much effort. To learn how not to lay tiles, watch this useful video:
Self-leveling mixture
The concept of self-leveling flooring appeared in Russia not so long ago. However, the technology has already proven itself on the positive side and is widely used in interior decoration. There are several varieties united by one term. In our case, “self-leveling floor” means pouring screed for laying tiles and tiles.
After complete drying, the base turns into a perfectly flat and durable surface, free from flaws in the form of cracks, chips and potholes. Thus, the use of self-leveling mixtures is the most popular method of preparing floors for tiles.
If we touch upon the main question of interest to us, after how many days can tiles be laid, then everything depends on the characteristics of the chemical composition of the mixture used.
On average, exposure is allowed for 3 days, but exact information can be found on the back of the package, which indicates the proportions of adding water, application conditions and drying period.
The uniqueness of this method is that there is no need to use beacons. The liquid composition itself is distributed over the area in a strictly horizontal position.
The owner decides which base leveling option will be chosen for a particular room. This depends on several factors: the drying period of the composition and the possibility of laying tiles.
In addition, it should be emphasized that the cost of self-leveling mixtures significantly exceeds the price of cement-sand screed. However, the latter wins in terms of characteristics, timing and ease of filling.
Advantages and disadvantages
Any method has its advantages and disadvantages, knowing which you can avoid many troubles.
The undeniable advantages of dry screed include:
- No long drying time. The floor can be immediately covered with finishing materials.
- Obtaining a high-quality surface in a short period of time, which significantly saves time on repairs.
- The absence of dampness eliminates the risk of moisture penetrating into adjacent rooms.
- The method allows for high thermal insulation, which eliminates the use of additional heat-insulating materials.
- Neighbors will appreciate good sound insulation.
- The technology ensures that work can be carried out without dirt.
- Environmentally friendly.
- Fire safety.
- It is possible to carry out work in stages, adjusting the leveling process.
- Strength allows the coating to withstand heavy loads, up to approximately 350 kg.
- Easy to dismantle the screed.
- The method does not require high qualifications or special skills, which makes it possible to do everything with your own hands.
- The lightness of materials and simplicity of technology do not require the use of special heavy equipment.
- The advantage is that there is no strong pressure on the load-bearing surfaces of the room.
The disadvantages include:
- Price.
- The technology is not suitable for use in damp rooms without heating. The presence of any moisture is excluded.
- The leveling layer is large, more than 4 cm, which limits the use of the method in small rooms with low ceilings.
- Heavy dust in the premises during installation. It is recommended to carry out all work wearing a respirator and goggles.
- In unfavorable microclimates, mold may form.
Laying ceramic tiles on a fresh, semi-dry screed.
This information is poorly received by many tilers of European culture (USSR countries, including). Mainly because of primitivism - to take as a basis only one picture of the world or one technology.
For starters, a video about Vietnamese tilers:
Usually, the statements of knowledgeable masters, after watching the video, are as follows:
- Wild place, wild people - Asia, what else could you expect from them.
- Poverty, lack of tools, technologies, mixtures - that’s why they do it.
- They have an eternal summer, there are no frosts - you can do it like that, no problem.
But one fact should be alarming: if this technology did not work, then people would not do this. They're not idiots. This method is common not only in Vietnam and Cambodia.
And now, it’s a different country, different people, different equipment, but the principle is the same:
And one meaningful way to look at it:
If this technology is used on such a scale and with such equipment, then there is something useful in it. Further, an attempt will be made to collect characteristic techniques, the sequence of works using this technology of various masters, without attention to place of residence and degree of development.
Individual skills, techniques, developments.
Individual techniques of various masters practicing this method are the most valuable piece of information.
- Watering the concrete base with cement laitance before laying the trim:
The problem with many traditional semi-dry screeds is weak, loose bottom layers, which are actually designed to float. There are rare exceptions when the base is moistened with water.
Applying liquid high-quality cement laitance to the base gives the dry mixture additional moisture and guarantees reliable adhesion of the entire layer.
Here they do the same thing, but at a more progressive level:
- Instead of cement laitance, use tile adhesive.
- The dry mixture is prepared with high quality and has high moisture content.
Perhaps they do this because the layer is insufficient:
- Watering the prawn layer with liquid cement laitance . To better saturate the layer with cement mash, furrows are cut. But not everyone does this. Water generously.
Watering the semi-dry mixture with cement laitance.
- Composition (proportions) of cement laitance.
Visually, liquid impregnation consists of cement and water. Advanced options available:
There are similar attempts to reduce water loss and stretch out the hardening of cement using tile adhesive:
Sometimes, in the case of light-colored tiles, the mortar is prepared using white cement. Then there is no need to clean the seams from gray cement and fill them with grout.
And, finally, Quick-Mix for laying porcelain stoneware outdoors:
The Germans came to a similar, but more reliable and more expensive solution. It’s hard to say who stole from whom. In the countries of the East, any technology is spreading slowly - there is no mass coverage of the Internet, there are few masters who broadcast in an understandable language. It takes time for technology to take root in such a territory.
Rather, Western technologists paid attention to the peculiarities of laying tiles in individual countries. But we approached the process at a more high-tech level.
Why use a prance and not a regular solution. What is the advantage of this method?
- The loose layer of grout allows you to set the tile to the desired height. The solution would not provide such an opportunity - it would squeeze out the adjacent tile, as happens when laying on a larger layer of glue without creating voids. When the semi-dry mixture is deposited, compaction occurs without squeezing out adjacent tiles.
- The semi-dry mixture allows water to pass through and is practically not saturated with it.
3. Gartsovka is less durable than mortar, but less susceptible to cracks and breaks - as if more viscous. Anyone who has had to knock down a layer of correct prancing knows this.
Why do you need to know these, at first glance, “crazy technologies”?
The problem of durability of outdoor cladding has not been solved. Particularly for porcelain stoneware floors, where there are significant temperature fluctuations. Leading construction brands continue to look for solutions:
1. It is proposed to lay the tiles on the steps on a drainage mat and drainage solution:
Tiles on drainage mat.
- The same thing, but on the balcony. On top of everything else, the tiles are laid on “bumps” . The last solution should not be shown to smart tilers under any circumstances - they will get very excited. Thinking about the correct 60% or 90% filling will begin.
What is the conclusion from the information collected?
“Tiles on the prance” can be considered as a possible method of tiled cladding on the street. The result can only be known in 10 years. But if such attempts are not made today, then in 10 years everything will remain at the level of theory.
The specific design must be technologically higher than is customary today in the East, but cheaper than Quick-Mix.
Prepare a semi-dry mixture based on washed screenings (waste from crushing crushed stone). This composition is well selected by manufacturers of paving slabs. And in different parts of the world.
- Composition cement: screening 1:3 (not less). Better 1:2.
- Instead of watering with cement paste, use class C2 tile adhesive on the tiles.
- And watering the base with cement laitance is a very good solution.