For any type of construction, the construction of a blind area is necessary; without it, the foundation will quickly become unusable.
The main function of this design is to protect the building from the negative effects of precipitation, groundwater, etc.
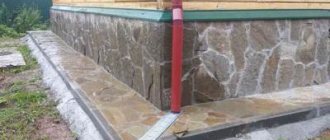
In addition, the blind area performs a decorative function, giving the building an attractive appearance.
Read the article about how to make a blind area around a bathhouse with your own hands.
Construction standards taking into account materials
When creating a project and determining the location of the future building on the site, it is important to pay attention to the materials used to make the bathhouse itself and the buildings surrounding it. Primary requirements:
- Between buildings made of stone, block, reinforced concrete products, as well as buildings built using monolithic technology, there must be a minimum of 6 meters.
- The distance between the house and the bathhouse, if the first one is built using the technologies described above, but has wooden floors, is already 8 meters.
- Between wooden buildings - 15 m. This requirement applies both to buildings located on the same site and in different territories. In other words, the distance from the bathhouse to the neighbor’s bathhouse, if both objects are wooden, must be at least 15 m.
- The stone fence from the bathhouse with wooden ceilings is 6 meters away.
- There should be at least 6 meters between the fence on a wooden frame and the stone sauna.
- If the fence is made entirely or partially of wood, and the bathhouse has wooden floors, a distance of 8 m must be maintained between these objects.
- There must be at least 10 m between the wooden fence and the wooden sauna. The same requirement is relevant if the sauna is made of stone and has ceilings made of flammable materials.
Plan for laying pedestrian paths on the site
The plan of paths on the site takes quite a long time to draw up and it is better if it is based on the practice of using the land.
Therefore, temporary pedestrian paths are used on the site, which should be dry, low-cost, easy and quick to install, comfortable and easily demolished, so that later it is easy to replace them with hard-surface paths, move them to another location, or slightly adjust the outline. Before laying paths on the site, familiarize yourself with their advantages:
- Quickly erected, not labor-intensive to implement
- Does not require large expenses, often completely free
- Dry in wet and rainy weather
- They look quite well-groomed, but do not require constant attention
- If necessary, they can be easily removed and replaced with hard surface tracks
Installation of a soft blind area
The organization of the soft blind area of the foundation is carried out in the following order:
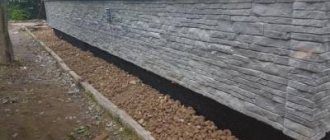
- The clay layer, which will become the base of the blind area, is laid across the entire width of the future “path”. At this stage, it is important to maintain a slope of 5-10 cm across the entire width of the structure. To prevent swelling of the base, the clay must be free of sand impurities. On average, the thickness of the layer is 10 cm, which is compacted and leveled carefully;
- The waterproofing film is mounted on top of the clay and fixed directly on the surface of the foundation. It is necessary to lay waterproofing with a small margin, and therefore a fold of an average of 3-4 cm should run along the entire length of the insulation. In the event that the blind area suddenly moves away from the foundation, this margin will be used as a kind of compensator;
- Then sand is poured in, which protects the newly laid waterproofing;
- Geotextiles, the composition of which is represented by propylene threads, are laid on top of the sand across the entire width of the blind area. This material is capable of allowing water to pass through and at the same time it does not allow sand to accumulate in the voids between the crushed stone layer;
- The crushed stone is backfilled onto geotextiles. The thickness of the layer varies from 12 to 15 cm, which is quite enough for moisture to reach the waterproofing and then move away from the foundation;
- The geotextile is re-laid, after which a direct blind area is created from the materials of choice.
It will take just a little time and effort to create a reliable decorative path around your home that will withstand severe frosts and floods.
Features and types of blind area
If the roof is not supplemented with an organized drainage system, then the width of the blind area should exceed the width of the house eaves by an average of 15-20 cm. The minimum acceptable width of the blind area is considered to be 60 cm, but if the house is built on planting foundations, then its width is up to 1.5 m.
When arranging the drainage covering of a structure from the walls of the building, it is necessary to adhere to a slope of 3% or no less.
If the house has a columnar foundation, and the soil on the site is dry and does not subsidence, then organizing a blind area may not be necessary.
The materials used to create the top covering divide the blind area into two types:
- Solid blind area (concrete, asphalt concrete, sandstone, etc. are used in its construction);
- Soft blind area (characterized by the absence of a hard covering as such, instead of which decorative crushed stone of various colors, paving slabs, mulched soil or soil with lawn grass is used).
And if with a hard blind area everything is more or less clear, since it has become most widespread in domestic construction, then the soft blind area, due to its novelty, deserves close consideration.
Registration process
Is it possible to register an unauthorized sauna building? It is not difficult to obtain permission for a building constructed on the land of individual housing construction, private household plots or dacha territory, although unauthorized construction is considered a civil offense. You can register without imposing sanctions if the premises comply with existing rules. Previously, the presence of a bathhouse was not welcomed and was not subject to legalization. Today such a right exists; after registration, the building becomes private property with the possibility of inheritance.
The resolution of the problem has been simplified by the adoption of by-laws; the dacha amnesty has been extended for the current year, which makes it possible to register property by filing a declaration in a simplified manner.
You will need to collect the necessary documents:
- land ownership certificate;
- cadastral passport of the house and land;
- receipt for payment of state duty;
- technical passport of the real estate;
- passport.
Houses and buildings that are subject to registration are registered in a short time. The dacha amnesty is used by citizens who have illegal buildings on their property.
It should be noted that registration is required for buildings that are considered permanent. Small baths are operated without these actions.
You can register a previously built bathhouse by submitting information to the cadastral service:
- an application with the name of the location of the plot and building;
- function of an auxiliary building;
- building plan (indicating category, area, number of floors);
- the structure of the sauna with the name of the materials used, the type of stove device, the location of the internal rooms;
- communications (sewage, ventilation system); show how the water supply is installed (well, borehole), how the runoff is drained and drainage is carried out.
Please note: when registering a bathhouse, the implementation of step-by-step instructions on sanitary and fire safety measures is taken into account.
Types and design options for paths in a summer cottage
The types of paths on the site are operational and decorative.
- Some carry a functional load and provide the shortest connections between garden areas and outbuildings.
- Other paths influence the overall appearance of the garden. Even a slight change in route can change the perception of the garden.
If the design of the paths on the site is thought out, then you get a good road network that:
- uses land sparingly, because every extra 10 cm of path width “eats up” the usable area of the garden,
- provides the shortest paths between different parts of the garden and buildings,
- allows you to care for plants without any problems,
- makes it possible to admire your garden and flower beds from the most advantageous angles.
Options for paths on a summer cottage provide for different types of operation. The rational placement of paths and driveways, as well as their type, are determined at the site planning stage, and then adjusted as each new building is erected.
Possible errors and their consequences
Many people believe that blind areas are needed only for residential and industrial buildings. This opinion is erroneous, because this type of structure effectively protects from the harm of precipitation, plant roots, etc. Therefore, it is an integral part of the construction of a bathhouse.
When arranging the structure, the following errors are possible:
- Incorrect width and depth. This can cause water flowing down the roof to penetrate into the ground, which will lead to the gradual destruction of the foundation. To avoid this, even while planning the arrangement of the blind area, you should calculate its depth (often depends on the type of structure, as well as the soil) and width (add 20-30 cm to the width of the roof canopy).
The lack of a slope leads to stagnation of moisture, as a result of which the blind area collapses, followed by the foundation.
Therefore, the installation of the structure is carried out with a slope of 10-15 degrees from the bathhouse wall. A drainage system must be installed to remove moisture to a safe distance.
Varieties
The simplest and cheapest option for constructing a blind area is clay. It is laid in a 10-15 cm layer around the entire perimeter of the bath, after which it is covered with a hard coating.
Clay is considered a moisture-resistant material; it has excellent waterproofing qualities and protects the foundation from water penetration.
Crushed stone is often used to construct a blind area. For reliability and strength, it needs to be moistened and compacted. To extend the service life of the structure and increase its strength, many use the methods described above in combination with cementing. In addition, it is much easier to maintain a concrete surface than crushed stone or tiles.
A monolithic slab 6-8 cm thick can be used as a covering . However, it is not recommended to install it on clayey or waterlogged soil. Otherwise, you will have to periodically repair the blind area and seal the resulting holes.
Main functions
The blind area is an important element, which has several functions:
- Protective function. Since the foundation and soil tend to expand at different temperatures, this inevitably results in a gap between them that allows water to penetrate, causing the foundation to fail over time. Thanks to the construction of a blind area, you can most effectively solve the problem of removing moisture from the foundation, minimizing the risk of its destruction.
- Safety function. Living organisms living in the soil cannot live without oxygen. If a blind area appears in this place, plants, as well as burrowing animals, will be deprived of a component important for their existence. Therefore, living organisms bypass the area where the blind area is built and do not create passages, which, in turn, protects the foundation from moisture penetration.
- Warming function. With the onset of cold weather, the soil begins to undergo deformation, which is transmitted to the foundation in the form of uneven lateral pressure. As a result, a load is created on the entire building. Thanks to the blind area, a layer of non-freezing soil of a plastic structure appears, and this allows the pressure to be distributed more evenly. In order for the blind area to experience minimal deformation, it is worth considering insulating it.
- Decorative function. The blind area gives the building a complete look. But for this it is necessary to carefully select the external coating so that it is combined with the finishing material of the building.
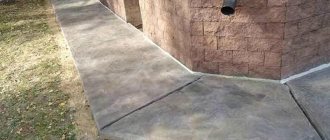
- Practical function. A concrete blind area can serve as a pedestrian zone, but in this case, even during its construction, potential loads will have to be taken into account.
Analyzing the functions of the blind area, it is not difficult to guess what requirements it must satisfy - be solid, have no cracks and be tightly adjacent to the building. It is equally important to choose the right depth, which should not exceed half the depth of soil freezing in the region. Otherwise, it will not be able to effectively cope with its task and will be just a continuation of the foundation.
When is its device inappropriate?
The main mistakes made by inexperienced builders are incorrect or untimely equipment for the blind area, which makes the functional structure useless and pointless:
- Filling without a slope - if the drainage is poor, the water will stagnate, leading to cracking and damage to the concrete;
- With a reverse slope (not from the house, but towards the house) - the result will be not only wet walls, but also a collapsing base.
- The construction of a blind area after the building has been built and the base of the foundation has been soaked - in this case, it will no longer be able to fulfill its main purpose.
Experts note that it is inappropriate to equip a blind area on an already formed fertile layer (this will certainly lead to soil subsidence), and even if the site has a complex terrain that creates a counterslope towards the house. In this case, water will flow onto the concrete and contribute to its rapid destruction.
Strip foundation for a fence - types of foundations and selection criteria
When the mass of the enclosing structure increases, a foundation of greater strength must be used. For massive fence supports and structures with heavy brick or stone pillars, a reinforced concrete foundation for the fence is required. It is worth choosing a strip foundation, erected on all types of soil. The foundation for the fence is reliable and has an increased safety margin.
A reliable fence around a private house is required
For the construction of fences, the following types of strip foundations are used:
- composite. It is distinguished by its simplicity of design. A prefabricated foundation is constructed from various types of concrete blocks or natural stone. On a prefabricated cushion, the stone fence is not subject to deformation and remains stable during operation. The technology for constructing a prefabricated base involves preparing a trench, forming a cushion, followed by laying blocks or stones on a cement mortar;
- whole. The monolithic foundation structure is more popular compared to the prefabricated version. To construct a foundation strip, soil is removed along the contour of the future fence, a sand-gravel mixture is poured onto the bottom of the reception area, and formwork is constructed. The height of the formwork is determined by the level of elevation of the foundation above the soil surface. Then the reinforcing grid is installed and concreting is carried out.
According to the level of penetration into the ground, the strip-type foundation is divided into the following types:
To build a fence, it is important to choose the right type of foundation.
- a shallow foundation used for installing lightweight fencing structures made of chain-link mesh, profiled metal or wood. A shallow type of foundation is used for the construction of fences on stable and slightly heaving soils. The foundation depth is 0.5-0.7 m;
- a deeply buried foundation used for heavy stone, block, or brick enclosures. The base of the base of a buried foundation is located 0.3 m below the soil freezing level. To build a buried foundation, an increased volume of building materials is required, which affects the total cost.
It is important to choose the right type of foundation for building a fence around the site. There are a number of factors to consider:
- design features of the fence;
- a lot of components of the future fence;
- the magnitude of the load acting on the support pillars;
- soil characteristics;
- soil freezing level;
- relief features;
- proximity to aquifers;
- total costs.
The service life of the entire enclosing structure depends on how correctly the type of foundation is chosen. The stability of the foundation is also affected by the following points:
- the likelihood of soil shrinkage due to seasonal changes in humidity and temperature fluctuations;
- exposure to atmospheric factors and possible erosion of the foundation by melt water;
- the total area of the enclosing structure, the windage of which causes deformation.
It is important to choose the correct dimensions of the foundation tape and determine the dimensions of the reinforcement grid. When choosing a type of strip foundation for a future fence, take into account the requirements for the foundation. Main selection criteria:
Main selection criteria:
- ensuring the stability of heavy fences;
- uniform distribution of the fence mass on the soil;
- preventing fencing deformation and local shrinkage;
- preventing the fence from collapsing under wind load;
- maintaining the stability of the structure during soil movements.
To correctly determine the type of strip foundation, strength calculations should be performed based on the design features of the fence and the results of geodetic surveys.
The fence may sway if the foundation is weak
Comparison with other options
Only knowing all the advantages and disadvantages of the pile-screw structure, as well as the features of strip foundations with the pros and cons of the technology for constructing and operating the building fixed on it, can you make the right choice. The strip base is characterized by:
- possibility of shallow laying on dry, non-heaving soils;
- convenient arrangement of the burial space;
- the opportunity to do everything with your own hands;
- it takes a certain time for the concrete solution to completely cure;
- used to strengthen brick and concrete buildings;
- a significant increase in costs for areas with severe soil freezing.
It should be noted that the arrangement of a strip base in the cold season is accompanied by an increase in labor intensity and costs.
Tape baseSource nl.decorexpro.com
There are several other types of foundations based on the use of piles, which are popular in individual construction.
Pile-tape construction
The most advanced option is considered to be a pile-strip foundation, the pros and cons of which reflect its effectiveness in the most difficult cases:
- for a building made of brick or reinforced concrete structures;
- mobile heaving soils;
- groundwater, high humidity;
- difficult terrain, slope.
Pile-strip foundationSource vologdadom.com
The piles are installed to a depth of up to 2.5 m, which ensures increased reliability and stability of the foundation of the house.
Reinforced concrete piles
The construction of a house in areas with problematic soil, including coastal areas, steep slopes, peat bogs, deep freezing, is carried out on a foundation on reinforced concrete piles, its pros and cons are as follows:
- design work is complex and must be performed by a professional;
- allows you to obtain the maximum possible stability and rigidity of the foundation;
- suitable for heavy buildings;
- high cost of materials and work;
- use of specialized equipment.
Reinforced concrete pilesSource svoisvai.ru
The length of reinforced concrete piles reaches 11 m. In private construction, elements about 3 m long are used, which weigh at least 700 kg.
House on a pile-screw foundationSource kursremonta.ru
Construction of a concrete blind area: technology, work procedure
The blind area must be done before the finishing of the base. It is better not to postpone the work, but to carry it out during the construction of the bathhouse, because even in one season, cracks may appear on the foundation.
The blind area has two layers: a coating and a special layer. Usually the blind area is erected at the same time as the foundation.
Along its perimeter, the blind area should extend beyond the building by approximately 20-25 cm more than the eaves of the bathhouse roof - this is necessary so that the blind area drains melt and rainwater.
SNiP standards for layers
When pouring a blind area, it is necessary to take into account many requirements that must comply with SNiP (SNiP 2.02.01-83) and SP 82.13330.2016. This is the device, slope, height of layers, depth of the trench and many other aspects of construction.
There are also several rules for manufacturing:
- the structure must fit tightly to the building;
- slope no more than 10%;
- each layer must be made even;
- the concrete must comply with the standard that is used for paving roads (it should not contain curvatures, bubbles or other defects);
- for a slope you need to make a thick solution, so it will spread less;
- the soil under the cake must be compacted;
- between the wall of the house and the blind area there must be a compensation layer that will protect against temperature changes and further cracks;
- if people will walk on the structure, the concrete layer should be 5 cm higher than the standard one.
All these rules must be followed so that the blind area does not fall apart in six months. If there are cracks or it does not adhere tightly to the building, then defects may occur.
How to make the right blind area around the house with your own hands?
Are you asking about how to make a blind area around the house? Then this is for you. Having completed construction, you should not delay it and you should immediately begin arranging the blind area. If this is not done, then the risk of destruction of the foundation and plinth increases repeatedly.
Insulated blind area prepared for pouring concrete
As for the blind area, it must be buried at least 20 centimeters. Keep in mind that this is a subjective value, so in an ideal case, in the most frozen soil, the depth will be from 35 centimeters.
Next, markings are made around the perimeter of the entire house. That is, at the marking stage, you must lay down for yourself what you will use for finishing. An affordable way is to fill the blind area using concrete. The markup should be based on your own wishes and the budget that you are willing to spend on it. The larger the area you fill, the more you pay for raw materials and labor.
Craftsmen advise pouring a blind area at least 0.6 m wide. Today, there are options for finishing with tiles, when the blind area is 47-50 cm. This is enough, since it will perform its function even in this case. To mark, use pegs, pull the string, groove the soil, and then remove the string and pegs.
Next, start going deeper. Having decided on the type of soil you have, it is advisable to dig 30, 35 cm. Make the bottom of the trench even. The correct blind area should rise above the ground surface by approximately 5-7 cm. This will repel rainwater and melting snow.
Remember that the blind area must have a slope towards the fence. This will allow water to flow away from the foundation. The blind area should not be connected to the foundation, otherwise this may lead to disruption of the technological process. Having gone deeper to the design value, they fill in a cushion of sand. It should occupy approximately 5-7 centimeters of the total depth.
Next, experts recommend laying geotesticles. This is a special film that will protect against moisture penetration and increase the support area. Geotextiles are laid with an overlap on the surface of the soil, after which insulation is applied on top of it.
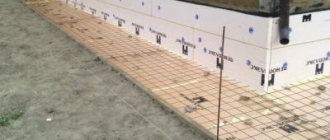
Reinforcement of the blind area with mesh is a prerequisite
Penoplex is used as thermal insulation. It is the most dense, able to withstand moisture and ice without collapsing. Penoplex, depending on the budget and the desired result, is chosen with a thickness of 3 to 5 centimeters. A film is installed on top of the thermal insulation, which will provide protection from outside water.
Next, the reinforcing mesh is installed. This is a mesh made of reinforcement with a cell of 100 by 100 mm. Its strength is sufficient to ensure rigidity of the blind area and protection against soil heaving. Next, having installed the upper part of the formwork, which will be required to raise the blind area above the general ground level, we begin pouring concrete.
As a rule, it is made independently, since transporting concrete to an already closed area in concrete mixers is problematic. To mix concrete, sand, crushed stone and cement are used in a 4-2-1 ratio. That is, for 4 buckets of sand you will need two buckets of crushed stone, one bucket of M-500 cement.
Filling is carried out taking into account the slope towards the house. To achieve an ideal result and overall aesthetics, a guide can be attached to the unfinished plinth. It will be used so that you can stretch the upper plane of the blind area, taking into account its support on the upper part of the formwork.
The surface will be smoother and more aesthetically pleasing. If this is not done, then you will have to level it “by eye”, after which notches and unevenness may appear. When the work is completely finished, experts recommend letting the concrete cure. The design drying time is at least 28 days. During this time, it gains strength and is completely ready for work.
Features of concreting
When installing a concrete blind area around the house with your own hands, you need to take into account some of the subtleties of the technology.
Firstly, the composition of the solution must be frost-resistant. It’s clear why. You can buy ready-made mixtures, but they are not cheap. You can use additives that increase the frost resistance of concrete. In the simplest case, add more cement. Make a solution at the rate of: one part cement, three parts sand and crushed stone.
When installing a concrete blind area, it is necessary to make expansion joints
Secondly, to avoid cracks, expansion joints must be made. For this, boards with a thickness of 25 mm are usually used. They are treated against rotting with hot drying oil or antiseptic impregnations. Then they place it on the edge, setting the required slope, approximately every 2-3 meters. Secure with metal pins or wooden pegs. When pouring the solution, they can be used as beacons. In the future, the planks will ensure the mobility of the formwork during seasonal soil movements.
And thirdly, to give the surface greater strength and a more aesthetic appearance, it is sprinkled with dry cement, which is rubbed down with a trowel. This is done after the filling is completed. This process is called ironing of concrete. The surface then becomes durable, smooth, with a slight shine.
Device technology
Any blind area consists of an underlying layer and a protective coating.
Backfill: what materials to use
The purpose of the underlying layer is to create a level base for laying the protective coating. Its thickness is about 20 cm. Sand and crushed stone are often used for these purposes, but native soil or clay can also be used.
The simplest design of a blind area made of clay
Sand and crushed stone are used on well-draining soils. In this case, sand is first laid, spilled and compacted. Then there is a layer of crushed stone, which is also compacted.
If the soil on the site is clay or loam, then it is better to use native soil. If, with such soils, crushed stone or sand is laid around the foundation, then water will certainly be present near the house. Because it turns out that the density of the soil outside the underlying layer will be higher. This will cause water to accumulate under the blind area. If, with this design, a drainage pipe is laid around the perimeter of the bedding, the problem will be solved. And it’s effective. But there will be more work, and the cost of the blind area with drainage will be higher.
Types of protective coating
The covering for the blind area must meet many requirements:
- should not allow water to pass through;
- must be frost-resistant;
- have increased abrasion resistance;
- should not be destroyed by water.
This could be paving slabs or paving stones. The shape and color can be very different - you select based on the general design of the territory and the houses of nearby buildings. The thickness of these materials is at least 6 cm; only in this case will they withstand harsh operating conditions.
The protective coating can be made of natural or artificial stone
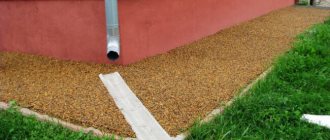
You can use slabs or tiles made of natural or artificial stone, you can lay out the paths with large pebbles or pour crushed stones on top of all layers.
There is another type that is becoming increasingly popular - this is a soft blind area. It has few layers but works effectively. There may not be any hard or waterproofing layer on top: you can pour soil and plant grass or flowers. An interesting solution for a summer house or country cottage.
The principle of constructing a soft blind area
All these options are not bad, but the cost of their arrangement is quite high. If there is a need or desire to do it cheaply and cheerfully, your choice is a concrete blind area. There will be a lot of work, but the total cost is low.
General principles
Depending on the soil on the site and the purpose of the building, different materials and layer structure can be used, but there are some points that are always present:
- the blind area has a general slope “away from the house”, its minimum value is 3% (3 cm per meter);
- There must be an expansion joint of 1-2 cm between the protective coating and the foundation (lay roofing material in two layers, polystyrene foam or EPS, cover with sand, fill with sealant);
- when waterproofing and insulating the foundation, the material rises to the level of the blind area;
- the base should hang over the expansion joint and it should not interface with the protective coating (a gap of 1-2 cm is left).
Another popular type of protective coating for house formwork is paving slabs or paving stones.
How to make a blind area at home with your own hands
First, markings are made along the perimeter of the building using pegs and laces. The following is the order of work:
- The plant layer and some soil are removed. The depth of the trench depends on the size of the underlying layer and the thickness of the protective coating. Usually - 25-30 cm.
- The bottom is treated with herbicides. This is necessary to prevent plants from growing in this area. They are able to destroy even concrete and asphalt, and they grow instantly between tiles or paving stones.
- The bottom of the trench is leveled, forming the required slope and compacted.
- The underlying layer is laid and compacted, maintaining the slope. It is advisable to compact everything using a vibrating platform. Manual tamping is ineffective. Density is especially important when laying concrete, but it is advisable to compact it well under tiles or paving stones: it will not collapse or warp.
- A protective coating is laid.
- A drainage groove is formed.
It's very short and sketchy. Each coating has its own characteristics, and each needs to be discussed separately.
Why the blind area can become unusable
The desire of our people to constantly save is not some kind of greed, but a necessary measure. Well, we don’t have the income to afford everything that technology dictates. However, there are things on which it is simply a crime to save, since as a result everything results in even greater expenses. The list of such phenomena undoubtedly includes the blind area.
People tend to underestimate the power of natural phenomena due to ignorance or careless attitude towards the matter. By the way, simple freezing of wet soil can squeeze out and split an entire concrete slab if it is not strong enough - we remind you that concrete does not belong to the category of elastic materials. The integrity of the blind area is also affected by other factors that should be taken into account:
- The most common mistake builders make is insufficient compaction of the soil poured back into the pit. This leads to unplanned shrinkage, which can damage the waterproofing and even crack the hard blind area. And it’s okay if it’s just a crack that can be repaired and made airtight. In some situations, the material is completely destroyed.
- When the bottom of the trench is compacted, you must not forget to constantly monitor its slope, since this is one of the most important conditions for proper blind area. It is also worth taking care of the evenness of the bottom, otherwise when filling the pillow you will end up with uneven layers of crushed stone and sand. This leads to the fact that the base of the blind area has a different density and load-bearing capacity, and this already leads to the appearance of cracks in the concrete. In general, everything is interconnected and requires strict control during execution.
- If the builders do not give the required slope, or worse, make it in the wrong direction, then all the high water will flow towards the house. The effect of such a blind area will be exactly the opposite.
- We have already mentioned expansion joints. Very often builders forget to do them, and this also risks compromising the integrity of the concrete. When heated, the material begins to expand in all directions, and it simply has nowhere to go - the internal stress in its structure increases, which causes its destruction. Expansion joints should be made not only between the blind area and the house, but also with a certain step transverse to the direction of the tape.
- Another quality requirement that should not be forgotten is the use of only sand without clay impurities for preparing concrete. It is also not allowed to use dirty water. All this leads to a decrease in the strength of concrete.
How thick should the blind area be?
How thick should a concrete blind area be so that it can cope with the amount of water that falls on it from above? We are not talking about other options, since everything is determined by the thickness of the material used, while monolithic concrete needs to be accurately calculated. The essence of such calculations is not to determine the minimum thickness - it must be taken at least 7 cm, but, on the contrary, to calculate the maximum thickness at home.
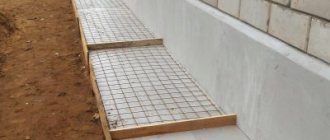
The blind area will be poured over the insulation
This is not difficult to do. You know the angle of inclination that you will give for the blind area. Next, check how much you want the blind area to protrude above the rest of the area, for example, 7 cm. Take into account the width of the tape, draw the resulting right triangle and find the height of the back side. To do this, you can use the Pythagorean theorem or the rules for finding lengths from angles. If the calculations are difficult for you, then find the right online calculator and get the result in a few seconds.
Why do you need a blind area at the foundation of a bathhouse?
The main purpose of the blind area is to prevent erosion of the soil by rain or melt water, as well as to remove precipitation from the foundation of the bathhouse. In autumn, water seeps into the foundation, in winter it freezes, the density of the water increases, and it puts high pressure on the foundation, which causes cracks to appear on it. Over time, water penetrates into them and enlarges them, causing the base to collapse.
The blind area is indispensable for regions of Russia where groundwater rises high and penetrates to the base of the building. The waters wash away the foundation of the bathhouse unevenly, which is why cracks appear on it, and this entails the destruction of the entire building.
Blind areas are also recommended if the construction of a bathhouse is planned on heaving soil.
The blind area provides heat and waterproofing, protects the bathhouse floor from drafts. It also acts as a walkway and is durable and abrasion-resistant, making it comfortable to walk on.
But the blind area has not only a functional purpose; this design decorates the building. Landscape designers often make a blind area, as it can become an important part of the overall exterior.
The blind area can be made from different materials, the most popular of which is concrete.
Insulation and waterproofing
If a concrete blind area is constructed for buildings with an unheated basement or ground floor, or the building is located on heaving soil, then care will have to be taken to provide thermal and waterproofing.
When performing waterproofing work, it is important to choose the right material. This can be PVC film, roofing felt or bitumen mixtures . To increase the temperature in the foundation area, before laying waterproofing, it is necessary to place a layer of insulation underneath. As the latter, you can use polystyrene foam, foam glass or other materials.
When constructing a concrete blind area for insulation, you need to create an air gap under it. This is done by laying a layer of crushed stone impregnated with bitumen.
The negative impact of moisture on the foundation can be reduced by creating drainage. This will help improve the removal of excess moisture from the building and provide maximum protection to the foundation.
Dimensions
Since the main task of the blind area is to drain melt and rainwater, its width should be at least 20 cm greater than the roof overhang. But experts do not recommend doing it less than 60 cm - moisture can seep into the foundation.
The width of the protective belt also depends on the type of soil. If these are normal soils that drain water well, then 60 cm is enough. If the house is on loam, other heaving or unstable soils, the width should be up to 1 meter.
Basic parameters of the blind area for normal drainage of water from the foundation
But the blind area must also go deeper. Its depth depends on the type of soil, the functions it will perform and the thickness of the top finishing layer.
If the house stands on normal, non-heaving soils (not clay or clay-containing soils), and people will not walk on the surface, it is enough to make a backfill of sand 10 cm thick. You can lay tiles, stones, etc. on top. This means that the depth of the trench will be about 10-20 cm - it depends on the thickness of the finishing material. Only for a coating that is made up of fragments, a border is required. So you dig in edge stones around the perimeter, reinforce them, and only then pour sand into the bottom of the trench.
If the formwork is to be used as a walkway, a more substantial weight-distributing underlay is required. At the bottom of the ditch, crushed stone of a medium-sized fraction of about 15-20 cm is first laid, and then sand is placed on it, and only then the finishing coating.
Options for constructing a blind area with crushed stone, rubble stone, asphalt
What else is mandatory is compliance with the slopes: the decline comes from the house. This way the moisture will flow into the drainage system or soil located around it. The amount of slope depends on the type of protective coating used. For concrete and asphalt, the slope is 3-5% (height difference per 1 meter is 3-5 cm). When laying stone, tiles, porcelain stoneware, the slope is 5-10%.
How can you style it beautifully?
- Christmas tree. The method is interesting, but not economical. It takes a lot of pruning;
- Brick. Practical and economical, because not many tiles need to be cut;
- Square. The most common option.
You can experiment and try different variations of tile laying.
How to calculate the required quantity?
To calculate the amount of material used for arranging the blind area, you need to calculate the area of the entire house path
To do this, using a tape measure, it is important to determine the boundaries of the end of the blind area for each of the sides (and turns) of the house, and then multiply the width by the length for each section
On the Internet, on the website of the company from which the tiles will be ordered, there is usually an online calculator that allows you to calculate the required number of tiles yourself.
For example, a house has 4 straight sides, without turns. 2 of them have a blind area width of 2 m and a length of 10 m, the other sides are 5 m long. It turns out: (2×10) + (2×10) + (2×5) + (2×5) = 60 m2 – total area of the blind area.
Now you need to calculate the area of one tile: if one is made in the shape of a square, then its width and length will be 0.2 m each. As a result, the area of one element is 0.2 × 0.2 = 0.04 m2. And for 1m2 it will take 25 tiles (1:0.04). Knowing how many elements are needed to cover 1 m2, all that remains is to multiply 25 tiles by 60 m2 = 1500 pieces.
Laying concrete mixture
There are two ways to fill the formwork with concrete:
- manually - using a bucket or shovel;
- directly from the mixer - through the drain tray.
After unloading a portion of concrete, you must:
- level the solution with a trowel, removing depressions;
- compact by vibration.
When compacting, excess air and water not associated with cement are removed from the mixture. It is not practical to compact the M200 blind area by compaction.
In the absence of a vibrator, the layer can be compacted by bayoneting. To work, you will need a metal rod weighing about 3 kg. Having found the supply fittings, proceed as follows:
- They stick the rod into the concrete with vibrating points, as if “piercing” the layer.
- Swing the rod from side to side, simulating the vibration of the laid mass.
- The reinforcement is pulled out, also giving the rod horizontal and vertical vibration.
Each cell must be bayoneted in a spiral, from the formwork to the center. For every 10 sq. cm of concrete there should be 1 “injection” of reinforcement.
Protective composition Elakor
You can paint a concrete blind area using special protective solutions. These include Elakor. This drug is prepared on the basis of polyurethane, which is the active principle. It is used to prevent dust formation and other concrete structures, preventing their destruction. It is applied in a thin layer. A distinctive feature is that Elakor penetrates several centimeters inside, and a special protective film is formed on the surface. The latter contains very durable crystals that are resistant to moisture and chemicals.
The solution penetrated into the concrete blind area increases the strength of the structure and its wear resistance. The outer protective layer adheres to the surface as much as possible and forms a single material with the entire structure, as a result of which it does not peel off or collapse. The service life of the coating is up to 15 years, while the surface is less susceptible to mechanical destruction and does not become slippery.
Materials and tools for construction
You can make a blind area for a bath from any materials. The only difference is their cost, complexity of work and appearance.
Each of them must have certain properties:
- provide reliable waterproofing of the building, while removing excess moisture;
- withstand temperature changes;
- have an attractive appearance and fit the style of the bathhouse;
- maintainability and low maintenance requirements.
Concrete, paving slabs, brick and other materials meet these requirements. To ensure strength, depending on the type of soil, sand, crushed stone or clay is placed under them. In some cases, several layers of these materials are used simultaneously. If the soil is very mobile, then the blind area should be insulated with penoplex or expanded polystyrene.
During the installation process, various tools may be required, depending on the type of blind area. Basically, this is a shovel, a mixing container, an edged board, reinforcing mesh, bulk materials, etc.
Building size and thickness of monolithic structure
A monolithic foundation is the most expensive type of foundation, which explains the desire of developers to determine the minimum permissible slab thickness that would withstand design loads with a margin.
Factors influencing the indicator:
- reinforcement frame height;
- thickness of the concrete layer above and below the mesh;
- reinforcement thickness.
For baths made of light material - frame-panel or wooden, it is enough to add these three values to find out the thickness of the monolith. The optimal slab size is considered to be 0.2–0.3 m.
In this case, it is necessary to take into account the height of the cushion made of non-metallic materials, which in most cases will be equal to 0.5 m: 0.3 m of sand and 0.2 m of crushed stone. In regions with sharp temperature changes, experts advise placing a layer of insulation 0.1 m high under the slab.
If large-scale construction is underway, for example, a bathhouse with an area of 6 x 6 m, then the weight of the building must also be taken into account, since there is a possible risk of slab foundation subsidence, especially on unstable soils. In this case, the thickness of the slab is increased to 35–40 cm
For economic feasibility purposes, the monolith can be replaced with a foundation using ready-made factory-type reinforced concrete slabs or a foundation with stiffeners can be built.
What is the structure?
In order for the bathhouse to last for many years, it is recommended to make a blind area. Its installation must be done during the construction of the foundation . It will protect the building from moisture, plants and other negative influences.
Some builders recommend installing the structure a year after the construction of the bathhouse, since it will shrink for some time. This opinion is not correct, since over the course of a year a lot of excess moisture will get into the foundation of the house, which can destroy it.
A blind area is simply necessary where groundwater rises high, which leads to destruction and cracks in the foundation. It is also installed on heaving soil. The design provides reliable thermal insulation of the bathhouse and protects the floor from drafts.
Why is it needed?
It is necessary for:
Protection of the foundation of the building. During the period of precipitation and temperature changes, the soil expands, which leads to moisture entering there, which over time leads to the destruction of the foundation.
The blind area effectively solves this problem by removing moisture from the building.
- Protects the foundation from rodents, plants and other living organisms living in the soil.
- With the arrival of cold weather, the soil begins to deform, as a result of which the foundation is subjected to an uneven load, which leads to its gradual destruction. The blind area makes the soil more plastic and helps distribute pressure evenly.
- Improves the appearance of the building.
- Can serve as a walking path.
If you do not make a blind area, groundwater will penetrate into the foundation, which will lead to its gradual destruction and the appearance of cracks, both in the foundation itself and on the walls of the building. The construction of the blind area should be started before the cold weather arrives.
Do not forget about the construction of a storm drain , which will remove excess moisture outside the bathhouse. It is important to maintain the required slope angle from the building by 5-10 degrees.
What happens if the blind area is not made?
Great difficulties await owners living in regions where heavy rainfall often occurs. During such periods groundwater begins to rise , as a result, surface water can easily penetrate into the foundation of the building. If nothing is done, the foundation will gradually collapse, and soon cracks will begin to appear, both in the foundation and in the walls of the building.
Owners who decide to build a house on heaving soils risk facing more serious problems. With the onset of winter, highly moist soil will begin to expand unevenly, creating a significant load on the building structure. However, it is within the power of every home craftsman to prevent such an unpleasant phenomenon - to do this, it is necessary, in the process of building a blind area for a house with your own hands, not to forget to insulate it.
An equally important issue is calculating the optimal width of the blind area for the house. Here it is worth proceeding from the fact that it should extend beyond the boundaries of the cornice by about 20-25 cm . Most often, a width of approximately 80 cm is sufficient, but in some cases it is allowed to make a blind area smaller.
It is imperative to take care of installing a storm drain along the edge of the blind area so that water can easily drain through it. This can only be done if the blind area for the house is built with a slope of at least 5-10°.
According to some experts, before starting the construction of a blind area for a house, it is necessary to make a foundation, and it is important to follow this exact order of work.
At the same time, there are experts who disagree with this: after making the foundation, you must wait at least 12 months, and only after that you can start making the blind area. Otherwise, the soil may sag, which can lead to cracks in the structure.
Reasons for the need to construct a blind area.
The blind area is designed to perform the following functions:
Decorative - it is the logical conclusion of the entire architectural image of the building, and is its integral part. Landscape designers make full use of the blind area to create the desired impression of a bathhouse.
Practical - quite often the blind area serves as a kind of path, and accordingly there are certain requirements for materials and design. It must be abrasion-resistant and hard.
Insulation and waterproofing are the most important functions that a blind area should perform.
If you did not take care of the blind area at the stage of building the foundation, then this must be done before the cladding of the base is completed. Otherwise, the water will begin to erode the nearby soil and undermine the foundation, which will lead to cracks.
Before you start work, you need to decide what materials you will use to make the blind area. Can be used: asphalt, cobblestones, bricks, reinforced concrete slabs, concrete, tiles, wood and even bottles.
Any type of blind area consists of two layers: a covering and a lower layer: sand, sand, clay or small crushed stone. Usually the blind area is done at the same time as the foundation. Well, if you purchased a ready-made bathhouse without it, you will have to equip it.
standard and budget option for constructing a blind area
The main rule that must be followed when constructing a blind area: its width should be 20-25 cm greater than the overhang of the building's eaves. Usually a width of 80-100 cm is sufficient, but the wider the blind area, the better it copes with the function of draining water from the building.
Typically, the blind area is made at an angle of 3-7 degrees. In addition to it, a storm drain (small ditch) will also be installed around the perimeter for drainage.
Six options for arranging a blind area.
If you want to quickly and effortlessly build a blind area, you can purchase ready-made concrete slabs. They just need to be laid out on an area prepared in advance and filled with liquid bitumen.
Drainage profiled membranes are also popular . They need to be laid out on the ground and covered with a mixture of crushed stone and sand. You can make any coating on top.
You can use other options, which we will discuss in more detail. They will provide better protection of the foundation from water.
The first place in popularity is the concrete blind area.
In our country, a concrete blind area is most often made by filling it with a fifteen-centimeter layer of clay. If the soil in the area is heaving, we recommend adding an additional layer of sand of 6-8 centimeters. But it is impossible to build a blind area only from concrete, otherwise it will quickly collapse. It is necessary to arrange expansion joints. This can be done by placing wooden slats in increments of 2.5-3 meters, after covering them with bitumen. They need to be installed on an edge and concrete must be poured between them. In addition, they will additionally serve as beacons.
Such seams can be made if you use reinforcing mesh, laying it at the joints with a large overlap.
To prevent such a blind area from absorbing water, you need to make iron reinforcement - sprinkle it with dry cement and level it with a trowel. Then the surface should be covered with a wet cloth and periodically watered with water for ten days.
Although the concrete blind area is quite popular, it is not the best option. Since it takes a lot of concrete to create it, which is not cheap at all. In addition, the process is quite labor-intensive. It has an important advantage - that you can walk on it, but that's all.
For heaving soil - a soft blind area.
Concrete blind area is only suitable for non-heaving soils. And for turbulent soil it is better to make a soft blind area:
Stage 1. Along the perimeter of the foundation you need to pour a layer of clay at a slight angle from the bathhouse. Stage 2. Waterproofing material must be laid on the clay. You can use glass insulation, 250-300 micron film or an unnecessary banner. Stage 3. It is necessary to pour a layer of clay up to 10 cm onto the waterproofing layer and fine gravel on top of it.
soft blind area for a brick bath
Blind area with rubemast.
Step 1. Install formwork from edged boards around the foundation and pour sand inside in a small layer. The ditch inside the formwork must be perfectly flat, and the slope must be created with sand. Step 2. Lay the rubemast on the sand, bending it onto the foundation. Step 3. Everything needs to be filled with ASG to the top of the formwork. Step 4. Lay paving stones on top, and such a blind area will be suitable for walking.
Weed protection – geotextiles.
To make a blind area with geotextiles you need:
Stage 1. Make markings for the blind area and dig a trench at the desired angle. Stage 2. Lay geotextiles. Its advantage is that it allows liquid to pass through, but plants do not grow. And its service life is more than 20 years. It must be laid with a slight overlap on the walls of the building. Stage 3. Fill in a layer of crushed stone with a fraction of 10-20 and level it with a rake. Stage 4. Place a border up to 20 cm high on the sand cushion. To make a sand cushion, pour river sand onto the edges of the blind area. Stage 5. Place a ten-centimeter layer of crushed stone inside the trench.
“Smart” Finnish blind area.
An interesting technology for creating a blind area from the Finns. But you can easily repeat all the work yourself:
- Lay a corrugated drain pipe with holes around the perimeter.
- Fill with gravel and lay overlapping foam on top and fill with soil.
- Connect the pipe at an angle to the drain wells.
- Step back 40 cm from the foundation and fill in crushed stone and beautiful pebbles on top of it.
Such a system will ensure good water drainage, the foundation will not freeze and, as a bonus, no cracks in the blind area.
Cheap and cheerful - blind area in Russian.
If you want to save money but get excellent results, use this option:
Stage 1. Make a not very high sand cushion around the perimeter and fill it with a thin layer of concrete.
Stage 2. Immediately place plain glass bottles in this pillow. You don't need to stack them too close to each other. And fill everything with concrete again.
Stage 3. Build a reinforcing layer and pour the concrete solution again.
blind area from bottles - cheap and cheerful
The advantages of this method are:
- There is no need to make expansion joints;
- Need some concrete;
- The bottles serve as insulation and are not difficult to obtain.
As you can see, it’s quite a profitable option, and at the same time effective.
The blind area is an important part of the entire architectural design of the bathhouse, so it is important to make it not only of high quality, but also beautiful. We hope we were able to inspire you to choose and bring to life your ideal blind area. We will be happy to answer your questions and provide assistance from excellent craftsmen to build the bathhouse of your dreams.
Blind area - step-by-step instructions for creation.
The technology for creating a blind area looks like this:
Step 1. First you need to outline the boundaries and prepare the base. First you need to clear the area of plants and even their roots. Simply remove the top layer of soil with a bayonet shovel so that the plants do not subsequently destroy the blind area. Treat the soil additionally with herbicide compounds. Then you need to place restriction boards around the perimeter to prevent the solution from leaking out. You need to pour sand into the trench that has formed, compact it and fill it with water. Pour crushed stone or broken brick onto the layer of sand. If possible, compact everything with a vibrating device.
Step 2. Creation of insulation and waterproofing layers. If there is a cellar or basement in the bathhouse, it is imperative to insulate the blind area. The insulation material can be foam glass, penoplex, or expanded polystyrene. The insulation of a concrete blind area must be done so that there is an air gap of up to 15 cm underneath it. To waterproof the foundation, use PVC film, roofing felt or bitumen.
blind area with waterproofing and storm drainage
Step 3. Arrangement of temperature cuts. For these purposes, it will be convenient to use slate and storm drains. It is important to leave an expansion joint at the junction of the blind area and the walls of the building. To create it, you can use sealant, roofing felt or bitumen in two layers.
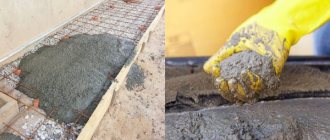
Step 4. Pouring concrete. Next, you need to prepare a concrete solution and pour it, in parts and according to the rules. It is better to choose cement grade M-300, so the blind area will be stronger and more durable. You can make concrete yourself, following this recipe: take one part cement to three parts sand, four parts crushed stone and half part water. To do this, mix water and cement in a concrete mixer until the mixture becomes sticky. Add sand and crushed stone piece by piece. Concrete is considered ready when the mass becomes homogeneous.
Step 5. Ironing. After pouring the concrete, wait 15 minutes and sprinkle the blind area with dry cement and smooth it with a spatula. Ironing will protect the blind area from moisture penetration, and the surface will be smooth and look beautiful. But if you plan to do the finishing with tiles, then you don’t need to do this.
Step 6. Decoration. Then you can proceed to the most interesting and creative part. You can decorate the blind area with stones, tiles, and plant ornamental plants around the perimeter. If you plan to use materials with a porous structure, such as artificial stone, for finishing, then you need to treat them with products with a water-repellent effect.
What comes first, blind area or finishing the base?
Why do you need a blind area and a plinth?
The operating functions of the elements are protection from moisture, necessary to preserve the load-bearing capacity of the foundation and lower tiers of the house.
The base prevents the walls and beams of the basement from becoming damp. It drains surface water and prevents excessive contact between moisture and the bottom of the foundation.
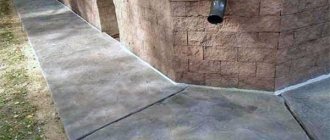
The structural elements are arranged in different planes. The place where they join is at a certain angle, which is especially vulnerable to moisture. In this regard, the cladding of the base must be as airtight as possible: this is the only way water will “roll off” the wall and move away from the building along the concrete slope.
Sequence of work
The blind area is a structural component of a building with high responsibility. Over time, under the influence of water, the soil near the house may change its technical characteristics and lose structural connections. Such changes threaten the collapse of the building. That is why the manufacture of a blind area is the final stage of construction work. A correctly executed element should be located as closely as possible to the foundation. Only after its arrangement can you begin finishing the entire facade, and therefore the basement.
Various materials can be used to cover the upper part of the foundation: plaster, paint, basement siding, tiles, artificial granite. The latter options are more weather resistant and do not require regular updating.
The most common materials for blind areas are concrete or asphalt. The top of the screed can be covered with natural stone or tiles. The asphalt mixture is cheaper, but its service life is much shorter.
The concrete solution is poured in a wide, meter-long strip around the entire building, having previously arranged a sand cushion. To provide additional strength, a reinforced mesh is inserted into the tape. Every 10-15 meters an expansion joint made of bitumen mastic, roofing felt or other suitable materials should be installed.