A sorghum broom for household needs can be either purchased or made independently. Especially if you want to combine business with pleasure and use this cereal crop as a decoration for your site.
Surely you have heard about sorghum. Brooms are not the only thing this plant can be grown for. It produces cereals, flour, starch (for example, from durra), livestock feed (from Sudan grass), feed grain (from gumaya) and even biofuel (from sweet sorghum). Some types of sorghum can also be used as green manure (the same Sudanese grass). But there are also special varieties from which brooms are knitted.
Before growing a particular variety of sorghum on your property, find out if it is poisonous.
Knitting a broom with your own hands
You can’t live without a good broom in an apartment or private house. The equipment is used for indoor cleaning, and although it is inexpensive, many people prefer to knit brooms with their own hands.
This is especially true for owners of country houses who have at least a small plot of land. They can easily sow black sorghum on the plot and tie a broom for sweeping.
Part of the inventory can be used for your own needs, the rest can be sold on the market and receive financial benefits.
Don't forget to share with your friends!
What plants are brooms made from?
An outdoor broom is often called a broom. It is usually made from thin branches and twigs. There are practically no secrets here. Young one-year-old shoots are cut about a meter long. These are the plants that are good for a broom:
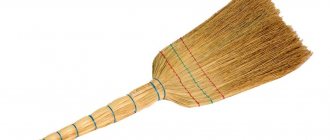
This is what a regular and synthetic broom looks like
These are common ones. But they are also made from other bushes or tree branches. Even annuals are used: wormwood, kaoliang (a plant very similar to millet or sorghum), kochia.
A certain number of branches are collected in a bundle, aligning them along the cut. The upper part is pulled together in two to four places. This tie forms the handle. But, firstly, the handle is too thick, and secondly, to clean it on the street, you will have to stand for a long time “in an inclined position.” Therefore, the broom is attached to a wooden or plastic handle. The diameter of the handle is not too large to be comfortable to grasp with your hand. The load is small, so 3-4 cm is enough. The holder is often switched from an old broom to a new one.
How to make an outdoor broom from plastic bottles
They also make a broom out of plastic bottles. The process is quite simple and everyone has bottles. They are cut into strips, inserted one into the other, and secured. Making it is no more difficult, and probably even easier, than using traditional materials. So, here's the procedure:
- Cut off the bottom of the first bottle.
- Cut the “body” of the bottle into thin strips. Do not cut 4-6 cm to the neck.
You can make a broom or broom from plastic bottles
- For everyone else, we cut off both the neck and the bottom. We cut off the neck 2-3 cm below the place where the thickening begins.
- We cut it into thin strips and put it on the first piece - the one with the neck.
- In total, you can insert 5-8 pieces one into the other.
- We cut off the neck of another bottle like the others. Cut off 2/3 from the bottom. We put the remaining 1/3 with the neck cut off onto the broom blank. This will be a “case” that gives the plastic broom its usual shape for a broom.
- Somewhere in the area where the thread for the lid is cut, we pierce a hole with an awl. This is for attaching to a broom handle.
- The edge of the holder must be sharpened so that it fits into the neck of the bottle at least 5 cm.
- We insert the holder and screw the screw through the hole.
- Now we squeeze it at the bottom of the “case”, forming the flat part of the broom.
- We take a coarse thread or wire, scissors or an awl. We pierce the “cover” in at least two places, but more often. We thread the wire through the holes, tighten it, and twist it.
Cut into strips, forming a “sweeping” part
We attach it to the handle
Firmware for a broom made from plastic bottles
The broom made from plastic bottles is ready. You can make it two-level. Or three-level. Thicker and more powerful. We just make a few “packages”. Exactly as described above. We put them on one holder, one under the other.
You can’t live without a good broom in an apartment or private house. The equipment is used for indoor cleaning, and although it is inexpensive, many people prefer to knit brooms with their own hands.
This is especially true for owners of country houses who have at least a small plot of land. They can easily sow black sorghum on the plot and tie a broom for sweeping.
Part of the inventory can be used for your own needs, the rest can be sold on the market and receive financial benefits.
Features of a homemade broom
A broom is a small bunch of branches or twigs. The item is often called a broom; it is used to restore order in living quarters or sweep the local area. In addition to its standard purpose, the tool was used by our ancestors to spray laundry or garden crops against pests. When treating plants, it is necessary to dissolve the active substance in water, dip a broom into the liquid and make a sharp movement with your hand.
To make a broom, herbaceous plants and twigs of shrubs no less than 55 cm long are used. They are attached to a small wooden handle with a rope or wire. In addition to natural raw materials, modern brooms are made from synthetic materials (polypropylene threads), which are tied with twine.
Note! From the Old Church Slavonic language, broom is literally translated as “bun”.
Now a broom is considered a standard household tool and is used to clean the floor in any room. With its help, you can clean the floor covering from large debris, which can lead to clogging of the vacuum cleaner. The equipment is recommended to be used for preliminary cleaning of the floor. The broom must be compact and durable, its standard service life is at least 10 months. This is true for products made from cereals or other natural raw materials. After the specified period, the branches dry out and begin to break off, causing more harm than good.
Growing sorghum
To grow raw materials you need sorghum broom. Culture seeds can be bought at a specialty store or borrowed from neighbors. In the southern part of our country, sorghum has time to ripen; the seeds of the crop can be collected independently.
Harvesting and planting seeds
Ripened sorghum grains are black in color; they are not needed for the production of brooms, so the seeds are collected during the procurement of raw materials. Many summer residents simply squeeze the stem and tear off the sorghum with their hands. In this case, it is necessary to use gloves to protect the skin on your hands. Craftsmen have come up with a simpler way of preparing seed material. They take a metal bucket, clamp the seed part between the handle and pull out the stem - the grains end up in the bucket.
Sorghum is planted in previously prepared, weed-free soil. It is best to carry out operations after the threat of frost has passed, when the ground warms up to +15 °C. Sorghum is sown to a depth of 2 to 4 cm in rows, with a row spacing of 35–40 cm. There is also a continuous scatter sowing method. The area is leveled with a metal rake, which will allow the grains to be deepened into the soil.
Important! After the emergence of seedlings, the crops need to be thinned out so that there is a distance of 7–12 cm between neighboring plants. This will prevent lodging of the crops.
Harvesting
Harvesting begins at the stage of waxy maturity of the grain. The stems are cut by hand, only the tops within 80–100 cm. After this, the grain is collected in a bucket, sorted and the stems are tied into bunches. It is necessary to properly store the raw materials; they are hung under a canopy or in a well-ventilated area.
Agrotechnicians recommend drying the grain, part of it will be used for subsequent sowing or for sale, the rest is used as an additive for poultry. Unnecessary stems that remain in the field are collected in late autumn, when the summer resident has more free time. The raw materials are crushed in a special crusher and used as mulch for various garden crops.
How to grow sorghum for broom
You can easily make a broom yourself. You need to grow sorghum, it’s not difficult at all.
The technology for growing sorghum on brooms consists of several stages.
You need broom sorghum seeds; brooms are made from its stems.
Purchased seeds must be tested for suitability. To do this, place the seeds in a deep container and fill with water. There should be enough water so that it is several centimeters above the seeds. After half an hour, low-quality seeds will float to the surface. They need to be collected and thrown away. The rest are suitable for planting; they need to be thoroughly dried.
You can select seeds suitable for planting using another method. This should be done in an open space during dry, windy weather. Planting material needs to be winnowed. Empty grains will fly to the side, full ones will fall straight down. The seeds need to be winnowed over a canopy or oilcloth laid on the ground.
Seeds should be planted after frost. Usually this is the second half of May and the beginning of June. It is best to plant in warm soil. It is not demanding on soil quality. For good quality of grown raw materials, the beds are covered with mowed grass.
You need to sow in rows. If seeds are planted sparsely, the plants will have large panicles, but if planted densely, the panicles will be small.
Seeds need to be planted to a depth of five centimeters. Broom sorghum loves a lot of light, so it needs to be planted in open sunny areas.
During the growing process, it is necessary to loosen and water the soil. After germination, you can apply fertilizer. And the first shoots will appear a couple of weeks after planting. When the shoots appear, they need to be thinned out. There should be a distance of about 10 centimeters between plants.
For fertilizer you can use humus, urea or superphosphate.
Knitting
Making sorghum brooms with your own hands is quite simple. You need high-quality raw materials and special tools.
Procurement of material
Weaving a broom from millet is not difficult. At the preparatory stage of work, the required number of stems is selected. Each product will use 25–30 thin branches or 20 thick ones. The raw materials are placed in a large container, then poured with boiling water. An important condition for softening sorghum is keeping the shoots in warm water for 2 hours. After this, the stems need to be dried a little.
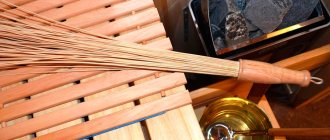
Brooms are produced in a factory using a special machine, which allows you to produce from 150 to 200 products per shift. We don’t have such equipment at home, so we knit a broom from twine or tie the stems with rope and cut off the end part. It is important to familiarize yourself with the features of the workflow.
Manufacturing technology
Step-by-step process for making a broom:
- The dried and seeded twigs of the crop are placed in small bundles with a diameter of about 10 cm. The panicles are trimmed and tightly tied with wire or twine near the base.
- In tying (with rope, wire or other material - each person has the right to choose independently), the main thing is to tie a tight bunch, the stems of the crop should not crumble.
- Divide the lower part of the broom into three parts and tie the bundle in these places (you should get three bundles).
- On the side bunches, several upper stems are cut obliquely, which will help reduce the diameter of the handle to convenient parameters. The shoots are cut about 5 cm higher from the bottom trim.
- Squeezing the handle of the broom, make sure that the shoots fit tightly one to the other, and tie them in several places, every 8–10 cm.
To give the product a neat appearance, the panicles in the lower part are trimmed with scissors, and the upper protruding rods are cut with a knife. If something is unclear about the technology for making a broom at home, you can watch the video.
From seed to harvest
Knife for cutting stems. Raw materials - peeled broom stems. If you want to make a large broom (for example, for cleaning the yard), take more thick stems.
It is enough to soak sorghum seeds in warm water for an hour or two, and high-quality seed material will remain at the bottom; or sift in the air with a slight wind - the empty seeds will be blown away. The sorghum is not buried deep, 4-5 cm is enough. A little cut grass is placed at the bottom. At the initial stage of growth, watering is desirable, and already in mid-June you can admire the sprouts. This means that it is time to harvest the “harvest”.
I recently started growing soris. It is a hybrid of rice and sorghum, the crop from which brooms are made. I plant the crop after potatoes, legumes or melons. I water only during drought, because soris is very drought-resistant. I collect panicles with grain when the harvest ripens.
You can sort sorghum seeds in another way - in warm windy weather, dry sorghum seeds are poured onto a tarpaulin and begin to sift. Sorghum is planted in mid-May. Seeds are planted in a continuous line, without observing the interval between rows. After drying, the sorghum panicles are cleared of seeds and leaves.
After the seeds are fully ripe, the stems are cut off just above the roots (about 12-15 cm from the ground). You will also need two “needles” made of stiff wire to sew through parts of the broom (you can use a thick shoe awl instead), as well as a sharp knife to trim the stems. In order to tie a broom, it is best to use sorghum stems that have not dried out, then they will break less.
First, you will need to grow sorghum directly. To do this, just buy seeds and plant them in the garden after frost. And at the end of August you will be able to collect sorghum twigs for the future broom.
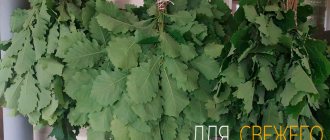
After cutting, the stems are dried. Having divided the entire quantity into small bunches, they are hung with panicles up, choosing a sunny place for drying, and only after the plants are completely dry do they begin further work. The twigs, cleared of seeds and leaves, are formed into bundles along the thickness of the future broom.
The plant needs to be mowed at the root with a sickle or scythe, and then sorted so that the panicle lies to the panicle. The cut twigs of brushwood are separated into several parts using a knife. Rake the sorghum roots raised to the soil surface with a rake and burn them. The roots remaining in the soil can be collected after spring plowing.
Trending:
- How to cure Serana in Skyrim? You can cure Serana from vampirism in Skyrim only after the end of the Downguard storyline. After asking her if she would like to cure vampirism, choose the second […]
- You have chosen a tariff Select the best tariff for the following services3 tenge per minute of connection. The billing step is per second.” Where can I buy an Altel 4G SIM card and how much does it cost? The cost of connection directly depends on what tariff [...]
- Where in St. Petersburg can you donate mosquitoes? If you donate a kilogram (one three-liter jar of mosquitoes) to a pharmacy, you will earn good money. If you find the same numbers on the tabs inside a pack of cigarettes, you will be lucky, and there, somewhere […]
Homemade brooms made from other materials
Sorghum stems are not the only material for making brooms. Thin birch branches are suitable for the production of a broom with a handle. They are tied into a bundle of the required diameter, then the stalk is hammered. The tool is used for cleaning the local area.
Bath brooms are made from branches of various trees (oak or aspen). The stems are tied together with the leaves and hung in a shed to dry. An original idea would be to make cleaning equipment from plastic bottles. In the container, cut off the neck and bottom, then cut thin strips from bottles 1 cm thick and 20 cm long.
Subsequently, the elements are inserted between two wooden planks and glued together to make a broom handle.
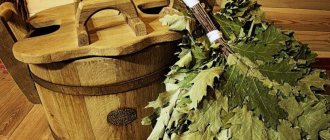
How to make a broom for a bath - technology of preparation, knitting and drying
Do you like a real bathing holiday and have decided to try making brooms with your own hands for the next season? Then this article will be very useful to you, because it will talk about how to make this original Russian invention yourself.
Here you will learn what brooms can be knitted from, how to properly prepare, dry, store and steam them.
“In a bathhouse, a broom is more valuable than money!”
Is it possible to use a broom in the sauna?
When we prepare brooms for a bath, a logical question arises about whether they can be used in a sauna. In order to deal with this, it is enough to find out the conditions that are created in the steam rooms.
As you know, the bathhouse has a relatively low temperature, but at the same time quite high humidity. Using a broom, you can achieve conditions that will be favorable for your body. Using this attribute, you can increase the load on the body by creating even more humidity in the steam room, which will promote profuse sweating and the removal of toxins.
In the sauna, the conditions are opposite: the temperatures are high and the air is dry. At the same time, the body experiences enormous stress, and using a broom will only increase it. With low humidity levels, it is very difficult to achieve profuse sweating. The blood begins to circulate quickly, the heart works with furious force. In this case, the use of a broom is contraindicated to avoid heart attack or stroke.
Doctors do not recommend using a broom in a sauna; a bathhouse is ideal for these purposes.
Raw materials for brooms
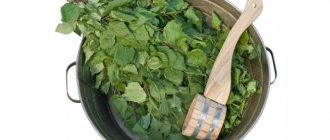
The starting material for these miracle devices can be branches/stems of a wide variety of trees and plants! We will mention only a few and briefly talk about their unique properties.
So, what do our compatriots make bath brooms from?
- Traditional birch products. The choice of most steam room lovers! And this is not surprising, because such brooms have a very mild, but at the same time profound effect: they remove waste and toxins from the body, heal the kidneys and lungs, expand the small bronchi and get rid of phlegm. In addition, a bath broom made of birch twigs is convenient for massage - it is flexible, durable, and the leaves stick to the body like an adhesive plaster, well drawing out and absorbing all the dirt from the body and skin.
In the photo - fresh birch “massagers” on drying
In addition to all of the above, birch leaves and buds contain a valuable complex of vitamins, essential oils and tannins.
- Nettle brooms. They are usually harvested in mid-summer, before or during the flowering of this burning plant. It should be noted that steaming with them is a special pleasure! They tingle pleasantly, relaxing and massaging the whole body. No burns, blisters or similar troubles. The only health benefit is the prevention of radiculitis, gout, and rheumatism.
And this is a product made from nettles
For your information! The only disadvantage of such brooms is that they are only suitable for one trip to the bathhouse, but this disadvantage is fully compensated by the easy preparation and knitting of nettle products.
- Currant and cherry brooms are as durable as birch or oak brooms, but steaming with them is much more pleasant thanks to the amazing aroma that comes from them! In addition, these “aroma massagers” are good for skin health.
Note! The branches are harvested in early June: young shoots and root shoots are cut off. There is no need to go far for raw materials, especially if you live in a private house.
Fragrant broom made of cherry twigs
- Juniper brooms are the choice of the most desperate people. Such a device stings “oh-ho-ho”, in addition, it is also rough and prickly. If you use a juniper broom improperly, you can very easily injure your skin. However, all these inconvenient moments are fully compensated by the benefits of massage with such twigs. An excellent remedy for the treatment of radiculitis, neuralgia, gout, rheumatism, paralysis, various allergies, colds and even tuberculosis. Indispensable bactericidal and antiseptic properties.
Juniper "massager". By the way, the price of brooms today varies from 60 to 200 rubles! Why pay when you can easily do it yourself?
Interesting to know! It is not for nothing that not so long ago surgeons sterilized threads for suturing wounds in juniper oil.
You can stock up and use juniper branches all year round, since this shrub is evergreen. Remember that you need to cut off the “prickly raw materials” carefully, because juniper grows slowly and its thickets are poorly restored.
What to do with the branches after harvesting?
An attic space is a good place to store harvested branches, or a heap of hay is even better. A balcony or even a mezzanine is suitable for storing workpieces in urban conditions. In this case, the brooms will need to be pre-wrapped in paper bags.
Drying brooms
Drying brooms on the roof of the barn is also allowed. This is done in the following sequence:
- meadow hay is spread over the roof;
- birch branches are laid out on the hay with small gaps;
- a layer of hay is laid out on top of the branches;
- Every day (some experts advise increasing this period to 2-3 days) the branches turn over. This is done over the course of a month.
Most often, dried pieces are tied in pairs to a rope and stored in this position. You don’t have to knit brooms right away, but combine the branches into small sheaves. The sheaves are wrapped in hay and stored in the attic. Before going to the bathhouse, the required number of branches is pulled from the sheaf and tied into a broom.
The process of preparing branches, knitting and drying in detail
Well, having learned a little about the variety of raw materials for homemade “massagers,” let’s move directly to the answer to the main question - how to properly make brooms for a bath?
The general time for collecting raw materials, regardless of the chosen type of tree (be it birch, oak, maple, linden, etc.), is when the leaf has already matured. In other words, the season for harvesting branches is from early July to mid-August. Collecting raw materials at this time is completely justified, because the leaves of the trees are already becoming large, but they still have enough essential oil glands.
The general rules for choosing a tree for collecting raw materials boil down to the fact that you need to look for young trees/shrubs with straight flexible branches, at a distance of at least 3-4 kilometers from a residential area.
Proper harvesting of birch branches
So, in this article we decided to describe how to correctly collect branches for birch brooms so that they turn out to be of high quality and as useful as possible.
Despite the fact that we will be talking about a specific type of raw material, these collection instructions, in principle, apply to other trees/shrubs:
- Firstly, it is better to break branches for brooms in the first half of the day, immediately after the dew has disappeared.
- Secondly, you need to skillfully select trees. As a rule, these are tall curly and weeping birches, whose branches fall in braids, and the leaves are porous, slightly rough. The branches we need can be characterized as follows: flexible, unbreakable, thin, without knots, 40-50 centimeters long.
Important! Many folk knitters recommend, on the contrary, choosing young birch trees that have never bloomed, explaining this by the fact that they have the most delicate leaves. Of course, we cannot disagree. However, you still need to look at these sheets and even try with your tongue: if the upper side is rough, then you can safely look for another tree. The leaves should be velvety on top.
Leaves are what you need!
- Thirdly, when cutting raw materials, do not use “whips”. Branches for a bath broom must have 2-3 forks, so to speak, for thickness and splendor. It is also desirable that the leaves on them are small or medium.
Attention! To prevent trees from suffering, cut only a few branches from each.
Raw materials for creating bath “massagers”
Knitting brooms
How to make a bath broom correctly - where to start knitting it?
Below is a step-by-step technology for this simple, but requiring special skills and abilities:
- Having prepared a sufficient armful of birch branches, you can start knitting. For one product, enough raw materials are taken so that the handle is no more than 5 centimeters thick. Agree, it will be inconvenient to use a thick and heavy broom.
- The branches are cleared of knots and leaves where the handle will be. As for its length, there are no special rules. You just need to leave the handle long enough to make it comfortable to hold and use the broom.
- When collecting twigs in a broom, the thicker ones are placed in the middle, and thinner ones around them - this way the product will be very durable and can be used 2-3 times.
Knitting brooms is not difficult!
- Then you need to shake and turn over the branches collected in one bunch several times to make sure that the half-finished broom is even, dense, fluffy and beautiful.
- The knitting technique itself is simple and consists of several steps. We need to fasten the collected branches with strong synthetic twine:
- The first knitting is located closer to the end of the handle of the product and is not tightened very tightly. Then the broom is divided into two equal parts, which are twisted 360º (both!). The clamp will be strong. And if the first knitting is made too tight, then there will not be enough strength to twist the broom, or the branches will simply break.
- For the second knitting, you need to cut a piece of twine as long as possible and tie it above the bottom one as tightly as possible. There is no need to trim the ends of the synthetic twine; they will later serve to connect two brooms into a pair.
Visual knitting technology
- Now all that remains is to carefully trim the ends of the branches to the required length using a sharp ax on the stump. You can move on to drying!
Drying and storing brooms
During drying
First of all, we warn you - you cannot dry them in the sun or use various artificial drying methods. The brooms dry out on their own, the main thing is to properly organize a place for them to do this.
It should be in the shade (for example, a barn, garage, attic, haystack, etc.) with moderate humidity. An increased concentration of moisture can cause mold to appear on the leaves, and then the brooms will have to be thrown away.
It is best when the products take the shape of a fan rather than a panicle. To achieve this result, fresh brooms are laid out on the floor and turned over every day. When they dry (not dry!) you will need to stack them on top of each other, periodically changing places - this way they will gradually flatten.
It is important not to dry them out! After drying, all the leaves on the broom should have a concentrated matte green color, and the aroma of balsam birch oil should emanate from the broom itself. After steaming the product, this pleasant smell will sharply intensify, which will have a beneficial effect on the health of the entire body.
For your information! After drying the products, the second knitting may become loose and will need to be re-tied.
After about a week, the finished brooms can be stacked tightly in a dry, dark and well-ventilated area. And to prevent them from getting dusty, you can wrap them in cellophane or paper, but not tightly, so that there is little air access.
Storage of dried products
A good option for storing bath whisks is in a haystack. In winter, you can also store simply prepared branches in the form of one sheaf, and, as necessary, knit healing “massagers” from them. In wallpaper cases, the leaves are preserved better.
Parking brooms
You also need to know how to steam a broom!
So we learned how to make bath brooms. However, there remains one more important nuance, without which the competent preparation of a “massager” for the steam room cannot be considered complete - this is its preparation directly for use.
The easiest way to steam a broom is as follows: lower it into a bowl of cold water for 3-4 minutes, then into warm water for the same amount of time, and finally into a tub of hot water (not boiling water!). At the same time, it is important to cover the tub with something so that our broom “steams.” But you can tell when to take it out by its delicious aroma!
Advice! Do not throw out the remaining water from steaming - it will be useful for watering hot stones or the walls of the sauna stove, thanks to which the entire steam room will be filled with wonderful natural smells.
Conclusion
The steam should be light and the broom should be fragrant!
Having steamed to your heart's content in the sauna for the rest of the day, you feel a surge of vigor, health and strength. And if the broom was also knitted with your own hands, with due diligence and accuracy, then the bath procedures will be a real pleasure! The video in this article is ready to share information on these issues, watch it!
What should a broom be like?
Vacuum cleaners appeared in human everyday life relatively recently, with the beginning of the development of technological progress, but it was the broom that was and remains to this day the very assistant that makes it easy to keep the floor clean.
History of the floor broom
A traditional broom is a bunch of branches or twigs, used for cleaning apartments and houses, and sometimes even local areas. Although the device for sweeping streets is usually called a broom, it is still the closest relative of an ordinary broom. Previously, these bundles of twigs were also used for cleaning wardrobe items, spraying flowers or linen - the broom was simply dipped in water, and housewives fanned with it what needed to be moistened.
Broom for sweeping the floor
Typically, twigs of shrubs or stems of herbaceous plants up to 50 cm long are used to make a broom. They are secured to a short or long handle using special strands, twine, soft branches of trees and shrubs or wire.
On a note! From Old Church Slavonic, Czech and Slovenian languages, broom is translated as “bun”. This is reported in the etymological dictionary of M. Vasmer.
Now a broom can be made from both natural and synthetic materials. Previously, their creation was carried out by people called brooms. Currently, there are large-scale industrial productions - brooms go on sale from conveyors, have become mass products, and their production has certain standards regulated by the document OST 56-31-91.
OST 56-31-91. Sorghum brooms. Technical conditions. Downloadable file (click the link to open the PDF in a new window).
OST 56-31-91
On the territory of Russia, the broom also had cultural significance. Residents believed that a brownie lived in the “crown” of the broom, and in general this object was associated with evil spirits. However, at the same time, it was also considered a talisman for the home, a person’s wealth, and was used for fortune telling.
On a note! The broom is still important in some regions. And in the village of Semeno-Alexandrovka, Voronezh region, residents create not simple devices for cleaning the floor, but real works of art, distinguished by their special beauty. The individual rods are tied here using willow twigs.
Nowadays, a broom is considered a common household tool used for cleaning the floor. It is ideal for cleaning the base from large particles of debris that can clog the vacuum cleaner and cause it to fail. As a rule, a broom is used at one of the stages of major cleaning - first they walk across the floor with it, then they pick up a vacuum cleaner, then comes the final stage of cleaning - washing the floor with a rag.
The broom is still used today
A good broom should be durable and neat in appearance. It is not recommended to use it for a long time - it is usually thrown away approximately 10-12 months after purchase. The fact is that if it is made from natural raw materials, the branches dry out and begin to crumble over time. Thus, during cleaning, the broom itself produces more garbage than it is useful.
Types of brooms
First, a little classification. In general, brooms can be divided into two categories: for cleaning indoors and for outdoors. There are home brooms for cleaning the floor and others for dusting. Those for dust are more often called “brooms”. They are made from soft, thin materials that look more like hairs. Once upon a time, a bunch of feathers were used for these purposes; now, more and more often, synthetic fibers are secured with a fan or a “brush”. All this beauty is attached to the handle.
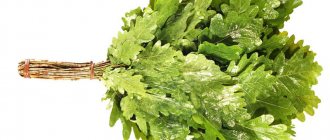
What is a broom made from... But traditionally it is made from millet and sorghum
Household or home floor brooms are designed to remove not only small debris, but also to capture dust. They are softer and denser than those for the street. Collected from a large number of thin elastic branches/lint. They are given a “broom” shape: the handle is round, the lower part is flat. Due to the width, a considerable area is captured in one pass. So this shape is not accidental.
A broom differs from a broom in the presence of a handle
A broom for cleaning outside is tougher. This weapon is often called a broom, but a “street broom” is also in use. It is made of thin branches and twigs. They are tougher and more elastic. After all, they don’t have to chase dust and crumbs around the house. You need to remove stones, leaves, branches or something similar. So you need not only thickness, but also elasticity to make it convenient to remove debris. But they cannot grab sand, soil and other “trifles”, so there are often two “tools of labor” on the street - a broom and a broom.
What are floor brooms made of?
Throughout its centuries-old history, the broom has remained virtually unchanged in appearance - only the materials from which it is made have changed. You can make this cleaning device out of almost anything. Basically, brooms are made from stems and branches of bushes and herbs, and twigs. Most often they are created from a special plant - sorghum, but we will talk about it a little lower.
To create brooms, the stems of a plant such as chiliga or wild acacia can be used. It has quite strong and flexible shoots. But such a broom is not suitable for cleaning the house because of its density and roughness.
One of the modern broom options
Brooms are also knitted from common wolfberry, a shrub popularly called “wolf berry.” By the way, this is the plant that produces the popular goji berries. But a soft broom can be made from St. John's wort, wormwood, and oregano. If you sweep the floor with such a product, the house will smell fragrant, and moths and other insects will not appear. Spiders could be expelled from a home by sweeping it with a broom made of reed stems. In villages they still use brooms made from nettles and linden branches.
The Slavs often used millet stems to create brooms. But now such products have practically sunk into oblivion - they have been replaced by softer brooms made from broom sorghum.
You can even make good money making brooms
Growing broom sorghum, care and how to tie brooms
Have you ever grown broom sorghum in your garden?
If not, be sure to try it. This is a very necessary crop in the economy. All parts of the plant
sorghum can be used:
panicles - for making brooms, seeds - for feed for livestock and poultry, and stems - for mulching beds .
Sorghum is a high-yielding plant; in the national economy it is used as a grain and fodder crop. The sown area of different types of sorghum in the world is more than 60 million hectares. In Ukraine, it is grown over large areas, mainly in the southern and central regions, since it is a very drought-resistant crop.
What is a house broom made of?
Natural raw materials have always been in price. It is environmentally friendly and does not pose a health hazard. That is why natural brooms made from broom sorghum are still used. It is also sometimes called economic.
Sorghum is an annual plant native to hot Africa. However, now it grows in India, America, Europe, Asian countries and Russia. This plant is drought-resistant, is not afraid of lack of moisture, is generally unpretentious in care, and loves warmth. Sorghum has a strong stem that is excellent for broom production.
Sorghum (lat. Sorghum)
To make brooms, only mature branches of this plant are used - a kind of panicles. In a temperate climate, they still do not have time to grow, so most of the brooms, one might say, come from the south. The highest quality products are obtained from stems that end their life and dry out on the root. Also, the best raw materials have reddish panicles and red or brown grains. Some growers even leave them on the branches to prove the quality of their product.
On a note! Not only brooms are made from sorghum. The plant is excellent for making paper, starch, and silage. In terms of nutritional properties, it is no worse than corn.
Sorghum can be used for more than just making brooms
From a business perspective, sorghum is a profitable investment. It grows well, and from 1 hectare of land you can get up to 4 thousand brooms. However, this plant is very fond of pests, which adversely affects the harvest as a whole. Sorghum can ripen to the desired state already cut, which is used by broom producers in the northern regions.
What are brooms for sweeping made of nowadays? Cleaning brushes
Brooms will never go away from everyday use due to the fact that there is a certain number of floor coverings that require careful handling. These are laminate, parquet, some types of tiles (for example, vinyl), etc. In no case should they be cleaned using brute force. And a broom comes in handy here.
Nowadays brooms are also made from polymers. They may have an antistatic brush and a long plastic handle. They are convenient to work with, and such brooms are also good at collecting dirt from the floor covering. Synthetic products can be used to clean any surfaces, they do not scratch anything, do not generate dust (to avoid the dusting effect when cleaning with a regular broom, you have to wet it), they allow you to reach hard-to-reach places and sweep them well.
This is what a modern broom looks like
Synthetic brooms are used for cleaning both residential premises and local areas. They are purchased by enterprises for cleaning production areas. Their main advantage is durability compared to conventional brooms and lack of fragility.
Most often, synthetic brooms are called brushes - they just look exactly like brushes, bearing little resemblance to a standard and familiar broom. They are usually made of PVC. Their cost is greatly influenced by the quality of the raw materials, the length of the handle and bristles of the brush itself, strength and manufacturer brand.
Soft synthetic floor brush
By the way, in modern artificial brooms the length of the sweeping part (broom) has become much shorter than in their predecessor - the traditional broom. But the handle has become longer and can have a variety of configurations. These brooms are lightweight and easy to clean/storage; they can be treated and disinfected with various chemical compounds.
Table. Types of brushes.
Rectangular, with long handle
Laminate brush
The benefits of an oak broom
Anyone who wants to be young and beautiful should take an oak broom to the bathhouse. Oak leaves are considered truly medicinal for those who suffer from skin diseases, hypertension, and vitamin deficiencies. Almost everyone knows the properties of the oak collection “Oak Bark”; steamed leaves also have the same effect.
Tannins, flavonoids and polysaccharides are the substances that we need for external baths. The rest of the complex of useful ingredients in the bath will be unnecessary, because... They are best taken internally as a tincture. Immediately after the broom leaf has soaked, it begins to release healing juices and at the same time a coloring pigment; it is for this reason that it is better to go to the bathhouse without clothes in order to wash off the brown stains.
An oak broom is especially good for those who suffer from skin irritations and acne. The flavonoids contained in oak activate the body's protective functions so that the skin instantly calms down. Its surface is covered with a protective film, which is formed as a result of the secreted plant juice.
Oak extracts saturate the surface of the skin and make it more elastic. It is not for nothing that oak wood is valued all over the world as a reliable raw material. Oak leaves have a beneficial effect on blood pressure. Regular use of oak tea can cure skin dermatitis, reduce allergic rashes, and alleviate abscesses.
A broom is a simple tool, but requires preparation
A newly purchased broom needs preparation before it can be used to clean the floor. And it is important to prepare it correctly so that it serves well and for as long as possible. There are no exact instructions for pre-processing a broom, but many use those that grandmothers and mothers shared with them.
Broom for sweeping
A new broom can be filled with boiling water, preferably with the addition of a small amount of salt (at the rate of about 1 teaspoon per 1 liter of water). Although some use only 2 tsp. for a 10-liter bucket - this does not make the procedure any worse. Leave the broom in a bucket of water until the liquid cools completely (at least 3 hours). Next, it is dried (preferably in a pressed state).
Advice! For ease of use, the broom whisk can be trimmed - cut it at a slight angle. Then it will be easier to handle hard-to-reach places and corners.
You also need to properly care for the broom so that it lasts as long as possible and does not deteriorate.
- It is not recommended to store this cleaning tool in an upright position. The best option is to place the broom on a horizontal surface after use. As a last resort, the broom is placed in a corner with the sweeping part up.
- Before using, it is better to soak the broom in a hot salt solution each time.
Three-stitched sorghum brooms
How to knit brooms
Making a broom is not as simple as it seems at first glance. First of all, ripened sorghum is cut and sent for drying. It is usually done in a dry room where there is good air circulation. The drying time of the material is about 10 days. Next, the sorghum stems are cleared of leaves and excess seeds are removed - this is done with a special comb.
Raw materials are sorted by size - length and thickness of the stems. On average, their consumption to create one broom is 20-35 pieces. The length should be about 85 cm. The width of the panicle is 25-40 cm.
The stems of the plant are tightly pulled together using metal and rubber rings and fastened with special pins. Twine, nylon, wire, and willow branches can also be used. Finished brooms are sent from production for sale.
Making a broom with your own hands
You can grow your own broom in your own garden plot. It is enough to buy sorghum seeds, and by autumn you will have the necessary raw materials. Let's get acquainted with the technology of creating a broom at home.
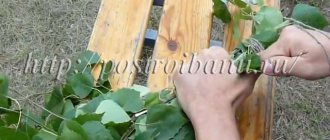
Step 1. To make a broom with your own hands, sorghum stalks are grown in your garden plot. Seeds are planted in the spring.
Sorghum on a personal plot
Step 2. In the fall, when the sorghum is ripe, its stems are cut off. It is easy to recognize the moment of pruning sorghum - the leaves of the plant begin to turn yellow, and the seeds acquire a reddish color.
Cut sorghum stems
Step 3. Large leaves from the sorghum stems are removed - a small panicle remains, which is hung upside down in a dry, ventilated room from the ceiling for proper drying. The drying period is about 10-30 days, but it is better to leave sorghum until spring.
Step 4. Next, the seeds are removed from the sorghum stems - otherwise they will all end up in the room during cleaning. A regular metal bucket will help you cope with the seeds. A sorghum sprig is pushed into the bucket with a broom so that the metal handle of the bucket then rests on its stem. This way the handle is pressed against the bucket and the sorghum is between them. The stem stretches outward, and the seeds all remain in the bucket thanks to the bucket and handle.
Dried sorghum stalks
Removing seeds using a metal bucket
Step 5. It's time to form the broom. First, a smooth working surface of the broom is created. To do this, all sorghum stems are laid carefully on a flat surface. In this case, small branches should be inside the broom, large and powerful stems should be placed outside.
The stems should be laid straight
Laying the branches correctly
Step 6. To make a broom, you will need a rope about 2 m long, which is suspended on some kind of support. A wooden lever is tied to its lower part.
Next you will need a rope
A wooden lever is tied to the bottom of the rope
Step 7. Take a bunch of sorghum, select the place where the first knot will be located, and then make a loop of suspended rope around this place. The rope is fixed by pressing the foot on the lever. The rope is stretched and makes it possible to pull the broom as tightly as possible, which at this time rotates half a turn.
Forming a loop in place of the first knot
Step 8. After this, take a nylon thread and pass it through the middle of the sorghum bundle. At the location of the rope, the thread is wrapped around the future broom. The ends of the thread are tied after winding. After tying, the ends are passed through the middle of the bun again and pulled up. Excess threads are cut off.
The thread is passed through the middle of the bundle
The thread is wrapped around the broom
Step 9. Next, several more windings are made around the sorghum bunch in the same way.
Then you need to make several more such windings
Step 10. Excess stems are cut off using a sharp knife.
Trimming excess stems
Step 11. Next, the broom needs to be stitched. The following device is useful, created from two slats connected to each other by a piece of rubber. One of the strips has two holes, and the other has two bolts. The broom is placed between two slats and tightened with bolts. The panicle straightens out well.
This device will be used
The broom is placed between two slats
The panicle spreads out well
Step 12. The stitching will be done according to the principle of sewing shoes - with two threads and using an awl.
Let's get started with the firmware
Step 13. The broom is pierced with an awl and the thread laid at the bottom of the broom is picked up by it and pulled up. The top thread is pulled into the resulting loop. The lower thread is tightened.
Two threads are used
The thread laid at the bottom of the panicle is picked up by it and pulled up
The lower thread is tightened
Step 14. In the same way, the entire broom panicle is stitched in the selected place. The threads are tied at the end. You can knit a couple of rows for reliability. The ends of the thread are hidden inside the broom.
The entire broom panicle is stitched in the same way.
Step 15. Using the same principle, the place on the panicle located below the retaining slats is stitched. The broom is ready.
The broom is stitched in two places
Prices for brooms for cleaning
Harvesting sorghum for brooms
This should be done after the seeds have fully ripened, which occurs approximately from the end of August to mid-September.
Maturity can be determined by the dried stem and panicle, which should acquire a red-brown color.
Be patient, because what follows is a labor-intensive process. The stems of the plant need to be cut off at the root. This can be done using a scythe, sickle or knife. Don't rush to shorten the stems.
Cut panicles require careful drying. They need to be folded and hung with the panicles up. When they are completely dry, remove the seeds and leaves from the stems.