Hello friends!
The holidays are approaching, and I personally plan to celebrate them in a country house. Initially, it was an old wooden building, which I literally brought back to life with my own hands. He strengthened the foundation, tidied up the façade, and lined the walls with gypsum plasterboard from the inside. But many acquaintances did not believe in my success and said that plasterboard was undesirable in a house made of timber. I was convinced in practice that you just need to use it correctly! Let me share my practical experience and tell you how to sheathe a wooden house with plasterboard.
Drywall in a wooden house allows you to finish it and save money. Since the material belongs to the category of budget construction goods, many can afford it.
How to cover a wooden house with plasterboard and is it worth doing?
Drywall sheets are a good, affordable material for leveling walls in a wooden house. You can do this yourself using a certain algorithm.
The room was lined with plasterboard
How to cover a wooden house with plasterboard:
- Surface marking with horizontal and vertical lines.
- Installation of a timber frame . Installation of a timber frame is not complete without leveling.
- Cut out the sheets . The height of the sheet should be 7-10 cm less than the height of the wall. In addition, the sheets should be cut 3 cm shorter (this is due to subsequent shrinkage of the house).
- Fastening the sheets in a checkerboard pattern. This will avoid the formation of transverse seams.
- It is necessary to leave an unlined space near the floor , which will be covered with decorative skirting boards.
- Gaps where sheets join (if any) are sealed with masking tape.
- Fastening the gypsum boards is completed with putty work.
When attaching sheets to bars, provide ventilation to maintain normal air exchange.
How to install the frame
Since even after the main shrinkage the house will still gradually shrink and move, it is important to make a floating frame before installing drywall. The frame is made of wooden blocks or metal profiles. The first option is preferable, as it is more environmentally friendly, cheaper and does not corrode.
Installation of the sheathing begins with calculations and markings. In the corners from ceiling to ceiling, marks are made using a plumb line. Then the locations of the vertical posts are measured at a distance of up to 60 centimeters from each other. Simultaneously with the installation of the sheathing, metal hoses are installed in which communications are hidden if hidden electrical wiring is planned in the house.
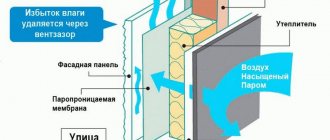
Profiles or bars are installed according to the marks and connected using horizontal bars or profiles. After this, insulation is laid in the gaps of the sheathing, if it is provided for in the project. However, experts recommend using external insulation, as it will provide a ventilated facade and will not reduce the internal space in the house.
A waterproofing layer is laid in the frame. A membrane film is suitable for this, which is placed with the waterproof side up. It will effectively protect the tree from the negative effects of wind, moisture and precipitation. The film is overlapped and secured with construction tape. After the work has been done, the walls in a wooden house are immediately covered with plasterboard.
Is it possible to sheathe the inside of a wooden house with plasterboard?
A wooden frame can be used as a base for drywall. But if you are used to making sheathing that includes metal slats, you will have to take into account some significant differences in the two frame construction technologies.
First of all, if metal slats do not rot, then wood is susceptible to these processes. Therefore, first treat the timber and all other wooden elements with special preparations - abiotics and antiseptics.
The process begins with marking. It will allow you to understand how the wooden elements of the frame will be located - then the sheets will be evenly distributed over the base, and there will be no places with wide voids.
And then the process looks like this:
- It is decided whether it is possible to carry out communications in the wall, whether they are needed here. Will the wall be solid, or will it include door and window openings? It is determined in advance whether there will be shelves, mirrors, hangers, etc. on the wall.
- In order for the marking to be done correctly, remember that each sheet of drywall is attached to at least three bars. And if the sheet is solid, there must be one vertical beam in the middle. Between the vertical bars there are horizontal jumpers that are adjacent to the ceiling and floor.
- A horizontal beam is also needed if facing work is planned with horizontal seams that will connect solid sheets and pieces of gypsum board.
- After the installation of the side guides is completed, the frame is marked. The locations are indicated: where the bars pass, the distance between the bars is calculated, and all design details are taken into account. Tags can be applied directly to the wall.
- To install a vertical beam in one plane with another, it is checked against the outermost exposed guides. This can be done this way: a tight thread is drawn between the outer bars, which is aligned with the outer planes. The thread will help secure the top of the block between them.
Another obvious “plus” of finishing a wooden house with plasterboard is the ability to do repair work yourself, be it installing an interior partition or leveling the walls.
When the installation of the frame is completed, check the strength of its adhesion to the wall. The bars should not move away from the ceiling, the guides should be in the same plane, and the dowel-nails should securely hold the bars.
When do interior wall decoration work begin?
“It’s better not to rush and let the new building sit for at least 10 months”
The final finishing of a “fresh” log house can begin no earlier than the shrinkage process is completed. For a structure made of laminated veneer lumber, this period lasts about four weeks, for others it lasts for many months. To calculate the time required to shrink a new house, you need to know the percentage of humidity of the raw materials used for construction, the climatic features of the area where the cottage is located, and take into account the duration of construction. In any case, it is better not to rush and let the new building sit for at least 10 months. During this time, the logs themselves will dry out and the insulation lying between the crowns will shrink. Externally, it is difficult to notice the processes taking place with the eye, however, if you ignore the recommendations and sheathe the walls before the shrinkage is complete, you can clearly see that it is quite active. The finish will definitely become distorted, covered with a network of cracks, or even completely torn. In general, nothing will save you from remodeling, not even the installation of a floating frame.
Is it possible to sheathe a wooden house with plasterboard using the frameless method?
Frameless plasterboard sheathing exists - the sheets can be attached to the surface immediately using a special adhesive composition. This, undoubtedly, can be done with your own hands; it will increase the usable area of the room, but there are also some obvious “disadvantages” of this method.
The main disadvantage is that there will be nowhere to hide the wires. Yes, and we can carry out such installation only on concrete or brick with high-level masonry. Attaching drywall to the timber right away is not the case. After all, the surface of the timber is uneven, fastening a thin sheet is hardly feasible, and the installation will be unsuccessful.
And besides, adhesives and environmental friendliness at home are incompatible things. So it is better to use either metal slats, or, if you are leaning towards wooden beams, still build a wooden frame.
Preparatory stage
Drywall is a finishing material characterized by durability. It is this fact that makes us think about carrying out preventive treatment of all surfaces that will be hidden behind gypsum board sheets. The owner of the building can only find out that fungus has appeared on the surface of the main walls or mold has grown at the moment when the structure, erected several years ago, begins to crumble and collapse.
Natural wood is a fire hazard. Therefore, all surfaces should be thoroughly treated with antifungal agents. The gaps between the beams must be caulked with tow, impregnated with compounds that ensure the structure’s ability to resist fire. Silicone or foam can be used as an additional treatment.
Foaming cracks
All components of the structure are pre-cut or sawn into separate pieces, the length of which is determined after accurate measurements are taken. This applies not only to the contour. Longitudinal (rack-mount) guides and jumpers are prepared in advance.
How to cover a wooden house with plasterboard
If the installation is to be done in a wooden house, then it is quite possible to use plasterboard on wood to cover it in the traditional way. That is, make a frame - using metal slats or profiles, or use a wooden beam.
The first stage is leveling the walls for finishing. Sometimes walls are interior partitions; the work will be approximately the same in technique with both the wall option and the partition option.
An important point - find the largest depression, adjust the level of the plane from this depression to the most convex mark. Align only serious depressions and protrusions, but you should not pay attention to small cracks.
In order for walls or partitions to be leveled with lathing, you need to apply planks to the walls of the house and adjust them to the level. Repeat strips are applied where there will be drywall joints along the wood sheathing. Everything is fixed with self-tapping screws and a screwdriver. Step frequency is approximately 50 cm.
Benefits of drywall
Experts recommend using wooden lining for finishing a timber or log house, but this is a rather expensive option. Drywall is considered a more affordable and economical material. These are popular and cheap products that are environmentally friendly and have good thermal insulation. Light weight does not put a strong load on the walls and foundation.
Drywall is a universal material that is suitable for covering walls and ceilings. It is easy to install, so you can do the installation yourself without any hassle. The main advantage of drywall is its ability to level walls and ceilings, eliminate uneven areas in a room, and hide electrical wiring and other utility networks.
The frame on which drywall is installed in a wooden house is used for laying insulation and waterproofing. This allows you to make the room warm, protect the house from drafts, cold, wind and the negative effects of precipitation. The smooth surface of the installed drywall makes it possible to realize any design ideas, including painting and painting the material, laying tiles or gluing wallpaper, making three-dimensional structures and multi-level ceilings.
Drywall is safe for wooden structures, as it does not contain chemical impurities. In addition, it is fire resistant. The material is easy to cut and saw, process and install. Today you can choose the appropriate type of drywall for the type of room. Let's look at which product to choose for a wooden house. We will learn how to level the walls in a wooden house and cover the ceiling with plasterboard.
The role of drywall in the cladding of a wooden house
This material has gained popularity due to its technical characteristics. It is endowed with wear resistance and durability, strength and practicality. There are several types of drywall that are used in rooms with high air humidity and temperature fluctuations.
Using drywall you can perform the following work in the house:
Which is better: heated floors or radiators?
Warm floorBatteries
- level the walls;
- build a suspended ceiling;
- install partitions;
- arrange slopes;
- make various decorative elements.
Approximately 80% of all home repairs can be done using drywall.
Its use in repairs will not cause difficulties. Installation of the material is carried out on a pre-constructed metal or wooden frame. For such work it is not necessary to prepare rough surfaces. If you use drywall, DIY repairs are quick and easy.
Frameless installation
As we said above, gluing drywall to wooden walls will not work. But this does not mean that installation cannot be carried out without constructing the sheathing. It is possible, but as fasteners we will use dowels with a plastic sleeve, which are simply driven into the wall and expand inside, which is how the fastening occurs.
This method is very simple and many are especially pleased with its price. Indeed, in this case you will not have to spend money on materials for the frame and time for its construction. Unfortunately, there are a number of limitations due to which this method is not always applicable. There are quite a few restrictions, but we will focus on the most significant of them.
Restrictions
As you can see, there are quite a lot of situations where covering wooden walls with plasterboard without a frame is impossible. And that is why this method is not considered the most common, although it is the simplest.
If you haven’t found a single item from the list in your home, then consider yourself lucky and you can use this option, in which case, let’s look at this process more carefully.
Advice! Don't skimp on the type of drywall. Today, special sheets marked GKLVO are available for sale. This is a non-flammable, moisture-resistant plasterboard of increased strength. The difference in price will be small, but such walls will last much longer.
Installation
Covering wooden walls with plasterboard without a frame begins with careful preparation of the surface. In our situation, the quality of the entire repair will depend on it.
So, installation consists of several stages:
That’s basically it, we put all the other sheets in the same way and at the end we seal the joints between them using a special reinforcing mesh and putty (see How to putty drywall joints according to technology).
How to cover the walls of a wooden house with plasterboard
This process involves leveling the surface. In addition, covering the house with plasterboard allows you to make high-quality insulation of the room. The sheets are attached to a frame that has cells of a certain size. Insulating and insulating materials are inserted into them.
If gypsum boards are used in rooms with high air humidity, it is better to use polystyrene foam or polyurethane foam as an insulating agent.
The surface of the structure must be properly processed. For this purpose, starting and finishing plasters and putty are used. The joints of the sheets are masked with serpyanka (special construction tape). Layers of plaster mixtures are placed on top of it. Then the surface is primed, painted or wallpapered.
GKL perform not only decorative functions - they serve as the basis for the installation of cabinets, shelves and other elements. If the weight of the structures is quite large, then the likelihood of sheet deformation increases. Chips and cracks appear, and sometimes holes form. As a result, repairs need to be made.
Work is performed using:
- plasters;
- putties;
- gypsum mixture.
If the damage is significant, you can put a kind of patch in the form of a sheet of plywood or gypsum fiber.
It is worth considering that after this the repaired part of the gypsum plasterboard house sheathing will not perform a load-bearing function.
Briefly about the main thing
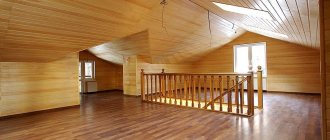
Using a cold attic space and creating a warm, cozy living room in it is possible today. We offer a choice of 6 options for covering the interior space of the attic.
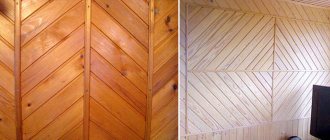
Classic lining will help create a cozy “rustic” interior. Drywall will make it possible to create modern forms. A block house or imitation timber will immerse you in the atmosphere of a rich village mansion. Plywood will allow you to create a warm room with maximum savings. OSB boards will solve the finishing issue in the shortest possible time.
Knowing the characteristics of materials and their capabilities in installation and operation, you can make the final choice. After all, one of the attic cladding options will fit perfectly into your interior.
How to properly sheathe the ceiling in an old wooden house with plasterboard
Ceilings made of plasterboard have become quite popular. With their help, they not only level the rough plane of the house, but also create original multi-level systems.
Installing ceilings in homes is one of the most popular drywall renovation jobs.
Installation of the material on the ceiling is carried out similarly to the finishing of wall surfaces. During the work, it is necessary to take into account the height of the future structure.
You should not build a suspended ceiling in rooms where the height of the walls is less than 2.5 - 2.8 m.
Multi-level systems are used for zonal distribution of space, as well as to give the room sophistication and unusualness. The basis for their construction is the first level of gypsum plasterboard or the ceiling surface.
If you can cover a wooden house with plasterboard yourself using an adhesive solution and lathing, the installation of a suspended ceiling is carried out only on the frame. It can be made from metal profiles or wooden planks.
The weight of a frame made of profiles will be several times lower than that of wood lathing. This must be taken into account when installing structures on a rough foundation that does not have particular strength.
Advantages of designs
The positive side of a plasterboard partition is that, unlike brickwork, it does not need to be plastered. The wall surface is smooth, ready for finishing. Additional advantages of the designs:
- quick installation;
- light weight reduces the load on the foundation;
- stability and reliability of the structure thanks to a durable metal frame;
- The wiring of electrical points is simplified as much as possible, without additional gating of walls;
- high noise insulation;
- gypsum, which is 92% in the slab, is an environmentally friendly material.
When installing structures there is much less dust and debris. The ease of assembly allows you to build them yourself. You just need to adhere to a certain sequence and follow the recommendations of specialists.
Options for partition construction and design
How to make partitions from plasterboard in a wooden house: in addition to cladding
Such structures can be built in any home. They not only divide the space into certain zones, but also perform decorative functions. For example, a bar counter made of plasterboard or a shelf for books looks original. In order for some elements to add zest to the interior design, special glass panels are used in their construction.
Making a partition yourself is quite simple. Initially, you need to determine the location for its installation. Then install the frame, which will be covered with plasterboard on both sides.
To ensure the structure has a normal level of sound insulation, special means and materials are used.
When installing a solid partition, it is necessary to use materials for sound insulation.
Sheets of polyurethane foam, mineral wool or polystyrene foam are inserted into the cells of the resulting sheathing. For a higher level of sound insulation, isolon is used - a rolled material on a rubberized base. Doors and window frames can be mounted on such structures. They can withstand significant loads because they are based on a metal frame.
Examples of attic cladding - photos and videos
Walls - imitation timber, roof slope - plasterboardSource domoholic.ru
Walls - plasterboard, roof slope - clapboardSource yandex.net
Finishing with plastic lining and block houseSource samozdrav.net.ua
Beauty in the interior, created on the basis of plasterboardSource vse-otoplenie.ru
An interesting solution in plywoodSource modernplace.ru
Classic attic interiors of country housesSource izbrusadom.com
Interior of an attic at the dachaSource lestnitsygid.ru
How to design slopes in a wooden house after covering with plasterboard
When renovating apartments, drywall is used most often. With its help, original designs are created. It also helps to level slopes both from the inside and from the outside.
For work on the design of window openings on the facade of a building, it is better to use moisture-resistant gypsum board.
Installation of the material is carried out in two ways: on a wooden sheathing installed in the house and with an adhesive solution. The first method requires the construction of a frame of wooden slats. Its height should not exceed 1 - 2 cm. GK sheets are installed on top of it. They are plastered, puttied, primed and finished.
Wooden sheathing must be painted or primed. Otherwise, under the influence of moisture it will begin to deform.
Covering a wooden house with plasterboard is not considered difficult. The rough surface must be clean and primed. Glue is applied to the back side of the material and the slope. Then the drywall is applied to the surface and pressed tightly. After this, the resulting slope must be plastered.
Types of drywall
- Classic drywall consists of two layers of construction cardboard, between which hardened gypsum dough with filler is laid. It is suitable for rooms with moderate humidity;
- Moisture-resistant materials are suitable for covering wooden walls and ceilings, as the products contain antifungal and moisture-repellent additives. This will prevent the formation of fungus and mold on wooden surfaces;
- Special drywall is the most stable, durable and reliable material containing reinforcing additives. It can even withstand open fire;
- The combined material includes the properties of special and moisture-resistant drywall. It does not burn and is not exposed to the negative effects of moisture and ultraviolet radiation.
Decorative designs from HA
Do-it-yourself home repairs with plasterboard are carried out with the aim of quickly and efficiently decorating wall and ceiling surfaces. Despite this, the material has found wide application in the construction of decorative elements. False fireplaces, flower stands mounted into the wall, and much more are often made from it.
Installation of such elements is carried out only on a metal profile frame. With its help, structures are given strength and reliability. Since profiles can be bent, decorative elements take on various shapes and parameters.
Specifics of interior decoration of houses made of timber
Wood is one of the first building materials used by mankind. It has not lost its relevance today. And the use of modern processing and construction technology allows you to quickly build a house that meets all quality requirements. However, interior decoration has its own nuances, without which all the advantages of the building will simply turn into disadvantages:
- Firstly, it is worth remembering that it is worth starting interior work in a wooden house after at least 6 months. During this time, the house will “settle down”, and movements of load-bearing walls and ceilings will not spoil the interior decoration.
Decorating a fireplace with plasterboard in a timber house - Secondly, despite the naturalness of wood finishing, in any case additional finishing of the external surfaces of the premises will be required: bathroom, toilet and kitchen. The walls of these rooms will be subject to higher humidity, which will lead to deterioration of the material.
- And thirdly, it is difficult to lay communications in the walls and ceilings of a wooden house.
What are the advantages of finishing a house made of timber with plasterboard, taking into account these construction nuances?
Stages of covering a wooden house with plasterboard
Before purchasing the required amount of materials, you need to determine what type of frame the interior will have: wood or metal.
Metal or wood: what to use for cladding a wooden house with plasterboard
The walls of a wooden house are quite suitable for finishing with gypsum plasterboard, made from the same material. But, there are some nuances that need to be taken into account before attaching sheets to such a frame:
- Firstly, a beam with a suitable cross-section (40×40, 50×50, or 40×50 millimeters) and a length of 2–4 meters is used for the frame. The wood for the base must be well dried, otherwise the frame mounted from raw material will definitely move, and this is fraught with the appearance of unevenness and cracks on the plasterboard sheathing.
- Secondly, wood is very sensitive to moisture. Wood untreated with protective coatings or impregnations in a cramped space under a lined wall will inevitably begin to rot or mold. This will result in a ruined home renovation in a few years.
It is desirable that the slats or beams are free of knots and other defects. Particular attention should be paid to choosing even planks, otherwise they will complicate the installation of the sheathing.
With metal profiles there is no such problem; you just need to stock up on the required quantity. You should definitely pay attention to the quality of the protective zinc coating and the wall thickness of the products (standard 0.6 mm) .
Disadvantages of wooden sheathing
Wood is one of the oldest materials used in construction. But, nevertheless, it has many shortcomings that previously builders simply had to put up with.
Diagram of the installation of wooden lathing on the wall under plasterboard
It was the development of the production of finishing products that led to the replacement of wood with metal parts. This happened for a number of reasons:
- Wood reacts very sensitively to changes in the surrounding air. When there is a high level of moisture, the slats or beams begin to absorb it and swell, which leads to an increase in volume. The temperature difference from lower to higher leads to drying out. As a result, the wooden product changes its shape, it “twists”, bends or warps. And such fluctuations are one of the features of our far from ideal climate. One can only imagine what will happen to the finish without proper care and treatment of such elements. An example of attaching wood lathing to a wall
- The second negative point is the reaction of wood to stagnant air without ventilation. The timber under the plasterboard sheathing will simply begin to quickly deteriorate, that is, rot. And if you also add a layer of insulation, which contributes to the lack of ventilation, the frame will become unusable very quickly. Diagram of the installation of timber sheathing for plasterboard
- And also the tree will react significantly to turning the heating on and off in the house. For example, in winter the room is heated, the air is drier, and as a result, moisture evaporates from wooden parts. When the heating is turned off, the humidity rises and the products will begin to replenish the lack of moisture. Simply put, the tree will begin to “pull” dampness from the sheathing, insulation and walls of the house.
- Another disadvantage of wooden material for assembling sheathing for drywall will be its poor quality of drying. Most sawmills sell lumber not fully dried, or even raw. Over time, in the absence of conditions for drying, the slats become deformed. Leveling the wall in this way will become very difficult, if not impossible.
But, all these problems are completely solvable, especially considering the fairly low cost of the material.
The process of laying insulation under plasterboard sheathing
Modern technologies, especially various impregnations and waterproofing, in combination with modern equipment, make it possible to use lumber to assemble sheathing for drywall.
How to make a wooden base for gypsum plasterboard sheathing?
What you need to cover a wooden house with plasterboard
The basic list of materials and tools is the same as when working with drywall in ordinary houses. Of the tools you will need.
- Drill and screwdriver with a set of drills and bits.
- Grinder and metal scissors (for cutting profiles). If a wooden frame is being built, then a hacksaw is quite sufficient.
- A knife for drywall or a regular stationery knife, but with a supply of blades.
- Plastering accessories: spatulas (300 mm and 50 mm wide), nozzle, mixer;
Materials you will need:
- Putty - starting and finishing.
- Serpyanka for joints.
- Primer.
- Drywall.
Features of working with the material
Covering walls in a wooden house with plasterboard has some nuances. Expert advice will help you avoid mistakes during installation:
- Floating frame. Since timber absorbs moisture well, over time the walls expand and change in size. In addition, new houses are prone to natural shrinkage within 1.5 years after their construction, so the frame of a wooden house is often called “floating”, which leads to unevenness on the surface. As a result, small gaps should be left when installing gypsum boards. This method will help not to disturb the geometry of the skin.
- The remaining gaps are covered with decorative panels or baseboards.
- Shrinkage period. It should be noted that plasterboard finishing should be started no earlier than a year after the construction of the building. If the building is built from laminated veneer lumber - 8 months.
- Installation of gypsum boards. During installation, under no circumstances should the gypsum boards be closed tightly to each other. It would be ideal if you leave a 3mm gap between the sheets. This is necessary so that if the wood moves, the finish remains intact. Otherwise, deformation or destruction of the finishing material is inevitable.
- Timber processing. The tree is easily attacked by insects and also has poor resistance to various negative factors. To prevent this, before installing gypsum boards, you should treat the walls with an antiseptic composition.
- Wiring. To prevent power supply wires from causing a fire, for example, in the event of a short circuit, they must be disguised as cable ducts or a metal hose, and additionally sheathed with fire-resistant plasterboard.
GCR installation methods
Installing gypsum boards does not require any special skills, and does not take too much time. To work, you will need tools such as a metal profile, a plumb line, self-tapping screws, a spirit level (level) and a screwdriver.
- The first stage of work begins with the installation of a metal frame. However, this method can be too expensive, so the metal frame is often replaced with a wooden beam. This design can be easily assembled from ordinary slats with a cross section of 50 by 50 mm.
- Then you need to mark the walls. At this stage, a tape measure and a spirit level will be indispensable tools. On the ceiling, you should draw a line parallel to the wall, and then build a vertical frame diagram.
- When the frame is ready, it should be fixed to the wall. But it must be remembered that the structure cannot be attached to the wall too tightly. The installation of horizontal slats serves as spacers. To increase the level of sound insulation, the frame is additionally sheathed with insulation.
- Then the drywall is secured to the frame using self-tapping screws and a screwdriver. To ensure stability of the structure, screws should be placed no further than 16 cm from each other. The joints of the plasterboard sheets are glued with reinforcing sickle tape. This method will prevent cracks and other defects from appearing over time.
Experts recommend installing a metal frame rather than a timber frame. This is explained by the fact that wood requires a lot of labor: before work, the slats should be trimmed and treated with antiseptic agents. This procedure will take longer than if you choose a metal frame. In addition, this material is much more reliable and durable than wood, which means that the finishing with plasterboard sheets will be more firmly fixed.
However, there is another method of installing gypsum boards - frameless. In this case, the sheets are immediately fixed to the surface using special glue. This method allows you to make the room area a little more spacious, but it is not possible to hide communications. Installation of drywall using the frameless method is used only on a perfectly flat surface.
After covering the walls, you can move on to absolutely any method of interior decoration, which allows the owner of his home to bring to life even the most daring design solutions.
https://youtube.com/watch?v=Xax0g8JeZeg
Preparing to cover a wooden house with plasterboard
At the preparatory stage, before covering the walls, you need to carefully inspect them for changes, and if an old building is being restored, you need to carefully check the wood.
It is worth knowing that in a new house, after construction is completed, you cannot immediately begin installing drywall on wooden walls. It takes time for the wood to shrink and dry out.
If there are places with rot or fungus, they are thoroughly cleaned and treated with antiseptics. Severely damaged areas need to be restored.
In a new wooden house, before covering the premises with plasterboard, it is necessary to treat all surfaces with an antiseptic, as well as with a special impregnation.
If the surfaces are perfectly flat (which is extremely rare), you can fasten the drywall to the wall. In other cases, the difference in height differences is determined and the optimal distance at which the frame will be mounted is selected. After this, you can begin assembling the base and finishing the walls with plasterboard in a wooden house.
How to choose the right materials
When selecting materials for finishing a house made of timber with plasterboard, several fair questions arise:
- Is it possible to attach drywall directly to wooden walls inside the house?
- If you use a frame, can it be assembled from wood or should you prefer a metal profile?
- What type of drywall should I use: wall, moisture-resistant or fire-resistant to improve fire safety?
The answers to these questions will determine the further choice of material, as well as the techniques for finishing a house with plasterboard.
Frame or frameless methods
The frameless method of mounting plasterboard sheets to the wall surface is simpler and faster, but requires compliance with many factors.
GKL can be mounted directly on walls if the planes do not have significant differences. Perfectly straight walls in a wooden house are very rare, even in a new building. After all, wood dries out and shrinks along with movement.
And in this case, laying communications becomes much more difficult. For example, you will have to directly drill the supporting structures for the wiring.
Scheme for frameless installation of drywall
The frame, on the contrary, makes it possible to level out any differences and unevenness of the walls to the ideal value, and laying utility lines under the plasterboard sheets will not be difficult at all. In addition, if suspended ceilings are planned, structures on a solid foundation can withstand the load much better.
Metal or wood
In timber houses, both wooden slats and metal profiles can be used as frame material. Moreover, in the first option, it is permissible to build a simpler structure by attaching the beams under the gypsum board directly to the walls (again, taking into account differences). But the quality of lumber must be at a high level. Only wood that is well dried and treated with protective compounds is used. The cross-section of the racks of such a frame must be exactly 50×25, the same criterion for the crossbars, but the guide bars are no less than 75×25!
Mounted wooden frame under plasterboard in a timber house
The process of attaching wooden frame posts
Metal profile types are also suitable for use in wood construction. With their help, you can build a solid foundation that is resistant to influences such as humidity and temperature changes.
An example of fastening a metal frame in a house made of timberMetal frame on the ceiling
To do this, you need ready-made guide elements UD profiles and rack CDs. In terms of cost, metal “parts” of the frame will be cheaper in comparison with high-quality wooden slats. The video shows how to install a metal frame on timber walls.
Which drywall to choose
The type of drywall for finishing a wooden house is selected depending on the purpose of the room. In the bathroom, toilet and kitchen there must be a moisture-resistant sheet; in living rooms, a wall option is quite suitable, and a fire-resistant one is used for finishing structures that may be exposed to temperature influences. In addition to the above-mentioned features of material selection, in a house made of timber, it is necessary to use a vapor barrier.
Installation of a frame for subsequent covering of a wooden house with plasterboard
As mentioned above, with smooth walls or with minor (several millimeters) differences, you can attach sheets without a profile directly to wooden walls. However, this happens extremely rarely, and before attaching drywall to a wooden wall, you need to build an appropriate frame. How this is done is shown in the video:
Wooden frame for covering walls with plasterboard
The sheathing for plasterboard on the wall is assembled from slats or timber of the appropriate section. Initially, elements are installed on the floor and ceiling that will act as guides. Fixation can be achieved with ordinary self-tapping screws.
The same slats are mounted on the walls on the left and right. Then they begin to install the main racks from the same timber. If the distance from the walls of a wooden house is significant, direct hangers are attached to them, with which the sheathing is connected to the load-bearing surface.
With guides, the slats are attached with mounting angles or straight hangers bent at right angles. Wood screws are used as fasteners. To make the structure rigid and reliable, you need to install transverse slats made of timber on the wooden frame, which are installed on the base using mounting angles. The frame on the ceiling is assembled in a similar way.
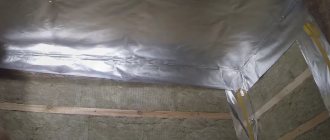
When the wooden sheathing for drywall is ready, insulation is placed in it (if necessary) and wiring is laid.
Metal frame for covering wooden walls with plasterboard
Using metal profiles, the frame is assembled according to the same principle as in conventional brick buildings, finishing them with gypsum board.
Finishing stages:
- Initially, guides from the UD profile are installed according to the markings.
- Next, you need to install direct hangers to the walls.
- The frame posts are inserted into the guides and connected, to which the hangers are bent and secured with clamps. The number of profiles is calculated based on 3 pieces per sheet of drywall. Moreover, adjacent sheets of sheathing are joined to the outer slats.
- Transverse jumpers made from a rack profile are also required.
When the frame is ready, insulation is placed in it and the wiring is pulled through.
Sliding frame device
If everything is clear with the first and third points, then the second forced me to get involved in studying this issue thoroughly. Because, when making repairs with our own hands, we had never thought before that the frame could be mounted in any other way than rigidly to the wall. On the contrary, they tried to screw everything tighter.
But, as it turned out, it can rest securely on the base and at the same time “float” in a vertical plane along with the cladding screwed to it, which eliminates its deformation and the appearance of inter-seam cracks. Moreover, the frame can be either wooden or metal.
Metal carcass
If the cladding of a wooden house is planned immediately after the main shrinkage, it is advisable to use only metal profiles for constructing the frame, as they are not subject to their own deformations due to the influence of external conditions. Everything you need to create it is listed in the table.
| Name | View | Dimensions | Application |
| Guide profile | 28x27 mm | Floor leveling, support for racks | |
| Ceiling profile | 60x27 mm | Load-bearing part of the frame | |
| Self-tapping screw for washer | 5-10 cm depending bridge from unevenness walls | Attaching the frame to the wall | |
| Self-tapping screws | 12.5-13.5 mm | Connecting frame elements to each other |
And a standard set of tools: a level (preferably a laser), a tape measure, a screwdriver with attachments, a cutter, a small grinder, a stepladder, and a pencil.
Now about the main points of the sliding frame design.
- First, as usual, a level is struck along the floor and ceiling, but the guide is attached only to the floor .
- Then, using a laser level and a tape measure, lines are marked for the vertical posts, the distance between the axes of which should be 40 or 60 cm. That is, one guide should be located exactly at the junction of two adjacent sheets 120 cm wide, and one or two more should be under them.
Markings for rack profiles
- Next, the height of the wall is measured, and the racks are cut so that their length is approximately 10 cm less than this height: they should not rest against the ceiling . And 10 cm is a sufficient margin for possible shrinkage, of course, if the house has already been standing for at least a year.
- By the way, I advise you to pay attention to the thickness of the profiles. 0.4 mm is not enough, the frame turns out to be flimsy. It’s better to take 0.6 mm, the price is higher, but the quality is at the same level.
- Now comes the fun part. Take the first post, apply it to the markings and mark 3-4 attachment points on it in those places where there are no joints or deep cracks in the timber. Write the number 1 on both the wall and the profile so as not to get confused later.
- In the marked places, cut a groove with a grinder along the axis of the profile, 10 cm long and slightly wider than the thickness of the self-tapping screw. Its edges need to be cleaned, they must be smooth. The main length of the groove should extend downwards from the intended attachment point.
This is a later photo, but you can see the grooves
- Prepare all other wall and corner posts in the same way, remembering to number them, since the grooves may end up at different levels.
- Now, just above each slot on the wall, you need to attach stops from pieces of bars that will prevent the profile from “falling through.” Their thickness should be such that the outer edge coincides with the plane of the future frame.
Simple self-tapping screws screwed into the wall to the required level can also serve as stops.
- We screw the racks to the wall using self-tapping screws with washers of such a diameter that they rest firmly against the plane of the profile. In this case, the profile is installed “topsy-turvy”, and the self-tapping screw is screwed into the upper part of the groove, departing from its top point by about a centimeter. When the house settles, it pulls the rigidly fixed fasteners down, deforming the posts or tearing out the screws. In our case, this will not happen, since it will move along a specially made slot inside the profile. There is also a small space left on top in case the wood expands due to moisture.
The self-tapping screw is not tightened all the way, but so that the washer under it can be turned with little effort
- During the installation process, do not forget to lay electrical wiring in metal sleeves behind the frame.
This is what should happen in the end
- Since drywall cannot be screwed to such a frame, the next step is to combine the already installed U-shaped profiles with the same ones, but turned to the desired side. They are twisted together with self-tapping seed screws through the side edges or connected with a cutter.
- Finally, transverse stiffening profiles are installed, after which plasterboard cladding in a wooden house can begin.
The sliding frame is ready
There are also several nuances regarding the cladding, but more on them later.
Wooden frame
It is recommended to use wooden blocks as a load-bearing frame only in houses that have undergone complete shrinkage. They themselves must also be dry and treated with the same compounds as the walls.
The principle of constructing the frame is the same, the groove is simply sawed through in the block. It is advisable to make a recess on the outer side around the groove so that the head of the screw does not protrude beyond the plane of the frame.
Installed wooden stand
It is assembled faster than metal, since there is already a plane for attaching drywall. And if you need to minimize the distance between the wall and the sheathing, then the bars can be recessed into the wall by sawing a groove in it slightly wider than their thickness. The main thing is that they stick out everywhere beyond the unevenness of the wall and create one plane.
Covering wooden walls with plasterboard
Sheets of material are secured using self-tapping screws with a length of at least 20 mm. Fastening drywall is done using a screwdriver or drill with variable speed control.
The sheet is installed on the frame and one edge is mounted, and then the opposite. When screwing in a self-tapping screw, you need to control the pressing force so that the head does not damage the top layer of the material, while it is slightly recessed into the surface (1–1.5 mm).
The use of gypsum plasterboard in an old house in this video.
If you need to cut a sheet, first make markings on its surface on the front and back sides. Then an incision is made. By cutting through the cardboard, you can easily break off the desired piece. Irregularities in the cut can be easily smoothed out with the same knife or a regular plane.
You need to attach drywall to wooden blocks in the same way as to metal slats.
Fastening drywall to timber
The sheathing is carried out as when using a metal frame. But there are some nuances that should compensate for some of the disadvantages of such a material as wood. Scheme for attaching various materials to a wooden sheathing First, sheets of plasterboard are attached to a wooden frame with gaps from load-bearing walls within 5 mm. This distance from the floors should be up to 30 mm, and the ceiling should also be 5 mm. Scheme for installing drywall on a wooden frame Secondly, installing drywall at the joints is not done end-to-end, but with a gap of 3–5 mm
These precautions are taken in case of possible movements of the wooden base. Self-tapping screws are screwed in in increments of 250–300 mm, joining adjacent sheets on the frame posts. The caps are slightly recessed, but without damaging the cardboard layer
After covering, finishing is carried out using conventional technology with putty and reinforcement of joints.
Finishing
After covering, you can immediately begin finishing the surfaces:
- Initially, the joints between the sheets are reinforced with a special tape and all fasteners are covered with putty.
- After drying, the applied plaster mixture is rubbed with sandpaper on a grater.
- If painting or wallpapering is planned, then all plasterboard walls must be puttied by applying a leveling starting layer of the mixture, and after drying and grouting a thin finishing layer, 1–2 mm thick.
You can also finish it with decorative plaster or lay tiles.
How to treat the surface → Room decoration → How to choose the right paint → Surface treatment technologies → Leveling and finishing the walls → Selecting and applying a primer → Removal from the surface → Stretch ceilings and technologies → Reviews and testimonials
When to start
On a “fresh” log house, you can begin finishing work no earlier than the main shrinkage has passed.
If the log house is made of laminated timber, it should take 3-4 weeks. For all other types of wooden houses, the period is calculated in months, and sometimes years. The exact shrinkage time depends on the initial moisture content of the raw materials, climate zone and construction time. That's how difficult it is. In any case, it’s not worth starting finishing sooner than a year later, or at least 10 months later. During this period of time, active shrinkage of the wood occurs, logs and beams decrease in size, and the insulation laid between the crowns is crushed. If you attach the trim before the main processes have completed, it will fall off or become warped. Everything will have to be removed and redone. So there's no need to rush. Moreover, there will be enough work: you need to achieve tightness of the joints, and this is not easy. Careful competent caulking is needed. Before starting finishing work, it is tedious to caulk a log or timber frame
Typically, the main caulking of a log house takes place in two stages. Primary - a few weeks after installing the log house, and secondary - after about six to eight months. Each time the cracks are clogged with insulation - jute, tow, sometimes moss. It is done immediately both outside and inside, otherwise the house will warp. Therefore, they walk around the perimeter of the building, caulking alternately, each crown, now from the outside, now from the inside. Work begins from below, from the lowest row of logs or beams.
With each caulking, the frame rises by 5-7 cm. Then, under the force of gravity, it gradually settles. The compacted inter-crown insulation reliably covers the cracks
The quality of this work is very important: it not least determines how warm the house will be
Finishing work begins inside the wooden house after the frame has settled after the second caulking. To determine whether the process is completed or not, the height of the walls is periodically measured. If there are no significant changes within two to three months, we can assume that the main processes have passed. It's time to start decorating the inside and outside of the house.
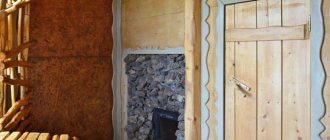
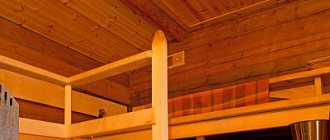
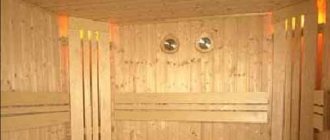
Why do you need plasterboard walls in a log bathhouse?
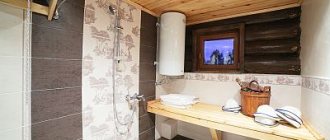
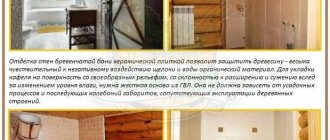
The answer to this question can be simple - for covering the walls in a washing bath with ceramic tiles or other waterproof material. After all, having log walls, it is quite problematic to decorate them with any decorative material. If you cover them with plasterboard sheets, then this problem is easily solved, since you will get a smooth and reliable base when finishing with moisture-resistant materials. True, provided that everything is done correctly.
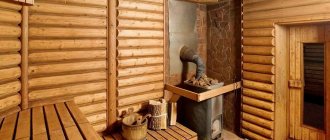
It makes no sense to decorate other bath rooms with plasterboard - if desired, they can be lined with clapboard, and the bathhouse will take on a completely modern look. Another thing is the washing room. High humidity and excess water can negatively affect the durability of wooden walls.
Therefore, when starting to build a bathhouse with your own hands, it would be a good idea to think about covering them with plasterboard and then covering them with ceramic tiles.
up
Reinforcement and puttying
A wall or partition covered with plasterboard is not yet ready for finishing: the heads of the screws and the seams between the sheets must be hidden with putty. In addition, the seams and outer corners of the walls need reinforcement and reinforcement.
To reinforce the seams, serpyanka is traditionally used - a self-adhesive fiberglass mesh with a cell size of about 2 millimeters. It is glued along the seam, after which it is filled with putty directly through the mesh cells. You have to putty at least twice: gypsum putty gives a small but quite noticeable shrinkage when drying.
Reinforcement of the seam between sheets with sickle tape.
External corners are reinforced:
- Galvanized perforated corner profile;
- Plastic profile with mesh.
The corner is sunk into the putty applied to the corner, after which it is covered with another layer of it.
The corner profile will be completely closed when the wall is puttied.
The photo shows a corner of the partition protected by a decorative plastic corner.
What putty should I use to level the surface?
The most common gypsum putties in Russia produced by the German company Knauf are HP Finish and Fugen. However, I liked the cheaper and less common ABS Saten much more: the mixture lives noticeably longer (at least 45 minutes versus 25-30 for Knauf products), if necessary, can be diluted with water (which increases its life time to an hour or more) and does not lumps during mixing.
Finishing gypsum putty ABS Saten.
How to prepare putty correctly?
- Water at the rate of 1 liter per 1.6 kg of dry gypsum mixture is poured into a wide bowl (I use a plastic paint bucket);
- The mixture is poured into water, distributed as evenly as possible over its surface;
- After 3-5 minutes, the swollen putty is mixed - manually (with a spatula) or with a mixer attachment for a drill.
How and with what to properly putty seams, corners and screw heads?
- The caps are covered with two movements of a spatula 10-12 cm wide, crosswise. The first sliding movement fills the recess with putty, the second (“scraping”) removes its excess;
- The seams are also filled with cross-shaped movements of the same spatula. In this case, the seam is filled with putty as tightly as possible. Cavities in it increase the likelihood of cracks. In the second pass, the seam, together with the serpyanka reinforcing it, is covered with longitudinal movements of a spatula 30 - 35 cm wide;
Puttying with a second pass should completely hide the texture of the reinforcing material.
- To align external and internal corners, it is better to use special corner spatulas.
After filling the seams and masking the heads of the gypsum board fasteners, they are often puttied over the entire area. A layer of putty about a millimeter thick completely masks the seams and does not allow the base to show through the paint.
The next stage is sanding. GKL is sanded with grids No. 80 in the first pass and No. 120 - 160 in the second pass. It is better to sand in bright, oblique lighting, which will highlight the slightest irregularities due to the shadows they cast. I use an inexpensive oscillating sander for sanding.
Vibrating sander with attached sanding mesh.
The smooth surface of the gypsum board is dust-free (I clean it of dust with a regular broom) and primed with penetrating acrylic primer. The primer will stick the remaining dust and improve the adhesion between the surface of the drywall and the final coating - paint or wallpaper.
Deep penetration acrylic primer from Ceresit.
Wallpaper can be glued immediately after the soil has dried, but painting will have to wait at least two weeks after puttying. If you hurry, the seams will show through any number of layers of paint due to the moisture that has not completely evaporated.