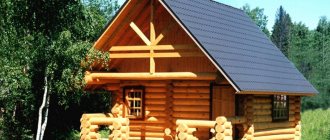
of budget is very interesting and in demand , because you still want to do it well and efficiently, even if you don’t have much money. Let's try to explore the possibilities of this approach. One of the simplest and most affordable options is a bathhouse made of boards on a frame with insulation, lined inside with clapboard or other boards. And there are three ways to connect the boards together. All of them are discussed below.
Readers interested in the topic of high-budget construction and improvement should pay attention to bathhouses made of kelo and cedar, as well as impregnated wood and wood species such as abash.
Unedged board
First, briefly about the lumber itself. A log of a sawn tree is average between a cone and a cylinder, if you do not take into account the curvature of some trunks, which is close to a circle in cross section. If you start laying it on boards, then at the top and bottom there will be a hump, which is called “croaker”, and then there will be boards, the edges of which are uneven, covered with bark, and one plane of the board is wider than the other.
The bark is called “wane”, and the board that has only passed through a sawmill is called “unedged, unplaned” . Since it is not planed, there is a lot of “lint” on it - wooden fibers raised by the saw.
The biggest problem is humidity. They cut boards from logs and natural moisture. And such a damp board needs to be dried for, say, six months.
In most cases, they sell boards with a moisture content of 22-30%. And for construction, the optimal humidity is 12%. However, the tree will eventually come to it over time, deforming along the way, though. Therefore, it is better to dry it completely . The video shows how to do this:
Sometimes a decision is made to work with a wet board. Some craftsmen rely on the fact that the fixed wood is less deformed. We believe that there are many factors, it happens that raw wood warps a little when drying, and it also happens that any fastener breaks off - this is how it becomes deformed. Therefore, it is better to work with dry ones.
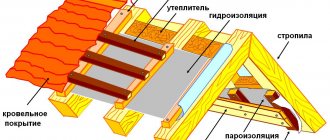
Construction of the truss structure
The main conditions for the comfort of any bath are:
- Walls, floor and ceiling well protected from heat loss.
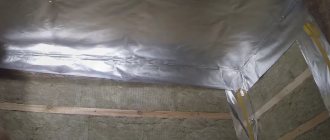
- Reliable insulation of structures from water and steam.
- Compact, quick heating oven.
- Effective sewerage and ventilation.
Typically, boards with a section of 15x5 centimeters are used for floor beams and rafters in frame baths. They are placed on the edge and fastened together. As a result, a distance of 10x12 centimeters is obtained between the rafters. In a vertical position they are fixed with “kerchiefs”, and on top they are combined with a ridge beam of a similar section.
The beams extend outward approximately 40 centimeters. The sheathing is made from boards 25 cm thick, it is laid in the direction from the ridge.
To fasten the rafter forms, special metal plates are used. It is much easier to assemble such a structure on the ground next to the building, and then lift it up and install it there ready-made.
Bathhouse made from unedged boards: how to prepare the material
A little was said about drying above. But besides this, cheapness results in additional work for the buyer - before using it, the board must be cleared of bark, planed , and then sanded. If desired, also give the edge a wavy shape.
All this requires tools. If there are no special means - manual, if there are - electric. But the purchase of the latter is cost-effective only for permanent, and not one-time work with wood.
Tools
To remove wane
There are many ways to remove bark/wane, each of which seems easy and effective to different people.
An old-fashioned method that is still relevant today is to use a stapler. You can buy this device or make it yourself.
You can use a lawn mower if you have one. There are actually many ways, people try to use what they have at hand. An electric planer can also be useful, but if the task is only to remove the bark and not plan the tree, then depressions and curvature will become a problem for this tool.
You can use an angle grinder with a brush disk or a corroder disk, or an AlphaDisk. There are different types of angle grinders, there are reports that the machine at 9500 rpm did an excellent job, but the brush quickly broke down, and during the work it raised such dust that it was necessary to rely solely on hearing - the sound of the processed bark and wood is different.
The task is simplified by steaming the boards - impregnating them with fire-bioprotection (for example) and wrapping them in polyethylene for a day and a half. After this, the bark can be removed much easier, but it needs to be dried, and this board cannot be used everywhere in the bathhouse (it cannot be used in the steam room). For exterior decoration - just right.
Walling
If we are building a frame bathhouse, after the foundation is prepared, we can begin building the walls. Before doing this, make sure that the wood is well dried. The type of wood used is not particularly important, with the exception of birch, since it will quickly rot. The main thing is that the wood has low thermal conductivity.
When choosing materials for external cladding, preference should be given to pine and larch, while aspen is best suited for interior finishing. After completion of construction, the outside of the building is covered with an antiseptic, for example, Texturol. It is necessary to monitor the quality of the work performed so that repairs to the bathhouse are not required too early.
External cladding
We have an article in which we talk about how to build a bathhouse entirely from boards. It mentions this method of external finishing, in which a cleaned and treated board is taken and attached to the frame of the future bathhouse.
In this case, of course, no tongue-and-groove joints are assumed, and in order to prevent cracks from forming and water not flowing into the joint, the boards are mounted overlapping, the first is attached from below, the second above it, overlapping the first. This connection is also called “herringbone”. It is quite suitable for external cladding.
There is a video on the Internet, the author of which talks in detail about his experience of building a bathhouse from a board, and he used wet
lumber because there was no time for drying. The result was not catastrophic. See his methods for yourself (he talks about fastening somewhere in the middle of the video):
Suitable wood species for exterior decoration
Yes, in principle, anything can be used outside if it is thoroughly treated with an antiseptic and impregnated with something water-repellent.
Conifers in the sun, of course, will ooze resin, but this is the inevitability of conifers. Before the invention of antiseptics, these species were preferred because the resin is a natural antiseptic and protects the wood. Now this advantage is equalized with deciduous ones using chemistry.
Deciduous outside, you can also use any that you find or consider necessary.
In addition, the outside of the bathhouse can be painted in any color, or covered with transparent varnishes or azures with any color. So the color of the original wood, and even its texture, may fade into the background.
Construction of a columnar foundation
This type of foundation for a frame bath is made in the presence of high groundwater. They build a columnar version of the foundation without the involvement of special equipment and a team of workers (for more details: “How to make a columnar foundation for a bathhouse - types of construction options”). You need to have a drill, plastic or asbestos pipes at your disposal and be able to mix cement mortar.
If you are building a frame bathhouse with your own hands, step-by-step instructions for arranging a columnar foundation look like this:
- Level the land.
- Mark the locations for installing the pillars.
- Holes are drilled and waterproofing is placed at the bottom.
- Gradually pour the concrete solution and raise the pipe, which is fixed at the 20-30 centimeter mark. When the concrete hardens, it is reinforced.
- If the base is ready, the pipe is filled with solution to the end.
- Using a strong beam, a grillage is formed.
The most reliable design is considered to be a lower frame made of high-quality timber, having, for example, a cross-section of 10x10 centimeters. It is connected at the quarter corners and securely fastened with nails.
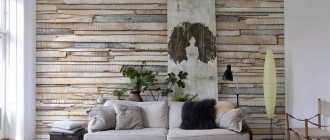
Interior decoration
But this method of finishing is positioned not as cheap, but as ethnic. Do you want a Russian-style bathhouse? Finish the bath with unedged boards.
Suitable wood species
In the bathhouse, some rooms are cold, others are warm, others are hot, plus the humidity in some is high.
So, in cold and warm (dressing room, rest room) you can use any wood you like.
In the washing room, where there is the most water, it is better not to use wood at all, but to make tiles, for example. But if there is a desire, then even there you can finish the surfaces with wood, and coniferous is desirable, because it is less afraid of water.
In the steam room , exclusively deciduous species are recommended, of which everyone knows linden, aspen and alder. Linden is also the most common type of wood for making windows and doors for bathhouses.
Wall decoration
There are two options for wall cladding of a bathhouse with unedged boards.
If you don’t particularly want to bother with a jigsaw and adjust the edges of the boards to each other, then you can use the two-layer cladding method.
The first layer can generally be laid from minimally processed boards . Because the second one will still close it to the maximum.
So, you mount the boards on the sheathing vertically or horizontally - it all depends on your preferences. You can fasten it with ordinary self-tapping screws, they will not be visible. The presence of cracks is not critical - everything will close.
Strip foundation
Such a foundation is installed when there is heaving soil on the plot.
The work on its construction is carried out step by step:
- Markings are made on the site and a trench is dug, the width of which is 40 centimeters and the depth is approximately 50 centimeters.
- The hole is filled with sand layer by layer until the ground level is reached, compacted each time and watered with water to ensure compact shrinkage.
- They construct formwork 50 centimeters high and 30 centimeters wide. For greater strength, it is reinforced using rods and metal pipes.
- Pour the concrete solution in several approaches (without allowing the previous layer to dry) or at a time.
- Roofing felt is laid on top of the concrete to waterproof the frame walls.
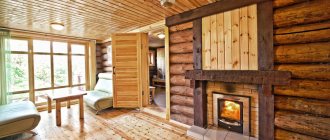
Interior decoration of the bathhouse with boards
The cladding process consists of several steps and does not take much time. First, it is necessary to carry out preparatory work, then install a wooden frame, lay insulating materials, and then install finishing boards. Finally, the surface of the boards is coated with a protective varnish.
Preparing to plank a bathhouse
Carefully inspect the surface of the walls. If you find large differences (more than 2 mm per 1 m), you will have to level it with putty or plaster. Then treat the walls and ceiling with a special antibacterial agent.
Next comes the stage of laying communications - electrics, water supply and everything that needs to be hidden behind the board panels. Only after this work has been completed can you begin to purchase boards, fasteners, wooden blocks, metal hangers, as well as steam and heat insulation materials. Take all metal parts from galvanized iron, otherwise rust and stains will appear on the walls over time.
After purchasing the boards, bring them inside the bathhouse and leave them there for two days - they should get used to the climate of the room. If you purchased unedged boards, you will have to work with them a little before covering. Finishing a bathhouse with an unedged board requires preliminary cleaning of the bark, which can be done using an electric planer, and requires high-quality sanding of the material. Use 80 grit sandpaper first, then 120 grit.
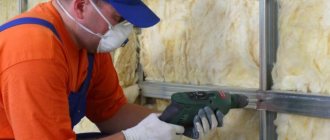
Creating a frame for attaching boards in a bathhouse
To construct the sheathing, use wooden blocks. Before installation, treat them with antibacterial agent. Select the section individually, based on the thickness of the insulation. Cut the bars into lengths of 100 cm and 50 cm.
Place metal hangers in rows at intervals of 30-40 cm. Pay attention to the distance between the rows - it should be 40-50 cm. Mark places on the walls for mounting metal hangers. Drill holes, drive in dowels and secure the hangers.
Attach frame bars to the hangers. Start the first row with a long bar, the second with a short one. The sheathing must be level and in the same plane, so check each row with a vertical level. If you find large differences, place a spacer under the bars.
Attach the bars of the same row not too far from each other. This will allow air to circulate between the rows. Around windows and doors, secure the bars vertically along the perimeter of the slopes at a distance of 30 mm from the edge.
Creating a wooden base
Self-construction of a small frame bathhouse, as a rule, does not require the construction of a foundation due to its lightness. But to prevent the walls from becoming damp, you need to make a foundation.
In the case where you plan to build a bathhouse no larger than 3x4 meters in size, and the walls and roof are light, then it is enough to create a simple wooden foundation, which is secured along the edges with stakes. Such a foundation is considered a particularly good solution when carrying out construction on clayey, seasonally mobile soils that do not have excessive levels of moisture.
Necessary materials with current prices
| Material | Price (per cubic meter) |
| Concrete | from 2000 rubles |
| Profiled timber | from 11,000 rubles |
| Lining | from 200 rubles |
| Board | from 190 rubles |
| Vapor barrier | from 400 rubles |
| Mineral wool | from 200 rubles |
| Metal tiles | from 300 rubles |
Alder
Alder has a valuable quality - it has low thermal conductivity. This allows you to avoid burns in the bath from contact with the heated shaft. Alder boards and cladding have a pleasant smell and a reddish tint. Moreover, over time, these qualities take on even more pronounced forms.
For a steam room, finishing with alder suits all parameters. It does not shrink, does not release resin drops and successfully withstands regular exposure to hot steam.
Among the disadvantages, the difficulty of mechanical processing of alder is noted. This material is inelastic, although quite soft. Considering the fact that there is practically no perfectly smooth alder cladding on the market, covering a steam room with this high-quality material can be difficult. In addition, alder is not the cheapest tree.
Finishing the bathroom with alder
The main advantage of linden boards and coverings is their ability to have a beneficial effect on the respiratory system. The reason for this is the high concentration of active substances in wood. Linden is easy to work with. The resulting coating does not crack or twist when used in the bathroom. Even with the softness of the wood, alder can last for many years.
The surface of freshly cut linden has a soft texture and a pleasant pink color. At the same time, there are no knots or resinous drains on it.
Among the shortcomings, dirt is noted, which manifests itself in the form of stains on the surface. However, sanding easily eliminates this problem, returning the original color.
Finishing the bathroom with linden
Pediment functions
The pediment is the part of the facade of the house enclosed between the roof slopes. It has a triangular, pentagonal or trapezoidal shape and is made of a material that matches or differs from the material of the main wall. In addition to its aesthetic function, the roof gable performs the following tasks:
- Protects from wind. The gable structure is exposed to wind loads, so it must be strong enough.
- Supports roof slopes. Reliable gables are an additional measure of support for slopes, which is especially important for roofs made of heavy roofing materials, for example, slate or tiles.
- Keep warm. The pediment is a protective barrier between the warm spaces of the attic and the cold atmospheric air. Therefore, the thicker the lining, the fewer cracks in it, the warmer the house.
- Protection from atmospheric precipitation. The wall between the slopes should be sewn up to protect the finishing of the under-roof room from moisture.
- Improves the appearance of the facade. The facade of the house will look beautiful if the pediment is covered with siding, clapboard or other decorative materials.
We invite you to familiarize yourself with Finishing the walls of the attic floor
Note! When it comes to choosing sheathing, experienced builders offer two options: sheathe the roof gable with a material similar in color and structure to the main wall trim, or highlight this area using a contrasting shade. High-quality lining masks small flaws in the masonry, unevenness or unsightly appearance of the wall.
Sheathing with horizontal boards
This type of installation is more common in Russia, but is usually limited to the use of imitation timber, although there may be many options.
If the board is attached with an overlap, then only one nail is used for fixation into the lath through the bottom of the board to ensure reliable operation of the facade in all weather conditions and minimize the risk of cracks. The overlap must be at least 20mm.
With this installation scheme, ventilation of the facade is ensured not only vertically, but also horizontally, this improves the working conditions of the facade and reduces the impact of natural factors.
READ How to put a sandwich pipe in a bathhouse
To ensure the safety of the wooden facade, it is necessary to ensure high-quality priming of the boards and sheathing bars themselves. You need to prime the entire surface, both internal and external, as well as the grooves if it is imitation timber.
For this reason, priming should be carried out before installation, preferably by immersion in a suitable solution. If the primer is applied with a brush, then this procedure must be carried out at least 2-3 times. Finns usually practice covering painting, i.e.
the board is completely covered with paint, hiding the texture of the wood, this ensures greater wear resistance of the facade to natural factors.
For the article, material from frame house designer Vladislav Vorotyntsev was used @
First option
A very common type of facade in Scandinavian countries. Made from boards 120-170mm. minimum thickness 20mm. As the width of the board increases, its deformation can be very significant; for this reason, for widths greater than 150mm, a board with a thickness of 22mm is used.
In this case, the flashing does not have to be the same size as the outer cladding board; it can be either narrower or wider. It is necessary to attach the flashing to the sheathing bar, bypassing the outer sheathing board. This will avoid cracks on the facade when the geometry of the boards changes depending on humidity and weather conditions.
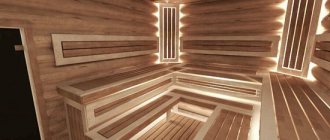
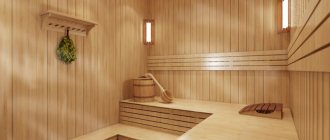
Steam room and sink
Facing
Luxurious wood species are mainly used to decorate the steam room and sink: linden, cedar and abash. They are distinguished by a delightful aroma, mesmerizing beauty, and incredible benefits for the body and soul. In addition, these tree species have amazing technical characteristics.
Therefore, they resist the destructive effects of climatic, biological, thermal, mechanical, and chemical factors. In addition, wood is easy to handle and maintain. Ideal for finishing and flooring, walls and ceilings. In addition, stingrays are good for making accessories and furniture for steam rooms and showers.
Decor
Of course, furniture must be selected in accordance with one style direction or another. But since the bathrooms are made primarily in the Russian style, we will look at accessories that will perfectly highlight the features of the direction.
The following accessories are appropriate in a Turkish bath of the “Russian spirit” style:
- fragrant juniper;
- spacious steamers;
- comfortable footrests;
- original thermometers and hygrometers;
- laconic headrests;
- aromatic herbal infusions.
The following decor is appropriate in the shower:
- exclusive buckets, buckets, buckets, cascade buckets;
- extravagant slippers and flip-flops;
- patterned hats and towels;
- save essential oils.
A piece of fantasy and a piece of desire will give the bathroom amazing reasons!
Furniture (sanitary equipment)
The steam room and shower room are rooms that do not require a variety of certain interior items. For example, in a steam room only shelves are appropriate, but in a laundry room there is a shower, benches or chairs, a massage (relaxation) bed, and a huge barrel. And, of course, this setting is in perfect harmony with the above-mentioned accessories.
A competent combination of upholstery material, furniture and decor is the key to an exclusive bathroom design! Want to take a photo from a Turkish bath? Fashionable “clothes” for the bathroom will help you with this!
Sauna roof
What is a frame building without a roof? The final stage of construction work is the construction of the roof. Most often it has a gable shape. It is assembled on the ground from 150x50 mm boards and rises to the top one by one. The front parts are installed first, then the intermediate rafters. The pitch is calculated according to the size of the building and usually does not exceed 1000-1200 mm. All fastening occurs with nails and self-tapping screws. For additional reinforcement, crossbars are used.
The assembly ends with the installation of sheathing, insulation, roofing and drainage.
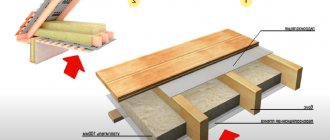
Floor base
Logs for a dense floor begin to be laid from the walls with a slope towards the sump to collect water. The logs near the wall are the highest. In the remaining logs, make cuts with a bevel of 2-3 mm. This will make the floor slope about 10 degrees, which will ensure good drainage of water.
For loose floors, a joist slope is not provided, and they can be laid from any wall.
Stelem boards
First create the "sub" floor. According to their design, 50x50 mm bars are fixed from below along the edges of the trunk. A “subfloor” is laid on them - any illicit or unedged board. The subfloor is covered with roofing felt or a special waterproofing film. Then the floor is insulated with a layer of expanded clay or mineral wool.
After this, they begin laying the clean floor. Use grooved boards. Sometimes the nails in the steam room and washboard are not secured so that they can be removed for drying. The grooves of the boards are located inside the tank; when adjusting, this will allow you to hit the end with a hammer, which, unlike a tongue and groove, is thicker and will not break.