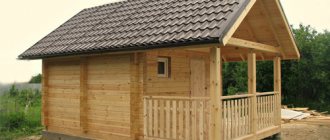
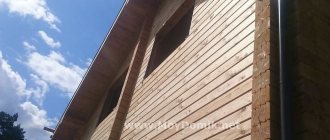
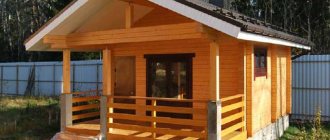
There are many people who want to build a permanent residence from massive rounded timber on their own country plot. Such construction projects require significant capital investments, which many private developers do not have the financial capabilities to afford. But thanks to modern construction technologies, such a dream can be realized at a lower cost, for example, by imitation timber used for exterior finishing of the facade of a frame house.
Wooden panels imitating natural wood, made in a factory, are several times cheaper. Moreover, they can be used not only for the exterior cladding of buildings, but also to create the interior interior of a house.
What is imitation timber and what are the advantages?
Imitation of timber is a technique for finishing buildings outside and inside. The material used in it is called false timber, or timber simulator. These are facing panels made of natural wood, a type of lining.
The material is used for cladding walls inside and outside the building, as well as for decorating the ceiling. Panels are also used in frame construction.
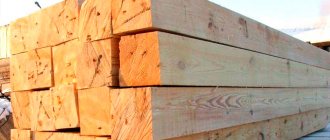
False beam
The material differs from eurolining:
- lack of recess on the front side (the so-called shelf);
- large width and thickness;
- maximum resemblance to a wall made of timber, which is why it received its name.
Eurolining
Prices for various types of lining
Lining
Facing with false timber has many advantages:
- after finishing, the building looks as if it was made of natural wood, and even a specialist will distinguish the imitation from the original only upon close examination;
- during interior decoration, it hides uneven walls, allows you to hide wiring and other communications;
- protects the walls of old buildings from atmospheric influences;
- has heat-saving and noise-reducing properties;
- creates a comfortable microclimate because it is made from natural materials;
- It is simply mounted on the walls, so its installation does not require special knowledge.
Wood must be well impregnated with insecticides to protect it from pests
Thanks to these properties, false beams are often used for cladding old houses. In this case, the original material of the walls does not matter. These can be foam, gas, cinder blocks, bricks and even rounded logs that need restoration.
But imitation timber also has disadvantages that should also not be overlooked. It is necessary that the material is well impregnated with antiseptics and insecticides. Otherwise, moisture will quickly destroy it, and insect pests can spoil the lining. Treatment should be carried out regularly when the previous layer expires. Detailed data on the validity period of the composition are indicated in the instructions for the drug. Fire protection will also be required, since natural wood burns well.
Important nuances
In order to qualitatively sheathe a house with imitation timber, you need to take into account a number of features when choosing and installing the material:
- pay attention to the quality of wood when purchasing it;
- when choosing imitation timber, it is necessary to take into account the type of premises - external or internal decoration, grade and species of wood for certain purposes;
- strictly follow all technology and stages of panel installation;
- in rooms with high humidity it is better to use metal profiles as lathing;
- when laying false beams on the wall, it is better and easier to install, starting from the floor and moving upwards;
- strictly follow the rules for placing the panel “lock” - groove up, tenon down;
- Be sure to treat the material with antiseptics and protective compounds.
Form of false beam
Unlike a convex blockhouse, with which false beams are often compared, it has a flat surface. Chamfers are cut along the edges at an angle of 45°. After connecting adjacent planks, barely noticeable seams remain, but not the same as with eurolining. Rather, they resemble “calm” lining.
Block house on the cut
From the back side, 1 to 3 ventilation ducts are cut out, which run along the entire length of the beam.
Reference. Previously, domestic enterprises produced wooden cladding without these grooves. This led to the fact that over time the timber became severely deformed due to temperature fluctuations, swelled, and cracks formed in the wood. The wood was susceptible to rotting due to excessive exposure to moisture.
The false block has the same lock as other types of lining
The edges of the lamellas have a spike on one side and a groove on the other. These are the connecting elements of the timber. The tongue-and-groove lock solves several problems at once:
- makes the cladding windproof;
- increases sound insulation properties;
- strengthens the skin.
Prices for various types of false beams
False beam
Interior decoration
Depending on the nature and method of design, imitation timber finishing inside the house can be of two types:
- combined;
- monolithic.
Combined
This option combines finishing the interior of the house using several types of materials. In this case, the main area is occupied by imitation timber. The rest of the space can be decorated with plaster, tiles, stone, wallpaper.
For the combined option, several types of materials are used Source indizajn.ru
Monolithic
Wooden blocks with this type of design are used in all areas, even on the ceiling. The name of this type of finishing speaks for itself - the wooden panels must be joined closely to each other.
Wooden panels must be joined closely Source 47dom.ru
Advice! For interior wood work, you may prefer shorter siding pieces with less thickness. This will save money if the number of joints does not play a fundamental role.
How to choose false timber?
When choosing false beams, pay attention to the following characteristics:
- size;
- type of wood;
- variety.
Raised beams are classified according to grades, sizes, wood species
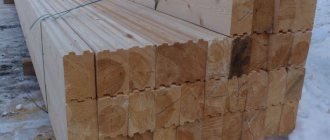
Dimensions
The timber is produced in different sizes, which allows you to choose the most suitable option for your purposes:
- length - 2.5–6 m;
- width - 1.10–18.5 cm;
- thickness - 1.6–3.5 cm.
For exterior finishing, wider boards are used.
Block house prices
Block house
Which tree species are better?
False beams are made from different types of trees.
The timber is produced in different sizes
Conifers
This is one of the most popular tree species in home decoration. The most accessible products are made from pine. Spruce is also used, but the tree is quite knotty, which is a disadvantage, although it is more resistant to moisture. The advantage of the latter is its uniform color. Therefore, on spliced beams, the seams are hardly noticeable. Pine, unlike spruce, turns yellow over time.
However, Angara pine is already a premium type of wood. It has a high density and almost no knots. The same can be said about Altai cedar. The timber made from it has a beautiful pattern. But a much more significant plus is strength and weather resistance.
Photo 9. False timber made of pine
Larch remains the leader in wear resistance and consumer characteristics. It is especially often used for external cladding. After all, its resin contains natural antiseptic substances. Because of them, the wood is not susceptible to rotting.
Hardwood
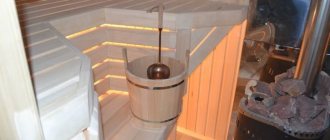
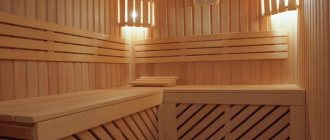
Linden, oak - a couple of trees from which false beams are most often made. However, their uses are different. Linden is most often used to decorate saunas and baths, since it does not have the necessary strength. In addition, when exposed to sunlight, it acquires a yellowish tint.
Oak has the best performance characteristics. In terms of hardness, it is second only to ebony. In addition, it is resistant to all atmospheric influences.
Aspen is used to imitate timber, but quite rarely. Its core is susceptible to rotting. Therefore, they only make thin lining out of it. It is used for covering steam rooms.
Linden and aspen are often used for baths and saunas
An analogue of false beams is a block house - an imitation of rounded logs.
When choosing false timber, you need to consider where exactly it will be used. Larch and cedar are not suitable for bedrooms and children's rooms. They give off a rather pungent odor. This can cause headaches and worsen asthma. In summer cottages you can use inexpensive pine and spruce. Panels made from these materials are also suitable for the bedroom. In the living room it is better to use oak and cedar.
The lighting of the room also matters. If the lighting is dim, then light types of wood are suitable - pine, linden. For southern rooms choose darker oak and alder.
Variety
Table 1. Types of false beams
| Variety | Characteristics |
| Extra | Smooth surface, no growth, rot, or wormholes. Knots are only embryos, no more than one per linear. m. End cracks of 30x0.5 mm, tar cracks of up to 20x3 mm, as well as wane and non-string, which are not visible during assembly, are allowed. |
| A | There are no falling knots, no signs of rotting or damage to the wood by insects. Healthy knots - no more than 35 mm. There may be growth, tar marks, cracks at the end, chips on the ridge and bottom of the groove, blue, but not more than 10% of the surface and 10% of the batch. It may be difficult on the reverse side |
| B | There should be no rot, dead knots up to 10 mm. No more than 3 wormholes per panel (no more than 5% in the party). Porosity, tar patches, and wane hidden after installation are not considered critical. Blueness and fading (up to 10% coverage), as well as poor color underneath, are not considered defective. |
| C | There may not only be dead knots, but also holes. Longitudinal cracks up to 30x3 mm are acceptable. Boards with wormholes, sprouts, resin pockets, and rot, which do not affect the hardness of the board, are not rejected. The category does not exclude planing defects in any part and invisible wane. Used only under opaque coatings. |
Reference. Extra grade products are extremely rare on the market. Usually sellers pass off grade A as extra.
AB category products
Masters identify another intermediate class - AB, although they do not set standards for this category. Boards of this class are opened with varnish, wax, and paint.
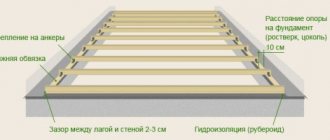
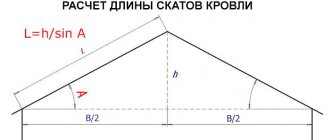
Distance between support system parts
Before starting all the work, I drew up a drawing with the location of the sheathing elements. He simplified the calculation of the required step through which they were recorded. When determining it, the thickness of the false beam was also taken into account. For me it was 16 mm. Thicker strips could be purchased.
Source remontnik.ru
Using relatively thin slats allowed me to increase the stride. If they were thicker, then the distance between the frame elements would have to be reduced. The pitch between the bars of the supporting system was chosen taking into account the size of the mineral wool slabs, since this heat insulator was used to insulate the house. Thermal insulation material 1000*500 mm was laid between the racks and girders of the frame.
How to install imitation timber on the facade of a building
Installation of false beams is carried out in several stages.
Video - How to install imitation timber
Preparing the base
Regardless of what material is used for the construction of the building, the foundation is prepared according to the same scheme:
- Remove the remaining solution from the working surface and clean it from dust.
- Make a waterproofing layer. The materials used must match the building material of the wall. For brick and concrete, coatings or impregnations are used, for wood - films. The canvases are secured from below. When changing the canvas, make an overlap of at least 15 cm wide. Glue the individual canvases with tape.
Walls are protected with waterproofing agents
The preparatory process is now complete. If coating and impregnating materials are used at this stage, the work will have to be postponed for some time. This is necessary for the solutions to act or set. The exact drying time and penetration into the building material are indicated in the manufacturer's instructions.
Lathing
This is the frame to which the false beam will be attached. The lathing consists of individual bars with a side of at least 5 cm. It is recommended to select lumber depending on the thickness of the heat insulator.
If the wall is originally brick or concrete, frame dowels will be required for fastening; for a wood base, nails and screws will be required. Craftsmen do not recommend using fasteners with plastic dowels.
On a flat wall, the sheathing beams are attached closely to it. If there are irregularities and gaps form, the voids are filled with linings.
Attention! Linings should be made of synthetic materials, not wood. This material tends to dry out. There is a possibility that during the operation of the finish, a backlash will form and its quality will decrease.
Next, perform the work in the following sequence:
- The guide bars are positioned and secured in the corners, strictly observing the vertical, for which a level is used.
- Stretch the cord from one corner to another and secure it to the corner bars.
- The remaining beams are fastened and maintained at a distance of 50-80 cm, which depends on the width of the sheet of heat-insulating material.
- Lay thermal insulation.
- A moisture-proof film is laid over the sheathing.
Often slats up to 3 cm thick are attached to the sheathing. This is necessary so that an air gap is formed between the heat-insulating layer and the false beam. This measure enhances ventilation and extends the life of the wood finish.
Fastening false beams
Before installation, the wood for cladding is removed from the packaging. They do not take the material to work immediately, but wait several days. This way the timber will absorb moisture from the air, so no distortions will form after installation.
Different types of fasteners and methods of their use
Install the panels from bottom to top. One of the fasteners is used:
- Using a self-tapping screw, the board is attached to the sheathing through the ridge. Sometimes the screw goes directly through the board. Then it is inserted so that the head is flush with the face of the beam. The recess is then hidden with putty or wooden plugs, sawdust and varnish.
- A galvanized nail is driven into the ridge. When installing vertically, it is also passed through the groove, hammering in at an angle of about 45° until the head is hidden.
- Claymer is a reliable and convenient fastening clip consisting of a bracket. One end is located on the sheathing, the other holds the panel by the groove. The gluers themselves are nailed to the base with galvanized nails.
The false beams are fastened in the following order:
- Place the starting board with the ridge up using a horizontal level and attach it using the selected fasteners. The tenon cannot be directed upwards - this will cause water to collect in the groove. This causes cracks to appear on the board, mold to form, and the wood to rot.
- Place the tongue of the second board in the groove of the first. Using a hammer, plant the second board, but not closely, but with a gap of 5 mm. This distance is necessary to avoid deformation of the elements due to temperature fluctuations.
- Repeat steps 1, 2 until you reach the top.
After installing all panels, the surface is coated with the selected product.
Attention! In the corners of the beams, cuts are made at an angle of 45° for an aesthetic connection of parts. Decorative strips can also be applied. They not only hide the joints, but are also a decorative detail in the cladding.
Installation of imitation timber indoors
The installation of timber indoors is almost the same as on the façade of a building. If the panels are laid vertically, then work begins from window to door. Interior panels are too thin. Therefore, the fastening method, in which a self-tapping screw is screwed into the tenon at an angle of 45°, is considered too rough. For such work it is recommended to use furniture nails.
Pros and cons of imitation timber
Perhaps the most difficult thing is installing panels on the ceiling. Since a large load on the hands is created, for such work it is recommended to take materials with the smallest width. In addition, too wide a beam will visually reduce the ceiling area. The length is chosen so that there are fewer joints.
In stone buildings, the insulation is placed on a vapor barrier material. This material should not be used in wooden houses, as this will only provoke the formation of excess moisture and lead to rotting of the wood.
Decorative overlay for the corner of the building
The procedure for installing timber to the ceiling
Some houses already have wooden beams on the ceiling. In this case, there is no need to do the lathing. It is enough to use a vapor barrier layer.
But sheathing will still be required if the beams have an uneven surface. In other cases, first base bars 2-3 cm thick are nailed to the ceiling. Next, communications must be protected if they pass along the ceiling. Then the ceiling is insulated if there is a need. Next, work is carried out as when installing external finishing. The beam is mounted from the window.
False beam on the ceiling
Installation methods
When covering walls, both internal and facade, you can choose horizontal or vertical methods for installing imitation timber.
Horizontally
When installing the imitation timber horizontally, place the starting board with the ridge up, then the next parts of the “lock” should be at the bottom during assembly so that no water gets into the groove.
Vertical
When vertically finishing cottages, private houses or summer cottages with imitation timber, the installation of the first board begins from the side edge of the windows to the door. The material sheathed in a vertical direction creates a smooth, ideal surface and visually expands the space in small rooms.
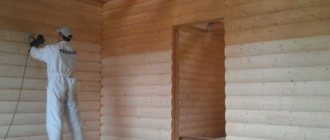
Raised beam protection
Before installation, the material is treated with protective compounds. Insecticides are used for this. These preparations protect wood from the most dangerous pests - bark beetles, bark beetles, longhorned beetles, etc. Treatment against mold, mildew, and fire retardants is necessary. The sequence in which treatment must be carried out is indicated in the instructions for the preparations.
Transparent coatings
To protect wood from moisture and other harmful effects, opaque coatings are used - for example, wax-based oils, varnishes.
Oil-wax has some advantages over varnishes:
- the product does not emit toxic substances;
- can even be used in a children's room;
- allows the tree to breathe;
- does not spoil the structure of the tree;
- penetrates deep between the fibers and protects the boards from the inside;
- Contains no aggressive solvents.
This coating can be tinted and give the wood a darker shade.
Working with wax is easy and safe
As for varnishes, any are suitable for street work. For internal ones, it is better to choose water-based products. Its heat resistance will not be superfluous, especially with increased risks of fire.
Video - Waxing wood
Reference. Some craftsmen recommend coating the wood before laying it. They say that when processing already assembled walls, unpainted areas may remain.
There is also a well-known homemade wax coating recipe. To prepare it you will need:
- beeswax - 9 parts;
- carnauba wax - 1 part;
- turpentine (gasoline can be used) - 90 parts.
The safest materials for painting timber are considered to be linseed oil, gum turpentine, and colophon resin, better known as rosin.
Rosin is a natural wood preservative
Prices for wood preservatives
Impregnation for wood
How to apply wax to timber
Work on applying wax is performed in the following order:
- Repair cracks and imperfections. If necessary, level the surface of the timber with a grinding machine or sandpaper.
- Wipe the surface, remove debris and dust.
- Wax-oil is applied with a brush. Excess is removed with a dry, lint-free cloth.
- Allow the composition to dry.
- Polish the surface with a piece of cotton cloth.
Opaque coatings
Opaque coatings are also suitable for painting. Such products provide protection, but at the same time they also hide the imperfections of the material. These include enamels, water-dispersion and acrylic paints. Before painting with such products, the wood is treated with a primer - for example, drying oil. This will reduce the consumption of paint and varnish products.
Imitation timber is an easy way to make your home attractive and extend its service life. With proper installation and subsequent proper care, the cladding will last for many years.
Care instructions after installation
In order for the finished cladding to serve for a long time, it requires care. For this, there are specialized tools that will protect the panels. Primers or wax are often used. After coating, the boards will need to be cleaned from dust from time to time; wet cleaning is allowed, but without abrasive compounds and detergents.
Additional protection and individual shade can be achieved with stain, paint or varnish. Due to the latter composition, the service life is significantly increased, but the coating must be renewed periodically. Stain helps improve the texture of the wood and adds shine. Imitation timber is an excellent option for decorating internal and external spaces, which will suit any interior and architectural style. To obtain a high-quality finish, you will need not only to provide periodic maintenance, but also to comply with installation work.
Preparing the boards
These lumber do not require additional processing and are supplied immediately ready for installation, but the wood must be given time to acclimatize; it must naturally acquire a moisture level close to operating conditions. To do this, leave the boards for about a week in the room where you will assemble the cladding, or outside, next to the cladding area.
Important! It is not necessary to completely remove the boards from the original packaging; you also do not need to remove the shrink film; you just need to open the packages and let air in. And don’t forget to protect the material from direct exposure to rain and moisture!