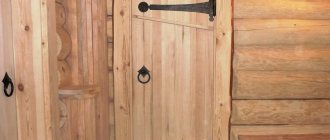
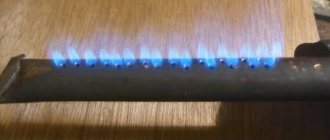
A carpenter's mark is a tool for marking parallel lines, straight or curved, on a wooden surface, along which logs are cut or construction forms are made. On one board, carefully remove the edge, then use it to apply a marking line on the next strip, which is leaned against the first.
The metal tip leaves a deep longitudinal mark along which further work is carried out.
Longitudinal groove: marking and cutting a longitudinal groove
The first principle of laying the logs of a log house is that the arrangement of the logs should correspond to the order - “butt to top”.
The natural structure of logs is such that they become thinner towards the top. In order for the walls of the future log house to be smooth, it is necessary to alternate the location of the logs, in other words, a log with a thin end should be followed by a log with a thick end. The second principle of laying logs is that the lower log is laid with the hump up, and the top log with the hump down. After marking and selecting a longitudinal groove, you will receive a parallel arrangement of logs relative to the longitudinal axes. All rows must be laid in exactly this sequence to ensure that the wall is as even as possible. To mark the corner bowls and the longitudinal groove, a special tool is used, which is called a “dash”. It is quite possible to make such a tool yourself using available materials. To do this, you will need to take a thick wire about 10 mm in diameter. Next, you need to bend it into a V shape, the length of each side should be about 10-15 cm.
The ends of the legs need to be sharpened so that they leave a mark on the wood, scratching it. The resulting tool can be attached to some kind of handle, for which you can use an ordinary stick or the handle of a hammer. To prevent the sides of the tool from moving apart in width, you need to install a wedge between them and wrap them with some kind of cord.
is engaged in the construction of houses from hand-cut logs professionally, and therefore our specialists use a professional carpenter’s “line” for marking. In Europe, the “line” is called a “scriber”.
You can see the image of the carpenter’s “line” in Fig. 1
A professional carpentry “trick” is quite expensive, this is due to its complex structure and equipment. Levels are built into the professional carpenter's line, which enable carpenters to maintain an even vertical position when applying markings. The entire construction of the log house depends on how correctly the “line” is worked. If you only plan to build one house, then you don’t have to buy a tool at a high cost; instead, you can use a level and an ordinary carpenter’s compass. Of course, such a work process will take more time, but if the construction time is not critical, then this is quite acceptable.
Preparatory stage
At the preparatory stage, a cutting technology is selected. Traditionally used:
- cutting “into the oblo” - a bowl is cut out in the lower log;
- cutting “into the hole” - a bowl is cut out in the top log.
Non-professionals who decide to assemble a log house with their own hands are recommended to choose the second option, in which the crowns are laid with the bowls down. Since the work will progress relatively slowly, there is a high risk that the log house will be exposed to rain before the finishing, final assembly is completed - if the bowls are cut out in the lower logs, moisture will get into them, which will cause the wood to rot.
Construction requires high-quality timber, preferably winter felling. For a beginner, it is easier to make a frame into a bowl from rounded wood - the geometric precision of the elements simplifies the marking of the bowls and the adjustment of the links.
How to use "trait" ("scriber")
To correctly apply the markings, the logs must be laid one on top of the other (not forgetting the “butt to top” rule), and then secured with staples. Taking into account the region in which the log house is being built, the width of the future groove is determined. A mark is placed at the end of the log; the distance from the bottom point of the log to this mark should correspond to the width of the longitudinal groove. Then one leg of the instrument is moved to this mark, and the second is moved back to the top of the hump. Thus, we prepared the “line” for work by setting the required interval between the legs of the tool.
Having fixed the legs of the “feature”, we place one leg at the height of our mark, and the other on the surface of the hump of another log, draw a line. Thus, the second leg of the tool creates a line that follows the line of the longitudinal groove of the first log. Subsequently, for convenience, the markings made can be additionally highlighted with a pencil. The marking must be applied on both sides of the logs without changing the “line” settings. This completes the marking of the longitudinal groove.
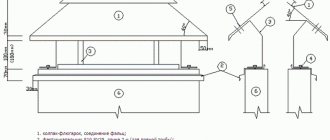
In Fig.2
You can see the layout of the longitudinal groove.
Now let's start creating a longitudinal groove. Having outlined the log, we can see the resulting groove; it has a rounded shape, repeating the run of the log.
The run-off of a log is a smooth change in the diameter of the log from the butt to the top.
Thus, all grooves will alternate the direction of inclination. This method can only be used when working with logs that have a slight slope or no slope at all, when the log has an almost cylindrical shape. Or this is applicable to working with logs that are calibrated and have approximately the same thickness at the point of cutting. In this case, the inclination of the grooves does not matter.
Logs of different thicknesses, on which there is a rung, need to be drawn to each other in a slightly different way. The lower log must be placed on special stands so that the hump is aligned as horizontally as possible, after which the log is fixed with brackets. The upper log is placed so that its butt is located towards the narrow part of the lower log. During the delineation process, it is necessary to maintain the vertical position of the legs of the “line”; only thanks to this can an even groove with a varying width be achieved.
If you mark the groove incorrectly, this will lead to the so-called “kiss” - the edge of one log will only slightly touch the end of the other. Of course, in this case, the conversation is neither about the thermal properties of the log house, nor about the required width of the longitudinal groove. Thus, all the logs are laid one after another and marked to the very top until all the grooves are horizontal.
After the drawing is completed, the log is removed from the brackets and turned upward with the side on which the markings are applied. Next is the sampling itself. Carpenters, when selecting, use a chainsaw, making many cuts across the log, moving along the entire length of the trunk, deepening the saw to the depth of the future groove. Experts do not recommend cutting to the full depth of the groove, but leaving half to one centimeter and then finishing it manually. This can extend the longevity of your building.
To finish cleaning the groove, a tool called an “adze” is used. This is an ax whose sharpened surface is directed across the handle, and not along it like an ordinary ax. There are two types of adze: small and large. Working with a large adze occurs while standing, cutting off the surface with strong blows. They can immediately begin creating a groove, without using an ax.
To further refine the logs, a small adze is used. When the groove is cut, all that remains is to check how well the logs fit together. To do this, a special coloring composition is applied to the upper part of the lower log, then a log with a cut groove is placed on top. After such fitting, you will see how the coloring pigment has stained the cut out groove. Those cutting areas that remain clean indicate that they were not touched by the surface of the lower hump.
Marking
In the question of how to cut a log house, special attention is paid to correct markings. Professionals use a special tool - a “dash”, which consists of a handle and two rigid plates with pointed ends, the distance between which can be changed. “Dash” allows you to draw two lines in parallel, making markings during construction with your own hands.
In order to mark, lay two logs on the ground strictly parallel to each other. It is important that the edge of the third, transverse link, laid crosswise, is positioned so that the distance from the end to the bowl is at least 25 cm. Check the placement of all logs of the future crown. To prevent the log from spinning or moving when marking, it is secured with a bracket.
If the bowl will be cut in the upper log, the “dash” plates are moved apart so that the distance between their tips is half the diameter of the lower log (this is important if construction is carried out from non-rounded logs).
When marking, one plate of the tool must always rest on the upper log, the second on the lower one. To mark the contour of the bowl, the leg of the “dash” must move, touching the arc of the lower log, while the second one will draw a parallel line on the upper log - the contour of the future bowl. A semicircular groove should be marked and selected along the log so that the crowns fit snugly against each other and are not blown through.
If the bowl will be cut into a lower log, one leg of the tool should outline the bottom of the upper log, and the other should draw a line along the surface of the lower wall element. The distance between the legs should correspond to half the diameter of the top log.
To quickly mark with a “line” according to a template, you need to have skill. If it is not there, then when assembling a log house with your own hands, it is easier to use traditional tools and mark each joint individually.
During the work, do not forget to number the fitted crowns, using a sharp nail or indelible pencil, as for marking. Numbering each whip will further simplify the final assembly of the log house.
Features of the carpenter's trait
Working with a carpenter's mark requires care, as the scratch cannot be erased like a pencil mark. Another work that is done with the help of a carpenter's line is the cutting of a longitudinal groove for a tight connection of logs in a wall frame, the bowl of a log, before subjecting it to the final processing. The line is used for beating and drawing an even line on the block when planing, processing the boards for their tight fit. The tool is used for marking joints and various marks in carpentry. At the same time, a carpenter's compass is used.
In ancient Russia, when cutting down the walls of houses and churches, carpenters used only an ax and a line. To connect the logs, unique grooves were used that did not require the use of a chisel and chisel. This demonstrated the individual methods of skillful work of ancient masters.
Subsequently, in wood finishing, the line was replaced by a surface planer, which translated from German means a device for drawing parallel straight or winding lines. This tool is used to copy dimensions from one shape to another part. The difference between the two devices is that instead of a wedge and a line ring, the thicknesser has a moving block with a screw lock.
Drawing principle
The process of drawing crowns during the installation of walls requires the special skill of a specialist, because the quality of the constructed log house depends on his precise work.
Deviations vertically and horizontally when drawing lines are unacceptable; moreover, in the process of work they first make rough markings, then the final clean drawing. It takes a carpenter to make a quality log house . Currently, the carpentry trait has been improved, and an almost new tool has emerged, which is called a scriber. Drawing contains the following steps:
- installation of the log of the upper belt, adjustment of the horizontal level on the linings, alignment of the vertical axis of the ends;
- after this comes the drawing stage, which consists in spreading the ends of the scissors to a certain distance, taking into account the thin end of the log, this is done this way, because if you start with a thick butt, then the longitudinal groove may not reach the narrow section;
- You need to draw a line along the level, therefore, moving the needle and pencil to the lower end and the upper, respectively, looking at the bubbles in the device, move the scriber along the log. The same method is used to draw cups.
Features of pairing “in the bowl”
A semicircular recess is cut out on the surface of the log for the element of the next crown of the perpendicular side. When assembling a log house, the crowns are wedged together and, after shrinking, form a strong structure that is windproof due to its configuration (the protruding part of the log should be 25-30 cm to the edge of the bowl) and the use of insulation.
Such corners do not freeze, which reduces heat loss in the house, and there is no condensation that provokes the development of fungus on the wood. In Canada and Norway, cutting a log house using the “bowl with a tenon” technology is popular - this is an even stronger connection, but it is much more difficult to do it yourself without experience in such work.
Possibility to make a tool with your own hands
A simple version of the dash is made from thick diameter wire. A similar solution is to drive two long nails into a suitable wooden handle. A mechanic's compass is also used to mark wood. The accuracy of drawing increases as the distance between the teeth of the tool decreases; skill and experience play an important role.
The scriber
is a mechanical compass with a built-in level.
The latter is intended for precise marking of lines horizontally and vertically. If everything is done correctly, then marking with your own hands will allow you to assemble the log house in such a way that it will not be possible to push a match between the logs. Scriber is an advanced carpentry trait that has been given two levels. This saved time for the carpenter. After all, now they don’t draw a rough line for marking, but immediately draw a finishing mark.
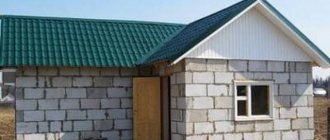
Construction from logs: technology of cutting into a bowl
One of the most important advantages of a log house is its ability to retain heat well, which helps save on heating costs during the cold season. However, the energy efficiency of a wooden house largely depends on the assembly technology of the log house. Cutting into a bowl is the best option, since in such houses the corners do not freeze or become damp.
A frame made “into a bowl” can be erected with your own hands if you have carpentry skills and a suitable tool. If this is your first experience in building a log house, it is important to work carefully, carefully marking and adjusting each log. This will require a lot of time and effort, but the result will please you for many years.
Carpentry Feature Improvement
Time works to improve the instrument and does not stand still. When drawing markings, the main thing is to ensure horizontal and vertical compliance with the line; for this, the ends of the carpenter's line are set using level bubbles. A Canadian inventor proposed an innovation in the form of a marking tool based on a carpenter's line, which he called a scriber. The Russian skilled carpenter did not further elaborate and developed a different version of the scriber, which later became known as the carpenter’s compass.
Foundation for a log house
The main tasks of any house foundation are as follows:
In addition to the above-mentioned requirements for the foundation of any house, some more requirements should be added to the foundation of a log house:
log house on a pile foundation
Read more about the types and properties of pile foundations
Read more about the properties of a columnar foundation
log house on a columnar foundation
Stage 6
Tool for making a modern carpenter's dash
To make it yourself you will need the following tool:
- hacksaw with blade for metal;
- vice and hammer;
- angle grinder “grinder” with cutting and grinding wheel;
- welder;
- drill, metal drills;
- a set of files, dies, taps with a diameter of 10.8.6 mm;
- plumb line, vertical and horizontal level.
make a carpenter's compass entirely from available materials nearby. You will only have to buy the appropriate washers and nuts in the store, if they are not in the home craftsman’s storerooms.
The tool is based on old, obsolete metal scissors. Carefully cut off the bolt heads and attach them by welding to the handles of the scissors. To install the pencil and needle mounts, use the threads on the ends of the bolt.
They make a socket for installing the needle and the needle itself, then design it further. The device for installing a pencil is designed in such a way that in addition to it, a needle can be placed in the mount. Flasks with bubbles are taken from old building levels; you will need two of them, for the horizon and vertical.
To determine the amount of separation of the needle and pencil, an adjustment bar is provided. It is fixed with nuts, and the compass is secured in the extended position with clamps made of bolts and washers. To secure the levels, a mounting platform is made. During operation, the pencil lead is ground down, and when the compass is pulled out again, the compass may get lost, so a special template is created, which provides for a joint design of a screwdriver and a head. Alternatively, you can use another needle instead of a pencil.
Video on this topic
agency of historical projects "Ratobortsy" project "Seven in the Past"
Carpenter's trait/device/principle of operation Our website - https://vologdahouse.ru/ We are on VKontakte - https://vk.com/vologdahouse Forumhouse -...
Home -> -> We build and craft -> Homemade scriber is a carpentry trait.
Scriber
- a carpenter's marking tool that replaced the line.
Time does not stand still and makes its own improvements to carpentry tools. When marking with a line, the most difficult thing is to ensure that the marking ends of the line are strictly vertical. Canadian inventor, one of the authors of the “Canadian felling” technology, Robert Chambers, proposed a marking tool in which verticality is ensured by bubble levels. He called it ChambersScriber.
The talented Russian carpenter Yuri Milykh developed his own version of the scriber, which he called the carpenter's compass
. Based on his motives, my homemade product was made.
The main reason for making it yourself is the high cost of this tool (300 - 500 US dollars).
To make a scriber you need the following tool:
1. Hammer, 2. Hacksaw for metal, 3. Vise, 4. Grinder with cutting and grinding discs, 5. Welding transformer, 6. Drill, 7. Set of needle files, 8. Taps and dies with a diameter of 6, 8, 10 mm , 9. Plumb (for vertical adjustment), 10. Level (for horizontal adjustment).
The scriber is made entirely from scrap materials. It cost me $2 (the price of nuts and washers) and two days of wasted time.
Well, now, the manufacturing process in pictures.
Photos of the finished structure.
During the marking process, the problem with a regular pencil is that the lead wears off. It has to be constantly sharpened and pushed out. Since the scriber was adjusted for a certain length of the pencil, in order not to make mistakes when extending it, a special template was made (at the same time a screwdriver and a 10mm head).
In construction, the carpenter's trait (in modern format called "scriber") is important. Without the line, it is problematic to organize sawing of logs or the production of building forms. A scriber is necessary for marking on wood surfaces. The marking can be straight, curved, or consisting of several parallel lines. We take one board, remove the edge from it, which will be needed in order to obtain a line for cutting on the next strip - this strip leans against the first one. The line is drawn precisely due to the carpenter's line.
How to quickly make a scriber with your own hands
You should have the following list of things in your hands:
1. Regular hammer; 2. Welding tool; 3. Drill, drill bits (tools must be able to handle metal) 4. Hacksaw for metal; 5. Grinder (there must be a cutting and grinding wheel); 6. Files, taps and dies; 7. Levels - horizontal and vertical (old building levels); 8. Plumb.
No specific materials are needed for a carpenter's compass. You will only have to spend money on various nuts and washers if you do not have such things in your house of the appropriate size.
The bolt heads need to be welded to the hand shears. Requires pencil and needle attachment. In this case, the threads on the ends of the bolt come to the rescue.
First you need to make a needle, then a socket for its installation. When making a device for mounting a pencil, make sure that the needle will fit into the mount. The levels noted above are required for bubble flasks.
The distance between the pencil and the needle should be as precise as possible. For this purpose we use an adjustment bar. You can securely fix the bar using nuts. To fix the compass in the extended position, a clamp is used, which bolts and washers do an excellent job of. You need a mounting platform - this way you can secure the levels. The pencil lead may become damaged during work. There is a possibility that the compass will go astray when you erect it again. This problem is solved using a special template. This design is made using a head and a screwdriver. An alternative method is to use an additional needle rather than a pencil.
Width of carpenter's line?
A carpenter's line is used to mark corner joints in a log house, longitudinal grooves in logs; blocks and boards for their tight fit to each other. They are simple in design, but not uniform - it is either a metal plate with triangular cuts at the ends or a two-pronged fork with curved ends, or maybe a metal rod unforged in two. The smaller the distance between the teeth of the line, the greater the accuracy of the marking, taking this into account, set the width.
Buy carpentry?
Only if you know exactly how you will earn money with this craft TODAY, then it’s worth buying. I had a wonderful furniture workshop within walking distance. I held on with all my strength. Two years ago she was “eaten”! Competing with furniture giants is pointless and dangerous.
But carpentry is much broader than “furniture making”! If you own any unique craft such as carved bas-reliefs on entrance doors, Chinese carved screens or “prefabricated wall panels”, then the flag is in your hands! If not, then think a thousand times.
What is the most expressive character trait among Germans?
The most striking character trait among Germans nowadays is their meticulousness, adherence to rules, and lack of flexibility. If it is written or established to do this and not otherwise, they will never act differently.
In addition, they clearly separate work and personal life. And if you are wonderful friends and colleagues at work, this does not mean that a German will invite you to his home.
As for accuracy, pedantry, punctuality - these qualities, if they existed, did so a long time ago. From now on, these are rather stereotypes that are associated with Germans...
How deep is the swamp?
But personally, I talked to one guy once and he said that the swamps are very deep, 20-40 meters deep. Here. And some say that swamps have no bottom at all. But the fact that they keep corpses and all equipment “new” and “fresh” is pure truth. So it goes.
What is the main distinguishing feature of a sweatshirt?
The sweatshirt appeared in the 20s of the 20th century as part of the athletes' uniform. The name appeared by combining the words sweater and shirt. The sweatshirt has several main distinguishing features:
made from cotton
Ribbed sleeve cuffs and hem
a triangle under the collar used to be a mandatory attribute of a sweatshirt. It was needed to prevent the collar from stretching during training. But now, when the item has become part of the everyday wardrobe, the need for such an element has disappeared. But even now, some brands add such a detail to sweatshirts, but it is purely decorative.
Richelieu or Richelieu?
Richelieu, Churchill, Goebbels - so in the original, but the letter “e”, unfortunately, is not held in high esteem in our country, so the incorrect pronunciation of these (and, I think, many other) surnames has become established.
What is shukhlyadka?
Well, let's start with the fact that I don't know the word "shukhlyadka". In Belarus, the word “shuflyadka” is commonly used to refer to a table drawer. In fact, the word is Russian and I don’t know why Russians have such problems with it. Perhaps because the word came from the Polish language, and we border more closely with Poland than Russia. In fact, it seems to me that one word is more convenient to say than “desk drawer.” How do you even live without a drawer? Regarding the word “shukhlyadka” - perhaps this is some kind of euphemism for a fallen woman. Don't know. If someone calls you that name at work, for example, you can always complain about the offender to your colleague over a cup of coffee. And call her the same thing back! Hug!
Why do some people separate the concepts of “Slavic appearance” and “European appearance”?
1) Outwardly, each type of European is different from the others. Germans, French, Italians and Slavs are quite similar to each other when compared with Asians or blacks, but they look completely different from each other. And we, Slavs, are interested in highlighting our differences from everyone else. 2) Ideological subtext that divides us (Russians, Slavs) and Europeans (the West as a whole). Almost the entire history of our state from pagan times, to the tsar and communism, and even now we oppose ourselves to the West, to the Europeans. We have a special path, we are Orthodox (and they are Catholics), we have a different mentality, etc. This is especially important in the context of the fight against the Nazis (white Europeans, essentially). After all, Hitler didn’t like Poles, Russians, or Serbs (I would give a link to support my words to the lines in Mein Kampf, otherwise the Nazis wouldn’t believe it, but alas, by law I don’t have the right), and Stalin made very flattering speeches to the Slavic people .
What is a sub-caliber projectile?
A sub-caliber projectile differs from a regular one in that the first has a warhead much smaller than the diameter of the gun barrel from which it is fired, and it is similar in appearance to crowbar. This scrap or core is made of tungsten or depleted uranium, then it is placed in a cartridge type that has fins to stabilize the flight.
What are the ways to join flaps into a single piece?
Hello, there are many types of patchwork, the most popular are:
1) Knitted patchwork - the patches are not sewn, but tied with hooks and threads;
2) Quilting - two canvases are connected to each other with a stitch that imitates patterns;
3) Crazy patchwork - various curved patterns of different shapes are used.
How to make a log house with your own hands
Without each of them, it is impossible to ensure the quality of the log house. For example, the traits of a carpenter.
A carpenter's mark (doodle) or an imported analogue, Scriber, is a carpenter's tool for preliminary marking. It is used when drawing on the surface of a tree the boundaries of a sample of an inter-crown laying groove and elements of a corner notch. The line looks like a large modified metal compass with a special pencil and a heavy-duty lead. Leaving a clearly visible mark on a log of natural moisture. Many of the carpentry features are equipped with a water or alcohol hydro level. Often two to control position in two dimensions. The line does not require a pencil (the smaller tool in the photo on the left) with smooth markings.
According to the classical scheme, when cutting a log house, the bowls are first selected in rough form. Then the log is “planted” - thrown in a place on top below the already finished one. Then, using a line, the outlines of the laying groove and bowl are marked on the opposite side surfaces of the log. Then the log is removed, and a groove with bowls is removed on the ground. Or it is not removed when it is inconvenient or the frame is cut into a low foot.
Some regularly practicing carpenters, with a steady hand and a normal eye, are able to cut a dovetail without drawing. They say that there are modifications of the carpenter's mark that supposedly allow you to mark a log in one step. This is not so, or we are talking about the highest skill of individual carpenters.
The marking tool can hold both a regular lead pencil and a specialized “dot” round, oval or faceted one. Leaving a perfectly readable line on concrete, stone, metal surfaces, dry and wet wood. There is also an interesting invention - a gas refill from Fisher Space Pen, which writes boldly not only on literally everything, but also at an impressive range of temperatures, in snow and water.
A carpenter's line is sometimes equipped with a mirror to make it more convenient to draw at arm's length or in hard-to-reach places. This ancient tool was used to mark out a lot of things. They even marked (beat) the boards before edging so that they would fit tightly afterwards.
Review and examples of working with carpentry features.
Alexey K:
for 8000r she has to draw it herself!
Muffler Makarych:
What price
Nastya Zaitseva:
Great work and beautiful work! I wish you success ! First you need to grow up. and then evaluate it expensively or cheaply! And it’s easiest to scratch with your tongue on the keyboard.
Sergei Savcuk:
hurry up how much it costs in dollars I want to buy
Vadim Tarakanov:
The regrets of other viewers about the high cost of this device are interesting. Guys, if you are cutting down a house on which you intend to earn a few lyams, will you save on a tool that will save you effort, time and nerves? What if you intend to cut down more than one house? Is 8000 still a lot?
Sergey Sarapulov:
Hello. I heard you sell them. What price?
Yaroslav Chashchin:
Well, it’s unlikely that a log will be thrown away, you’ll cut it by half a centimeter or a centimeter and that’s all)
Ivan Smirnov:
and how our grandfathers used to chop without levels.
Oleg Panov:
Wow, 8,000 rubles! You can buy a Stil chainsaw
Andrey Kabanov:
I use this one! Thank you guys! It’s just that one of the fastenings (the top one), which holds the rod with the level, has become loose. I had to hit the riveting with a hammer, otherwise there would be an error and the level would dangle. And when it’s hot, the bubble in the level disappears, you need to either store it in the shade or pour cold water on it!
Sergey Makeev:
where can I buy
Natalya Andreeva:
and where is it and how to find the city of Ufa.
Natalya Andreeva:
and how much it costs.
Natalya Andreeva:
how to buy your trait.
Akaki Akakievich:
why is there a level in the line?
Kurlyandr:
Previously, the rough cup was chopped and drawn, but with the help of the Trait, now you can immediately completely figure it out. Before, before. Progress does not stand still. Plumb you say? Why the hell didn't he give up in the wind? Forged trait?
Mini scriber made from a drawing compass
I am glad to welcome you again, successors to the Kulibin cause and others like them. This time I want to talk about another marking tool - a scriber. Let me explain a little what this instrument is and where the name comes from:
For information, offers for the sale of carpenter's scriber start at RUR 3,000. Here's what a factory-made tool looks like:
I’m not going to cut down log houses, I’m not going to buy such a tool for a one-time job, especially so I began to look for a way out on how to design such a device at the lowest cost. The solution was found to be ridiculously simple - in principle, a scriber is a marking compass, to which is attached a bar with two bubble levels to maintain verticality. For my purposes, a large compass opening is not needed, 60 mm. It’s quite enough, two bubble levels are generally overkill, one circular level will be enough, especially since it’s more convenient to keep track of it, so the compass from the ready-to-use kitchen was perfect, with minimal additions and unchanged functionality.
We make markings to connect the corners to each other and the holes for the bubble level.
Drilling corners 6989
And we connect them together using rivets like this:
We first drill the hole for installing the bubble level with a 1.6 mm drill, then drill it out to 8 mm and finally bring it to the desired diameter by boring a round file, and finally with a needle file.
We mark the center of the hole for fastening the compass head as follows: measure the width of the ring spring and divide the result in half, from the resulting size we subtract the distance from the end of the spring ring to the end of the compass axis and add the length of the 3 mm sleeve. We put the resulting size on the marked axis of the small corner, counting from the inner surface of the large one. We drill a 3 mm hole in this place. drill (for greater accuracy, I first drilled 1.6 mm, and then drilled out to three rubles).
Let's put our design together. Using an M2 screw, through the hole in the compass axis and the bushing, we fasten the shelf of the large angle
I used a level (also magnetic) as another plane.
We bring the ends of the compass together and align them.
Source
how to make a line for cutting a log house
Show me a forged line with a solution of 15-20 cm, and draw it, and then cut it down. You will end up with a holey tub...
Vladimir Lebedev:
While you make the adjustment, and even if the pencils break off and there is no time to chop, my father and grandfather taught me to work with a forged line, scratched and the markings are also on it + a marking board with a plumb line. No hassle
Nick Kos:
Yes... Well, guys, beat the prices. Innovation...)
Denis Ermakov:
Hello, tell me, is it possible to order a carpenter's line from you? very urgently needed.
Forge Toporsib:
Trait on the site in the category “Special tools”.