There are many objects of different sizes and shapes, with the help of which property owners strive to decorate it, distinguish it from the surrounding buildings, and give it an interesting and original look. One of the options for such decorations are weather vanes. Despite the abundance of modern solutions, this detail of the external interior remains relevant to this day. In addition to decorative ones, it performs practical functions. Making a weather vane with your own hands is not difficult, but to do this you need to decide on its structure, role and purpose.
Story
The weather vane has its own rich history. There is no exact information about who and when the first weather vane was made. But today it is known for certain that the first weather vane decorated the Tower of the Winds in Athens, and this was around 48 BC. This weather vane was an image of the sea god Triton and the direction of the eight winds. You can immediately understand that even the very first design had a symbolic meaning.
The tradition of making weather vanes in the shape of a rooster originated in England. There, since ancient times, it was considered a symbol of a new day, vigilance and had magical meaning. The rooster is also a symbol of Christianity. During his reign, the Pope ordered all churches to be decorated with the image of a rooster, which symbolized the Apostle Peter. Thus, the roofs of cathedrals in Catholic Europe began to be decorated with weather vanes depicting this bird.
The rooster is also a symbol of France, which is why its people love to decorate their houses with weathervanes with this particular image.
The Vikings also loved this device. They made weather vanes from bronze, often gilded, depicting figures and scenes from Scandinavian mythology. The Vikings often placed their weather vanes on their ships. The symbol of the stork - the patron saint of the family hearth - originated in the Scandinavian countries.
During the era of feudalism in Europe, the weather vane was made with the image of the coat of arms of the owner of a particular castle. The Japanese and Chinese, who had their own mythology, loved to decorate their homes with weathervanes depicting a dragon. He brought good luck to the house and protected it from evil spirits.
In Rus', weather vanes began to appear in the 15th century as home decorations. Initially they were made in the form of a flag. But over time, they began to depict animals, people and mystical creatures.
In 1782, by order of Empress Catherine II, the largest weather vane in the world was made and installed. The name he was given is symbolic - Tsar Weathervane. But, unfortunately, due to its enormous weight, it did not last long and was subsequently melted down.
Over time, this device gained increasing popularity, so in Europe, at the end of the 17th and beginning of the 18th centuries, workshops even began to appear in which weather vanes were produced en masse.
It should be noted that this trend is still observed today due to the growing demand for this design. As it turned out, weather vanes have not lost their meteorological value. Forecasts do not always correspond to reality, and modern weather vanes, equipped with a more complex design and electronic filling, can easily determine the strength of the wind and its direction.
They are most often used by modern weather services and aviation bases.
Today, the simplest version of this device has lost its scientific value due to the development of technology, but modern people still decorate the roofs of their houses with this simple device for decorative purposes.
Do six
An important stage . Wheel balancing. Due to different weights of the disks (if they are different), inaccurate installation (violation of the symmetry of the cuts, different depths of attachment of the blades), excess glue on any blade, the wheel becomes unbalanced. Imbalance is harmful due to the appearance of vibrations during rotation and the fastening units will suffer from it and strong mechanical noise may appear. If everything is balanced, then turning the wheel to any angle, it will not rotate further.
Windmill wheel
If the wheel, after any rotation, tends to return to its previous position, then the blade located below, after the rotation has calmed down, is heavier relative to the others. We eliminate this by gluing small weights to the edge of the opposite blade or blades. This work requires skill and the presence of a small amount of small metal or other rubbish. Sometimes it is enough to attach a piece of chewing gum to the edge of the blade. In my area it will never slip off the blade, but where it’s hotter, I don’t guarantee anything. The balancing was successful - good. If it doesn’t work out, it doesn’t matter. It will rotate. In strong winds, a broken windmill operates on one blade!
The purpose and principle of operation of the weather vane
Many owners of private houses are thinking about how to make a weather vane with their own hands at home with a minimum of effort, money and time. However, before you start making it, it would be a good idea to learn about its purpose, structure, varieties and meaning of symbolism. Let's look at them in more detail.
A weather vane is a decorative element of the roof of a house and a multifunctional device. The principle of its operation is based on the interaction of a special part - a flag - with the air flow.
The force of the wind turns it in the direction of minimal resistance. In this case, the counterweight arrow will always show the direction from which the wind is blowing. If you have a light propeller, the device will also determine the wind load, and when connected to other devices, it will also perform other useful functions.
Depending on the tasks assigned to it, it can have one or several of the following purposes:
- Decorative.
- It is part of the exterior design of the building.
- Meteorological.
- Acts as a device showing the strength and direction of the wind, as well as its quantitative measurement when a meter is connected.
- Protective (for chimney).
- Closes the pipe outlet from precipitation, objects and wind.
- Electricity generating.
With sufficient power of the blades and constant high wind force, it is possible to connect a generator to generate electric current.
In addition, a weather vane can protect both the house itself and the surrounding area from rodents. However, in this case it is not installed on the roof, but directly on the site.
Interesting information! A weather vane is one of the obligatory elements that crown the roof of a private house in almost all European countries. Moreover, in each specific case it looks original, unique for the entire area.
Briefly about the main thing
The weather vane interacts with the air flow and shows its direction. When connected to a sensor, it is also capable of measuring its speed. Depending on the purpose and design, there are the following varieties:
- Decorative.
- Meteorological.
- Protective for chimney pipes.
- Generating electric current.
- Repels rodents and birds.
In the standard version, it includes a flag, a boom, a counterweight, a vertical axis with a block and fastening elements, a propeller and a protective cap. Its main most noticeable part - the weather vane - can be made in the form of various figures - a rooster, a cat, a lion, a horse, etc.
As a rule, wood, steel, copper, plastic and plywood are used as manufacturing materials. They all have characteristic pros and cons. When installing a weather vane, it is necessary to observe its orientation vertically and to parts of the world - in the presence of a wind rose. An elementary model can be made quite easily according to the instructions, but more complex and high-quality options are available only to professionals.
Device
Basic elements of a weather vane:
Checkbox.
This is the main part of the device. Under the influence of the wind, its plane turns around and stands parallel to the air flow. It is made in any geometric shape or with artistic design - a thematic figure. Thanks to this, it gives the main decorative value to the entire device.
Arrow.
Placed on the opposite side of the flag. The main purpose is to indicate the direction from which the wind is blowing. It is not a mandatory design element - if the flag is installed directly on the vertical axis.
Counterweight.
Installed on the opposite side of the flag axis. Balances the flag-boom system (wind vane). As a rule, it has the same mass as the opposite part. Sometimes it is more difficult when the device is made so that when there is no wind it returns to the same position.
Vertical axis with housing and mounting block.
The axis on which the weather vane is located is fixed in a special housing and sits on a bearing. In an effort to simplify the design, it is often simply installed in a pipe of a suitable diameter. At the bottom, to facilitate rotation, it simply rests on a metal ball.
Protective cap.
It is placed directly above the vertical axis and serves as protection against the penetration of moisture and dust into the rotating mechanism.
Propeller.
Mounted instead of a boom and allows you to estimate wind speed. Electronic meteorological meters or an electric generator can be connected to it.
Fastening elements.
Depending on the material and design of the roof, brackets, screws, bolts and other fasteners are selected in each specific case.
Advice! When choosing how to make a weather vane with your own hands, you need to take into account the smallest details, so as not to carry out complex modifications later. One of these elements is the wind rose. It consists of a pair of rods crossed at right angles, on the edge of each of which a letter with the corresponding part of the world is installed. After it is correctly aligned with the compass, you can quite accurately determine the direction of the wind.
Briefly about the main thing
The weather vane interacts with the air flow and shows its direction. When connected to a sensor, it is also capable of measuring its speed. Depending on the purpose and design, there are the following varieties:
- Decorative.
- Meteorological.
- Protective for chimney pipes.
- Generating electric current.
- Repels rodents and birds.
In the standard version, it includes a flag, a boom, a counterweight, a vertical axis with a block and fastening elements, a propeller and a protective cap. Its main most noticeable part - the weather vane - can be made in the form of various figures - a rooster, a cat, a lion, a horse, etc.
As a rule, wood, steel, copper, plastic and plywood are used as manufacturing materials. They all have characteristic pros and cons. When installing a weather vane, it is necessary to observe its orientation vertically and to parts of the world - in the presence of a wind rose. An elementary model can be made quite easily according to the instructions, but more complex and high-quality options are available only to professionals.
Select an option
Undoubtedly, a beautiful and original weather vane can be purchased in a store. But it is also possible to make it yourself at home. To do this, you need to select the appropriate material and develop a detailed sketch of the device.
The weather vane can be made from a variety of materials:
- plywood;
- tree;
- metal;
- plastic or plastic bottles;
- old CDs.
The last two options are suitable for small structures that can be placed, for example, on the roof of a veranda or gazebo. Plywood and wood are short-lived materials, even if they are treated with special means.
Metal can withstand all weather changes and strong gusts of wind, so it is considered the most successful material for a decorative weather vane.
The most important step is choosing a figure for the flag. After all, there are opinions that this is not just a decorative element, but also a kind of symbol. Therefore, any image has its own mystical overtones.
The symbols are deciphered as follows:
- The rooster is very popular in Russia; it scares away evil spirits.
- The cat is a symbol of home comfort.
- The owl symbolizes wisdom.
- Leo , the king of beasts, indicates power and strength.
- The eagle helps protect your home from enemies.
- The stork brings mutual understanding and happiness to the house.
- The goose is a symbol of vigilance, love and order in the home.
- The chimney sweep is a symbol of good luck.
- George the Victorious protects the house from any troubles.
- Baba Yaga opposes the evil influence of evil spirits.
When choosing a weather vane figurine for your home or cottage, it is better to familiarize yourself with what it can symbolize.
It should be noted that there are several main functions that this design has.
- Meteorological. First of all, a weather vane serves to measure the speed and strength of the wind and indicate its direction.
- Protective. When installing this structure on a chimney, it serves as protection from strong wind blowing.
- Repellent. If you install a propeller on the weather vane and place this device not on the roof, but on the ground, then the vibrations will repel moles, rodents and shrews. If you install an electronic windmill, the effect will be stronger.
- Decorative. This device often has a very attractive appearance, so it is installed on the roof as an unusual decorative element.
Do two
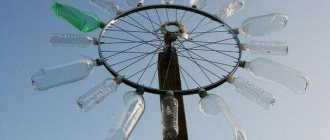
To reflect light you need a mirror surface. The cheapest surface CD, DVD discs. Of course, you don’t have to run to the store to get them. If anyone has problems purchasing discs, go to the forums. Experience in operating wind turbines forced us to find alternative sources of mirror surfaces - pancakes from hard drives. How to extract them is a separate topic. So, we have a lot of disks and we need to attach them to the wheel. Again about safety precautions. If you don’t have experience, we buy disposable gloves. We put on gloves and, without putting much effort (for this you don’t have to be a big guy pumped up on steroids), slightly rocking the disk, insert it into the cut. This must be done carefully, without bending the disk. Did it work? Is the disk cracked? Throw it away. Next. Let’s assemble the wind wheel - turbine and take it apart a couple of times. Do you have the skill? We disassemble the wheel. Now we need to firmly install the blades.
Hot melt adhesive
Molecular glue
Glue moment
We will do this with glue. Experience has shown that Moment glue in all modifications, instant second adhesives, rubber glue and hot-melt adhesive do not provide reliable fastening of the blade to the wheel, and molecular glue also damages the disc creating a zone of fragility at the fastening boundary. The record for the survivability of wind wheels was shown by the method of fastening using epoxy resin. We accept this glue as the most reliable.
Disc is inserted
Apply the edge of the disc
Epoxy adhesive
It is better to glue in air. Cover the work surface with newspaper or magazine. The fumes from the glue won't lead to insanity, but they won't add health either, they will only take away. According to the instructions, we dilute the glue components. Spread the edge of the disc at the point of contact with the wheel. You should not apply a lot of glue; the contact is tight and excess glue will drip onto your hands and clothes. Be careful not to get glue on the bearings. Insert the coated edge of the disc into the cut. Try to keep the center of the disk in the plane of symmetry of the wheel. We do the same with other blades. Carefully apply glue to all the voids from the cuts. Alternating the mirror side and the non-mirror side will increase the chances of the device operating when the windmill is unfavorably positioned relative to the sun, that is, the sun will be reflected when the turbine is illuminated both from the front and from the back. In the end it should work
.
Glued wind wheel
Five-bladed wheel
Two-bladed wheel
Three-bladed wheel
We place the turbine on the table and carefully adjust the blades. The wheel should be parallel to the surface of the table and all blades should touch the surface. It turned out great. If it doesn’t work, don’t care, it will still spin, albeit with vibrations. Place the wind wheel in a safe place to dry. Carefully! Excess glue may drip from the wheel. The drying time of the glue depends on the temperature. My glue only hardened on the second day. On that hot summer day it was +14°. The photographs show photographs of wheels with a different number of blades. I managed to glue an eight-bladed wheel.
Materials and tools
Typically, the design of a simple weather vane includes the following elements:
- A flag that turns in the direction of the wind. It can have a simple geometric shape or an unusual decorative design and be the main decoration of the device.
- Arrow. The figurine is most often placed on it.
- Counterweight. It is located on the opposite side of the flag. It must have a greater mass than the mass of the flag, then it can return to its original position.
- Vertical axis. It is mounted either on a bearing or on a metal ball, which allows the structure to rotate.
- The cap prevents water from entering the bearing.
It is best to make a flag from metal, for example, it can be copper or steel. This way it will be much more durable than a product made from wood or plywood sheets.
There is always the opportunity to make a forged product, but it will be quite heavy, and not everyone can do it on their own. And the work of a master will be expensive.
Any material must be treated with a protective coating, such as paint, to withstand the elements.
The base and axle should be metal, as this is a very strong material for their construction.
To make a weather vane with your own hands, you will need special tools:
- a jigsaw for wood or metal (this is useful for cutting out a flag);
- drill;
- hammer;
- soldering iron;
- vice;
- pliers;
- grinder and files;
- sandpaper.
Do it once
We mark the wheel to make slots for the blades. For complex markings, I attach stencil files (
,
,).
Making a cut in the wheel
Wheel in a vice
Marking a wheel for four blades
We make marks on the wheel, for example, with a ballpoint pen. If this is your first windmill, then it is better to start with two or four blades. So, we marked it out. Wheel designs are different, if there are removable bearing linings, then we dismantle them and put them in a safe place. Then it is better to adhere to the given technology; for this you will need a vice and a hacksaw. If you suggest another reasonable way to make cuts, I will publish it. We clamp the wheel in a vice, it is better to clamp it so that rubber sawdust does not fall on the bearings. In the photo, sawdust gets on the bearing! It is not right! We select the angle of inclination of the hacksaw blade (30-45°) and begin sawing from the top point of the wheel. We saw slowly and carefully with a metal saw. If you rush, there may be injuries and broken hacksaw blades. We cut to a depth of half to two-thirds of the thickness of the rubber, in my case to the steel pads.
The cut is done
Result of work Marking the wheel
Having made the first cut, we re-clamp the wheel in a vice and make a second cut, and so on. The result should be something like this. If you are left-handed, you can saw with your left hand in a different direction.
Drawing
First of all, you need to decide which figure will crown the weather vane. Then you need to create its drawing with your own hands. If you have never cut out this kind of shapes before, then it is better to stick to a simple option for better execution.
The circuit is very easy to make yourself. It is better to first draw a drawing on a regular sheet of paper, and then complete it in exactly the size that the figure will be, thereby obtaining a stencil. This stencil will be universal for any manufacturing material. It is better to choose its dimensions in the range from 300 to 500 mm, otherwise the flag may break.
Do eight
The device in action
We install the pole in a pre-selected place. First, replay the climb in your mind and evaluate your capabilities. We lift it carefully, the main thing is not to destroy the windmill by hitting foreign objects. After installation, securely fasten the pole. Hooray! Ready. The house, the dacha are protected from dark forces ;)! Video of a wind turbine in operation. Bunnies video.
According to Feng Shui, evil forces are concentrated in dark corners; a windmill, when installed correctly, can throw sunbeams into the most unexpected places in dark corners and rooms. About the positive impact of the design in protecting against dark forces