Quite often it turns out that the first step is to build the bathhouse box, and only then install the partitions between the rooms.
Any bathhouse has at least two rooms. In this case, a five-wall log house is constructed: four common walls and one partition. For modern people, a classic bathhouse consisting of two or three rooms is no longer enough; today such buildings are being built with six or more rooms. Thus, there is a need to arrange not one, but several partitions at once.
In order to correctly install partitions in the bathhouse, you should take into account the general style of the design. You also need to take into account the material of the load-bearing walls, because for arranging a partition in a brick bathhouse, it is logical to use brick, and for wooden buildings - frame or timber materials.
Of course, the materials used for the general frame of the building may be different from the material of the walls, but it is worth remembering to preserve the general style of the bathhouse building.
What to make between the steam room and the sink
Before you build partitions in the bathhouse, you should decide on the footage of the future premises and choose what to make it from.
Important! The more people you plan to receive in the bathhouse, the more spacious the rooms in it should be made.
After this, you need to decide where it is best to place the doorways, as well as determine the amount of materials required.
What is the best material to make bath partitions from:
- Transformers are presented in the form of sliding, folding, sliding structures or screens;
- Stationary partitions are made of brick, glass or wood.
The type of enclosing structures should be determined based on the requirements put forward for them. For example, in order to permanently separate rooms while providing high-quality insulation, stationary partitions are constructed. In other cases, the installation of partitions in the bathhouse can be limited to the installation of collapsible structures.
Transformable partitions are perfect when you need to separate the changing area from the rest room.
Due to the fact that in most cases, bathhouse owners choose stationary partitions, let us examine their advantages and disadvantages in more detail.
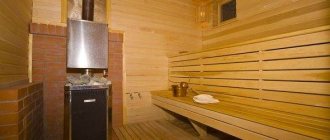
Read more about wooden walls
For walls made of natural wood, partitions in a bathhouse made of timber, frame structures or partitions in a bathhouse made of logs are usually used.
A wooden partition in a bathhouse has both advantages and disadvantages.
The advantages include:
- This design is environmentally friendly, since wood is one of the environmentally friendly materials;
- Relatively light weight with a fairly impressive thickness of the structure;
- Strength can be added to the frame partition in a bathhouse, which will allow it to withstand heavier loads;
- Soundproofing properties of wood.
With such a convincing list of advantages, one should not forget about the disadvantages. These include:
- The hygroscopicity of wood, which is why the partition requires an additional waterproofing layer;
- Lack of fire resistance, which increases the risk of fire. To avoid danger, wooden partitions are carefully treated with fire retardants;
- The tree is attractive to pests, which requires treatment with antiseptics.
Fire safety requirements - what to consider?
Construction regulations regarding fire safety of bathhouses mainly regulate the parameters for the placement and operation of stove structures. As for walls and partitions, the following requirements should be adhered to in the selection and installation of materials:
- The design must withstand temperatures up to 120 °C.
- The wood is treated with special fire-resistant impregnations that prevent the spread of flame.
- Regardless of the type of material, the structure located close to the source of fire must be additionally protected by galvanized steel sheet, heat-resistant plaster or asbestos cardboard.
- Insulation of partitions should be made of non-combustible panels such as stone and mineral wool.
Whatever material and installation configuration is chosen, a fire shield or at least a fire extinguisher must always be present in the bathhouse.
DIY frame
In order to equip a frame partition in a bathhouse, you should familiarize yourself with its distinctive qualities and the information given below.
The structure described below is a wooden frame with mineral wool insulation and clapboard sheathing.
Preparation for work
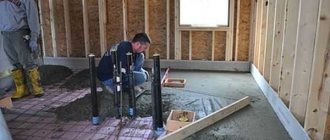
In preparation for the construction of a partition, the walls and floors of the room should be carefully treated: cleaned of paint, dirt, remnants of building materials and leveled.
In addition, it is necessary to arrange the formwork for the base of the structure. Bring the necessary materials, then get rid of construction waste.
After all this, we are ready and ready to proceed directly to installation.
How to make it in wood: installing a frame
Before proceeding with the installation of the frame, it is necessary to cut out the blanks for its base.
After this you can start working:
- Make holes in the blanks. Install them on the curb and make holes in the curb so that they coincide with the holes in the workpiece;
- Secure the workpieces;
- To construct the supporting frame, it is necessary to mount the outer posts on the base and secure them with screws;
- In order to create an opening for installing a door frame, it is necessary to install the racks in a vertical position. It is important to note that the clearance on each side must be at least 1 cm larger than the frame;
- The frame jumper is secured to wood using self-tapping screws.
Arrangement of sheathing and insulation layer
- Mineral wool slabs are placed in the empty cells of the frame;
- They must be covered on both sides with a waterproofing film, which can be secured with a stapler;
- The sheathing is installed with a step width of 40-45 cm.
Installation of the frame in the doorway
- It is necessary to install the frame in the doorway so that there is a gap of 1 cm on all sides;
- After installation, it is necessary to check the horizontal and vertical position of the frame. Treat all resulting gaps with polyurethane foam;
- Elements of the opening open to the washing room must be covered with planed boards.
Cladding walls with clapboard
Information. The walls are covered with clapboard using the tongue-and-groove system.
This means that the tenon of the next blade is fixed into the groove of the previous one. The lining is fastened with nails without heads in order to avoid burns in the future.
Brick
A brick partition in a wooden bathhouse is much less common than in a brick bathhouse.
They are usually built in brick and block bathhouses.
Quite often they make a brick partition in a wooden bathhouse with their own hands if it is necessary to cover the stove, which is located in the dressing room.
This is done due to the fact that the wall here must be as fire-resistant as possible and able to withstand high temperatures.
Important! It is very important to note that the partition in the bathhouse made of facing bricks is erected only after the frame has shrinked!
This can be explained by the fact that after a few years the wooden bathhouse will shrink by five or even ten centimeters, but the brick wall will remain in place.
Attention! Maximum attention should be paid to the quality of the cement mortar, since the reliability and service life of the partition being built depends on it.
Also, the disadvantages of a brick partition in a wooden bathhouse include the fact that brick heats up many times slower than wood, which is why it is better to build wooden partitions in wooden bathhouses. The wall with the stove in this case is an exception.
Brick has a number of advantages, which include:
- Good soundproofing;
- Moisture resistance, which means the formation of fungus and mold is unlikely;
- Fire resistance;
- Brick is completely unattractive to pests.
Let's not forget about the shortcomings. These include:
- Heavy weight of the partition;
- The complexity and duration of work on arranging a partition in a brick bathhouse with your own hands;
- Before finishing a brick partition, it is mandatory to plaster it.
How to make bricks correctly
The process of constructing a brick wall is as follows:
- Before building partitions in the bathhouse, you need to prepare the room. To do this, all unnecessary objects are removed from it, brighter lighting is installed, and materials are prepared. It is also necessary to remove the wooden covering from the walls and floors, clean the surfaces with a damp broom;
- On each of the components of the bath box, the contours of the future partition are marked;
- The prepared sand is sifted and mixed with dry cement in a ratio of 3:1. Next, water is poured into the resulting mixture until the solution becomes homogeneous and plastic. You need to decide what brick to make the partition in the bathhouse from;
- In order for the partition in a brick bath to be laid evenly, it is necessary to stretch a tape along its edges. You should also periodically check verticality using a plumb line;
- The door frame is pre-installed in the opening. It is lined closely with brick;
- It is necessary to carry out masonry with dressing of seams. To do this, every second row must be started by laying half a brick;
- Near the ceiling, small cracks and holes can be sealed with tow;
- If a partition is installed in the bathhouse between the steam room and the sink, then on the washroom side the brick should be protected with ceramic tiles in order to avoid the material getting wet and causing rapid wear.
Application of protective screens
Screens are shields made of brick or metal that protect walls from intense thermal radiation. Similar protection is used when installing metal stoves.
- Metal screens are made from steel or cast iron sheets, these
casings surround the heat source with a distance of 3-5cm.
Advice! When purchasing a metal sauna stove, you should give preference to a model equipped with a metal casing. Its cost is not much higher, but the issues of wall insulation are eliminated.
Additional frontal or front shielding, which is located on the walls depending on the location of the stove, will not hurt. The protection guarantees the wood from overheating, reducing the temperature by 100 degrees or more, and provides the opportunity to save space in the steam room. A stove protected by a casing can be installed at a distance of 50-55cm from the wall.
Installation of screens is simple. The casing, equipped with legs, is secured to the floor by side or front screens - with galvanized nails or self-tapping screws.
- Brick screens are masonry used to cover the stove with
on all sides, the same casing, only made of brick. Another method is to lay half a brick between the firebox and a wall made of solid fireclay bricks laid on a solution of clay and cement. The width of the wall should be 120mm, although there is an opinion that it is permissible to put 60mm in a quarter of a brick, but it should be remembered that in this case the thermal insulation value is reduced by exactly half. It is recommended to raise the height of the masonry 20-30 cm above the surface of the firebox, but if you raise it to the ceiling, it will not be worse.
The screen should be placed at a distance of 10-15cm from the wall, 5-15cm from the stove, that is, the space saving is 30-40cm
Important! Functional openings for heat exchange should be made at the bottom of the masonry. Protective screens are effective, they reduce the temperature to a level acceptable when using high-temperature fuel units
The same function is performed by wall cladding made of non-combustible materials.
Protective screens are effective; they reduce the temperature to a level acceptable when using high-temperature fuel units. The same function is performed by wall cladding made of non-combustible materials.
Glass walls
Glass partitions perfectly perform the role of ennobling a room.
They are made from glass blocks, the thickness of which is at least 6-10 mm.
The surface of such a partition can be matte, colored, corrugated or transparent. Whichever one you want.
Their advantages include:
- Great appearance;
- They transmit light well, and the blocks with a corrugated surface play beautifully with chiaroscuro;
- Good insulating qualities;
- They withstand temperature changes well and are fire-resistant;
- Glass partitions are very easy to clean, they are not attractive to pests and are not at all hygroscopic.
Let's discuss the disadvantages:
- It is impossible to attach shelves or other functional elements to such a partition;
- During the installation process, it is impossible to cut off a separate block of an integral structure;
- The glass surface eliminates the possibility of laying any communications through it.
How to make partitions in a bathhouse with your own hands using glass blocks
It is quite difficult for a person without experience to erect a glass partition on their own, but it is possible. To do this, you need to be patient and use a cement-sand mortar with a fine fraction.
There are two ways to install glass blocks:
- Using adhesive cement mortar;
- Using modular cells.
The work in the first option is very similar to laying bricks, but the process is longer and more labor-intensive.
With this option:
- It is necessary to clean the base of the partition and then level it;
- After this, install a row of blocks, and arrange plastic crosses between them so that the seams are of the same thickness;
- Next, it is necessary to carry out horizontal and vertical reinforcement of the masonry.
Information. Under no circumstances should you lay more than three rows of blocks in one day, since this structure is quite heavy and the raw seams of the lower blocks may simply not hold up.
We ensure the strength of the future coating
Since it is unlikely to be possible to glue tiles onto tiles in the bathroom over an old glossy coating, it should be pre-treated. How? There are three ways to solve the problem.
It is necessary to remove the gloss from the old tiles. It's long, hard, and there's a lot of dirt left behind. Then you need to make notches on it (the same disadvantages) or treat it with a special compound. The third method involves purchasing a primer, which is quite expensive. But since even the most frugal owner will not be able to glue tiles onto tiles in the bathroom without any financial outlay, it is wiser to stick with this option. But the process will not take either time or effort. This miracle remedy is called “Concrete Contact”. The primer will make the old tiles rough and provide excellent adhesive properties to the base. The composition is applied with a brush or roller. The main thing is to maintain the exposure time, that is, let the primer set well and dry. Which will take about six hours, no more.
Step-by-step installation guide for foam blocks
Important! The advantages of foam blocks include their low weight with a fairly large volume.
Thanks to this, the process of arranging a wall made of foam blocks is greatly simplified.
Let's look at it in more detail:
- The first step is marking. This should be done after the walls and floor are cleaned and prepared;
- In place of the future wall, roofing material is placed, preferably in two layers;
- Following the markings, you need to lay the first row of foam blocks, without using cement mortar;
- Next, the foam blocks are laid out using glue or cement mortar. It is applied in a layer of 3 mm, and after laying the blocks are tapped;
- At the junction of the partition and the main walls, the connection should be made using reinforcement or nails;
- Ultimately, the surface of the foam block partition is plastered and sheathed with clapboard or other finishing material.
Information. If the blocks are moistened with water before laying, the density of the finished structure will be higher.
Separation of a section of ceramic coating along with the solution from the base
The most likely cause of such destruction is an incorrectly selected primer mixture or no priming at all before laying the tiles. A common mistake when preparing the base is priming with concentrated latex, which forms a thin rubbery film on the surface that prevents adhesion to cement-based tile adhesives.
The separation of the laid tiles along with the mortar from the base can be caused by deformation of the base
The preserved finish is inspected and tapped to identify voids that are fraught with additional destruction of the cladding. If the area of the collapsed finish and existing voids in total exceeds 20% of the total area of the base, then the wall or floor cladding will have to be re-done in full, taking into account the mistakes made, since after partial repairs the destruction of the old tiles will most likely continue.
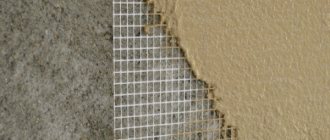
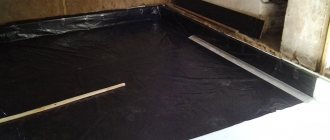
Insulation
Regardless of the adjacent room, the insulation of the partition in the bathhouse must be protected on both sides.
The vapor barrier film covers the side where the room temperature is higher, and a waterproofing layer is attached to the other side.
These conditions are mandatory if you want to maintain the thermal insulation properties of the insulation for a long time.
Many people wonder how to insulate a partition in a bathhouse, the answer to which is completely simple - the material must be environmentally friendly and fireproof. Mineral or basalt wool works well.
Attention! In order to provide additional protection against heat loss, it is necessary to cover the insulation with foil material. In this case, you will not have to make a thicker heat-insulating layer, and the insulating properties of the bath will improve significantly.
Types of violation of the integrity of the finish and ceramic defects
- Separating a section of the facing coating together with the mortar from the base.
- Detachment of ceramics from the adhesive composition on the surface area.
- Failure of fastening and falling of a single tile.
- Cracks in firmly seated ceramics.
- Sinks and chips on the surface of the tiles.
To determine the reasons for the destruction of the finish, you need to inspect and analyze both the materials used in the repair and other factors that are not always noticeable at first glance.
Both old and recently glued tiles can fall off
Possible causes of damage to ceramic finishes:
- incorrectly selected tile;
- incorrectly selected primer;
- deformation of the base under the ceramics;
- physical wear of the coating;
- base not primed before laying tiles;
- uneven base under the tiles;
- low-quality tile adhesive;
- incorrectly applied layer of adhesive solution;
- aggressive operating conditions (detonation);
- mechanical damage from impacts;
- sealing technological and installation holes.
Any of these factors or a combination of several circumstances may cause the destruction of a section of the facing coating or individual products.
Let's consider methods for repairing tiled surfaces depending on the type of damage.