Building even a small garage with your own hands seems like an expensive and overwhelming task to many .
In reality, everything is not so scary.
To create a foundation, all you need is to get used tires.
They are made of high-quality rubber, so they can withstand heavy loads, insulate from moisture, and are reliable and durable.
They are easy to get - there are plenty of car tires at any service station. Wheel tires often have no price at all at service stations - they will give you free or sell them for pennies .
Don’t forget your friends and neighbors who have a set or two of old tires in their garage that they can’t get around to throwing away.
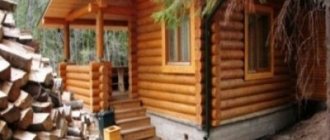
Construction options: bathhouse, barn, house
If you believe the reviews of experts, a foundation made of tires will be just right for small buildings .
On it you can build:
- a barn or garage for several cars (if you cover the tires with broken bricks, screenings or loam, they will not bend even under the weight of the truck);
- terrace and summer veranda;
- gazebo and garden house;
- small bathhouse.
It is also possible to build a small residential building on a tire foundation, such as a one-story dacha or an outbuilding of a cottage. In this case, the tires should be laid not in one layer, but in several. Before building a house, you need to dig a foundation pit .
For block or brick buildings above one floor, are not suitable as the basis of a building .
They should be used for the foundations of light residential structures only.
The main stages of arranging a building support
The foundation made of wheel material can be of two types:
- tiled;
- columnar.
https://youtube.com/watch?v=videoseries
Tiled
In the first case, to build a foundation, tires are laid under the base slab of the structure. To build a foundation, you can use a simple technology that includes the following steps:
- The first step is to prepare the site for the construction of the foundation. To do this, it is necessary to remove the fertile layer of soil in the area intended for the construction of the foundation. The fact is that the so-called humus contains a considerable amount of substances and microorganisms that can cause the destruction of concrete and other materials. As a rule, the fertile layer is no more than 25 centimeters. The surface obtained after removing the soil layer must be leveled using a building level.
- Car tires are laid out on a leveled area. You can also use tractor or bus tires. It is advisable to choose tires with a larger diameter, as they can provide better protection against moisture and greater stability and reliability of the structure. Tires must be placed flat, close to each other. When arranging a base of tires with your own hands, the number of layers is determined depending on the thickness of the tires used. For example, it is enough to lay tractor tires in one layer.
- It is advisable to lay ordinary car tires in two rows. In addition, when choosing the height of the foundation and laying tires, you need to take into account the characteristics of the terrain and soil. If the soil is a swampy, unreliable area with high humidity, it is better to make the base higher so that the structure is raised as high as possible above ground level and does not come into contact with moisture.
- Also, do not forget about the underground or basement. If you plan to install them in your home, you need to decide on the location in advance and not place tires in the selected area. Empty gaps will form between the tires during the laying process; it is advisable not to leave them in this form, but to fill them with gravel or broken bricks. It is not recommended to use sand and crushed stone for these purposes, since the base under their influence can cause severe shrinkage.
- The next layer on the tires is roofing felt. You can also use other roll materials, however, roofing felt is the most suitable, based on the characteristics and price-quality ratio.
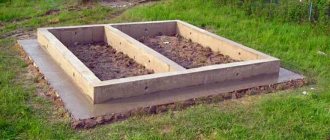
- A formwork made of wooden boards is installed on top of the roofing felt. The height of the sides should be approximately 15 centimeters.
- Next, concrete mortar is poured into the prepared wooden boxes. At the end of the work, you need to leave the concrete for up to ten days so that it dries completely. The formwork cannot be removed before this date.
Columnar
Do-it-yourself columnar foundations made of tires are arranged somewhat differently. In this case, the technology involves the use of tires as supporting pillars of the structure.
- In order to correctly install tires, you first need to calculate the exact location of the future structure and outline where exactly the corners will be placed.
- Next, as in the case of a slab foundation, it is necessary to prepare the site. First, the fertile layer is removed. After this, you need to dig a foundation pit over the entire area of the future building. The soil inside the recess is well compacted and leveled, after which a layer of fine crushed stone is poured onto the bottom. After this, you need to drive small posts in the place where the tires are installed and measure the distance between the proposed supports. The deflection should not be large so that the load is distributed evenly across all supports.
- Then tires are put on the pegs, leveled and covered with crushed stone. A well formed by several layers of tires must be completely filled with crushed stone. Next, a layer of roofing felt is laid on top of the tire, and then formwork is installed, which is then filled with concrete. After the solution has dried, you need to lay the bottom trim made of timber.
Backfilling on heaving soils
Loams and other types of heaving soils have a high water content. When it freezes and expands, such soils begin to rise and swell. Therefore, you can’t just build anything on them.
However, you can:
- Remove all raised soil and replace it with coarse, well-compacted sand. Water “does not linger” in it, it does not freeze and does not swell.
- “Heat” the soil. Put a layer of some kind of insulation between it and the house.
- Drain water using a special drainage system.
A tire foundation for heaving soils is a good choice because:
- rubber is a material that can withstand extreme cold and does not deteriorate for many decades;
- a tire foundation, unlike many other foundations, can easily withstand soil vibrations that are characteristic of heaving soils;
- rubber does not absorb moisture, it has excellent waterproofing properties, so the tire base will not expand or move much under the influence of frozen water.
Conclusion
In the video presented in this article you will find additional information on this topic. Also, based on the text presented above, we can conclude that a foundation created on the basis of tires is quite simple to make. At the same time, taking into account the availability and price of this material, the finished structure will be inexpensive and at the same time very practical (see also the article “Strip foundation for a bathhouse: from excavation to pouring concrete”).
Did you like the article? Subscribe to our Yandex.Zen channel
Construction options
You can create several types of foundations from rubber tires. The most reliable of them, developed by specialists, are columnar and solid.
No hard-to-find tools or materials are needed to create a columnar or solid base.
But in any case, you can’t do without:
- rake or pipes for compaction;
- bricks (whole and broken);
- sand, roofing felt or linoleum;
- formwork boards;
- building levels;
- metal fittings;
- shovel
Columnar
A columnar foundation made of tires is especially needed for buildings that are being built in an area with increased seismic activity.
When it shakes, the tires will become a kind of soft buffer , capable of absorbing even strong tremors.
They will protect the building from cracks.
Tires from trucks, agricultural and special equipment such as tractors or large snowblowers are best suited for building foundations.
They have a larger diameter, so the weight of the building is distributed more evenly . The foundation of large tires is stronger and more reliable.
At first:
- “We clean the soil”, get rid of roots and stones.
- We remove the top 20-30 cm of soil saturated with moisture and dig a pit to lay the foundation. We do the installation only in two layers, then it will be much stronger and more reliable.
- We mark the boundaries using pegs . We put the tires on the pegs. We place the first tire exactly in the middle. Using a special tool (called a level), we perform horizontal alignment. It is very important that the tires are placed on the same plane to each other , otherwise they will not form a normal reliable base.
- We fill all the voids between the tires with broken bricks.
- Cover it with crushed stone and compact it.
- We moisten the crushed stone.
- Pour the concrete solution (into the inside of the tires).
- The concrete will set in 4-5 days. Then it will be possible to begin installing the formwork (the height of its sides should be at least 10-12 cm). You can remove it in at least a week and a half.
Solid
You can create a foundation with a continuous layer in different ways. The most common is the tiled option.
Such a foundation is a two-layer, evenly laid base made of tires.
We create a tiled base from tires like this:
- We clean the area , remove the moisture-rich layer of soil. There is no need to make a pit deeper than the freezing point of the soil.
- We lay down the tires. Tires should be the same, preferably with a larger diameter . These tires are more durable.
- the voids between the tires with fine gravel or broken bricks. Sand is not suitable for this. If they fill voids, the foundation can quickly sink.
- We put roofing felt on . Thanks to it, the surface intended for pouring concrete will become more even, and there will be no need to spend money on expensive waterproofing.
- Along the perimeter of the bus base of the building we build formwork with wooden sides at least 10 cm high.
- Within the territory outlined by the formwork, we lay reinforcement .
- Cover with concrete mortar.
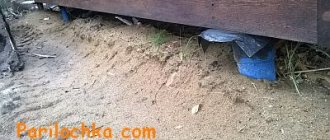
Without soil removal
A foundation made from car tires can be built without removing the soil at all. There is nothing complicated about it. We do this:
- We lay tires around the entire perimeter of the building.
- Fill with concrete mortar.
- We tie the tires with channels.
At the end, we bind the lower part of the building.
We invite you to read reviews from forum members about building a foundation from tires with your own hands for a barn, for a bathhouse or for a house on the Forum House website.
Where did the legs of the tire foundation come from?
Having studied the sources, I came to the conclusion that people have been using such supports for quite a long time, but they have become more widespread thanks to the Internet; on one forum house there is already a third thread discussing the foundation for a house on tires.
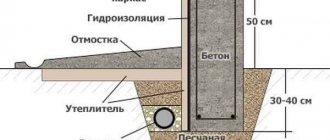
There is a patent for such a foundation, comrade Mikhail Egorovich Semykin, who has patented the technology for constructing foundation supports using tires. His tires work to increase the area of support for the foundation; the soil is swampy and does not hold the load well. This is what it looks like for him.
Option from Semykin
Where: 1 – concrete slab, 2 – Linoleum (Roofing felt), 3 – tires.
Building a house from tires
From tires you can build not only a foundation, but also real strong and reliable walls of a house :
- We place the tire foundation on a belt (made of reinforced concrete);
- we build tire walls, doing mutual dressing (similar to the one that is used when laying bricks);
- we fill the voids between the tires with a clay solution (an alternative is plastic clay);
- We cover the “yard” and the inner sides of the walls with wood and plasterboard;
- so that the tires cannot catch fire, we must plaster the walls;
- We reinforce the walls with reinforcement to make them stronger and more stable.
A house with walls made of tires, built with your own hands, is characterized by a high level of thermal insulation. This advantage allows you to significantly save on heating .
Errors and recommendations
The most common errors and recommendations for eliminating them:
- The tires around the perimeter of the bathhouse should not be left open. When directly exposed to sunlight, tires may emit an unpleasant odor due to toxic emissions. Also, rubber products are destroyed under the influence of ultraviolet radiation.
- Exposed rubber products are painted or fenced with corrugated sheets, metal, asbestos sheets or other material.
- Tire filling does not need to be thoroughly compacted. It is enough to spill the sand mixture with any filler with water.
- To ensure that the slopes retain their damping properties, the tires are not filled with cement or concrete mortar.
Is it possible to make a foundation for a bathhouse with your own hands?
Of course, it’s possible to build everything yourself, but you need to have at least a little knowledge and experience. However, we will share our knowledge with you.
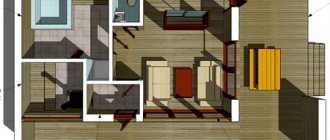
Construction is preceded by a project in which you decide on the size and layout of the building. Then certainty comes about the materials from which the bathhouse will be made.
But before moving on to foundation calculations, etc., it is necessary to conduct geological and hydrological studies of the site. Or raise documents if they have already been carried out during the construction of the house.
Geological data will show how deep the groundwater is and how deep the bearing layer lies. In addition, you need the freezing depth of the soil. With these data, you can calculate the required depth of the foundation, its height and the amount of materials required.
We have an article that talks about the calculations of the foundation, as well as all the technological stages of its manufacture.
From calculations we move on to site marking and excavation work. Afterwards, depending on the type of foundation, part will be poured into the prepared formwork or casing pipes with concrete, the rest will either be laid out of brick or screwed into the form of piles. For columnar and pile structures, the next stage is the manufacture of a grillage.
The finished foundation must be waterproofed horizontally. (Vertical waterproofing is done as necessary.) After this, the construction of walls from the selected material begins.
Unfortunately, a review article has its limitations, so here is a larger article with step-by-step instructions on how to lay the foundation for a sauna with your own hands.
Useful video
And here is a video that demonstrates all the stages of building a bathhouse with your own hands.
Pouring concrete
Loading a mixture of cement, sand, crushed stone and water does not cause difficulties, since the inner diameter of the tires is quite wide. The main thing is to use a fine fraction of crushed stone so that the solution completely fills all the voids inside the tires.
When constructing a foundation from several rows of tires, care must be taken to seal the joints. The tires are installed in a single row, level, the joints between them are coated with any construction waterproofing and, if necessary, clogged with tow. This way the concrete solution will not leak through the joints, will remain inside and harden completely.
After pouring, it is necessary to place some flat slab on top of the tires and install pressure on it in the form of several bricks or cinder blocks. This will ensure compaction and uniform distribution of the concrete solution throughout the available space inside the tires, and will also prevent subsequent flattening during construction.
Do-it-yourself sequence of work
Even the simplest method of making a tire foundation requires careful preparation. It begins with drawing up a project and making calculations of the necessary property.
Tools and materials
To work you will need tools:
- shovel, hammer, axe, hacksaw;
- level, tape measure;
- Bulgarian;
- tamping;
- marker.
The need for a concrete mixer depends on the volume of mortar that will have to be made for pouring and the type of base. Post supports can be poured by hand using a tray or bucket with a mixer. To pour a slab foundation, you definitely need to purchase a concrete mixer.
You need to buy the following materials:
- geotextile fabric;
- boards for formwork;
- cement;
- sand;
- crushed stone;
- dye;
- rope.
Columnar foundation
For structural strength, concrete mixture is poured into tires
The decision to create a supporting structure is made when construction is carried out on dense and stable soil, including on slight slopes. The pillars are installed at the corners of the building, as well as under its internal and external walls at intervals of 200 cm. If there is no fertile layer, installation can be carried out without first removing the soil. But this happens rarely; the summer resident still has to do excavation work.
The installation of pillars should be carried out in the following sequence:
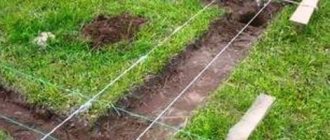
- Carry out markings, check the correspondence of opposite sides and diagonals. Mark the locations for the supports by driving stakes into the ground.
- Dig round pits, compact their bottom, and lay a geotextile lining.
- Make a backfill of sand and crushed stone, level and compact the bed.
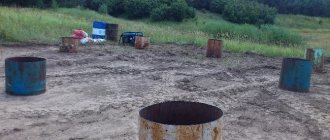
- Lower the wheels into the holes and give them a strictly horizontal position, using a level and a shovel.
- Make a mixture of crushed stone and sand, moisten it to fill the space inside the tires. Repeat the procedure until the desired height is reached.
- Make and pour concrete mortar into the assembled shafts. Remove air bubbles from it with a steel pin or an electric vibrator. Level the surface.
- Allow the structure to stand for 28 days to gain full strength.
Slab foundation
For slab foundations you can use tires of different sizes
Monolithic foundations are made with the expectation that they will last throughout the entire expected life of the building. These are monumental structures designed for large vertical loads.
Construction stages:
- Carry out markings - draw the outline of the future foundation on the site in accordance with the previously drawn up diagram. It is necessary to provide a place for installing formwork or strapping.
- Carry out soil excavation. The depth of the pit should be between 50-80 cm, depending on the height of the tires and the thickness of the cushion. Clear the bottom of the pit from stones and plant roots, level it and compact it thoroughly.
- Place geotextile fabric in the pit, securing its edges. Pour sand and crushed stone. Moisten, level and compact the fill.
- Prepare the filling. This is a mixture of solid fragments and sand, which ensures the absence of voids. It is better if the fragments have a minimum size.
- Install the formwork. To make it easier to remove after the solution has hardened, attach cellophane, roofing felt or other similar material to the inner walls of the mold.
- Pour the mixture into the voids between the wheels and into their internal cavities. Compact well and level the surface. Check the horizontal level of the surface with a level.
- Lay a layer of waterproofing. Make the joints of the strips with an overlay of 15-20 cm, then glue them with tape.
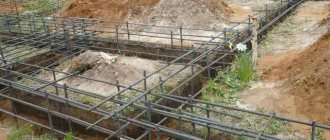
- Make a grid from reinforcement. Place it on supports 2-3 cm high.
- Mix the concrete solution and pour it into the mold so that it covers the tires with a layer of 5-10 cm, depending on the expected load. Level the surface.
- After the concrete stops flowing, cover it with cellophane. After a day, start watering the slab daily with water to ensure it dries evenly.