In this article we will talk about an additional room no less valuable for a bathhouse than the attic - the basement. Namely, about what can be made from it and how to use it, especially since often a basement already exists only due to the fact that this building was at one time converted into a steam room. We will also talk about many technical subtleties and secrets, knowledge of which will help you make your baths an entire multimedia recreation center!
Yes, you can’t live in a basement all the time - a purely human factor comes into play here, when the lack of sunlight and awareness of being underground has a depressing effect on the psyche. But spending a weekend with friends or family enjoying pleasant bath procedures and watching excellent quality and sound of a movie is quite a pleasant experience. After all, the Russian bathhouse has long been no longer perceived only as a washing or laundry room - now it is a traditional and multifunctional source of recharging for any urban person.
- 2 How to build a bathhouse with a basement?
- 3 Waterproofing and ventilation of the bath basement
- 4 Finishing: breaking the perspective and raising the ceiling
- 5 Why does a bathhouse need a basement? Amazing solutions!
Features of building a cellar in a bathhouse
Construction of a basement under a bathhouse is quite a complex operation even for experienced builders.
It is much easier to first build a cellar, and then, above it, a bathhouse. But if you are patient, you will succeed! By the way, there are even entire projects of ready-made bathhouses called “House-bathhouse with a cellar,” but these are options that you can order from construction companies; our task is to build a cellar for a bathhouse with your own hands!
For example, areas of gas underground. When they are opened, there is a risk of collapse. And if you are completely unlucky and you discover a large karst sinkhole, the bathhouse, the house, and you may go underground. Therefore, you should be very careful when studying the soil. To avoid mistakes, we recommend contacting the appropriate company.
Pay attention to the depth of groundwater. Professionals do not recommend building a basement directly above them
The minimum height is 50 cm. Otherwise: increased humidity, soil erosion and the risk of wall deformation and even collapse.
It is recommended to use blocks for construction. This is one of the easiest materials to use, combining good technical characteristics and low cost. But remember that blocks are afraid of moisture, so equip them with high-quality waterproofing. A sand cushion is required.
Bathhouse with a cellar: project and its nuances
The most important nuance that was indicated but not disclosed is waterproofing. It must be of very high quality, otherwise the service life of the cellar will be relatively short.
Why do you need to spend extra money on repairs? It is the arrangement of waterproofing that we would like to pay the main attention to. Moisture can penetrate from all sides: from below, through walls or through the ceiling
Even when vapors enter the room, condensation will accumulate, which will lead to the formation of moisture. We get rid of all factors one by one
Moisture can penetrate from all sides: from below, through walls or through the ceiling. Even when vapors enter the room, condensation will accumulate, which will lead to the formation of moisture. We get rid of all factors one by one.
- The entrance to the basement should be optimally equipped. There is no need to do it in a steam room or in a washing compartment, otherwise moisture will enter through it, both directly and in the form of steam. It can be installed on the side, in the rest room or dressing room.
- Moisture penetrates from the walls due to burst pipes or rain. In the most advanced cases, groundwater is to blame for the penetration of moisture through the walls. You can get rid of this trouble with the help of high-quality waterproofing.
- From below, water enters the basement due to groundwater. To avoid mistakes, conduct an experiment. Calculate the maximum depth in the room. Dig a small hole to this depth next to the bathhouse and watch it for two days. If there was no water in it, you can begin construction. Otherwise, you should abstain.
- Condensate. This problem can be solved with the help of ventilation.
Some builders prefer to use a drainage system to drain groundwater from under the bathhouse. But we do not recommend that you do this, because it has two significant drawbacks.
Firstly, it is expensive, and you will have to spend money on electricity every day, even when you are not at home.
Secondly, the soil is washed away along with the water.
The result is gradual shrinkage, deformation of the walls, and destruction.
Possible problems
There are several situations that arise in the cellar under the bathhouse.
- Flooding during floods. This is inevitable for any type of cellar. You need to deal with this problem as it arises.
- Unsuitable soil composition may cause construction to be abandoned.
- In advanced cases, condensation turns into puddles on the floor. This occurs due to the large temperature difference between the floor and ceiling of the room. This phenomenon is especially relevant during periods of using a bathhouse. And the owner will only have to guess where the leak is. Therefore, the presence of forced ventilation is mandatory.
- Arranging a basement under any house is a threat of the building collapsing. Therefore, before starting work, consult with specialists and make accurate calculations.
What work will be required
A bathhouse in the basement of a private house needs high-quality comprehensive insulation. Since it belongs to rooms with high humidity, this implies the penetration of steam into the walls. We are talking about deep penetration into the structure of the material, which will lead to its excessive wetting. As a result, the insulating layer will begin to deteriorate, so it is recommended to provide an air corridor between the thermal insulation and the wall, which will solve the problem of air drying out. The width of the corridor should not be more than 10-20 centimeters. It is better not to use polystyrene foam as an insulation material, as it tends to emit harmful fumes when exposed to high temperatures. For these purposes, a special thermal insulation material is used, which is intended for this type of work.
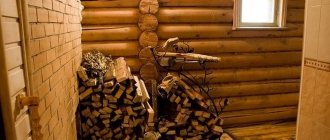
Natural wood is an ideal material for sauna cladding. However, you should not cover it with varnish, which, like polystyrene foam, emits harmful vapors when exposed to high temperatures. A do-it-yourself underground bathhouse must, first of all, be safe for health, so such materials must be excluded. The installation of a chimney is mandatory when installing a stove, regardless of the type of fuel (coal, firewood). If one is provided for in the house design, this is the best option. Adding it to an already completed structure is a very difficult task.
When choosing a stone, you must operate with the following criteria:
Wall masonry
The next day you can start laying. A solution of 1:3 or 1:4 is prepared. The sand should be sifted. For better adhesion, wet each brick in water before laying. To do this, you need to place a bucket of water nearby. Carefully lay the first row, be sure to poke. All the walls are brick thick. Next, in order not to damage the film, pour 5 cm of sand onto the bottom of the cellar. After three rows, supply ventilation should be provided. A corrugated pipe for cables with a diameter of 160 mm is suitable. In the future, condensation will flow down it, so it is better to move it a little inside the cellar, and in the future place a jar under it. The top of the pipe is subsequently insulated and laid in the top row of the plinth so that the inflow is outside the building.
Necessary materials for the construction of the planned project
The use of hollow blocks is simply an excellent solution for building a bathhouse. Light weight will help reduce the load on the foundation of the building, this will make it possible to make the foundation less durable, which will save costs on it.
In addition to the fact that the porous structure of the cinder block copes well with the task of preserving heat in all rooms, it also prevents fire and overheating of the wooden part of the building.
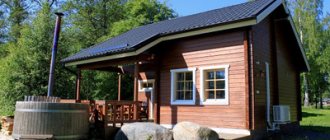
A hipped roof will add attractiveness to your idea, and a feature of its design is that it saves on the amount of wood for the rafter system. In addition, such a roof provides the necessary slope so that the roof does not experience serious loads due to snow in the winter season.
Because of this roof design, the bathhouse itself with a gazebo only receives benefits, since a good layer of air is formed under the roof, retaining quite a bit of heat. And the base, that is, the floor, must be raised above ground level by 40-50 centimeters for less heat loss and is made of natural wood. It is preferable to choose such a floor in favor of comfort; it is most pleasant to walk on it with bare feet.
To arrange the floor in the gazebo part of the building, combined with a bathhouse, it is necessary to use special boards, so-called terraces, which should be laid allowing for small gaps. The boards must be carefully sanded and free of sharp edges and chips.
Sauna assembly
First of all, you need to determine the location where the sauna will be placed. When choosing the location of a future sauna in the basement of a private house, you must be guided by the following criteria:
- The height of the basement ceiling is sufficient to accommodate a sauna;
- One or two sides of the future sauna are adjacent to the wall;
- There are convenient accesses to ensure ventilation of the room;
- There are connections for electricity, sewerage, water supply;
- Basement construction materials are fire resistant.
Two options are recommended as building materials for building a sauna in the basement - sandwich panels and a frame sauna made of bars.
Sandwich panels
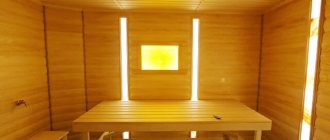
The frame for building a sauna in the basement of a private house from sandwich panels is shown in the figure below.
Figure 2. Sauna in the basement of a private house: diagram of a frame made of sandwich panels
We intentionally did not indicate the dimensions in the figure; only the structure of the sauna in the basement is shown. The sauna project is individual for each home. Its dimensions, options for placing the steam room, other rooms, and the amount of material must be determined independently. Figure 2 shows a schematic diagram that can be used during construction. The connection diagram of the sandwich panel frame boards is shown in sufficient detail and clearly. The places where the sauna stove is attached are shown in green. Blue color – supply air vent. Brown crossbars are where shelves are attached. Pink color is the exhaust vent. On the back wall there are layers of insulation and interior decorative panels. On the ceiling, to avoid increased heat loss, a layer of insulation is laid twice as thick as the wall panels.
Frame made of bars
This option is the simplest. The main thing is to make the frame correctly, calculate the dimensions between the vertical bars, and adjust the corners of the future room. Cover the outside of the sauna walls at your discretion: with clapboard, plywood, or other material. Next, lay a layer of mineral insulation. For vapor and waterproofing, use foil material. Use rolled material - it is better and has fewer joints.
Figure 3. Sauna in the basement of a private house: steam and waterproofing of the sauna
We carefully connect the joints with foil tape. The next required element is slats (longitudinal or transverse) to prevent the inner lining from adjoining the vapor-waterproofing material. It is advisable to use lining made of non-coniferous wood as internal cladding. We insulate the ceiling in the same way, only lay out the insulation in two layers.
Making the floor in the sauna
The floor of a sauna in the basement of a private house can be varied, depending on desire. The easiest way to make a floor is from ceramic tiles, and in order to stand on it pleasantly without getting burned, a grated flooring is made.
Installing the stove
The sauna stove is the main element of the system. Not only the proper operation of the sauna, but also the fire safety of the building as a whole depends on the quality of the stove.
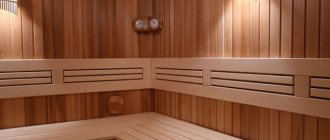
Figure 4. Sauna in the basement of a private house: electric sauna stove
It is advisable to install an electric sauna stove in the basement. Power, control system, floor or wall placement must be selected individually.
For small saunas, we recommend using wall-mounted stove options. Place the stones in it evenly and not tightly so that the heat from the stove rises freely and prevents water from getting directly onto the walls of the stove.
Thanks to the unique design, the walls of the sauna stove do not become hot. Therefore, it is better to fence the furnace if this is allowed by its design.
Security measures
In order for a basement sauna to have the right conditions, it is necessary to maintain the appropriate relationship between temperature and humidity. This relationship describes the "right to the sum of 110". According to this formula, the sum of the temperature (in degrees C) and humidity (in percent) in the steam room should be 110 (for example, 70 degrees C and 40%).
Otherwise, placing a bathhouse in the basement is a complete plus. You can start heating a sauna without leaving your home. Residents can take a steam bath and go out to drink kvass right in the kitchen. You will save on building a free-standing bathhouse - after all, you no longer need a log house, say, somewhere on the outskirts of a summer cottage.
Wall masonry
Once again, you should mark the walls (you can simply lay out the brick). Dig a trench 30 cm deep and 30 cm wide around the perimeter. Prepare a concrete mixture in the proportions of cement, sand, crushed stone - 1: 2.5: 4. Fill the trench with concrete to the base, lay the reinforcement, drowning it halfway into the concrete. Any corrugated fittings will do.
After three rows, supply ventilation should be provided. A corrugated pipe for cables with a diameter of 160 mm is suitable. In the future, condensation will flow down it, so it is better to move it a little inside the cellar, and in the future place a jar under it. The top of the pipe is subsequently insulated and laid in the top row of the plinth so that the inflow is outside the building.
An interesting project with a combination of construction materials
A remarkable effect can be achieved by using several materials at once. A bathhouse with a gazebo, for the construction of which brickwork and natural wood were used, looks very original compared to other projects.
Instead of a more affordable cinder block, which in principle can be plastered and painted, it is better to use a more expensive but strong brick, which will give a more wealthy appearance to the bathhouse and will absorb heat well in the warm season.
The dimensions of the planned mini-complex are approximately 5x10.5 meters. The main building, that is, the bathhouse, will take approximately 4.5x5 meters. This area is quite enough for a one-story building to accommodate, while maintaining a good volume of room, a steam room, a wash room, and even a recreation area, such as a veranda or gazebo. You can also find a small corner for the bathroom and pre-exit corridor. This bathhouse can be used comfortably throughout the year.
Since all the primary rooms are connected to each other under one roof, a stone wall is placed right in the center of the entire project in order to better heat three rooms at once. And the fireplace is not small in size, which can be used as a barbecue in the gazebo and can additionally heat one of the walls of the bathhouse. With this arrangement it will be possible to warm up the entire structure in a short period of time.
Features of the construction of a bathhouse under a residential building
The basement itself does not have good air exchange, and the placement of a bathhouse also adds humidity
To avoid stagnant odors and stuffiness, it is important to provide air circulation in the bathhouse - install special fans or deflectors. The basement is the basis of the entire house, so it is especially important to ensure compliance with fire safety measures. Experts even recommend installing a separate exit from the bathhouse to the street, which, of course, is expensive and troublesome during construction, but can save lives if there is a threat of fire.
Sewage and ventilation systems for a bathhouse in the basement
Using a bathhouse requires a large consumption of water, which requires proper operation of the sewer systems. A well-organized water drainage system is the key to stable operation of the entire bathhouse. It’s not difficult to organize it with your own hands - you need a trench with a slope from the bathhouse towards the site.
The width of such a ditch is slightly more than 500 mm, the depth is below the freezing level of the soil. Metal pipes are laid in the trench and connected to the bathhouse with a septic tank or taken outside the site. Above the shaft, a mesh is attached with double corners to purify water, and covered with sheets of iron. With this design, the floor in the bathhouse should be sloped towards the shaft.
To take healthy procedures in the steam room, it is necessary not only to organize the drainage of water, but also the flow of fresh air. In a bathhouse, ventilation is one of the most important factors. Proper room ventilation is easy to do with your own hands without the involvement of specialists. A ventilation shaft is placed near the stove, from which fresh air from the street will flow inside, and an exhaust hood is made on the opposite wall to remove moist air into the general ventilation system of the house.
There are special systems with a fan, which, when turned on, draws outside air into the steam room.
Conducting electricity inside the bathhouse
Due to frequent high temperatures, it is necessary to lay electrical wiring at a small height from the floor, since all the hot air rises to the top.
But at the same time, you should not hide it inside the casing because of a possible fire. All electrical appliances used (lamps, light bulbs) must be resistant to hot air, and sockets and switches are generally not allowed to be placed in a steam room.
Waterproofing bath walls, floors and ceilings
Since the use of a steam room is associated with the constant use of water, it is necessary to carefully waterproof the walls and ceiling using bitumen mastic.
The floor is additionally protected with a couple of layers of roofing felt. After this stage of work, you can begin steam and thermal insulation.
Garage with utility block
Every person who buys a car first of all asks himself the question: where is the best place to keep it? Open parking lots are not the best solution, and closed ones are not always possible to find. But what if you live not in a city, but in a small town where there are no parking lots at all? Of course, in this case, the best solution would be to build a garage. It would be even better to build a garage with a utility block.
If it is not possible to build a garage on your summer cottage, then for these purposes you can use the simplest carport, which you can make with your own hands in a few days.
Wooden garage with utility block
Building a cellar under the veranda with your own hands
To build a cellar, you do not need special knowledge or professional education. Even a beginner can cope if he chooses the right approach to work. Let's take a closer look at all the stages of building a cellar with your own hands.
First of all, it is necessary to carry out engineering and geodetic surveys. To do this, calculate the depth of the lowest point in the cellar. Then dig a hole near the house of the same depth and observe it for two days.
If the ground gets wet or water appears at depth, this indicates a high level of groundwater. It is possible that you will have to move the cellar to higher ground.
Remember that building a cellar involves risks. They are small, but they still exist, so it is better to enlist the help of professional soil researchers.
Examples include voids and gas pockets. In the worst case, you may find a karst failure, which threatens to deform the walls of the house and even completely destroy it. Don't waste a small amount of money on soil research! The cost of saving may be too high
Next you need to dig a pit. Install anti-talk structures inside to prevent the house from collapsing. Ideally, it is better to first build a cellar, and then a veranda above it. If you have enough time to dismantle and subsequently install the veranda, do not regret it. It will be much more convenient for you to work, and your safety will increase.
A strip foundation is a trench arrangement of a seamless reinforced concrete slab of complex shape. It will require significantly less resources than a monolithic one, but the reliability will also be slightly lower. Let's consider the algorithm for its creation.
- Dig a trench about 25 cm deep and about 35 cm wide along the direction of placing the foundation.
- Organize a sand and crushed stone cushion. It performs the function of waterproofing. It also serves to evenly distribute the load over the entire foundation. The layer of sand should be about 6 cm, crushed stone - 8 cm.
- It is necessary to install reinforcing elements. They should be located approximately in the middle of the future foundation. Remember that the steel should not touch the ground and the sand and crushed stone cushion, otherwise this will inevitably lead to corrosion of the metal.
- Install timber formwork. It is possible to install the foundation without formwork if the soil is hard enough.
- Now pour in the liquid mixture. It is not recommended to take breaks during work to achieve maximum uniformity. Lay the foundation layer by layer until you reach the desired height.
- Now wait 4 weeks, during which time the mixture hardens. Assess the structure, there should be no cracks. The foundation is ready to use!
A monolithic foundation is built a little differently.
- Sand is poured onto the bottom of the pit. The layer thickness is approximately 6 cm. Ordinary river sand will do.
- Next, a layer of crushed stone is poured (up to 10 cm). The function of the pillow is the same as in the previous case.
- The next stage is the installation of wooden formwork. Remember that it should rise above the proposed foundation by at least a few centimeters.
- Install the fittings. The rods should be arranged in two layers crosswise. The lower one does not reach the sand-crushed stone cushion by 7 cm. The upper one is located at the same distance from the top of the foundation.
- Next, the liquid mixture is poured according to the same rules, wait 4 weeks.
When building a foundation, voids often form inside. To avoid them, and to ensure the strongest foundation possible, we recommend that you use a vibrator.
The walls are erected using standard cement mortar. After the second row of masonry, it is recommended to create a hole for ventilation.
Laying is carried out to the very top of the pit.
Floors are made of wood, concrete slabs or simple roofing felt. Calculate yourself what will be most convenient for you.
The advantages of having a garage with a utility block
It is in the garage that the car will have the best protection from any environmental influences and dishonest people. Statistics show that almost 80% of car thefts occur in cars that are parked not in garages, but in courtyards. And no owner would want to risk his iron horse.
In addition, being in the garage, the car is much less exposed to the vagaries of the weather - snow, rain, wind, and sometimes hail, can seriously spoil the appearance of the vehicle. If the car is parked in a garage, this is guaranteed not to happen. Also in the garage it is protected from the negative effects of the summer sun, which causes the upholstery to fade, the plastic dashboard to dry out and crack.
Many car owners like that a garage equipped with a high-quality inspection pit allows them to carry out inspections and simple repairs on their own without visiting a service station.
Of course, the garage is used not only as a room for storing a car, but also for storing a huge number of other things. In private homes, this could be bicycles, food supplies, gardening tools, winter (or summer, depending on the season) tires and much more.
In some cases, when too many of these things accumulate, garage owners decide to build a utility room to store them. And the most far-sighted people immediately build a garage and a utility unit under one roof.
This allows you to save time and effort, design two combined buildings in advance and immediately gives you the opportunity to store things in the way that is convenient for you.
In this case, you won’t have to move a large number of things from one room to another later. In addition, when constructing both buildings, you can use the same material, so the aesthetic side only benefits.
Waterproofing and ventilation of a bathhouse basement
Thus, it is basements that are most susceptible to the negative effects of moisture - here it can penetrate from any direction. Therefore, even walls need waterproofing, for which a whole range of measures is carried out and for which it is necessary to allocate a lot of money and time during the construction process. But, naturally, if you are making the basement under the bathhouse residential, then first of all you need to make it dry.
So, if your bathhouse already has a basement, determine where exactly the moisture comes from:
- Through cracks in the floor and walls.
- On the surface of the walls in the form of condensation.
- From the upper room (for example, above the basement there is a washing room for a bath or steam room).
If the floors in the basement are literally flooded, it means that the groundwater under the bathhouse is too close. Test your fear: dig a small hole and watch it for 24 hours. If it receives abundant water, it is groundwater. They can be kept away from the bathhouse basement using a drainage well with a pump - effective, although costly. The disadvantage of such a system is that soil will also get into the water, which, although not harmful to modern filters, is gradually washed out from under the building itself.
Here's how to set up a drainage system around the basement: dig a small trench around the entire perimeter and lay a pipe wrapped in geotextile in it. This material allows water to pass through, but does not allow clogging dirt or fragments of branches.
And the condensation on the basement walls can be so strong that it forms puddles on the floor, which are safely perceived as moisture leaking from under the floor. But this is a common occurrence in the spring, when too damp air enters through the upper ventilation windows. And, if the basement floor turns out to be cold, streams immediately form on it. That is why high-quality insulation is needed in order to separate warm air from cold walls - this way condensation will never occur, and you don’t have to worry about dampness or mold.
If moisture in the basement appears due to condensation on the walls and floors, it means the ventilation is not organized correctly. To completely waterproof the basement floor from dampness, follow these instructions:
- Step 1. Remove the soil in the basement to a depth of 30 cm, and fill the bottom with a sand cushion up to 15 cm high. Compact the sand well, level it and check that there are no differences in height.
- Step 2. Pour concrete onto the compacted sand in a layer of 10 cm. Level it thoroughly.
- Step 3. Once the concrete is dry, apply hot bitumen to the surface in three layers. Each previous layer must dry well before applying the next one. Bitumen should also go onto the walls.
And then it is important to protect the basement from external dampness:
Of course, the sooner you start waterproofing problem areas, the better, because dampness can destroy walls. So, if these are cracks, then find every single one, fill them, fix the fiberglass reinforcement mesh and fill the entire floor with a layer of concrete. Hide the most problematic areas under hot bitumen - this will be a good barrier. And for problem walls, use coating waterproofing.
In addition to bitumen, today more expensive special compounds are also used, which are quickly absorbed into the surface being treated and immediately crystallize, thereby creating an excellent barrier to moisture. And the most popular today is the method of injection with a water-repellent liquid that saturates the entire thickness of the walls.
You can finally dry the basement after all the work using slaked lime: just leave the filled bucket overnight and pick it up in the morning.
You will be surprised, but it is easier to store vegetables in the cellar than to store furniture in the basement. The fact is that in the cellar there are always some open areas with soil, and the microclimate somehow self-regulates. But the basement is a closed system, and without normal ventilation it disappears. But the norms of SNiP 31-02-2001 are responsible for this. They say that in addition to ventilation exhaust ducts, the underground section must also have a window, at least the size of a small window. The influx of fresh air can be provided by ventilation ducts: for every 10 square meters their area should be at least 0.5 square meters, and they should be in each of the corners.
There should be two pipes in the ventilation system: exhaust and supply. The first one goes from the ceiling to the roof, and the supply one is on the opposite wall and goes from the floor. The first will remove air and cigarette smoke through the roof to the street, and the second will deliver fresh oxygen. Also, a constant optimal temperature is important for a residential basement. To control it, place a thermometer.
Finishing: breaking perspective and raising the ceiling
As a fairly budget option, compacted clay for walls and floors may be suitable if you can lay it out. Basement walls are most often finished with ceramic tiles, multi-layer plywood or stone. But ideally, for cladding the basement walls, use moisture-resistant plasterboard, which can be mounted on a metal frame. And then - what do you like best: stone or ceramic tiles, plastic panels, special moisture-resistant paints with a rich range or mineral plasters.
If serious mistakes were made in the construction of the basement, you will notice them immediately - damp spots will appear on the plaster. There is one more point: the basement is always the coldest place in the bathhouse. Therefore, its thermal insulation is as important as waterproofing.
Vertical lines on the walls and furniture, which also look stylish, will help to visually raise the ceiling that is usually low in the basement. Also purchase glossy or mirrored stretch ceilings, which also optically expand the volume of the room. Reference: the standard basement height is 1.92-2 meters.
It is convenient to zone the basement with the help of screens and a regular bar counter, but give up podiums and steps - these are traditional attributes of the attic, which has much more under-ceiling space.
The staircase to the basement of the bathhouse itself can also be a wonderful attribute of the interior - today there are so many options available! The main thing is to purchase or build one that does not slip (under bare feet after a steam room), is not steep and has comfortable handrails.
Because There is no natural light in the basement, so in the interior they give preference to light tones of decoration. Even if they don’t harmonize well with the bathhouse style. But it is better not to use green color at all, except in the form of upholstery on a billiard table.
Modern lighting design will also help get rid of the feeling of being in a cave and being enclosed - you can work wonders with it!
Ventilation of the basement under the bathhouse
The further operating conditions of the basement depend on high-quality ventilation. You cannot place furniture in a damp basement, you cannot store vegetables, and staying there for a long time is harmful to a person’s health.
In the basement under the bathhouse it is better to install a supply and exhaust ventilation system. A constant flow of fresh air and timely removal of “waste” air will reduce the risk of mold, stagnation of air masses, and moisture accumulation, even if the basement is well insulated.
Before carrying out ventilation installation work, it is necessary to calculate the ventilation system, determine the inflow and exhaust points, and the method of laying supply and exhaust air ducts.
The laying of air ducts is carried out when there are several, isolated rooms in the basement. The exhaust pipe is suspended at a distance of 100 - 150 mm from the ceiling level with the obligatory arrangement of intake openings in each room and the possibility of their adjustment.
It is advisable to place the exhaust air duct along one outer wall with the least number of turns and bends. The fan is installed at the last point of collecting all the air in front of the outlet pipe of the vertical pipe, which must rise above the ridge of the building by at least 1 m.
The supply part of the ventilation is mounted under the opposite wall at a height below 200 mm from the floor level. Fresh air is taken in through a separate pipe leading outside, no higher than 0.4 m from the ground level.
A grill must be installed on the intake pipeline to prevent rodents from entering the basement. A fan is installed on the supply pipe to improve the supply of atmospheric air masses.
The diameter of the supply air duct cannot be less than the diameter of the exhaust duct. An equal ratio of diameters will ensure high-quality supply and exhaust.
If there are no partitions in the basement, natural air circulation is arranged: the supply and exhaust pipes are installed diagonally in the room according to the fastening rules described above. The movement of air masses occurs due to the temperature difference between atmospheric and internal air.
Where to get a project for construction
Of course, before you start building a garage, especially if you are also planning a utility block, you need to have a project with you. This greatly simplifies the construction process, and also makes it possible to easily and quickly calculate the amount of building materials that will be needed for construction.
And here the question arises: where to get projects for garages with a utility block? There may be several possible solutions.
The easiest, fastest and cheapest way is to create a project yourself.
In this case, you do not have to contact specialists, wait for them to start working on your project, and also pay a lot of money for their services. The garage and utility block are built according to fairly simple drawings.
Project and drawing of a garage with utility room and canopy
The main thing is to clearly check the optimal dimensions and thickness of the walls. On the one hand, the room should be spacious enough to make it comfortable to stay and work. On the other hand, it should not take up too much space on the land plot. The effectiveness of thermal insulation depends on the thickness of the walls. That is, how quickly the room will freeze in winter.
If nothing comes to mind, you can look at the numerous photos of garages that are available here. Surely the options you see there will suit you or inspire you to create a project that suits you.
If you can afford to spend extra money on construction, you can turn to specialists. Yes, you will have to wait for some time and pay a considerable amount for their services. But the resulting project will be calculated down to the smallest detail.
The presence, location and size of windows, the thickness of the walls, the optimal area of the premises - all this will be calculated with really high quality. This means that you will not have any problems during the operation of the garage.
An example of an original garage layout with a workshop and a gazebo
Of course, before you start designing, seriously think about what kind of premises you need and how they should be located. For example, many people like a utility block with a bathhouse and a garage, where all the buildings are under one roof. On the one hand, it is convenient and saves space.
On the other hand, a bathhouse is always a source of increased danger, because in most cases it is heated using classic stoves. Therefore, think seriously: do you want to locate the garage in close proximity to the bathhouse? Or would it be better to place them at some distance from each other?
Bathhouse in the basement with a wood-burning stove: step-by-step instructions
When performing work, follow the instructions:
- We mark the future dividing wall and dig a trench.
- Fill the bottom with sand in a layer of up to 20 cm, compact it and water it with water.
- We install the formwork and pour the strip foundation.
- Lay out the wall. We use metal staples for attachment.
- We make a trench with a slope towards the site for drainage equipment. We lay square pipes in it and connect them to the central septic tank.
- Using double metal corners, we attach the mesh to the pipes and make an iron canopy over it.
- We make the floor with a slope towards the shaft. To do this, we cover it with two sheets of roofing felt and pour several layers of cement screed with gravel and roofing felt.
- We reinforce the second layer of screed.
- Apply a layer of waterproofing. It is better to use liquid glass or bitumen mastic for these purposes.
- We lay the finishing floor. The optimal materials for this are wood or tile.
- At the location of the furnace, pour a cement cushion 7-10 cm wider than the dimensions of the proposed structure.
- We lay a row of red bricks on top and waterproof the structure.
- We place the base of the stove on top in such a position that the combustion and blower holes go into the dressing room.
- We wrap the chimney pipe with insulation and bring it out through the base.
- We waterproof the ceiling and walls with bitumen mastic.
- We insulate the walls in the bathhouse using eco- or mineral wool.
- Cover with a layer of vapor barrier. It is better to use vapor-reflective foil. We leave a gap of 5 cm between it and the finish.
- After this we finish the walls with wood. Linden or larch are optimal for this.
What is better to build from?
The modern building materials market provides quite a large selection for the construction of garages and other outbuildings. The most popular are brick, wood, concrete and frame structures. Give each of these options serious consideration before you finally commit to one.
This video shows a very convenient garage functionality that you can make yourself
To make the choice easier, each option should be described in detail.
- Brick. Very comfortable, high quality and durable material. Buildings made of brick have a beautiful appearance. However, there are also a number of disadvantages. One of them is high cost. Yes, bricks are quite expensive. In addition, you will have to pay a fairly large amount to the masons who will do all the work. By the way, building walls also takes quite a lot of time.
- Tree. A great option, especially if your house is also built of wood - the garage will look great next door. Environmentally friendly, attractive and, importantly, costs much less than brick. Low weight allows in many cases to do without a foundation.
Excellent thermal insulation ensures that heating the garage in winter will be very simple: just turn on a medium-power heater for a few hours. But do not forget that wood is a flammable material. And garages often store reserves of oil, diesel fuel or gasoline. A simple oily rag can cause a fire. And a garage built from well-dried wood will be occupied in a matter of minutes. - Concrete. Quite a good solution - very inexpensive, accessible and simple. It is durable and easy to construct. Of course, due to its heavy weight, like a brick, it needs a foundation that distributes the load from the massive structure. Not flammable at all. Allows you to build a structure of any shape and complexity. Alas, he is not very attractive in appearance. Even with complex finishing, it remains a rather rough concrete box, spoiling the appearance of the entire area. Because of this, many people are forced to abandon it, choosing other, more suitable options.
- Frame construction. This option is suitable for people who want to get a really elegant structure on their site in a short time. Professionals will work on its construction, and you only need to tell us what the future garage should look like. And specialists will be able to build a garage with a canopy and a utility room of any size and shape to please you. Most of the work is done in the company’s workshops, and only the assembly of finished parts is carried out at your site. Therefore, construction takes a few days at most. The low weight of the structure makes it possible to do without a foundation (if there is high-quality waterproofing of the walls). However, even with insulation, a frame garage will cool down quite quickly in winter and heat up in the sun in summer. In addition, it is not uncommon for strong winds, which occur in many regions of our country, to damage frame structures. Therefore, it is worth considering: is this option suitable for you, or is it better to give preference to more suitable materials.
Condensation problem
So much condensation can form on the basement walls that it causes puddles on the floor. These puddles are often mistaken for groundwater infiltration from the foundation. Condensation on walls can form for various reasons, so effective insulation is also required to ensure that warm air masses are constantly removed from cooled walls. In this case, condensation will not form, so you won’t have to worry about mold colonies and high humidity. Often condensation occurs due to a poorly organized ventilation system in the room.
Condensation forms on surfaces when moist air cools.
The ventilation system in rooms of this type must be forced, because traditional supply and exhaust ventilation often cannot cope with such volumes of air. It is also recommended to install air conditioners or split systems. Equipment of this level will help combat condensation, high humidity, and stagnant air. But, of course, not everyone will decide to install an air conditioning system in their basement or cellar.
In addition, it is necessary to make vents in the basement walls that rise above the ground (if any), with the help of which it will be easier to ventilate the room if necessary. As a rule, basements under bathhouses are small, so a few vents are enough for relatively high-quality ventilation.
A basement or cellar under a bathhouse can be used for different purposes. If your bathhouse is large, then it is quite suitable for arranging a relaxation room or one of the main rooms of a traditional bathhouse. In a small cellar it will be convenient to store not only food, but also low-alcohol drinks for quick access to them.
Heating
The heating system for a bathhouse in the basement can be divided into two independent circuits. The first is used for general heating of the sauna, providing hot water for the steam room and shower. For these purposes, a double-circuit gas boiler installed in the utility room of the first or basement floor, outside the bathhouse, is ideal.
If the house does not have water heating, then to heat the basement you can use an industrial solid fuel boiler with automation and a built-in heat exchanger. In any case, the source of hot water should be installed outside the basement and bathhouse.
The second scheme is used to heat the sauna. In this case, only a factory-made electric heater should be used for the basement. The wiring for connecting the electric heater is laid behind the wall cladding, always in asbestos or fiberglass sleeves. Metal or plastic corrugations cannot be used. The heater must be equipped with grounding and UDO, the control panel is mounted on the wall at the entrance to the steam room of the bathhouse.
According to the conditions of SNiP, an electric stove for a bath in the basement must be equipped with an automatic shutdown when the maximum temperature reaches 150 ° C and a timer that de-energizes the heater after 8 hours of continuous operation.
Digging a pit
The construction of a cellar at the dacha with your own hands begins with marking the foundation pit, while adding from 0.5 to 1 m to the planned dimensions - this will make it easier to waterproof the cellar. First, the top fertile layer of soil is removed - it can later be used to create flower beds, terraces, alpine slides, etc. After this, the pit itself is dug (Fig. 6).
Before building a cellar, you need to choose the right place
A cellar is practically the same refrigerator, but with slightly different dimensions, and without the constant costs of repairs and electricity
Rice. 6. Digging a pit
To make sure that water is not seeping through the walls somewhere, the pit is allowed to stand for some time. Places where water appears are sealed with so-called “clay tampons” - they dig out a ditch (up to 50 cm deep) and trample it with crumpled fat clay, compacting it tightly.
Preparation period
To implement the desire to have a bathhouse with a basement with a specific use for the latter, it is necessary to develop a design solution, which is carried out by appropriately qualified specialists - design engineers. It is better to carry out the construction of a basement in conjunction with the construction of a bathhouse.
Installing a basement in an existing bathhouse is undesirable for several reasons:
Ladder
The simplest, but very inconvenient option is an extension ladder welded from pipes or knocked down from wood. It is advisable to include in the project a stationary staircase made of iron, concrete or metal; it is both more convenient and safer to use:
- the minimum width is 30-40 cm, but about 50-60 cm is better, it will be convenient to climb
A beautiful cellar will delight your guests for a long time
- if you plan to lower heavy, large-sized loads into the cellar that need to be carried by two people, then the width of the stairs should be at least 80 cm
- the maximum permissible slope is 75 degrees, but such a staircase will be within the capabilities of the young and energetic. To make the stairs comfortable, but not take up much space, the optimal slope is 45 degrees - it’s quite easy to climb (the flight is not very long) even with a load in your hands
- step height – 15 – 20 cm, width – 25-30 cm
You can purchase a ready-made cellar in the form of a capsule, which you simply have to hide in the ground
Brick consumption
For a cellar with internal dimensions of 2 by 1.5 m, a height of 2 m and a thickness of 25 cm, 800 bricks are needed. But you should also take into account the vestibule from the ground to the floor. It is also better to lay the floor in the cellar with bricks, filling the cracks with sand, so it is better to have 1000 bricks. The brick is better red, solid. You cannot use silicate.
If the height of the cellar is 2 m, and the number of rows is 25, build the walls up to 23 rows. Leave along the long sides (at the rate of 2 m by 1.5 m) six cavities 16 cm (2 rows of masonry) by 12 cm (half a brick) in the corners and in the center. Add last 2 rows. Last row with a poke. Next, on the outer sides, put three more rows of half a brick. They will serve as external formwork for the concrete floor. The inside of the masonry will serve as a support for the ceiling.
Installation of partitions
The easiest way to fence off a steam room and a dressing room is to make frame partitions from timber, insulate them and cover them with linden clapboard. To protect the wood from rotting, the lower part is slightly raised above the floor level. There are several options. You can lay a row of bricks and tile. You can mount the frame on an aluminum pipe or profile laid and fixed to the floor. If you use the bathhouse carefully and do not pour water on the floor, you can place the frame on the floor. But the insulation must be raised above the floor level! Near the stove you will have to build a small brick wall and cover it with metal.