Many regions of our country, unfortunately, cannot boast of solid soils: most territories are characterized by peat bogs, sandstones, loamy soils and other soils that require a high-quality foundation. This is worth paying attention to, since the foundation is the basis of any structure, a guarantor of reliability and long service life.
We have already written several times about the importance of this issue, so today’s article will not be about choosing the type of foundation , not about which one is better , but will be fully devoted directly to how to pour a foundation for a bathhouse.
Disadvantages of sawdust concrete baths
Sawdust concrete is ideal for building saunas, but it has some limitations that should be taken into account. In any case, these include the following:
- If a multi-story building is planned, then sawdust concrete is a fragile material. It has some limitations on load-bearing capacity.
- Under no circumstances should the material become wet for a long time, so you need to look at the operating conditions. Also, you should not build the structure on days when it rains. Some characteristics may be lost.
- If there are small rodents on the site, then it is better not to use sawdust concrete.
- Sawdust concrete is a new material that has not yet been sufficiently studied.
- The market for the production and modernization of such material is quite unstable, so the blocks may be of poor quality and not with the characteristics specified in the instructions.
- To maintain low thermal conductivity, the creation of cold bridges must be avoided. This problem is solved when masonry mortar based on perlite is used. But this will complicate the construction process a little.
As you can see, there are many more positive characteristics than disadvantages. That is why many people are now purchasing sawdust concrete and remain satisfied for a long time.
Preparation and marking of the site
In order to correctly carry out the marking, it is necessary to first prepare a project and calculate the foundation of the future bathhouse. You will use it to mark the walls.
Marking the corners of the walls is done by driving in pegs at the required points.
After this, you need to install four more pegs with precision. It is necessary to check the accuracy of the diagonals of the external walls of the bathhouse. If everything is correct, then we move on to marking the external walls of the bathhouse.
We stretch the rope from one peg to another, at the level of the future foundation. For greater reliability, you need to use a level.
Possible problems of an adobe bath
Of course, humidity will do its job over time and the lower rows of the adobe wall will begin to wash out. This is the problem with all bathhouses, be it a clay building or a log building.
In my bathhouse, the lower rims of the logs were turned into dust by ants and had to be replaced. Raise the bathhouse and change all the lower crowns.
In an adobe bathhouse there will be no such global construction costs. It is enough to start repairing damp adobe in time; it must be replaced with a new one.
The key to protecting an adobe bathhouse is a high-quality roof. The roof should cover the walls from rain as best as possible, that is, be low and wide. Therefore, if you do not have construction experience, it is better to entrust this part of the work to professionals...
People have been building from adobe for a long time; it is an affordable, natural, environmentally friendly material. Buildings made from it do not require the use of special tools, equipment or chemicals. All family members, young and old, can participate in this unusual construction!
Pouring premises from sawdust concrete. Nuances
1 foundation.
It must be monolithic, tape. No separate pedestals and piles, as some do for wooden houses. A structure made of sawdust concrete requires a strong strip foundation with a good reinforcement frame. The foundation for such buildings does not have to be large. A sufficient height of 50-70 cm and a width of 35-50 cm. The main thing is not volume, but the right technology. A well-made cushion of sand and crushed stone, a strong reinforcement frame, and good waterproofing.
For waterproofing, it is better to immediately buy plastic film. And lay out a trench for it under the foundation, before pouring. This film, firstly, protects well from moisture, and secondly, it ensures concrete-ground sliding. It would also be good to buy 3-5cm polystyrene foam. and place the sheets between the film and the outer wall of the trench under the foundation. the foam is cut into pieces ranging in size from the bottom of the trench to the top level of the ground approximately. Insulating the foundation in this way is a huge plus.
Well, then we mix the solution with crushed stone so that it is not liquid but like dough (since excess liquid makes the solution weak.) If you have M400 cement, then mix ONE to TWO (one part of cement to two parts of sand) and crushed stone until it is filled. Many may start arguing - they say one to two is too much, extra expenses. They say you need one in three, etc., etc. To which I will answer - based on my experience, I realized that good cement was only available during the union. And now he's shit. And only the one to two proportion of M400 makes the foundation really strong. Well, or as an alternative - Order a mixer. The cement mortar is usually good there.
2 Waterproofing sawdust concrete walls.
Waterproofing sawdust concrete is a very important component of construction. Because this material does not like moisture. He doesn’t like him very much - this is practically one of his main disadvantages.
This is how I understand sawdust concrete waterproofing technology.
It should be double. We fill the foundation and coat the top with bitumen. liquid to soak in. Better yet, use special primers and then coat them thickly with bitumen. Lay roofing material on the bitumen, at least two layers, coating each layer with bitumen. Nuances: You can take the cheapest bitumen, in a bag. You cannot melt it in a container, for example, in an old bucket (it’s easier to throw the bucket away than to clean it) over an open fire. Needed by email. tiles When the bitumen melts, you need to slowly add waste oil to it and stir. And when you boil the bitumen with oil, it is ready for use, since it will no longer harden. For us this is the very thing. (I also make a composition for filling the bottom of car interiors when I do anticorrosive and noise-resistant materials) We also take the cheapest roofing material, because it is not the price that is important, but the right technology. The first layer of waterproofing is ready. After this, we begin to fill the walls, fill the first 20-30 cm (up to 50) without sawdust, 1x3 or 1x4, that is, four buckets of sand per bucket of cement. This will be a type of base. After filling the base, we waterproof it again, and also coat it well with roofing material in one or two layers. And after that we proceed to the main pouring of sawdust concrete walls.
Building size and thickness of monolithic structure
A monolithic foundation is the most expensive type of foundation, which explains the desire of developers to determine the minimum permissible slab thickness that would withstand design loads with a margin.
Factors influencing the indicator:
- reinforcement frame height;
- thickness of the concrete layer above and below the mesh;
- reinforcement thickness.
For baths made of light material - frame-panel or wooden, it is enough to add these three values to find out the thickness of the monolith. The optimal slab size is considered to be 0.2–0.3 m.
In this case, it is necessary to take into account the height of the cushion made of non-metallic materials , which in most cases will be equal to 0.5 m: 0.3 m of sand and 0.2 m of crushed stone. In regions with sharp temperature changes, experts advise placing a layer of insulation 0.1 m high under the slab.
If large-scale construction is underway, for example, a bathhouse with an area of 6 x 6 m, then the weight of the building must also be taken into account, since there is a possible risk of slab foundation subsidence, especially on unstable soils. In this case, the thickness of the slab is increased to 35–40 cm.
For economic feasibility purposes, the monolith can be replaced with a foundation using ready-made factory-type reinforced concrete slabs or a foundation with stiffeners can be built.
Proportions of sawdust and concrete
In this article we talked about the proportions that are adopted when making blocks (bricks made from sawdust and cement).
However, these proportions are designed for the construction of load-bearing walls of houses with 2-3 floors and concrete floors, therefore such blocks have excess strength and high thermal conductivity.
For a house 1–2 floors high with wooden floors, the proportions can be changed, so due to the loss of excess strength, the thermal insulation properties of sawdust concrete can be improved.
The ratio of sand and cement should always be 2:1 because they form a binder and provide strength to the hardened concrete.
The ratio of sawdust and lime should be from 10:1 to 2:1. The more lime, the more durable and less sensitive to rot and mold the block is, but also the worse its thermal insulation properties, so the maximum ratio is rarely used.
The ratio of cement-sand mortar to sawdust is made from 3:1 to 1:4, but the optimal proportion is 1:2.
In this proportion, the strength of sawdust concrete is sufficient to build a 2-story house with wooden floors, and a wall thickness of 30 cm (if it has insulating voids) is sufficient even for places where the temperature in winter sometimes drops below 15 degrees below zero.
If severe frosts often occur in winter, then simply increasing the amount of sawdust will not solve the problem; you will have to change the shape of the block or wall.
Tip: if you reduce the amount of water to 0.5–0.6 by weight of cement and add a superplasticizer to the mixture, you will get more durable sawdust concrete. After all, the more water in the solution, the lower the strength of concrete.
If the water is slightly less than necessary, then the strength after hardening increases by 1.2–1.5 times.
Construction of a slab foundation
The slab foundation is a solid monolithic concrete slab, which is the foundation for the future building. If you have marshy soils on your site, but you want to install a large-sized bathhouse, then there is simply no alternative to a slab for the foundation.
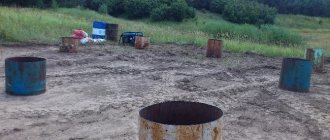
Trench for stiffening ribs and drainage pipe
In the presence of clayey, highly heaving soils, a concrete slab monolith can rise with the building in winter and fall in the spring. For this reason, it is also called a floating foundation. Having a larger area compared to the “ribbon”, the slab foundation works as a solid single platform. This puts less pressure on the ground.
A monolithic slab can be of two types in its structure: with and without stiffeners. It is clear that the first option makes the foundation more resistant to deformations and horizontal displacements. This is due to the fact that the stiffening ribs go deep into the soil along the entire perimeter much lower than the main foundation. This foundation design can be figuratively imagined as a cup turned upside down, only with very low walls.
The second type of foundation is easier and faster to install, but does not have such rigid characteristics as the first. It is a regular flat concrete slab, without any additional elements.
Watch this video on YouTube
Slab base for a bath
The foundation slab for a bathhouse is most rarely used. This is due to the greatest difficulty in its construction, which we will discuss in more detail below. A slab foundation for a bathhouse or house is an example of a flat floating foundation, which is a reinforced concrete slab made directly during the construction process.
Foundation slab for a bathhouse
The technology for manufacturing such a base requires a large amount of ground work, the production of a complex reinforcing frame and mandatory high-quality compaction of the concrete pour to impart maximum strength. At the same time, a bathhouse on a slab foundation will reliably serve for decades on such problematic soils as peat and swampy soils, characterized by high seasonal mobility.
House made of monolithic sawdust concrete
It is worth noting that we will consider the shortest and simplest scheme of work, but it is not universal! In your specific situation, there may be a lot of nuances that will require you to do something completely differently than in the instructions published below.
Remember this.
We will not describe the structure of the foundation, because there are many types of this structure and which one you should use is a topic for a separate discussion.
Let's assume that in our case this is the most common option - a strip base and we will only analyze how to fill the walls with sawdust concrete.
Strip foundation
Let's begin.
Installation of formwork and installation of a frame made of reinforcement
Walls, in fact, are made very simply - exactly the same as from any other concrete.
A frame made of reinforcement is mounted, formwork panels are installed on both sides of it, and all free space is filled with concrete.
This is what the structure of wall formwork looks like
Everything is done approximately in this order (let’s look at the example of assembling one wall):
The reinforcement bars are cut to the required length. If metal has not been released vertically from the foundation in advance, then you need to drill holes in the concrete and hammer reinforcement bars into them vertically (to the height of the future wall). The distance between them should be approximately half a meter
If the foundation is very strong and you can’t make holes, then pay attention to such a service as diamond drilling of holes in concrete - in theory, you can drill everything using a professional tool. If the reinforcement is installed vertically, then you need to attach transverse horizontal rods to it. So that you get a kind of grid with a cell size of approximately 50 by 50 cm.
Vertically installed fittings
If everything is done, then you can begin assembling the formwork. This is done very simply.
On both sides of the previously installed vertical frame made of reinforcement, you need to install (on edge) wooden sheets, plywood, for example. To keep the formwork vertical and not fall, it is usually supported by triangular posts made of timber.
After this, they begin directly to concrete work.
Pouring sawdust concrete
This is exactly the simplest stage.
The mixture is prepared (or delivered on a mixer) and the entire mass is poured into the space between the sheets.
It is very important to prevent the formation of voids. Therefore, you need to try to compact the entire poured mixture very carefully - this can be done even with an ordinary hoe
In addition, if the pouring does not happen “at once,” then remember one rule: the “joining” of hardened concrete and fresh concrete cannot be done vertically. It is better to lay the mixture in horizontal rows - this will make the walls more durable.
In principle, if the walls are poured, then after the mortar has dried and the formwork has been removed, you can begin installing the roof. It is done in the same way as on any other house.
Monolithic walls
That's all. Let's summarize.
Do-it-yourself sauna - step-by-step instructions.
Step I – preparing the area for construction.
Before starting construction, it is necessary to clear the site - remove bushes, stumps, remove debris and everything that will interfere with the foundation work.
Preparing the site for the construction of a bathhouse
Preparing the site for the construction of a bathhouse
Step II - building the foundation.
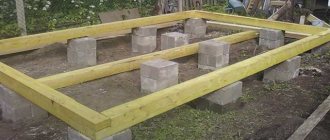
It is best to build a bathhouse made of timber on a columnar foundation, which is inexpensive and excellent for the construction of small wooden and frame buildings.
When constructing it, you first need to dig the estimated number of holes for installing supports. Their number is calculated as follows: supports must be installed in the corners of the building and at the intersections of walls, as well as with a certain step along their perimeter.
The pitch is selected taking into account the type of soil and the estimated total weight of the structure. The depth of the holes should be 1-1.5 meters, although it may vary depending on the depth of soil freezing in a given area. To perform this type of foundation, in addition to the materials listed above, you will need asbestos-cement pipes and fittings.
At the bottom of the pit it is necessary to pour a mixture of sand and crushed stone 10-15 cm thick. Then install an asbestos-cement pipe of the required length into it, strictly vertically, and secure it. Several reinforcement bars should be placed inside the pipe.
After this, pour concrete solution into the pipe and into the free space between the walls of the pit and the pipe.
How to make a columnar foundation
DIY columnar foundation
After pouring the solution, you need to wait a few days, then lay a half-brick thick wall between the pillars.
Step III – erection of walls and arrangement of the roof.
The traditional material for the construction of bathhouse walls is timber measuring 150x150 mm. Before laying the first crown, it is imperative to put waterproofing on the foundation. The lower part of the crown must be treated with an antiseptic. Most often, the timber is laid out using the “paw” method.
Connecting a beam into a paw
The first crown must be carefully aligned according to geometric parameters - all angles must be exactly 90 degrees. After the first crown is erected, they begin laying the beams for the set of walls. When laying out the walls, you need to make openings for future doors and windows and be sure to insulate each row with the selected thermal insulation material.
To connect the crowns, dowels are used - metal or wooden pins.
After the walls are removed, the roofing is installed. Depending on the chosen roof shape, it is necessary to fix the rafters, which are attached to the upper crown with brackets.
When installing a single-pitched sloping roof, the rafters are secured either by two external or one external and one internal supports. When erecting a gable roof, it is necessary to securely support the rafters from below to the wall, and connect them together from above to form a roof ridge.
Floor beams
Roof from the inside
Sheathing boards are attached to the fixed rafters, then hydro- and vapor barriers and insulation are laid on them.
The roof installation is completed by installing the selected roofing material.
Step IV - interior finishing work.
Interior decoration must begin with the installation of communications - sewerage, water supply, electricity. You should worry about sewerage even when designing and constructing the foundation.
It is necessary to dig a drainage well next to the future bathhouse, which includes a sewer pipe buried in the ground with a slope to remove wastewater from the washing compartment.
After the sewerage installation is completed, a finishing floor is made, which is made of wood or concrete. Concrete floors are more durable and are most often faced with tiles or porcelain stoneware.
If a wooden floor is chosen for interior decoration, it is usually made to leak. To do this, floor boards are nailed to the installed joists with a small gap, or a small drain hole is installed in the floor, covered with a grate.
In this case, the floor must be made with a slight slope towards the drain. Then the water that gets into the drain will be discharged through the sewer pipe into the drainage well.
After installing the sewer system, it is necessary to perform insulation, hydro- and vapor barrier of the walls and ceiling using appropriate materials, install electricity and water supply.
After installing windows and doors, then finish the room using, for example, lining.
After finishing is completed, you need to install the necessary electrical appliances.
Step V - installation of the stove and shelves.
There are a great many options for placing shelves; you just need to follow the recommended dimensions and the fact that they should be made of hardwood. The installation principle is simple - a stable frame is mounted, usually made of timber, and boards are attached to it.
The stove must be installed in full compliance with fire safety requirements. Wooden structures must be insulated from the high temperatures of the operating stove and chimney. If the furnace is heavy, it must be installed on a specially equipped foundation. This is determined on a case-by-case basis depending on the oven selected.
The stove is selected depending on the preferences of the owner. This can be a traditional wood-burning heater, a metal wood-burning or electric stove; sometimes it is advisable to choose a gas stove for a sauna.
For more information about choosing a stove for a sauna, read our special article “How to choose the right stove for a sauna.”
Step VI - choosing accessories
There are many accessories for a bath.
The main ones are:
— brooms (oak, birch and others); - containers (buckets, basins); - a wooden ladle for adding water; — wooden gratings for the floor and much more.
Additional individuality can be added by the interior decoration of the premises, which remains at the discretion of the owner - here, depending on desires and financial capabilities, you can give free rein to your imagination.
It should be added that all of the listed accessories can be made independently. The bathhouse is a great place to spend time in a pleasant, friendly company or with your family. It will be much more pleasant to realize that all this was done with your own hands, including useful and necessary devices: for example, hangers, lamps or ventilation grilles.
Insulation for the ceiling in a bathhouse: which material is best suited
Previously, it was customary to use natural raw materials such as moss, clay, sawdust, straw or earth.
Now people have begun to use the most effective coatings. They make all the work easier, even if you are not a professional builder. For example, it is widely used:
- basalt wool;
- expanded clay;
- penoizol;
- ecowool and others.
You can also use polystyrene foam and glass wool. But when heated, the former emits harmful gases and can ignite. A good protective suit is recommended for working with fiberglass.
The question is whether or not to insulate the entire building only inside or on both sides. There are many opinions on this matter, but the truth is in the middle. There are many additional factors you need to know:
- this is a Russian bath or sauna;
- what material is the bathhouse built from?
- what kind of stove does it cost?
To keep the steam inside and not escape outside, you need to achieve a “thermos” effect. Insulation must be both inside and outside the building. To achieve this effect, you will need insulation for the ceiling in the bathhouse. There are different options:
- waterproofing film;
- expanded clay;
- mineral wool or others.
What materials are used to insulate the ceiling?
The old-fashioned method has been proven over the years. This composition has excellent thermal insulation properties.
It can be used in several ways:
- Preparation of a liquid solution. Take 2 buckets of clay and the same amount of sawdust, add water and mix the solution until it becomes thick sour cream. This mixture is poured onto the insulating material in a layer of up to 10-15 cm, dried for 1 month, forming a monolithic mixture that is fireproof. Possible slight leakage through the ceiling.
- The preparation of the mixture is the same, but it dries somewhere on a flat surface, then it is cut into briquettes, which are used to insulate the ceiling.
- A 5-7 cm layer of sawdust is poured onto the insulating material, and a similar layer of clay is placed on top.
One of the most common types of thermal insulation today:
When laying sheets of mineral wool, it is necessary already at the stage of installation of ceiling beams
The distance between them should be equal to the width of the insulation layers to make it easier to lay them. It is important to seal the joints of the isolon well so that the mineral wool does not spill onto the ceiling, in which case it will fall on those steaming. It is better to choose insulation with impregnation that prevents it from crumbling. It is advisable to cover the top layer of mineral wool with a layer of waterproofing.
Insulation with expanded clay
When using this insulation, it is important to consider that it absorbs moisture well, so it is important to make the ceiling very durable and able to withstand heavy weight. It is better to cover the top with a layer of waterproofing. Insulation with sawdust and cement
Take 5 buckets of sawdust, half a bucket of cement, half a bucket of lime, 2 tablespoons of copper sulfate as a fire retardant. Cement, sawdust, and lime are mixed in a container or concrete mixer. Vitriol is diluted in a bucket of water and added to the mixture. Then add water until the consistency of thick porridge is obtained. This mixture is evenly applied to the covered isolon. Insulation with leaves and clay. In the fall, foliage is collected, applied in a layer of more than 25 cm, and 5 cm of clay is placed on top. After a few months, the layer will be about 10 cm.
- The application of isolon as a waterproofing material is end-to-end, which allows the insulation to flow through the ceiling.
- Insulation with sawdust and clay or sawdust and cement with a large addition of water will flood the entire ceiling and the insulation will take even longer to dry.
- Izolon as a waterproofing material must be overlapped by 15-20 cm onto the frame.
- Damp foliage is used as insulation; it will rot or rot.
- Many people do not use top waterproofing.
The main advantages of sawdust insulation include:
- Economical.
- Availability of material to families of any income.
- Easy to install.
- Durability.
| Type of insulation | Material price, rub./m2 | Price for work, rub./m2 |
| Glass wool | From 150 | From 100 |
| Stone wool | From 190 | From 120 |
| Polyurethane foam | From 350 | From 300 |
| Styrofoam | From 100 | From 70 |
| Sawdust | For free | From 50 |
Features of wood concrete
The basis of wood concrete (or in other words lightweight concrete, wood concrete, sawdust concrete) are chemical additives and organic, cement-binding fillers, presented in large quantities. Wood concrete is produced in the form of ready-made building blocks and slabs.
The filler is mineralized with liquid glass, calcium chloride and nitrate, aluminum sulfate and other substances that can effectively combat the negative effects of organic compounds on the hardening of the cement mass. The following are usually used as organic matter: wood chips, woody parts of stems - flax and hemp, chopped straw and stems of cotton plants.
An important advantage of wood concrete is its amazing strength. Structural types are able to withstand even very strong loads and deformations, and have the valuable property of self-healing after temporarily exceeding the maximum load.
Excellent sound absorption, environmental friendliness, low thermal conductivity, combustion resistance, low cost, convenience and ease of processing - all these qualities make lightweight concrete indispensable in the construction of low-rise buildings for any purpose (houses, bathhouses, garages, shops, cafes, industrial buildings, etc. .).
It is also ideal for the construction of internal partitions and non-permanent walls of buildings; it is often used as a material for thermal and sound insulation of ceilings, walls, etc.
Physicochemical characteristics
In terms of specific gravity and thermal conductivity, sawdust concrete is close to such materials as:
- foam concrete;
- expanded clay concrete;
- polystyrene concrete.
Like these materials, sawdust concrete has a low load-bearing capacity, so it cannot be used to build load-bearing walls of buildings 3 or more floors high.
If the building has at least one concrete floor, then the maximum height is 2 floors. However, it can be used as a wall material in houses with reinforced concrete frames.
Due to high vapor permeability, the rooms of houses made of sawdust concrete always have a dry microclimate, because excess moisture passes through the walls and goes into the atmosphere.
Another significant advantage of the material is its high resistance to open fire.
Sawdust concrete begins to smolder at a temperature of 150–200 degrees, but for combustion it requires long-term (1–2 hours) exposure to a temperature of 300 degrees or more or 0.5–1 hour of exposure to open fire.
After the cessation of exposure to open fire or high temperature, sawdust concrete quickly goes out, because the amount of pyrolysis gases released is not enough to maintain the pyrolysis process, without which combustion is impossible.
Read more about wood combustion and the pyrolysis process here Pyrolysis gas and its application.
Features of building a foundation for a furnace
Regardless of the type of foundation for the bathhouse, the load-bearing structure under the stove must be built autonomously. This is due to the fact that the heating device has significant weight and can shrink during service.
The foundations for the stove and the bathhouse itself must be separated by a sand cushion with a width of at least 0.5 m . In this case, each side of the base should be 5–10 cm larger than the dimensions of the heating device.
The foundation under the furnace is laid below the freezing depth. This can be a monolithic structure with a high sand cushion and a reinforcing frame or piles. In the first case, a pit is dug to the design depth, a compacted cushion is installed, formwork is installed, a reinforcement frame is laid, and the space is concreted.
Raw materials for the production of sawdust concrete
In addition to sawdust, the material includes:
- lime;
- cement;
- sand;
- water.
Sometimes craftsmen improve this composition by adding clay to it. Because of this, the strength and thermal conductivity of houses built from sawdust concrete increases.
The density of the material depends on the amount of sand, cement and sawdust used. Sand plays a significant role. The more of it, the denser the structure of sawdust concrete. If it is less, the house increases its thermal conductivity.
It is worth considering that a certain amount of raw materials can ensure frost resistance and water resistance of sawdust concrete. At the same time, the reinforcing masonry is also protected, which, under the influence of moisture, undergoes corrosion and destroys its structure.
This is what a sawdust concrete block looks like
When producing sawdust concrete for construction, the following technical characteristics of houses are taken into account:
- thickness of the walls of the future house;
- number of load-bearing walls;
- number of interior partitions;
- number of floors of the cottage.
Advantages and disadvantages of ceiling insulation with clay
Clay as a heat insulator for floors has become popular due to the following qualities:
- Low cost. The raw material has no competitors among analogues used for these purposes. You can always get it with minimal effort. In rural areas, the rock is often dug up and brought in independently.
- Clay is a fireproof material; it does not burn and does not contribute to the spread of fire. It can be safely laid near chimneys.
- Rodents and insects do not live in the thickness of the coating.
- The ceiling solution is prepared from a base and light fillers, which significantly reduces the load on the walls.
- There are no harmful impurities in its composition, so the ceiling is environmentally friendly.
- It’s easy to master insulation technology; you can do everything yourself.
- Clay and lumber interact well with each other. The wood remains in its original form for many years, and the insulating layer does not lose its qualities for a long time.
- If necessary, the already dried mixture removed for some reason can be reused, for which it is enough to wet it. This way, waste can be avoided after construction.
- After adding water, the rock becomes plastic and is able to fill any voids, which allows it to be applied to complex surfaces.
- Once the moisture evaporates, it becomes hard, so it is not necessary to install walk-on decking on the attic floor.
However, the material has practically been replaced by modern heat insulators. There are several reasons for this:
- This method of insulation is far from the most effective. In most cases, clay is used as an addition to the main heat insulator.
- To prepare the solution, it is necessary to carefully maintain the proportions, otherwise the insulating layer will crumble or simply not perform its functions.
- The finished batches are quite heavy, so the floors must be designed for heavy loads.
Selection of building materials
If you decide to build a building made of wood, then you will need the following materials:
- A square beam with a standard size of 15x15 cm or 18x18 cm. Also suitable with dimensions of 20x20 cm.
- Floor covering board with parameters 15x5 cm, length – 4 m.
- Cladding board for arranging ceilings and walls. A lining with a width of 10 cm and a thickness of 2 cm is suitable.
- Vapor barrier material. Films are usually used. They come in two types: polyethylene and polypropylene. They are also divided into single-layer and multi-layer. It’s up to you to decide which type to use in building a bathhouse.
- Waterproofing material. The rolled variety is suitable for baths. For example, roofing felt.
- Insulation for the ceiling. This can be basalt or glass wool, slag wool, ecowool, expanded clay, sawdust, sprayed polyurethane foam, cork boards, extruded polystyrene foam. Mineral wool is considered one of the most common options.
- Sheet asbestos. It will be needed to sheathe wooden walls next to the stove structure and chimney. Thanks to this, high temperatures will not be able to destroy the wood.
- Cement, crushed stone, sand and water are all that is needed to build a reliable foundation.
- Material for roof installation. The choice depends on personal preferences, financial capabilities and the need to maintain a certain style. For roofing, you can use slate or euro slate, metal tiles, flexible bitumen shingles, rolled material, shingles, polycarbonate and even straw. The main thing is that the finished roof fits into the overall appearance of the site.
- Insulation for the space between the rows: jute, tow, moss.
There is no need to purchase materials in advance. If stored improperly, timber can deteriorate: mold, rot, and fungus will appear. It is better to purchase it immediately before starting work.
Do-it-yourself sauna - step-by-step instructions.
Step I – preparing the area for construction.
Before starting construction, it is necessary to clear the site - remove bushes, stumps, remove debris and everything that will interfere with the foundation work.
Preparing the site for the construction of a bathhouse Preparing the site for the construction of a bathhouse
Step II - building the foundation.
It is best to build a bathhouse made of timber on a columnar foundation, which is inexpensive and excellent for the construction of small wooden and frame buildings.
When constructing it, you first need to dig the estimated number of holes for installing supports. Their number is calculated as follows: supports must be installed in the corners of the building and at the intersections of walls, as well as with a certain step along their perimeter.
The pitch is selected taking into account the type of soil and the estimated total weight of the structure. The depth of the holes should be 1-1.5 meters, although it may vary depending on the depth of soil freezing in a given area. To perform this type of foundation, in addition to the materials listed above, you will need asbestos-cement pipes and fittings.
At the bottom of the pit it is necessary to pour a mixture of sand and crushed stone 10-15 cm thick. Then install an asbestos-cement pipe of the required length into it, strictly vertically, and secure it. Several reinforcement bars should be placed inside the pipe.
After this, pour concrete solution into the pipe and into the free space between the walls of the pit and the pipe.
How to make a columnar foundation DIY columnar foundation
After pouring the solution, you need to wait a few days, then lay a half-brick thick wall between the pillars.
Step III – erection of walls and arrangement of the roof.
The traditional material for the construction of bathhouse walls is timber measuring 150x150 mm. Before laying the first crown, it is imperative to put waterproofing on the foundation. The lower part of the crown must be treated with an antiseptic. Most often, the timber is laid out using the “paw” method.
Connecting a beam into a paw
The first crown must be carefully aligned according to geometric parameters - all angles must be exactly 90 degrees. After the first crown is erected, they begin laying the beams for the set of walls. When laying out the walls, you need to make openings for future doors and windows and be sure to insulate each row with the selected thermal insulation material.
To connect the crowns, dowels are used - metal or wooden pins.
After the walls are removed, the roofing is installed. Depending on the chosen roof shape, it is necessary to fix the rafters, which are attached to the upper crown with brackets.
When installing a single-pitched sloping roof, the rafters are secured either by two external or one external and one internal supports. When erecting a gable roof, it is necessary to securely support the rafters from below to the wall, and connect them together from above to form a roof ridge.
Floor beams Roof from the inside
Sheathing boards are attached to the fixed rafters, then hydro- and vapor barriers and insulation are laid on them.
The roof installation is completed by installing the selected roofing material.
Step IV - interior finishing work.
Interior decoration must begin with the installation of communications - sewerage, water supply, electricity. You should worry about sewerage even when designing and constructing the foundation.
It is necessary to dig a drainage well next to the future bathhouse, which includes a sewer pipe buried in the ground with a slope to remove wastewater from the washing compartment.
After the sewerage installation is completed, a finishing floor is made, which is made of wood or concrete. Concrete floors are more durable and are most often faced with tiles or porcelain stoneware.
If a wooden floor is chosen for interior decoration, it is usually made to leak. To do this, floor boards are nailed to the installed joists with a small gap, or a small drain hole is installed in the floor, covered with a grate.
In this case, the floor must be made with a slight slope towards the drain. Then the water that gets into the drain will be discharged through the sewer pipe into the drainage well.
After installing the sewer system, it is necessary to perform insulation, hydro- and vapor barrier of the walls and ceiling using appropriate materials, install electricity and water supply.
After installing windows and doors, then finish the room using, for example, lining.
After finishing is completed, you need to install the necessary electrical appliances.
Step V - installation of the stove and shelves.
There are a great many options for placing shelves; you just need to follow the recommended dimensions and the fact that they should be made of hardwood. The installation principle is simple - a stable frame is mounted, usually made of timber, and boards are attached to it.
The stove must be installed in full compliance with fire safety requirements. Wooden structures must be insulated from the high temperatures of the operating stove and chimney. If the furnace is heavy, it must be installed on a specially equipped foundation. This is determined on a case-by-case basis depending on the oven selected.
What is sawdust concrete and is it worth making a bathhouse out of it?
In fact, sawdust concrete (aka wood concrete) is not a new material - it was invented during the Soviet Union, but has not yet been used very widely.
Essentially, this concrete consists of cement, sand, lime and sawdust. It comes in the form of ready-made blocks and in the form of a mixture.
Wood concrete structure
The more sawdust there is in the composition of such concrete, the better its thermal insulation qualities. However, if there is a lot of sawdust and little sand, then the overall strength of the material decreases - this should always be remembered.
This material is used for the following purposes:
for the construction of load-bearing walls and partitions in low-rise construction;
Wood concrete walls
- for the construction of fences and gazebos;
- for pouring concrete pillars;
- for insulation of foundations and floors.
As for the specific properties of sawdust concrete, there is definitely something to think about.
| Advantages: | Flaws: |
| 1. Relatively low price of the material. | 1. Not very high density of concrete material. And if it is increased by reducing the amount of sawdust and increasing the proportion of sand, then the thermal insulation benefits are lost. |
| 2. High thermal insulation qualities. A wall made of sawdust concrete is equal in its heat-shielding characteristics to a one-meter thick wall made of brick. | 2. Fragility of blocks. The material is unlikely to withstand strong mechanical shocks - it will simply crack. |
| 3. The material is easy to work with due to its light weight. And the finished blocks can be sawed with a regular hacksaw. | 3. High level of moisture absorption. But this is easy to fix - just don’t leave sawdust concrete without an additional protective layer of plaster or putty. |
| 4. Raw materials for making concrete yourself are not difficult to obtain - sawdust is not a scarce or expensive commodity, you must agree. | 4. It is difficult to make a mixture with the correct proportion of all components on your own. That is, in order to achieve optimal strength of sawdust concrete and normal thermal insulation qualities, you need to know exactly how much to add to the solution. |
| 5. High sanitary and hygienic qualities, due to the presence of lime and sawdust in the solution. | |
| 6. Fire resistance. Wood inside the cement-sand mortar is not flammable. | |
| 7. Sawdust concrete has a relatively low weight, which makes it possible to make an economical option for the foundation. | |
| 8. The material has excellent vapor permeability. That is, simply put, the walls of such a house will “breathe”, and thanks to this, the room will always have a comfortable microclimate. |
As you can see, there are many more advantages than disadvantages. So the conclusion here is very simple - it is quite possible to build small houses from the material. By the way, it is quite possible to build a bathhouse made of sawdust concrete with your own hands from such a mixture, it will be cheap, and the heat inside will be retained perfectly.
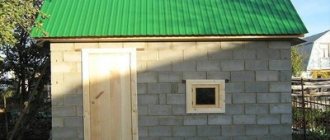
Construction of a bathhouse from sawdust concrete
What is wood concrete?
Sawdust concrete is a material that is made from cement, sand, water and sawdust in a certain proportion. It is made mainly at home, using it as a composition for monolithic construction, or individual blocks are poured.
general information
Now sawdust concrete is a lightweight concrete that has a rough structure . In addition, it has several varieties, which differ from each other in what components they contain. But in any case, most often it consists of sawdust, sand, binder, and water. In addition, it is considered one of the best wall materials.
The density will depend on how much sawdust and sand there is . Now there are several options for preparing the mixture. But it’s better to read about this in the standards. If you prepare sawdust concrete manually, it is a labor-intensive process. Very rarely a homogeneous thick mass is obtained. If possible, it is better to use mixers that will ensure homogeneity.
Sawdust concrete is most often sawn and cut with an ax. Fresh sawdust can be used without treatment, but old sawdust is best treated with lime milk or liquid glass. In addition, before use, you should still consider the main pros and cons of using such a material. Only after this can you really find out whether this material can be used for a bath.
d) Fire resistance (fire safety).
Arbolite does not support combustion. It would seem that it consists of 60% sawdust, which is a flammable material, but this material was made using a certain technology. Namely: the cement-sand wall reliably covers all wooden sawdust, in other words, each wood plate is hermetically packed in a cement shell.
As a result, when the material is heated, organic fibers self-extinguish. The fire resistance limit, at a temperature of 1100-1200 C, is more than two and a half hours, and the load-bearing capacity is maintained even after more than three hours of exposure to high temperature.
Wood concrete is significantly superior in fire resistance to the popular building material expanded polystyrene concrete, which meets fire resistance requirements. The expanded polystyrene concrete filler is foam balls. Cement-sand walls protect the foam from fire, but in case of prolonged temperature, what do you think will burn “better” - foam balls or sawdust?
Conclusion: although wood concrete contains a large amount of sawdust (about 60%) it is a non-combustible material, thanks to the production technology. The use of wood concrete is appropriate in the construction of any object. The fire resistance of wood concrete is higher than some modern building materials.
The relevance of using sawdust for thermal insulation
Current insulating materials are constantly being improved; moreover, more and more new thermal insulators appear on the market every year. But technological progress inevitably leads to rising prices. Often people save money for many years to repair their home (including insulation) or even take out a loan from a bank. And if we remember what materials our ancestors used to insulate walls and roofs, we can come to the conclusion that the “old-fashioned” methods are still relevant and effective. At the same time, it is difficult to predict what the condition of, say, polyurethane foam will be after 20 years of operation. But the sawdust has successfully passed the test of time.
Using sawdust as insulation
So, the main advantages of insulating the ceiling with sawdust include:
- widespread dissemination of this material;
- symbolic price;
- environmental cleanliness;
- extreme ease of installation;
- long service life.
Moreover, the savings here consist not only in reducing capital investments, but also in caring for natural resources, which contributes to a significant improvement in the environment and a reduction in the cost of heating a home.
Sawdust prices
sawdust
How to make sawdust
Modern thermal insulation materials
Table. Prices for popular insulation materials.
| Type of heat insulator | Price, per 1 m² (in rubles) | Installation cost, per 1 m² (in rubles) |
| Styrofoam | 100 | From 70 |
| PPU | 350 | 300 |
| Glass wool | 150 | About 100 |
| Mineral wool | 190 | 120 |
| Sawdust | For free | About 50 |
It turns out that insulation with sawdust will cost almost free. In fact, wood companies can even deliver sawdust to your home for a small fee. But here it should be clarified: not all varieties of this material are suitable for thermal insulation.
Bathhouse layout: recommendations.
At the beginning of construction, it is highly advisable to make a project that should, among other things, determine the optimal area of construction.
It is believed that the estimated area for 1 person should be approximately 5 sq.m. Thus, if the expected number of visitors to the bathhouse is 4 people, its total area should not be less than 20 sq.m.
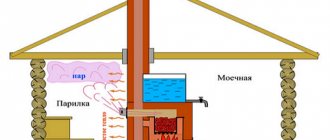
The minimum composition of the premises is as follows: steam room, washing room, relaxation room and dressing room. It is important to determine the most convenient location of these rooms relative to each other, as well as their geometric dimensions.
First you need to complete several diagrams and drawings:
— general plan of the building; — drawings of each room separately; — diagram of the foundation; - roofing diagram; - plan for fastening and laying out timber; — plan for the installation of the floor and ceiling of the bathhouse; — installation diagram of the furnace, taking into account its design features.
All the necessary drawings can be completed independently, and can also be found in many open sources. As a rule, bathhouses made of timber have similar designs and you can easily choose the most suitable one. If you wish and have the necessary budget, you can entrust the design to a professional architect or builder.
The advantages of this method of insulation
At first glance this seems absurd. In modern conditions, there is an abundance of artificial materials and insulation for every taste and budget, to resort to ancient methods of insulating roofs and ceilings, to use old “old-fashioned” methods? However, not everything is so obvious, because everything new is often well forgotten old, and some technologies of the past remain relevant to this day, and the method of insulating the ceiling of a bathhouse with earth has not sunk into oblivion.
Regular exposure of the bathhouse ceiling to hot air and water vapor requires a special approach to the issue of its insulation, both from the inside and from the outside (attic).
All methods of thermal insulation of roofs and ceilings can be divided into:
- By type of materials used:
- using natural materials;
hemmed (the ceiling is made from the inside, fastened to the floor beams);
For frequent use, other requirements for thermal insulation are met: the use of vapor barrier membranes, heat-reflecting foil, etc. These materials have their undeniable advantages: long service life, they are not subject to rotting, inedible for rodents, unsuitable for insects, quite light and durable, insulate from noise, easy and convenient to work with, increased fire resistance.
The most popular way to insulate the roof of a bathhouse was considered to be clay coating with the addition of sawdust. This mixture was used to cover the ceiling of the bathhouse from the attic side, and then additionally covered it with a layer of peat, sawdust, moss, tow, a mixture of these materials with sand, etc.
The advantages are the availability of materials, almost free of charge, environmental friendliness, etc.
- There is an attic space.
In this case, the ceiling insulation consists of the standard technology described above using natural materials. The method is not expensive, but requires physical labor and time. The ceiling is made of boards at least 4 cm thick, with them attached to the floor beams or continuous flooring. The work is carried out from the outside, attic side!
The second stage is to seal the seams between the boards with thick clay without additives. When the seams are dry, the entire surface of the ceiling is covered with a mixture of clay and some other natural material - sawdust, for example. The layer must be at least 5 cm thick. After drying, a layer of earth of 10 centimeters or more is poured on top.
You may be surprised, but the method described above for insulating the ceiling of a bathhouse with earth can also be used... in the absence of a roof as such! A ceiling with a layer of earth will itself act as a roof, and moreover, in addition to its useful function, it will also perform a decorative function. We are talking about Scandinavian green roofs, on which strawberries are grown, grass and even small shrubs grow.
The main difference between such a “roofing cake” installed over a bathhouse will be the additional layers of waterproofing, because Precipitation passing through the ground should not be absorbed into the clay. Despite the fact that a layer of soil of 10 cm is enough to absorb rainfall, average rainfall does not always occur.
To create a grass-covered roof, waterproofing is laid over a layer of dried clay mixture. Then a layer of geotextile is desirable (previously tree bark and birch bark were used for these purposes), and at least 20 cm of soil is poured. Warmed from the inside and moistened by rain from the outside, the soil on the roof of your bathhouse will quickly be overgrown with grass or moss and will become a wonderful decoration for the site.
It is no coincidence that the use of clay is so popular. This method of insulation has a number of advantages compared to other methods:
- proven and reliable technology: it has been developed over the centuries, it has long proven its effectiveness;
- environmental friendliness: the material is completely safe for the health of people, animals, and the environment;
- this method of insulation does not significantly load the floors and foundation;
- all work can be done with your own hands, even without much experience in construction;
- the material does not attract rodents and insects;
- fire safety: clay does not burn, so it can be safely used for insulation near pipes, stoves and other heating devices;
- cheap: you can even dig up the clay yourself, i.e. for free.
Foundation thickness
The thickness of the reinforced concrete slab for the garage is chosen taking into account two main parameters:
- soil type;
- design weight of the building.
If the soil is unstable and has a significant freezing depth, then a foundation pit is excavated at a depth of 0.6–1.0 m for the power structure.
In order for the foundation to rest on a stable soil foundation, a compacted layer of medium sand is placed at the bottom of the excavation (layer height is 0.2–0.3 m).
In addition to the geological features of the site, the weight of the structure itself is of decisive importance. For example, for a one-story floor made of lightweight materials such as foam blocks, a monolithic slab height of 10 cm with one layer of reinforcement is sufficient. If the developer is designing a two-story structure, or a garage made of brick or concrete, then the thickness of the slab must be increased by 5 cm.
In practice, the thickness of the slab for a garage is taken to be somewhat higher than the recommended values. This choice is due to several reasons:
- so that during the cold season ice and snow do not interfere with the use of swing doors;
- so that storm water and rainwater do not enter the premises;
- to ensure normal use of the garage even in unforeseen situations, for example, if part of the foundation subsides, or the soil in front of the entrance rises as a result of heaving forces.
Production of sawdust concrete
As has been noted more than once in the article, the material is easy to produce. Most of the tools you will need to make blocks from shavings and cement are inexpensive, and some can even be made yourself. But first, it’s worth talking about the solution.
We suggest you familiarize yourself with Where to get stones for a bath
Composition of sawdust concrete
To make a building mixture you need: cement, sand, lime and organic filler in the form of sawdust. To obtain 1 m3 of finished material, the proportions of sawdust concrete will be as follows, depending on the required grade:
- Thermal insulation material with strength grade M5: 50 kg of cement grade M400, 50 kg of sand, 200 kg of slaked lime, 200 kg of sawdust. The finished product will have a density of about 500 kg/m3;
- Grade M10, suitable for enclosing and load-bearing walls of ancillary buildings: 100 kg of M400 grade cement, 200 kg of sand, 150 kg of slaked lime, 200 kg of sawdust. The finished product will have a density of approximately 650 kg/m3;
- for the more durable M15, used as M10, but also suitable for the construction of one-story residential buildings: 150 kg of M400 cement, 350 kg of sand, 100 kg of slaked lime, 200 kg of sawdust. The finished product will have a density of about 800 kg/m3;
- Structural sawdust concrete with strength grade M25, suitable for the construction of load-bearing walls of residential buildings up to three floors high: 200 kg of M400 grade cement, 500 kg of sand, 50 kg of slaked lime, 200 kg of sawdust. The finished product will have a density of approximately 950 kg/m3.
- To accelerate the hardening of sawdust concrete, calcium nitrate, liquid glass or ammonium sulfate are mixed into the mixture. These additives have no other effect on sawdust blocks.
First, cement is diluted in water, then the required amount of sawdust, sand and lime is mixed into it. The sawdust in the container for preparing the solution is mixed with lime, then cement and sand are added to them, the resulting mixture is mixed with the required amount of water. Both sequences are used equally.
The resulting solution is placed in molds. They can be put together from boards or bought ready-made. Equipment for casting cinder blocks is optimally suited. Depending on the available tool, the method of manual or mechanical compaction of the composition in the mold is used. Sealing pins are often used to remove voids.
How to select the components of a concrete mixture?
We have already found out that the active components in the solution formula are cement and water, which makes it work. Only the grade of cement should not be confused with the grades of concrete, since these are completely different parameters. M of Portland cement means a value indicating the strength of the cement mortar. Therefore, regardless of what kind of concrete is needed for the construction of the future foundation, cement is taken with the marking M400 or M500.
Most often, Portland cement is used to independently mix concrete for the foundation. A pozzolanic analogue can be used if there is no base, as it shrinks greatly in the open air. The slag version perfectly resists ground moisture, but is pleased with frost resistance.
Since the foundation is a predominantly reinforced structure, crushed stone with a fraction of up to 40 mm is needed to mix concrete according to construction requirements. The optimal choice is crushed granite gravel, its rough edges optimize traction. Crushed limestone is not suitable for aggressive groundwater. You need river or sea sand, but in the absence of it on sale nearby, quarry sand will do. The sand must be sifted and washed. The inclusion of clay and organic inclusions of more than 5% is unacceptable.
You don’t need distilled water for mixing, but you don’t need to scoop it out of a stagnant lake of mud either. There should be no biological impurities, oils, or salts in it at all. Typically, concrete producers use potable water. The amount of water is approximately equal to half the mass of cement.
Conclusions and recommendations
If we talk about the construction of bathhouses or other structures, then when purchasing you need to look only at high-quality ready-made blocks. This will ensure the durability of the building, as well as minimal operating costs. In addition, you need to look at the integrity of such blocks and take them from the same batch. A separate point is that it is necessary to correctly calculate the number of blocks for construction before purchasing. In addition, you should make a reserve that will allow you to avoid purchasing additional material in the future. Before use, you should carefully study all the characteristics, and only after that buy sawdust concrete.
In any case, now new materials are replacing familiar and traditional ones, so it’s worth paying attention to them. And sawdust concrete is a worthy replacement for many other components
When purchasing, take into account all the nuances, and only after that make the final choice in favor of the purchase.
Bathhouse layout: recommendations.
At the beginning of construction, it is highly advisable to make a project that should, among other things, determine the optimal area of construction.
It is believed that the estimated area for 1 person should be approximately 5 sq.m. Thus, if the expected number of visitors to the bathhouse is 4 people, its total area should not be less than 20 sq.m.
The minimum composition of the premises is as follows: steam room, washing room, relaxation room and dressing room. It is important to determine the most convenient location of these rooms relative to each other, as well as their geometric dimensions.
First you need to complete several diagrams and drawings:
— general plan of the building; — drawings of each room separately; — diagram of the foundation; - roofing diagram; - plan for fastening and laying out timber; — plan for the installation of the floor and ceiling of the bathhouse; — installation diagram of the furnace, taking into account its design features.
All the necessary drawings can be completed independently, and can also be found in many open sources. As a rule, bathhouses made of timber have similar designs and you can easily choose the most suitable one. If you wish and have the necessary budget, you can entrust the design to a professional architect or builder.