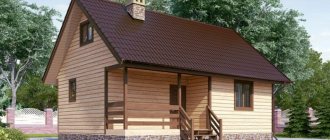
For every owner, the question of rational use of premises is always very relevant. That is why building a bathhouse with a residential attic is no longer a novelty. Each of us wants to relax with maximum comfort, and at the same time with benefit. A bathhouse with an attic is an ideal option for such a vacation.
Projects for bathhouses with an attic double the area.
Having a second floor adds additional space that can be used for various purposes. As a rule, the second floor or attic is conceived by those whose plot does not allow for wide expansion. In this case, it is the second floor that is the saving option, and therefore feel free to include an attic in your project. On the additional area you can plan a recreation room; it would also not hurt to have another bedroom (for example, for guests), a billiard room or a room for personal hobbies, hobbies and other things. Today there are many construction companies that offer their services for the construction of steam rooms. The only disadvantage of these companies is that the projects they offer are standard, that is, there will be few options to choose from. And if you want to create something original, then you will have to pay extra for such a special project.
There are also cases when the site allows you to build a fairly spacious bathhouse, but the financial possibilities are quite modest. Most often, in such cases, people prefer to save money, and the bathhouse turns out to be very small and uncomfortable.
Over time, money appears, and with it the question arises of rebuilding the bathhouse, that is, of expanding it. In this case, several options are possible:
demolition of the old building and construction of a new, more spacious one;- dismantle the roof and build a second floor;
- don’t disassemble anything, but make an attic in the attic.
If you are faced with a similar problem, then the best option would be to build an attic. You will spend less time and money, and will quickly start using a ready-made bathhouse with an attic.
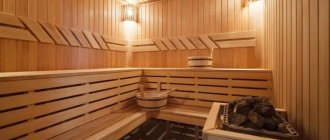
Premises equipment
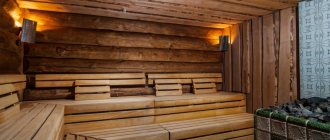
A stove and shelves are placed in the steam room.
Screens must be installed to protect against fire, and people must be protected from getting burns. In a shower room equipped with running water, a stall or corner is installed. If this is not possible, and the water is heated in the tank, then the shower is replaced with a large ladle or a vertical watering can on a support.
The bathroom is located in the boiler room or separately. You can use a bio-toilet or organize a full-fledged toilet if there is a sewerage system.
A stove and shelves are placed in the steam room
In a small bathhouse, you can combine a washroom with a steam room, without separating them with partitions, and dispense with the bathroom.
The dressing room in small buildings serves as a locker room, resting place, and firewood storage. Even a modest-sized room is furnished with the necessary furniture: a bench or sofa, a hanger, shelves for shoes, a table.
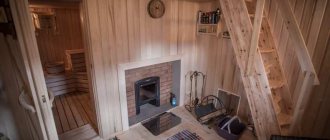
If possible, separate the dressing room and dressing room, and move the rest room to the attic. If desired, a billiard table, upholstered furniture, and a fireplace can be installed there.
The area of the bathhouse is calculated from the estimated number of visitors simultaneously taking water procedures. Each person is allocated 5 m².
Option for a rest room
A well-thought-out layout is the key to a comfortable and, most importantly, safe stay.
Electric Fireplace with live flame effect: Wall-mounted, Built-in, Floor-standing. Which model should you prefer? (230+ Photos)
How to escape from moisture - arranging a vapor barrier
An attic above a bathhouse is not at all the same as a second floor above an ordinary room. It's all about the temperature and humidity conditions, which differ significantly from normal conditions. After all, the main problem of the second floor of a bathhouse is high humidity. After all, a lot of steam comes from below, from the steam room, and therefore a special layer for such a construction is simply necessary. If the bath attic is equipped like an ordinary one, it will always be too stuffy and humid. Therefore, the interfloor pie here should be like this: on the side of the bathhouse, below, a vapor barrier must be placed (this can be foil or film), then insulation, and the finished floor on top of it. The “pie” will look something like this if you look at it from the bottom up:
- Finish ceiling: lining, suspended or plasterboard.
- Rough ceiling.
- Vapor barrier: film or foil.
- Thermal insulation: basalt wool between the rafters.
- Ventilated bottom gap – 50 mm.
- Roofing membrane - Tyvek, Isopan or Utah.
- The upper ventilation gap is also 50 mm.
- Lathing.
- Roofing covering.
In addition, all wooden elements of a log bath with an attic must be carefully treated with fire retardants and antiseptics
Before you start insulating, it is important to make sure that all its supporting structures are in order - cracks and small flaws need to be caulked or sealed with foam
If metal tiles were chosen as the roof over such a veranda, a film under it is simply necessary so that condensation does not accumulate on its inner surface. And the ventilated space between the insulation and the roof itself will significantly extend the life of the rafter structure - the wood will breathe.
You can also build a more budget-friendly option: use ordinary reinforced film as a vapor barrier and seal its joints with tape. And as insulation, use Ursa for the floor, for walls - slab insulation, placed in a spacer between the existing frame posts. The cheapest of them are Knauf, Techno and Rocklight.
Inclined single slope
Differs from flat by increased angle of inclination. Due to the larger angle, flexible tiles can also be used as roofing coverings. Water and snow shed better from a sloping roof, and the risk of mechanical damage is reduced. On free-standing bathhouses, sloping pitched roofs are rarely used; the design appearance and functionality are far from the wishes of customers. Most often, this type of roof can be seen on bathhouses that are closely adjacent to other buildings. Making a roof is not difficult; the rafters rest at one end on the upper crown of the frame, the other end rests on the purlin and headstocks. For the headstocks, side struts made of beams should be installed. All other operations for installing roofing coverings are identical to those described above.
Roof ventilation in a cold attic
In any room where there is no ventilation, a normal microclimate is impossible. Insufficient air exchange causes air stagnation and high humidity; at the next stage, mold begins to grow on structural elements and fungus starts to appear. All these factors negatively affect the structure; over time, it will begin to deform and lose its purpose. In a private house, the room under the roof can be warm or cold.
Differences between cold and warm roof ventilation
In the first case, the ventilation duct is installed over the entire area of the slope using sheathing and counter-lattice. Warm air masses enter the under-roof space at the eaves, rise and exit through the aerator in the roofing strip. Condensation also escapes through it.
Many owners of private houses, where the room under the roof is not heated, wonder whether roof ventilation is necessary in a cold attic, because no one lives there? Such a system should exist in this case as well, since it will ensure the safety of the structure itself.
Only for an unheated room it is arranged differently. In this case, vents are created in the under-roof eaves for cold air to enter, while warm air goes into the aerator and dormer windows in the attic of a private house.
Arrangement of roof ventilation for a cold attic
For the attic space this is the eaves level. Here you need to create holes
It is very important to correctly calculate the size of the vents in the attic, so that the inflow and outflow of air is the same. Often, owners of private houses use perforated soffits
To create an outflow of air from the attic, there are roofing elements such as aerators and a ridge. The direction of flow is determined depending on the characteristics of a particular house:
- if the roof of the house has two slopes, ventilation ducts are made on the gables - loose lining of the overhangs or holes in the wall, the area of the ducts should be 0.2% of the area of the attic space,
- if slate or ondulin is used as a roofing material and no vapor barrier has been used, then no additional structures are needed, since the air will circulate along the waves of the coating, the ridge will serve as an outflow element,
- if the roof of the house is flexible or made of ceramics, a “turtle” (valve) is formed,
- The system of two gratings has shown itself to be good, one is installed with holes pointing downwards, the other can be adjusted,
- on a hip roof, ventilation can be created using two holes, one of which is located at the bottom of the lining, the other at the top of the ridge,
- also on a hip roof, provided that the overhangs are wooden, you can place beams with a gap of several millimeters.
Sequence of work
- Calculation of air exchange. According to SNiP, in cold attics, as in basements, dormer windows or vents are necessary for air flow. Their total area should be 1/400 of the total area of the room.
- Selecting an air outflow and inflow system. After performing the calculations, you need to choose a system that will be optimal for your home: an aerator or a ridge, windows or vents. Next, a diagram is drawn up, that is, how many ventilation elements there will be, their sizes, how they will be located.
- Execution of work. When creating an attic ventilation system, you should strictly adhere to the diagram.
Let's summarize
From the above it is clear that the work is not difficult for a home craftsman who knows how to hold a tool in his hands and strictly follow the project recommendations. But it is still better to entrust the development of documentation to specialists. They will make calculations of the size of the vents in the attic, their location and quantity, according to the characteristics of a particular room. A professionally created project will save you from mistakes and shortcomings, the consequences of which can be disastrous.
Roof ventilation in a cold attic
The need to create effective roof ventilation in a cold attic is associated with the formation of the necessary level of comfort in residential premises. Otherwise, heat loss and the formation of condensation are inevitable, followed by the appearance of fungus and mold, and even deformation of the house.
Insulation
For the ceiling in a bathhouse, choosing insulation is one of the main tasks. Steam tends to rise upward and the likelihood of it leaking through the ceilings is greater in this case. If you do not create a reliable layer that prevents hot air from escaping, you can only dream of comfort in the steam room and washing area. Insulation is laid in several layers. Internal filing and laying of protection from the attic are allowed. When insulating the ceiling in a bathhouse, the saying comes in handy: you can’t spoil porridge with oil. The more material, the lower the thermal conductivity of the ceiling.
An excellent choice would be mineral wool. It justifies itself as a reliable material. When thinking about purchasing insulation for the ceiling, you can choose foam plastic. It’s just not recommended to install it in a steam room. Excretions, when exposed to high temperatures, lead to the appearance of an unpleasant and unhealthy odor.
Insulation for the ceiling in a bathhouse can be installed from the attic and from the inside. Various materials are used for this.
You can combine materials. Lay mineral wool on the inside and polystyrene foam in the attic. This combination allows you to achieve maximum effect in isolating the exit of warm air from the steam room.
Mandatory in the project
The bathhouse design must have two required rooms:
- dressing room;
- steam room
All others are additional and are provided if there is enough space near the house for this. A bathhouse, which consists only of a dressing room and a steam room, can be built even on an area of 6 m2.
Do I need a waiting room?
The dressing room is a very important room. On the one hand, it provides an additional air cushion, which prevents heat from escaping from the steam room to the outside. On the other hand, it can be a very functional room, especially in small baths. If the dressing room is small, then it must have a hanger for outerwear and shoes. In addition, there is usually a small bench in it to make it more convenient to put on your shoes. The dressing room also provides space for storing fuel that is used for the stove.
If the territory allows, then you can make a rest room from the dressing room. To do this, a sofa and other furniture can be placed in it. In addition, in some dressing rooms they install pools with cold water, which you can plunge into after leaving the steam room. So that the dressing room can comfortably accommodate several people, it is made two or more times larger than the steam room. It is in the waiting room that everyone who cannot be in the steam room at the same time can wait their turn. A window is provided in large dressing rooms for natural light. It can be installed at 90 cm from the floor. The size is chosen arbitrarily, depending on the available space on the wall. The glass unit must have several chambers to make it easier to maintain an acceptable temperature
If winters are harsh, it is important to monitor the insulation of the door. This will prevent it from icing up.
Note! It is advisable that the stove be loaded with firewood from the dressing room. This will make it possible to heat it and warm up the steam room
There will also be no problems with having to run for firewood from the steam room.
Steam room
The steam room is the heart of the sauna. It is in it that all the magic happens, in fact, for the sake of it, the bathhouse project is created. The steam room cannot be too small, unless it is designed for one person. For a comfortable stay of two people, the steam bath should have an area of at least 3 m2. In addition to the main area, it is necessary to take into account the passage, as well as the space that the heater will occupy. Some stoves can be installed through the wall with the main compartment opening into the dressing room. In this case, it is located close to the wall, so it is necessary to take care of thermal insulation so that the wooden elements do not catch fire.
The steam room may have one or more shelves. If it is assumed that bathhouse visitors will be able to lie across, then the width of the top shelf must be made at least 1.5 meters. In case of limited space, shelves in the bathhouse can only be for sitting. In this case, they should be at such a level that the legs can stand freely on the stand, and the width of the shelf is at least 40 cm. For a small bathhouse, a steam room of 4 m2 will be enough. At the same time, it can comfortably accommodate three adults. In some projects, the steam room is equipped with a window. It allows sunlight to penetrate for natural lighting. But it is more required for ventilation. If the bathhouse has a ventilation system, then the window does not need to be installed.
Advice! If you decide to install a window in a steam bath, then it should be of minimal size, for example, 30x30 cm. It is better if the double-glazed window is triplex, it perfectly retains the temperature inside.
The door to the steam room of the bath can be made according to your wishes. Most recommend making it tight with a high threshold so that there is no leakage of cold air from the dressing room. This is true in cases where the dressing room is small and serves as an air damper to the front door. But if it has the dimensions of a rest room, then the heat loss will not be so large. Some people choose to install a glass door. It not only looks beautiful, but also allows you to observe everyone who is in the steam room. If someone becomes ill, it will be easy to help him. Some users have found it useful to make the entrance to the steam room not from the waiting room, but from the washing room. Thus, there is another intermediate room that prevents heat loss.
Zones
Let’s say it’s decided to build a log bathhouse 5x5 meters.
If we consider standard plans for functional areas, there are three main ones:
- dressing room;
- washing room;
- steam room
The 5x5 m bathhouse layout option involves placing the firebox not in the dressing room, but in a separate corner, separated by a wall. The same wall separates the dressing room from the steam room. The waiting room will be spacious. It is convenient to place a table and benches, as well as hangers. This room can be a living room.
A 5x5 m bathhouse will accommodate a group of 5-6 people. The attic floor in such a bathhouse is often used as a small rest room. The attic can be equipped with a toilet and shower room. It is definitely worth considering communications.
In a 5x5 m bathhouse, it is important to install the doors correctly. For example, it is important to get directly from the guest room to the washing room
This placement will prevent heat loss from the steam room. A shower room can be allocated a little less space than a steam room. Plan your steam room carefully. It is important to carefully consider the shapes and sizes of the shelves.
Don’t forget that part of the area will go under the stove and heater. Its location should not be close to the wall, otherwise there will be a risk of fire in the sheathing and wooden walls. They expand the area of small baths by providing the building with a terrace. A small terrace can serve as a summer kitchen. The construction of a terrace will increase the amount of building material.
Start of construction and design of a bathhouse with attic space
At the initial stage of construction work on the construction of a bathhouse complex, it is necessary to select a land plot.
The selected site for construction must meet certain requirements. The main requirements are the following:
- the site should be located at a distance of 2.5 m from the boundaries of the farmstead;
- the distance from the well or borehole must be at least 20 m;
- the distance from erected buildings must be at least 10 m.
In order to determine the sequence of operations during the construction process, you first need to select the material for construction and develop a design for the structure. But before you begin construction work, you should realistically assess your capabilities financially and physically. If financial capabilities allow, and there is no time or desire to do construction work on your own, then the best option would be to turn to a specialized construction company for help and order a turnkey bathhouse. For example, in Ryazan there are a large number of construction organizations that are constructing a bathhouse with an attic
In the absence of sufficient financial resources, you can build a bathhouse complex with your own hands.
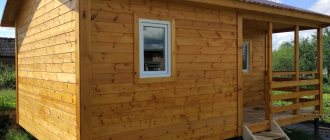
To build a bathhouse, you can choose any building material. The most economical option would be to build a frame bathhouse with an attic. The main requirement when carrying out construction work is that it is necessary to ensure maximum thermal insulation of the building to retain heat. The main condition for construction is that the bath complex should be as warm as possible. The second condition that must be met during the construction of a structure is uniform heating of the entire volume of the room.
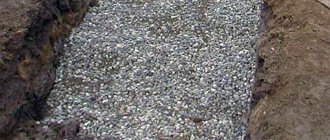
After drawing up the project and selecting a site for construction, construction of the foundation begins. The choice of foundation type depends on the type of soil at the construction site, the material used to construct the building, and climatic conditions. The most common base for a bathhouse with an attic is a strip one. To build this type of foundation, it is necessary to prepare a trench, at the bottom of which a sand cushion up to 15 cm thick is laid. The sand should be watered and compacted tightly. Crushed stone is poured on top of the sand and concrete is poured.
Flaws
Despite the large list of advantages, frame baths are also characterized by their small disadvantages. First of all, these are the costs of insulation, as well as finishing. The construction of a frame bathhouse itself can be cheaper than a brick bathhouse, but the price increases due to the fact that there is insulation.
Therefore, additional plastering will be required, which also costs a lot of money. The next disadvantage is that it is quite difficult to choose high-quality insulation for such a bath. It is impossible to save in this case, but even among the expensive insulation options, choosing the appropriate option will not be so easy.
How to add an attic to an existing bathhouse?
A bathhouse with an attic can be built in three ways:
- On a finished bathhouse that has been in use for a long time, the side walls are added to the height.
- The existing attic space of the bathhouse is being converted into living space.
- The attic is equipped with a special roof shape.
The easiest way to build a bathhouse from scratch is from timber - with an attic of a wooden structure, it practically does not change its weight, and the ideal rectangular layout allows you to avoid unnecessary costs. In addition, if the second floor will also be used constantly, then it makes sense, after laying the interfloor ceiling, to add walls 1-1.2 meters in height, and only after that erect the gables.
Bath layout options
The main rooms in the bathhouse are the steam room, washing room and dressing room. Depending on the size of the bathhouse, when planning the interior of the building, you can add a bathroom, rest rooms, bedrooms and even a swimming pool. Also, projects of bathhouses with a terrace under one roof include an attic, a balcony and a gazebo. Projects of bathhouses with a closed recreation room are no exception.
By contacting a construction organization, you can choose your favorite bathhouse designs with a relaxation room and a terrace from the catalog
But what to look for when choosing a material for a bath, see the following video: https://www.youtube.com/embed/Sskz64a8AJg
There are quite a lot of options, but among them we can conditionally distinguish three, taking as a basis the number of storeys of the building and its size: one-story baths; two-story or bathhouses with an attic; bath cottages.
One-story baths
In fact, they are both small houses with a minimum set of rooms (steam room and washing room), providing a comfortable pastime, and large one-story houses with an expanded set of rooms, including bathrooms and rest rooms. In addition, the recreation area can be moved outside the bathhouse to a terrace or veranda. When choosing a project for a large one-story bathhouse with a barbecue area, you don’t have to worry about where to accommodate vacationing guests, since the recreation area is divided into two parts - a room inside the bathhouse and a terrace.
One-story bathhouse with a minimum number of rooms
Two-story baths
Bathhouses with a full second floor are extremely rare - more often they are called bathhouses with an attic. In any case, thanks to the presence of an additional floor, the usable building area increases and two rest rooms can be made: one on the first floor, the second on the second. Thanks to the additional space, the bathhouse can accommodate a larger number of vacationers, which is an excellent option for relaxing with a large group. An inexpensive project for a two-story bathhouse with a terrace involves the presence of two lounges and a terrace.
Bathhouse with attic and terrace. Plan of the 1st and 2nd floors
Bath cottages
These are large bath complexes with outdoor recreation areas, several indoor recreation rooms, bedrooms, a swimming pool and a kitchen. This is a place to relax not only with your body, but also with your soul. Most often, such a complex is built for subsequent rental. Maintenance of such a building requires large expenses, which is unprofitable for private use.
Bath complex with an area of 250 m²
Adviсe
Professionals give several recommendations on how to make designing a bathhouse with an attic easier, so that the final result is at a high level:
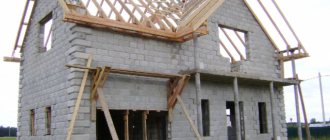
It is best to include the presence of an attic immediately in the construction plan. Then the load will be calculated correctly and the bathhouse will not “lead”, and the walls will not crack.
If it so happens that the decision to build an attic was made later, the attic itself should be made of lightweight materials: if the bathhouse is brick, from blocks, if wooden, by frame construction or from SIP panels. If the main room of the bathhouse is built of light materials, it is best to refuse to build an attic floor, since it is not a fact that the load-bearing walls will hold up.
Pay attention to the roof. Not every roof can have an attic
When planning it, keep in mind that for the subsequent construction of an attic room, mansard, hip, half-hip and gable roofs are suitable, respectively.
When planning interior decoration, expect that all rooms of the bathhouse should be designed in the same style. It is ideal to use clapboard for the interior lining of a bath structure.
It is better to entrust the planning and construction work to a competent company
When choosing professionals, you should pay attention to the qualifications of the personnel, portfolio, reviews and special equipment. It is also advisable to communicate with employees personally before concluding a contract. Finishing material should be functional and pleasing to the eye
While paying attention to quality and reliability, do not forget about the aesthetic side. There are many finishing materials that combine all these properties. If you are building a bathhouse yourself, you must carefully follow the work technology and all recommendations, otherwise the result may be disastrous (at best, it will result in a waste of money and building materials).
- Ideas from the Internet will help you create comfort and warmth on the second floor. On the World Wide Web there are a lot of excellent tips for decorating an attic, from the color of the walls to the selection of accessories. The main thing is not to be afraid to experiment.
- The bathhouse should fit harmoniously into the surrounding environment. Being around the bathhouse creates a certain flavor. The landscaped area around the building will play into the hands of the owner of the country house. It is much more pleasant to watch pictures of beautiful nature from the windows of the upper floor, and not the depressing view of the gray earth.
- Don't overload the space. The bathhouse should be spacious and comfortable.
Specifics of thermal insulation of the attic roof in the bathhouse
We carry out the work in this order:
We lay a waterproofing layer from the bottom to the ridge along the rafters. Using slats, we attach a windproof vapor barrier to the ventilation gap above the rafters. We cut the insulation into separate parts. Their width should be 2-3 cm greater than the distance between the rafters. We lightly compress each part of the heat insulator and insert it into the space between the boards. This way we fill all the empty niches
Please note that the insulation must be fixed evenly and smoothly. We seal the joints between the wall and the outer rafters with a sealant gun. We attach a vapor barrier membrane on top using a construction stapler. The overlap should be at least 10 cm. We glue the joints with metallized tape (using regular tape is not recommended). We stuff wooden slats in increments of 40-60 cm. We install the finishing material
The wooden lining is fixed in the opposite direction of the sheathing.
When laying insulation, do not forget to leave a distance to the roof covering, which should be from 2.5 to 5 cm. Such an air gap will provide high-quality ventilation, preventing rotting of the heat-insulating layer.
What is the best way to sheathe the frame?
In Russian baths they often use a wooden frame.
The lathing takes on the functions of ventilation. The gaps will prevent moisture from accumulating on the surface of the timber and insulation. Ventilation gaps provide good air exchange, where there is no room for dampness or fungus.
Fastening is carried out vertically. To insulate the walls of a bathhouse, not all types of thermal insulation can be used.
It is prohibited to use flammable cheap polystyrene foam or polystyrene foam.
Expanded clay and ecowool are not suitable due to the fact that they quickly become saturated with moisture and lose their working properties.
The best insulation options:
- basalt wool;
- kaolin wool;
- vermiculite
Photo: wall construction of a frame bath
The outside of the frame structure can be finished:
- siding;
- decorative plaster;
- edged board;
- half beam;
- clapboard;
- croaker;
- tiles;
- block house;
- plastic panels.
The cladding with a block house that imitates a log looks beautiful.
For interior work, lining is considered a universal ceiling and wall material. It is convenient for her to sheathe the steam room and dressing room. The lining does not heat up and is easy to install. To decorate the shower, choose ceramic tiles or moisture-resistant wood.
It is forbidden to paint or varnish the finish in the steam room, otherwise when heated it will begin to release toxic substances that are harmful to health.
It is allowed to use moisture-resistant plasterboard for covering the walls in the locker room. OSB and MDF boards are suitable for the same purposes.
The procedure for internal lining of the bathhouse is given in more detail in the section below.
General information
Advantages
The main advantage of a two-level bathhouse is that it makes it possible to save space on the site. If, for example, home owners want a spacious bathhouse with a comfortable seating area, they will get this by allocating a minimum space for construction. In addition, the recreation area is partially or fully located in the attic of the building. Often such baths are built in order to avoid building any objects separately. For example, in the attic there may be:
- Workshop.
- Winter Garden.
- Billiard room.
- Guest House.
- Summer cuisine.
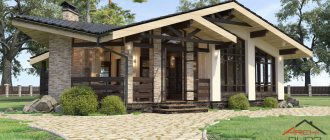
The attic above the bathhouse can be designed as a veranda with glazing, in which case it will act as a gazebo. In some cases, the upper level of a garage or bathhouse is equipped as a separate home for a family member. If you have 2 objects under one roof, you can save a lot of money on construction, communications, heating and room maintenance. Another plus is that such bathhouses made of logs or beams look much more impressive than one-story ones. The high-type roof slopes give them elegance. A beautiful bathhouse with an attic can become a beautiful centerpiece of a landscape design composition on a site.
Materials
Log sauna
At the moment, logs are a popular material. Based on the type of processing, it is divided into several types, here are the main ones.
- Planed - this type of wood is made by processing it with an electric planer. In this case, a small layer of wood is removed, and the fiber system remains unharmed, which provides the material with high performance properties. But the shape of such a log will not be ideal, but conical - like the real shape of a tree trunk.
- Rounded - when creating this log, most of the top layer is cut off on a machine to give the log an ideal cylinder shape. Because of this, the characteristics of the material are reduced, but it becomes as convenient as possible for construction.
- Scraped - this processing involves removing a minimum layer of bark. Such a tree will retain its natural resin content, which will make it as durable as possible. But its shape is not ideal, and it is difficult to lay out walls from it without noticeable gaps between the crowns.
For a bathhouse project with an attic and a terrace, rounded material is usually chosen, which allows you to make very high-quality log houses without cracks and gaps. There is an opinion that it is better to choose wood with natural humidity for a bath, rather than dried wood. But not all masters agree with this opinion. It is still worth trusting that the purchase of logs should be done by professional builders who have experience in selecting high quality wood
The peculiarity of such a bathhouse is that it will shrink, and it is important to begin its operation a year after the completion of the construction process. After the walls are laid, the log frame needs to be sanded and caulked a couple of times
timber
When creating timber from an ordinary log by sawing, a tree with a rectangular or square cross-section is obtained. There are also several types of timber.
- Classic (non-profiled) - a simple beam with smooth edges is cut from solid wood.
- Profiled - the edges have specialized grooves (ridges) for the most accurate fastening of the timber to each other.
- Glued laminated timber - when creating it, several thin lamellas are glued together under pressure, which is why a high-tech wood material is obtained.
- Half-beam - during manufacturing, the log is processed only on two opposite sides, which are needed for the crown connection. The other two sides will remain semicircular. Buildings made from this material have the appearance of a log house, but retain the technical parameters for a timber frame.
Such a bathhouse can be used almost immediately upon completion of construction. Shrinkage is 1-10% depending on the type of material. Glued laminated timber has a low percentage of shrinkage. Non-profiled bars will give maximum shrinkage and upon completion of the construction of the walls, caulking and finishing are needed. Other types of timber can be used without caulking.
Beautiful examples
A spiral staircase looks very impressive and can become not only a design feature of the interior, but also decorate it. Natural light makes a small room feel more spacious.
The presence of a swimming pool in the bathhouse is a definite plus. After visiting the steam room, you always want to plunge into cool water, so try to provide for the possibility of installing a pool, even if there is not much space.
The steam room is the most important element of any bathhouse. This example combines intelligent use of space and comfort. Illumination around the entire perimeter adds coziness; only when choosing lamps should you give preference to models that are resistant to high temperature and humidity.
As for the external design of the bathhouse, imagination has no limits. If space allows, the building is complemented with a balcony or terrace. In summer they can be used as additional places to relax.
For an overview of the bathhouse with an attic, see the following video.
Features: pros and cons
One of the most significant advantages of such a building is the optimal price. The attic can be a great place to relax for the whole family. A home cinema, a billiard room, a workshop or a guest house - the attic can be used for many purposes, and a terrace with a balcony will be an excellent place for privacy. A 6x6 meter bathhouse does not require much space, the organization of the premises is laconic and comfortable. In addition, such a building is original and fits well into the surrounding environment.
It is important to properly plan the hydro- and vapor barrier system. Otherwise, the air will not circulate properly. On the ground floor there will be high humidity, while upstairs, on the contrary, the air will be dry. Such changes will inevitably lead to rot of the base of the bathhouse. To avoid this situation, before attaching the filing in the steam room, you need to attach the foil to the ceiling.
How to arrange the outside?
A private house with an attic can be built from foam blocks, brick or timber. But all roof elements must be light and durable. You should not use concrete and stone - they will create additional load on the floors. The most suitable materials for roof cladding are metal tiles and slate. Mineral wool or basalt slabs can be used as insulation.
A square private house is an excellent option not only for a seasonal summer cottage, but also for permanent residence. In such a room it is easier to arrange the interior space and harmoniously place all the necessary zones. And so that such a house does not look like a squat cube, add an open or closed veranda near the porch. Bay windows, columns or a balcony on the attic floor will also help to dilute the boring appearance.
4x6 bath layout
- construction with a gable roof;
- compromise solution;
- An economical option in every sense.
When your options are limited, it makes sense to turn to such a solution. Despite the fact that the design of a 4x6 bathhouse with an attic is a compromise and minimalistic solution, it is still possible to bring many interesting ideas to life even in such a cramped format. By the way, in a 4x6 bathhouse you can easily arrange a sink with a steam room separately - there are many examples of perfectly implemented projects.
You can arrange a small rest room with a sleeping place in the attic. Or maybe even two, it all depends on your resourcefulness in developing the project.
Waiting room
The space that separates the street and the bathhouse itself. Some people sometimes refuse it due to saving space. And in vain. Its presence allows you to retain warm air in other rooms longer, especially in the cold season. In addition, the dressing room usually contains necessary things, such as a clothes hanger and a shoe rack. There may be a small drawer or cabinet with tools. If space allows, you can also place firewood or coal here.
Steam room
The main place in the bathhouse
And here it is important to decide on the stove. Will it be laid out independently from brick or will a ready-made structure be purchased - made of cast iron or steel
No matter what the bathhouse is built from, the steam room must be lined with boards. This is what creates the feeling of a Russian bathhouse. Everyone decides on their own other nuances - where and what shelves to place, whether it will be a separate steam room or a joint one.
Shower room
A necessary element of the bathhouse where washing is carried out. In this room it is recommended to tiled the floor and walls. This will be the most reasonable option. You can also install a small bathroom nearby. In the shower you need to provide shelves for bath accessories and hooks for towels.
Restroom
In very small rooms it is sometimes excluded from the project. But in this case, the space allows you to equip this room at your discretion. Here you can place a comfortable sofa with a low table or a table with chairs. Shelves or cupboards for dishes will be needed here, where all the necessary attributes for tea drinking will be placed.
A separate cabinet can accommodate a variety of teas, herbs, honey, and jam. For complete comfort, some people complement the relaxation room with a music center; pleasant, relaxing music can come in handy here. If someone in the family has the art of a massage therapist, you can also place a small massage table behind a screen.
There are a lot of options. One thinks that a small dressing room is enough, but there should be a large steam room. Another believes that the relaxation room should be spacious and comfortable. Therefore, it is equipped on the second floor or a terrace is given for it, which is well insulated. Someone decides that a bathhouse cannot do without a swimming pool, so instead of a relaxation room they decide to equip it there, and organize relaxation on a small veranda.
Frame
Everyone knows that frame baths are built much easier and faster than timber or brick baths. They do not require the creation of a serious foundation, no drawings, or expensive materials. Everything is much simpler than you might imagine. The main thing is to have a clear plan in front of you and follow it. To build a bathhouse from bricks or logs, you need to use only expensive building materials, as well as competent drawings. To build a frame bathhouse, all these nuances are not needed, which is why it is considered the simplest, but very effective option for a bathhouse.
Veranda. Needed or not?
The question of the veranda remains open in the case of the construction of small-format baths. Of course, in all respects, a bathhouse with a veranda and attic looks preferable than without it. Still, a small space for relaxing in the fresh air seems like a small thing only on paper, but in reality it is often what is not enough to achieve maximum pleasure from spending time with family and friends.
However, if the shortage of usable space is felt more than acutely, then it is better to implement the project of a bathhouse with an attic without this element. Still, do not forget that you are building a bathhouse first and foremost - and it is better to make every effort to ensure that after visiting it you have an extremely positive impression.
If there is a lack of usable space, you can replace the veranda with a more comfortable lounge or a small balcony in the attic. In this case, you will not lose any comfort, you will see. However, we will leave several projects with the layout of bathhouses with an attic, where there was room for a veranda, here.
Let's start construction
If the area of the plot allows, then the most optimal project would be 6x6 m. - it will perfectly accommodate all the necessary premises, in addition, the above-mentioned dimensions will make them quite spacious and comfortable. If possible, choose a site for construction that is level, and if this is not found, then try to level the existing territory as much as possible. When the project is ready, you can begin building a bathhouse using frame technology. Next, you can familiarize yourself with one of the many DIY bathhouse projects.
Foundation
For a frame structure, a strip foundation is quite suitable:
- remove the fertile soil layer
- we dig a trench and lay a cushion of sand, crushed stone and gravel in it (you can use ASG)
- fill everything with molten bitumen and lay the concrete in a pre-installed formwork made of boards
Bathhouse on a pile foundation
Before building the frame
- As soon as the foundation hardens, we lay a layer of roofing felt on it, which will serve as waterproofing, and make the bottom frame of the structure. For this we use timber 150x100 or 150x150 mm.
- We connect the joints with nails.
- We install logs made from 150x50 mm boards on the harness.
- We treat the harness and joists with an antiseptic according to the instructions and leave until completely dry.
Frame
From 150x50 mm boards we make frame posts and rafter system parts (everything is done in accordance with the project).
Bath frame