When talking about repairing sauna stoves, we most often mean brick devices. As you know, their laying requires special knowledge and experience. If the work was carried out by a qualified stove-maker, the structure will last for decades. However, nothing on earth lasts forever, therefore, sooner or later, any sauna stove begins to require repair. It’s quite expensive to call a stove repairman every time, which means you need to learn how to fix some problems yourself.
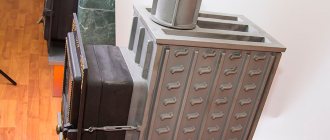
DIY metal sauna stove
Do you want to have a real Russian bathhouse in which you can steam to your heart's content? When do you need a sauna stove? In this topic we will talk about how to make a metal sauna stove with your own hands. Baths are often built next to residential private houses. They provide the opportunity to have a great time with pleasant and useful procedures. It is important not only to know how to build a given structure, but also what elements should be in it to ensure optimal use. The most important part is the sauna stove, which must create a specific atmosphere and the desired air temperature. It can be made from different materials, but if you plan to carry out this process on your own, then it is advisable to choose a metal oven.
Parameters and features of metal bath stoves
Metal stoves have long been considered the main analogues of standard brick structures. They can be used not only for heating residential premises, but also for baths. This popularity is due to the presence of numerous advantages of the elements. These include:
1 opportunity to make a stove with your own hands;
2 installation is simple and quick;
3 oven dimensions are small;
4 there is no need for it to install a complex and heavy foundation;
5 heating of the room is carried out very quickly, which is considered especially relevant for a bathhouse;
6 The design has a beautiful appearance.
However, it is important to know how to properly make a stove so that it not only does an excellent job of heating, but is also safe for use.
Disadvantages of a metal sauna stove
Unfortunately, there are also disadvantages and these include:
1 the stove cools down quickly because it cannot accumulate heat, therefore, when using the bathhouse, the lack of fuel in the stove must not be allowed;
2 it is important to make double walls in the structure, between which there should be a layer of air;
3 the fire safety of the furnace is low;
4 A metal stove can only be used for small-sized baths.
The simplest option is considered to be a potbelly stove, the design of which is very light. It consists of a metal box with a door. It connects to a pipe leading outside through the roof of the building. Such a stove does not have very good heat transfer, and you also need to spend a lot of fuel to heat it. Therefore, it is considered not the most optimal and suitable option for a bath.
It is advisable to make a modern version of the design that will be safe for use and also effective during use. To create such a furnace, you need to use sheet iron, and its thickness should not be more than 5 mm. The structure is equipped with a special thermal chamber, which is needed in order to place stones in it. You can even make a specialized tank designed for water. It is advisable to line the resulting metal stove with bricks, as this will improve the fire safety rating and ensure uniform heating of the room.
Main types of modern metal furnaces
The following most important types of metal structures can be distinguished:
1 Closed stoves, which are designed for small-sized baths. They are lined with bricks inside and out, and it is recommended to use fire-resistant red material.
2 An open stove, which has an open heater and is equipped with a small water tank. This design ensures quick heating of the premises, and in order to further increase the heat capacity, you need to cover the stones in the heater with a galvanized metal lid.
3 Combined stove, equipped with a firebox with two valves, a blower, two pipes and a grate. To create such a structure, steel is used in the form of sheets, the thickness of which should be 5 mm.
Depending on the fuel used, the following types of stoves can be distinguished that can be used in a bathhouse:
4 Wood-burning structures that are the most popular and frequently encountered. For their constant use, you need to store a lot of fuel - firewood, and it is also important to provide them with regular care.
5 Electrical designs are quite rare. They have a metal body in which the heating element and insulation are located.
6 Gas products are the most optimal and reliable. They are formed from iron, and a thermostat is additionally inserted into them, with which you can regulate the installed power. There is also a special safety mechanism that turns off the structures in the event of a gas supply interruption.
The process of creating a metal sauna stove
The entire procedure can be divided into the following stages:
1 preparation of materials, and you need not only metal sheets and a pipe for the stove itself, but also a pipe for the chimney, doors, latches and some other small elements;
2 a blower of optimal size is formed in the pipe;
3 from the inside of the pipe, directly above the created hole, you need to attach the fasteners intended for the grate by welding;
4 the grate is attached using these fasteners;
5 a firebox is formed, for which an optimal hole is made;
6, fastenings are fixed on top of it using a welding machine, and they are intended for mounting special rods of the heater;
7 on the other side of the heater you need to make a hole intended for pouring water;
8 stove bricks are placed in the heater;
9, in the lid of the resulting stove, a hole is formed that is necessary for installing a chimney, for which a pipe is used that is installed in this hole;
10 At the last stage, a water tank is installed.
How to properly install a metal stove?
Once the structure is ready, it is important to decide where exactly it will be located, as well as how it should be mounted. It is best to organize a light and simple shallow strip foundation. Several brick rows are later laid on it, on which the stove is already installed. There should be no wooden or other flammable elements near the structure. Also, it should not be located in close proximity to the walls of the building.
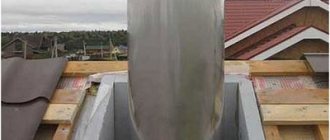
Additionally, you will need to take care of insulating the chimney, and for this you can use pipes made of sandwich panels. You can cover the resulting product with brick, as this will improve its performance, make it safer for use, and also improve the appearance of the structure.
Video: An experienced person tells how he makes a sauna stove.
Thus, the process of forming a metal furnace is not considered too complicated. It has many advantages, but also has disadvantages. As a result of the work, you can get a high-quality and reliable design that will provide optimal temperature and other parameters in the bath.
Repair of medium complexity
This group includes the replacement and strengthening of sauna stove parts.
You can fix a loose door by dismantling the brickwork next to it and re-fixing the door with steel wire.
The burnt-out grate is removed and replaced with a new one, which should not lie close to the bricks. It is necessary to leave a gap of 5 mm between the masonry and the grate and fill it with sand.
Leaky pre-furnace sheets cannot be repaired. They are simply replaced with new ones, not forgetting to place a piece of felt soaked in liquid clay underneath.
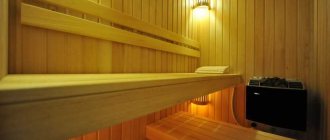
Bath stove
The foundation and frame of the bathhouse are ready. Choosing the right stove plays an important role when building a bathhouse! It is this that ensures the presence of steam and heat, making it possible to get real pleasure from the steam room - “to sweat well.” Question - which oven to choose?
The stove in the bathhouse is the main element. After all, without it it is impossible to take a steam bath, or to heat water just to wash, what can we say about heating the room itself. It is necessary to carefully select both the type and design of the stove.
There are two standard options:
- made of brick;
- buy ready-made metal.
Each of these options has its own advantages and disadvantages.
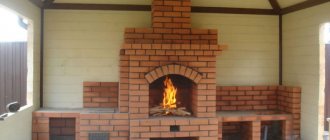
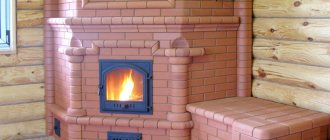
Brick
Pros:
- It retains heat for a long time, cools down more slowly, and therefore can prolong the vaping process longer.
- The “climate” in it is more comfortable, softer due to the lower air temperature, not exceeding 70°, while being saturated with moisture up to 60-70%.
Minuses:
- A high-quality brick stove that can last for a long time can only be built by an experienced stove mason, of whom there are few today.
- To properly fire such a stove, you need a lot of firewood and long-term heating.
- It takes at least 4 hours to warm up the room.
A simpler one in this case would be a cast iron stove or another stove made of heat-resistant steel. You can buy one for a relatively low price, and it is quite easy to install.
Metal
- Quickly warms up the air in the steam room, economical. Of course, here we are talking about properly designed sealed stoves, in which one load of firewood can burn for several hours.
- Almost 30-60 minutes after ignition you can use the sauna.
Minuses:
- None of the metal stoves will provide the climate of a Russian steam room in its pure form. High temperature (above 80) is harmful and unacceptable.
- Low humidity.
- It is difficult to dry a log house with a metal stove after a bath. Additional heating will be required.
You can raise the humidity with a metal stove installed by pouring water on the stones. At the same time, the humidity will, of course, increase, but it will still be difficult to breathe, since the steam in this case will be heavy.
- Hard thermal radiation from iron has a negative effect on people.
There is a simple solution that will help reduce these disadvantages and also increase heat transfer. To do this, you need to cover the metal stove with bricks.
Material required for lining:
- ceramic stove brick;
- clay mortar;
- asbestos cardboard.
The gap between the stove and the brick is 2-5 cm. The first row is not placed on the bottom, the second is placed on metal corners that rest on bricks in the corners. It turns out that there is a gap of about a quarter of a brick around the perimeter below. This option will not replace a brick oven, but it will make it possible to regulate the air humidity in the steam room, and will also protect you from accidental burns.
As you can see, with a little effort, you can get the effect of a Russian bath - a storehouse of health and longevity, which will help you restore strength after a hard week of work and improve your body.
How to prevent cracks in your cooktop
In heating and cooking stove designs, the “sore spot” is the cast iron hob. Cracks in the panel themselves do not interfere with the operation of the stove. If it is folded correctly, it has good traction and cracks do not cause any inconvenience. But - for the time being. If the design of the stove is broken or there are errors in the masonry, then carbon monoxide can leak through these cracks. And this is a big threat to the lives of people who are in the room.
As a rule, high-quality cast iron panels almost never crack. But it's better to be safe.
In order to prevent cracks from appearing on the panel, the first heating of the stove with a new hob is done carefully, warmed up slowly, without loading the entire firebox. To distribute heat evenly over the panel, pour a thick layer of sand on it, or lay out a brick. Remove the sand or remove the brick from the panel only after it has completely cooled. A uniformly loaded panel will “sit down” without distortions, which means there will be no “stress” cracks in it.
Materials required to assemble a sauna stove
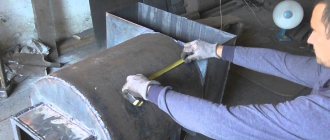
A do-it-yourself metal sauna stove involves the use of ferrous metal, the thickness of which should be at least five millimeters. If this parameter is met, then such a design can last from five to seven years. Finding metal of the required thickness is quite simple, because ferrous metal with a thickness of approximately ten millimeters is produced by almost all leading manufacturers.
A do-it-yourself sauna stove made of metal can be made in different variations with different sections. For example, with square or rectangular sections made of sheet metal. With this design, there will be one more welding seam on the stove, and in addition it will be necessary to perform rather difficult work of bending metal. To avoid unnecessary work, specially prepared pipes or ordinary metal barrels with the required wall thickness parameters are often used .
Tools
The set of tools depends on what solution was used when making the stove. For comfortable dismantling, you should wear gloves and a respirator, because there will be a lot of dust and ash, and they can make breathing difficult. You need to take care of your work clothes, which would be better to throw away later. Clay masonry is easier to disassemble. To make work easier, it can be moistened with water. Then she will be more pliable. If the brick is laid on cement mortar, then soaking will not help. Here you will need a hammer drill, since dismantling will be difficult.
For cutting you may need the following equipment:
- chisel;
- sledgehammer;
- scrap;
- pick;
- hammer drill
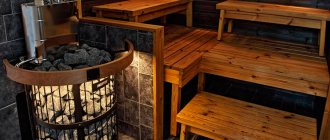
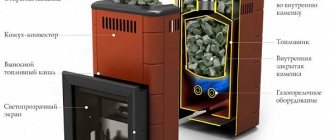
What does a metal stove consist of?
The structure of a sauna stove made of metal will help you understand the design and install it yourself. This design consists of several main sections:
- combustion chamber;
- stone hopper;
- water tank.
Below is a photo of a metal stove for a bath with your own hands and drawings.
Each compartment should be examined in more detail. The combustion procedure itself will take place in the combustion chamber. Therefore, it is very important to equip a small door for this in order to put firewood through it and a hole that is necessary for air intake. One of the important factors is cleaning the stove from such an unnecessary element as ash. Therefore, in order to facilitate the process of cleaning the chamber, you will need a special ash pan. It is necessary to install a metal grate through which the ash should pour out.
The heat that occurs in the combustion chamber will directly flow directly into the bunker, where the cobblestones are always located. In order for the heat exchange to be most optimal, the cobblestones should be placed on a grate, which serves as a unifying element for the fire chamber and the bunker with stones. Bunkers of this type exist in open and, of course, closed types. Both types can be installed in brick and frame sauna stoves. Let's look at the option with a closed bunker. To be able to move the cobblestones, as well as to be able to wet them with water, you will need to design a door that should be placed on the side of the stove, at a distance of 90 degrees from the door into which the firewood is loaded. The heat should then follow to the tank that will contain the water. The best way to distribute heat is through a chimney. It will also take care of the removal of gas - combustion items. Water is poured into the tank from above, and for the most convenient and practical draining of water from the tank, you need to place a tap at the bottom of the tank.
Preparation
Of course, in order to make a new stove, you will first have to disassemble the old one. And here the question arises: “should I leave the pipe or disassemble it along with the stove?” In order to decide on a solution to this issue, you need to pay attention to the condition of the pipe, because usually the pipe is in better condition than the furnace, since it is less subject to thermal load during operation. If the pipe is in good condition and has good waterproofing, then it may be worth keeping. Thus, costs can be reduced by almost a third.
Be sure to take into account how reliable the interfloor ceiling of the house is, because it will have to withstand the weight of the hanging pipe. It should also be noted that you will have to limit yourself in choosing the design of the furnace, because you will be constrained by the position of the pipe and the size of the foundation, so take this into account when you decide on the design.
Stages of manufacturing a furnace with a metal pipe
To make a sauna stove, which will have approximately a height of 1600 millimeters and a diameter of 700 millimeters, certain materials and tools will be needed. Having everything you need, you can start making a sauna stove with your own hands. The work is carried out in several stages, namely:
- It is necessary to cut the pipe into two parts: 0.9 m and 0.7 m;
- About 10 cm from the bottom of the pipe you need to make a blower. It can also be placed at the very bottom, this will facilitate the process of removing ash. For the blower, you will need to cut a special hole, it is better to cut it carefully, since the cut out part can be used in the future as a door. Above the ash pit, another door should be cut into which the firewood will be loaded; this is also best done carefully, since the cut piece can also be used as a door;
- In order to install the doors on the chambers, it is necessary to weld the ears and hinges to the metal pipe using a welding machine. In this case, the latches should then be welded to the doors themselves, after which they can be hung without problems;
- Next, you should cut a small circle from a sheet of metal. Its diameter should be approximately 0.7 meters. In the center of the circle you should make a hole for the grate. After this, the circle is welded inside the pipe, at a level slightly above the blower;
- This stage involves cutting out the appropriate hole, which is necessary so that you can water the stones without difficulty. The cut should be made at approximately 90 degrees, on the side of the ash pan and the door. A small door should also be mounted on the cut hole;
- After the work has been done, you need to make a special surface for laying cobblestones on it. To make such a platform, it is best to use metal rods. The platform should be made of metal rods. The cells are made depending on the size of the cobblestones;
If you have knowledge of metal carving, as well as a welding machine, you can safely take on making a heater stove yourself. However, you need to calculate the financial part, as well as the time spent on work, but in this way you can save a significant amount of money. But in practice, a self-made stove is in no way inferior to a purchased one.
Attention to the foundation and floor
Often the cause of coolness in the bathhouse is a cold floor, and the roots of this problem go back to the very beginning of the construction of the building, and they are different for rustic and modern buildings.
Rural baths are characterized by a strip foundation, an earthen subfloor and a leaky wooden floor. This is where we proceed in solving the problem.
The space under the boards itself does not freeze even in severe frosts (for a chopped bath), so in order to prevent your feet from freezing, we do the following:
- We increase the space between the floor and the ground a little. This can be done in two ways - make the foundation higher or remove a layer of earth.
- Sprinkle the perimeter of the concrete/brick tape on the inside with sand or expanded clay.
- Make a pile on all sides outside.
- Do not lay the floor boards close to the frame or to each other; we also leave a gap near the stove.
- Make the floor slightly higher than the base of the heater.
All this may not help modern frame buildings, as well as those made of brick or blocks, especially since in most of them you will not find a simple drainage of water to the ground. They are equipped with concrete bowls with a system for collecting and draining water to the outside. Moreover, many began to do this not only in the washing room, but also along the entire contour of the bathhouse.
In such buildings, t under the floor is often equal to that on the street, i.e. at -20 degrees in winter, after a week's absence, you will have almost the same amount under the floor. What happens - you turn on the stove, after an hour and a half it’s already hot, but downstairs it’s still cold.
It is better not to insulate the foundation from the inside with various types of foam-based materials - this threatens the appearance of condensation on the surface of the tape. Including the floor in the ventilation system will be very effective. In the washing room we make the floor leaky (in this case a special hole is not needed) and partially the same in the steam room. The heated air passes through the window into the washing room, heats this room, cools and is drawn back into the steam room through the cracks in the floor. By circulating in this way, the air warms the floor and underground space much faster.
Article on the topic: How many meters from the fence can you build a toilet
For those who have a monolithic screed, we can only advise laying a water or electric floor; adding layers of insulation to the base will not give the desired effect.
Features of dismantling
Dismantling the chimney pipe
Dismantling work starts from the top. First - the chimney. It can be simple and come from the roof or wall, or complex where the smoke passes through ducts in the interior wall of the house. A complex option is used as additional heating of the room. The iron pipe coming out of the house is removed by loosening it at the base. If it is made of brick, then we dismantle the masonry brick by brick, gradually going down.
After the external chimney, the part in the attic is dismantled, having previously closed the resulting hole with slate or a metal sheet. Here the work will go easily, since this area is done with sand-clay masonry mortar. To prevent the plaster from falling off the ceiling during work, it is worth placing a board on the beams, on which it will be convenient to stack the disassembled bricks.
Return to contents
Destruction of the structure itself
The masonry of the building begins to be dismantled from the top, moving to its bottom.
Next you should start cutting the central and most massive part of the furnace. The work is also carried out - from top to bottom, moving in a circle. The part near the pipe is disassembled first, gradually expanding. It is better to clean the plaster. If the stove is tiled, that should also be removed. For the job to go better, the chisel should hit the seams between the bricks. The wall, under the influence of vibration from a blow with a hammer or sledgehammer, will collapse. If you plan to use the resulting brick, you should be careful, because the wrong blow can break the brick.
The difficult part is cutting the vault. To prevent it from collapsing ahead of time, it is recommended to use the following trick: place a sheet of iron on supports under the arch. It is better to start disassembling work from the back wall and gradually move towards the front of the oven. The iron plate and doors are dismantled last. Don't rush or remove them prematurely. It is better to keep them closed, this will reduce the amount of soot that gets into the house.
Return to contents
How to disassemble the base of a brick oven?
The last stage remains - dismantling the furnace foundation. There are stoves that stand on supports. Their base can be simply removed and stored without disassembling. But here one person cannot cope. Others need to be dismantled, since their foundation is also laid with bricks. If the base does not interfere with the interior, it can be left alone. The top is simply covered with linoleum.
How to disassemble a brick oven: procedure and features of dismantling oven equipment
Now let's start disassembling the stove in the room. To do this, open windows and doors to allow fresh air to enter. We take a bottle of water, put a spray bottle on it and spray water on each brick of the row that we will disassemble. Sprayed? We don’t spare water in this matter, it’s better for us, less dust will fly. Now gently tap with a hammer and slowly remove brick by brick. You can, of course, use a sledgehammer) This way the whole stove will quickly fall apart. BUT it’s too dusty, and suddenly you’ll need these bricks for something later, you never know what happens. The more carefully you do everything, the better off you will be. Well, and so on until the very end. The idea is simple: spray, disassemble. And yet, before you start directly breaking down the stove, take care in advance of where you will put the old bricks so that you don’t have to drag them from place to place later. That's basically all. After all this, all you have to do is clean up and take out all the trash. Good luck!
No matter how good the old stove is, sooner or later many of its owners come to the conclusion that it needs to be disassembled. The reasons are different: the desire to expand the living space, the acquisition of an alternative heating system, the desire to change the interior design. In general, there are many reasons. The stove can be partially disassembled by converting it into a fireplace or simply rebuilding several partitions.
If you decide to disassemble your old stove, inspect it carefully. Any work begins with the head; at the stove it is the chimney.
Open the ceiling above the stove and make sure nothing is resting on the chimney. Don't forget to cover or take things out of the room; there will be a huge amount of dust and ash. Carefully, starting from the roof, widen the hole around the chimney and dismantle the masonry brick by brick, gradually descending into the house. Be careful not to stack too many bricks on the roof, otherwise you risk falling. In the attic and indoors, masonry can be broken with a sledgehammer or something heavy, but be careful not to damage beams and walls that will still be useful. Carefully fill the holes in the ceiling and roof left by the chimney with bricks.
Next, we proceed to disassemble the central and largest part of the stove, on which many people liked to soak up the heat when the stove was still in use. The main part of the oven can not be completely disassembled; just one wall can be removed. Adapt the remaining walls for niches or shelves.
If you decide to disassemble the entire stove, then again check whether the body of the stove is supported by something, and also dismantle the floor around the stove and inspect its foundation. Check how the walls are folded and how the bricks are connected to each other (clay or cement). If you later plan to build a new stove, you will need a price list for building bricks. If the oven is lined with clay, then everything is simple, the walls are quite easy to disassemble, but if cement is involved, then you will have to sweat.
What to do if there are cracks around the casting
Due to the large difference in the magnitude of the temperature expansion of metal and brick, cracks often form at the junction. To avoid them, during installation, recesses are made in the brick, which allow the metal to expand when heated without destroying the masonry (the recesses are 3-5 mm larger than the casting shelf). To soften the impact, the casting is wrapped in thermal insulation material. Previously, they used asbestos cord or cardboard, but now they often use mineral wool cardboard cut into strips or a special sealing cord (asbestos is harmful). When choosing cardboard, pay attention that it must withstand temperatures of 800°C and above.
If cracks do appear, they are repaired as described above - using a solution with the addition of fireclay. But if the damage is such that the door wobbles, as do the bricks above it, if the design allows, it is better to disassemble and reattach everything, tighten the fastening wire and re-wrap the casting with heat-insulating material.
Cracks around the casting - around the doors, near the stove - require repair
Mistakes when sealing doors lead to cracks
CAUSES OF PROBLEMS
Repair of a sauna stove can be caused by several reasons:
- Inadequate care
Irregularities in the operation of the furnace occur as a result of the formation of soot. Plaque settles on the internal surfaces, reducing the heat transfer of the structure and destroying its continuity.
The operation of the heater can be disrupted by the decomposition of stove stones, which forms a dense mass of debris at the bottom of the system and prevents high-quality heating.
- Wear of components
The furnace door that is secured with steel wire wears out the fastest. Another problem is the decomposition of the fixing solution, which threatens the appearance of small cracks, exposed seams and disruption of the furnace draft.
The most serious flaw in this group is the partial fracture of bricks, which appears as a result of using unsuitable material.
- Misuse
Wear and tear of the structure occurs as a result of improper fuel placement and the use of flammable substances (diesel fuel, gasoline).
- Design errors
The most serious reason requiring a complete redesign of the structure. It is expressed in the form of a complete lack of draft, deep cracks in the brazier, minimal heating of the external walls.
In some cases, repair of a sauna stove may be caused by switching from classic fuel to gas.
Chimney cleaning
The chimney must be cleaned regularly, at least once a year. If the stove is used only in the summer, for example, in a country house where no one lives in winter, then it is better to clean the chimney openings before the first ignition after a long period of standing.
One of the cleaning options is burning aspen wood. Aspen gives the highest temperature when burning and, as it were, burns away the soot. This option is suitable if you notice that the draft is poor and a little smoke enters the room.
If the stove is smoking and there is a lot of smoke in the room, then you need to approach cleaning more thoroughly. To do this, open the special doors leading to the chimney and remove the carbon deposits with a dustpan and broom. Sometimes removable stones are installed instead of doors. They need to be cleaned from the plaster and removed by hand, then clean the chimney opening. After cleaning, you can rinse with water using a brush.
Another option is cleaning from the roof. We also open the doors (take out the bricks), climb onto the roof, and push the carbon deposits and debris from top to bottom with a large, strong stick.
Features of dismantling
Dismantling the chimney pipe
Dismantling work starts from the top. First - the chimney. It can be simple and come from the roof or wall, or complex where the smoke passes through ducts in the interior wall of the house. A complex option is used as additional heating of the room. The iron pipe coming out of the house is removed by loosening it at the base. If it is made of brick, then we dismantle the masonry brick by brick, gradually going down.
After the external chimney, the part in the attic is dismantled, having previously closed the resulting hole with slate or a metal sheet. Here the work will go easily, since this area is done with sand-clay masonry mortar. To prevent the plaster from falling off the ceiling during work, it is worth placing a board on the beams, on which it will be convenient to stack the disassembled bricks.
Destruction of the structure itself
Next you should start cutting the central and most massive part of the furnace. The work is also carried out - from top to bottom, moving in a circle. The part near the pipe is disassembled first, gradually expanding. It is better to clean the plaster. If the stove is tiled, that should also be removed. For the job to go better, the chisel should hit the seams between the bricks. The wall, under the influence of vibration from a blow with a hammer or sledgehammer, will collapse. If you plan to use the resulting brick, you should be careful, because the wrong blow can break the brick.
The difficult part is cutting the vault. To prevent it from collapsing ahead of time, it is recommended to use the following trick: place a sheet of iron on supports under the arch. It is better to start disassembling work from the back wall and gradually move towards the front of the oven. The iron plate and doors are dismantled last. Don't rush or remove them prematurely. It is better to keep them closed, this will reduce the amount of soot that gets into the house.
How to disassemble the base of a brick oven?
The last stage remains - dismantling the furnace foundation. There are stoves that stand on supports. Their base can be simply removed and stored without disassembling. But here one person cannot cope. Others need to be dismantled, since their foundation is also laid with bricks. If the base does not interfere with the interior, it can be left alone. The top is simply covered with linoleum.