Correctly placing a log house on the foundation is an easy task at first glance. How many times have you observed that the bathhouse has moved or become distorted over time? But it will be difficult to carry out repair work, since the frame will have to be rolled out and reassembled. We will discuss together with our readers how to place a log bathhouse on the foundation correctly, what features need to be taken into account.
It is necessary to place the log house on the foundation correctly, observing all the details.
In what order to install a log bathhouse
It's no secret that the first crown of a house
or any other building is the most important. Since the dimensions of the lumber were known to me in advance, I precisely adjusted the layout of the future bathhouse and the size of the foundation to their length. Having accurately marked the first crown, it was enough in the future to use only a plumb line and a level so that the walls and corners of the bathhouse were vertical.
Log bathhouse.
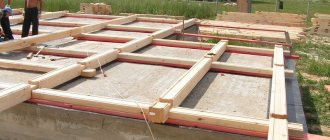
The first crown Before laying the first crown on the surface of the bathhouse foundation, I made waterproofing from two layers of RKP-350 roofing material.
Log bathhouse
, thanks to horizontal insulation, will not be exposed to ground moisture, which can rise through the foundation concrete due to capillary pores.
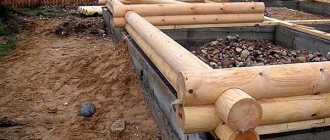
After the first crown, the rest are arranged. The entire frame made of timber
must be mounted along the crowns so that the lumber in the corners and other junctions is tied to each other.
How to connect beams in corners
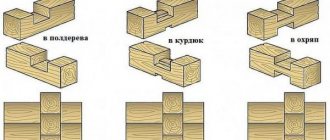
To connect the beams in the corners, I decided to use the simplest method, but quite sufficient for strength and heat protection - in a dressing with a root tenon (sometimes it is called a “warm corner”). It’s easier than not to tie the lumber together at all, installing them end-to-end, but then you would have to use staples to tie them together, and the corners of the bathhouse would be blown out.
Log bathhouse. Warm corner
All other methods that were in demand in the past - in a paw, in half a tree, in a cup, I immediately “rejected” as unreasonably complex. With modern means and methods for sealing joints, you can easily avoid unnecessary labor costs.
In order not to mark the configuration of the cutouts in the lumber for each corner separately, I simply made two cardboard templates, according to which I marked the ends. After this, making one or two cuts with a chainsaw and removing excess wood with a hammer and a wide chisel is a matter of a couple of minutes. The direction of the spike on each row must be changed. That is, if in an even row the tenon is on the right and the groove is on the left, in the odd row there should be a groove on the right and a tenon on the left. This bandage firmly holds the crowns together in height, preventing the frame from falling apart.
How to join a beam to a long wall
In some cases, it is necessary to make a T-shaped connection of the timber. This need arises when connecting an internal wall to an external one. I got three such connections for each crown.
It is better to make a T-shaped junction using a method that carpenters call a “dovetail” (in some sources this method is called a “frying pan connection”).
Log bathhouse. Dovetail connection
To do this, the end of the adjacent beam is cut out in a shape reminiscent of this very tail, and a corresponding notch is made in the long beam. After installing the unit, the connection must be wedged. For this, wedges made of dense, dry wood are used.
This type of connection provides sufficient strength and is completely airtight, since there are no through vertical joints.
How to connect crowns to tie a bathhouse frame
The connection of the crowns with each other must be carried out in order to ensure the strength of the structure of the bathhouse frame vertically. In other words, this is necessary so that the crowns do not move relative to each other. Previously, this operation was performed on wooden dowels - rods of round or square cross-section. They were driven into pre-drilled holes, connecting two or three adjacent crowns.
Not wanting to waste time preparing these dowels and drilling large diameter holes, I simply used 200 mm long nails. The nails are hammered very quickly, and if you deepen the head 3-5 cm into the upper beam, the nail will securely connect the two crowns, preventing them from moving.
To finish the nail and immerse it completely into the drilled hole, you need to use a hammer. If you don’t have it on hand, you can use an old, worn-out drill bit from a rotary hammer with a diameter of 10 mm.
Loghouse construction technology
In order to build such a house yourself, you need to familiarize yourself with the technology of its construction:
- Before you make a log house, you need to decide where it will be located. It is necessary that there is a decent amount of unoccupied space near the construction site, where it will be possible to install the components of the log house. Then you need to mark the future structure using pegs and rope. The corners must be straight.
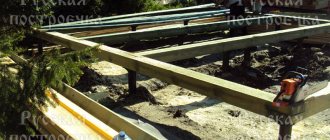
- Next comes the installation of the temporary foundation. It is made using meter-long aspen logs.
- Installation of the log house is the main part of the work. The structure will be stable if you are more careful and careful in connecting the longitudinal and transverse walls, as well as the logs with each other. To prevent the house from cracking in the future, it is necessary to make a cut along the entire length of the log.
- Before making a log house, you need to start laying the frame crown logs. They are located opposite each other. The side of the house located inside and the other side that is in contact with the foundation must first be hewn. The notches should have a width of more than 15 cm. Then sufficient stability of the crown and walls of the entire house will be ensured.
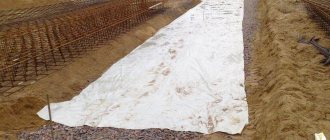
- Before you start laying logs under the foundation, you need to lay down boards that have already been treated with bitumen. The lining must have a thickness of more than 5 cm. A heat-insulating layer is placed on top, for example, it can be felt or tow.
- Next comes the turn of installing the walls. They are placed in horizontal rows - crowns. A home built from timber with your own hands should not have skewing walls, so alternate tops and butts are performed. Grooves are made in the logs in their lower parts, through which the rows are connected to each other.
- If you decide to make a beam with your own hands, then do not forget that wood shrinks when it dries, so you need to make a rough version. The frame needs to be marked and disassembled. Place the logs in a dry room. The final assembly of the structure must begin after 1 year. When you carry out the draft version, do not forget to make the holes for the tenons 2 cm deeper than the designed values, and the log house itself - 10 cm higher. You need to leave gaps above the openings of windows and doors, which will then be hidden with thermal insulation material.
- Having erected the walls, caulk all the seams on the outside and inside of the structure along its entire perimeter. You cannot caulk the entire wall at once: this can lead to the house being skewed. After a year, it is advisable to repeat the caulking. Replace the thermal insulation material near windows and doors with wooden blocks.
You can build a log house from timber for the purpose of either permanent or temporary residence. The log house is built from a building material such as timber, or glued laminated timber is also possible. If you plan to live permanently in a house made of timber, then the building material must be planed, but if it is for temporary use, it is not necessary. In any case, the timber is laid with the planed side inward.
Scheme of types and cross sections of timber.
Stage 3. Construction of the foundation
Let us immediately make a reservation that massive monolithic foundations can be abandoned due to the insignificant weight of the future structure. In order to save money, you can resort to one of two possible lightweight designs, namely:
- strip foundation;
- columnar.
Let's consider each of the options.
Strip foundation
Belt-type foundationMarkingMarkingDigging a trenchFormwork and reinforcementFillingReady foundation for a bathhouse
To build such a foundation around the entire perimeter, as well as under future walls, dig a trench 40 cm wide and 50 cm deep, lay a “cushion” of sand and gravel at the bottom. Next, lay the reinforcement, build formwork 50 cm high and pour concrete mortar. As a result, the height of the foundation will be approximately 1 m.
Video - Pouring the foundation
Place strips of sand and crushed stone inside the perimeter. In the future, the strips can be filled with concrete or a wooden floor can be built on them. The choice of one option or another depends on personal preferences and financial capabilities.
Columnar foundation
Drilling Fittings and pipe for the foundation Pipe and fittings installed in the hole Concrete poured into the pipe Anchor for attaching the lower trim
In the case of a columnar base, supports will need to be erected. There are two possible options:
- brick;
- from asbestos pipes.
Place supports at the corners of the perimeter, as well as under all walls in 1.5 m increments. Pre-lay a concrete “cushion” under each support. Fix several reinforcement rods in each support so that the latter protrude above the surface by at least 30 cm.
Build formwork 40 cm high, lay reinforcement in it and tie it to rods protruding from the supports. Fill with concrete mortar. After four to five weeks, when the concrete is completely dry, you can begin further work.
Foundation for a bathhouseBrick columnar foundation
Installation of timber to brick
To clad external walls using wooden panels, you need to understand how to attach the timber to a brick wall, as this can speed up the process and save the entire structure from destruction. To do this, you need to determine the position of the log in which it will be attached.
After this, you need to make holes for fasteners, for example, dowels. The distance between them corresponds to the width of the beam. For wooden elements with a size of 5 by 5 cm it will be from 20 to 30 cm and the larger the size of the log, the smaller the distance.
To hide the head of the fastener, you need to countersink the hole. To do this, it is drilled out to a diameter that corresponds to the top of the screw or bolt. You also need to understand how to secure a beam to a brick wall if you need to secure beams under the ceiling. This can be done using a hole made in the wall to a depth of at least 15 cm.
Fastening with dowels Source fischerdubel.hu
After this, it is recommended to carry out preparatory work with the wooden element:
- Cut the ends of the logs at an angle of 60 degrees.
- Soak them with antiseptic and let dry.
- After this they need to be treated with resin.
- Before laying, the ends of the beams are wrapped with roofing felt.
In order for the beams to fit well into the grooves, it is necessary to level their bottom and lay 2-3 layers of roofing material there. When installing, place the timber at a distance of 4 cm from the walls of the niche, since the remaining space in it must be filled with concrete.
You can also attach the beams using an anchor. It is recommended to install it at the time of laying the wall. It must be at a distance of at least 120 mm from the outside and protrude into the room by 200 mm.
You need to make a cutout in the beam for an anchor of the same diameter. Also, the thickness of the wooden beam should be 2 times greater than the brick, and the wooden element itself should be well dried so that the fastening does not move.
Installation in a niche Source i.imgur.com
Nuances of log processing
Initially, the log bathhouse must be kept under the roof so that the material used in construction (log or timber) is dried as much as possible in at least 8 months
It is important to note that these months should be as dry as possible. Usually, bathhouses are installed from a log house in December, so that they have time to dry before August.
If it is possible to wait a longer period, then drying can last 1.5-2 years.
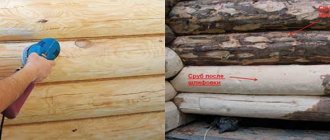
While the log house is drying, it is necessary to carry out a number of other works. Having installed the logs, it is necessary to treat them using special antiseptics, which are based on solvents. They are necessary to prevent fungi or mold from forming on the surface of the logs. To prevent the wood from tearing when drying, it must be treated with a different composition, for example, “Teknol JRM” is suitable.
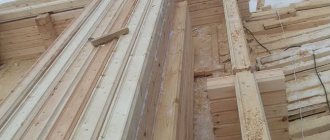
Choosing the right timber for the first crown
The timber must be selected and prepared in advance so as not to be distracted by small details and shortcomings during the construction process. To install the first crown, you should choose high-quality material, since the integrity of the structure during operation depends on it:
- the timber must be perfectly flat;
- there should be no knots or chips on the surface;
- the main condition is the maximum density of the timber rings; to make such material, the middle part of the tree is taken;
- timber with traces of blue on the surface of the wood is categorically unacceptable not only for the first crown, but also for the entire log house.
The finished timber produced at the factory is usually already processed and completely ready for use, but additional processing will not hurt, especially for the construction of a bathhouse. Thoroughly coat the timber with mastic, which is pre-mixed with the waste. Impregnation based on this composition is perfectly absorbed into wood. The ends of the timber do not need to be processed; they should remain bare and release moisture during drying and shrinkage of the structure.
It is how carefully you process the timber that determines how long the lower crown, and therefore all the walls of your bathhouse, will serve faithfully.
The essence of the problem
Theoretically, almost any structure can be lifted from its foundation without destruction or disassembly, as evidenced by the transfer of even multi-story buildings. Frequently encountered problems:
- How to raise an old bathhouse onto a foundation? Often, the construction of a small bathhouse is carried out without a foundation, and its base is simply placed on compacted soil and a sand-crushed stone cushion. Over time, such a structure begins to sag (often unevenly), which necessitates the creation of a foundation; the problem arises of how to raise the bathhouse onto the foundation after several years of its operation.
- How to repair the foundation? It often happens that the frame of a bathhouse can last for many more years, but for some reason the foundation is seriously damaged. This may be a consequence of a violation of technology during construction or natural circumstances. In this case, the possibility of repairing or replacing the foundation is associated with raising the structure itself.
- How to eliminate distortions in the structure as a result of its uneven subsidence? The bathhouse can receive dangerous deformation in the form of subsidence of a corner or wall, which causes the structure to tilt and the risk of destruction.
- How to raise the ceiling in a bathhouse? You can raise a building to increase its height. Often at the time of construction, a minimum ceiling height is set, but over time there is a desire to increase comfort. In this case, lifting will help solve the problem.
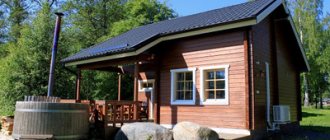
Bathhouse with steam room and dressing room: assembly features
A log bathhouse is a traditional option that allows you to ensure the comfort of water procedures and a pleasant pastime with real Russian steam in the company of friends. Log remains the best material that allows for good thermal insulation combined with natural air circulation. The bathhouse will have a comfortable and light atmosphere, and it will create the best conditions for a comfortable stay.
Ready-made log houses for baths
How to assemble a log bath? Making a log house yourself from scratch is a difficult job that requires refined carpentry skills, and it is better to entrust it to professionals. The highest quality processing of corner joints will be required: Russian, Norwegian or Canadian cutting can be used, but in any case the joints must be smooth and of the highest quality.
Then the log house is disassembled and the logs are delivered to the site itself. This option has several advantages:
- The structure will be warmer, stronger and more reliable than if you cut it yourself. Professional processing of logs guarantees them a long service life, so this solution will be quite profitable. The bathhouse will not be ventilated, the procedures will be quite comfortable.
Preparing for the construction of a bathhouse
How to assemble a bathhouse from a log house yourself? A number of works must first be completed. Construction begins with a project. If you want to order a ready-made log house, any organization can offer various options for baths.
The classic option is a rectangular structure 4x6 meters. In such a bath there will be space for a dressing room and a washing room, which will serve as a steam room. If the bathhouse has a large area, the space of the soap and steam room can be divided.
How to assemble a bathhouse from a log house with a dressing room? The layout should take into account the location of doors and windows: they are usually made small in order to maximize heat savings in the room.
It is important to choose the right place for the bath. In a small area, it is usually located in the opposite corner from the building to ensure compliance with fire regulations. If the size of the plot allows you to choose, the place for the bathhouse is chosen away from the gate and the house itself; it should be located so that you can relax near the bathhouse without disturbing anyone.
Foundation for a log bath
Work on the construction of a log bathhouse begins with clearing the site and building a foundation. It can be ribbon or columnar, it depends on the size and weight of the future structure.
The pillars can be monolithic, sometimes they are also assembled from concrete blocks or bricks. The finished foundation cannot be left unloaded for a long time, so you need to quickly move on to the construction itself.
Technology for assembling a log house for a bath
How to properly assemble a log bathhouse? The process begins with mandatory waterproofing of the foundation, which is especially important for a bathhouse, where humidity will constantly be increased.
Roofing felt, bitumen mastic and other materials can be used as waterproofing. After this, you can proceed to assembling the structure. How to assemble a log bathhouse?
- The first step is laying the trim crown. To keep it firmly on the foundation, the lower part is often sawed off to give the log a smooth edge. This will allow you to firmly install it on a columnar or strip base.
- Floor logs are cut into the lower crown, onto which boards and the selected finishing material will subsequently be laid. The crown is laid with natural tape insulation, after which the next log is laid in accordance with the diagram.
- The walls of a log house are usually erected quickly; the logs are fastened together with wooden or metal dowels. It is important to observe the alternation of “butt-top” when laying logs so that the wall does not end up skewed.
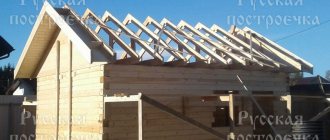
- Ceiling beams are installed at the last crown, after which you can proceed to the installation of rafters and the construction of the roofing system. The rafters can be assembled into ready-made trusses on the ground, but more often they are lifted one by one to the roof and installed in accordance with the selected type of roof.
When the log house is assembled, it is pre-treated with an antiseptic and left for a long time (at least six months) until the wood is completely dry and the settlement process is completed. After this, you can move on to insulation work and interior decoration.
Assembling a log house from ready-made elements will not require much time; the work can be completed in a few days. Everyone chooses the interior decoration themselves: the bathhouse premises are most often lined with clapboard or other natural materials, lighting is provided, and a stove is erected.
Wooden log bathhouse: pros and cons
Reliable and budget-friendly type of foundation. It does not create the need for additional waterproofing, but does not allow the possibility of building a basement. This foundation is placed under buildings with light walls (gazebos, bathhouses, verandas, utility buildings, wooden or frame houses), and is also used as a support for the porch. Used mainly on sandy and dry soil.
To lay this type of foundation, the top layer of soil is removed to the required depth before starting the main work. Then a kind of cushion of sand is formed to reduce the load that occurs in the event of seasonal swelling of the soil. Then the main structure is installed.
As an option, for heavy log houses a columnar foundation design with a grillage is used.
When considering foundation options, developers most often focus on cost
At the same time, you should pay attention to the durability indicator. The most expensive is a monolithic foundation, but its service life is estimated at 150 years, which exceeds the operational indicator of the log house itself
To strengthen the columnar supports, it is necessary to provide a strapping device that will sequentially connect all the supports into a single foundation. For a bathhouse made of wooden materials, a beam made of natural wood can be used as a frame, which is laid on top of the pillars. The strapping beam is also the bottom crown of the bathhouse.
Installing a columnar base does not take much time; the foundation is easy to build with your own hands.
Basic information about the construction of a sauna log house
Construction of a bathhouse, especially the walls for it, can be quite expensive
. The modern construction market offers a huge range of materials, both traditional and modern, which are widely used in the construction of buildings for specific purposes. But wood for a bathhouse is the most popular product for many reasons. These include long-standing traditions in construction, wide distribution, relatively low price, environmental friendliness and ease of use.
In this case, timber is a much simpler material to work with, and also does not require additional processing if you buy it and do not make it yourself.
In order not to incur additional costs for wall insulation, it is worth taking timber with a cross-section of 150 x 150 mm. This thickness of wood walls is optimal and will allow you to use the bathhouse throughout the year. To make the connection between the beams more dense, and the appearance of the finished wall to be aesthetic and pleasant, each beam must be properly planed.
One of the main positive qualities of timber is that walls made of this material do not require; they look self-sufficient, you just need to carefully process the beams. If you plan to decorate the external sides of the walls, then it will be enough to plan the material only from the side oriented towards the interior space of the bathhouse.
The first step in building a bathhouse from timber is installing a strapping crown on the prepared foundation
. The best option for choosing timber timber for the strapping crown is hardwood ash, oak and larch. Be sure to treat the building material with antiseptic substances.
Foundation for a log house with your own hands
Before starting construction, first of all, you should make a verified calculation of the foundation for the log house, marking the construction site accordingly. It is extremely difficult to redo such a foundation later.
It is also necessary, regardless of the type of foundation, to waterproof the log house in several layers, and also treat the initial log of the log house with an antiseptic to protect the walls from moisture.
During cold months, it is advisable to heat the water for the concrete solution to allow it to harden faster. During hot periods, only cold water should be used for this solution to avoid rapid cooling.
How to install a log house correctly
A log house is, in fact, the walls of a house, made of logs fastened together in a special way, and each “level” of its perimeter, consisting of four logs, is called a crown. By adding a floor, ceiling and roof to a log house, we get a house, a bathhouse or some other outbuilding.
In this article we will look at issues related to the correct choice of a log house when purchasing and its subsequent assembly on site.
Classification
If we do not consider some narrower and more specific options for log houses, then we can conditionally identify the following types and differences:
1. According to the layout:
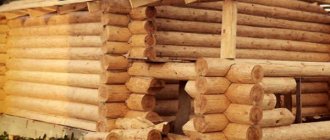
– ordinary – four-walled frame (photo 1);
– “five-walled” – a log house with an intermediate wall dividing it into two parts. The position of this intermediate wall can be different.
– not rectangular – the shape of such a log house is determined by the wishes of the customer, and accordingly the price for it is noticeably higher (photo 2).
2. According to the method of securing logs at the corners:
– into the upper bowl (photo 4);
– in the lower bowl (photo 5) – this method of securing logs is used for “irresponsible” buildings and is undesirable for log houses and bathhouses. The problem is that the lower bowl is a water collector built into the structure of the log house. Suppose that the tightness of the joints in the corners of the logs is broken (the gasket is destroyed or the corner is not tightly cut initially), then water collects in the corner joint. With all the ensuing consequences. It should be noted here: now approximately 60-70% of residential log houses are cut into the lower bowl. For builders it is fast and technologically advanced, but such a house requires external cladding.
3. According to the method of processing trunks:
– cylindered logs – passed through a special machine. These logs are an even cylinder, unlike those that have not undergone such processing - their cross-sectional diameter decreases from the base (butt) to the top. It is easier to cut log houses from rounded logs, and they look more “civilized.” But there are also a number of disadvantages, which are discussed below.
Choosing a log house
When determining the size of a future wooden house, you should remember: there are typical sizes of log houses: 6x6 m and 6x3 m. Such sizes are determined by the convenience of preparing trunks, their delivery, as well as the convenience of manufacturing and delivering the log houses themselves to the customer. Therefore, at most enterprises selling log houses, ready-made versions of log houses will most likely be standard. If time is of the essence, you can order a log house of exactly the size you need - for example, 8x7 m or something else.
Log houses for baths, saunas and buildings whose operating conditions require high humidity should be made from wood species that are least susceptible to rotting - larch, spruce or aspen. In addition, it is desirable that such buildings be cut into the upper bowl - it is this method of cutting that ensures the greatest durability of corner joints. It is desirable that sauna log houses be made from non-cylindered logs, since during cylindering the top layer of wood is removed, protecting the tree from environmental influences, which is why such a sauna log house will be more susceptible to rotting.
It is very important in what period of the year (winter or summer) the logs were harvested for the log house. The quality of the trunks after drying depends on this. A “winter” forest is preferable, since during this period the trees contain less moisture and therefore dry out, crack and bend less.
When purchasing, inspect the log house very carefully for the presence of dead logs. Such a log is made from a tree that has dried on the root (dead). The trunk of such a tree contains almost no resin, which is precisely the “embalming component” that protects the log from rotting. Such a dead log can be identified by the presence of woodworm burrows - there are no such burrows in a living tree. There should not be such dead logs in a log house - they can rot in just a few seasons.
Technical requirements
Before planning construction work, you need to take into account several technical requirements, without compliance with which the construction of a steam room may be at risk:
- The mass of the future structure should be small - up to 4000 kg. A massive building will sooner or later displace the soil.
- The dimensions of the bath structure should not exceed an area of more than 30 m2, and not internal, but external.
- The structure should be easy to disassemble and assemble. Thus, it can be easily dismantled and reassembled with your own hands. It is better if the portable bathhouse is a log house, since its elements are more mobile and environmentally friendly. If the steam room is not dismountable, then before installing the structure you should take care of the future transfer to the foundation - secure the brackets, with the help of which the building can later be moved.
Construction of wooden houses
Not only how long a log house will last, but also its correct geometric shape depends on the strength of the foundation and on compliance with the technology when creating it. But not only the foundation itself deserves attention, but also the methods of installing a log house on it.
Building codes suggest two methods for installing a log house on a foundation:
- Use rigid fixation of the log house to the foundation;
- There is no rigid fixation; the log house is simply placed on the foundation.
Rigid fixation
In this case, a collapsible or non-demountable connection between the grillage and the log is used. The immobility of the lower crown in this case occurs due to mechanical fastening using bolts and clamps.
This option provides a reliable connection and guarantees the immobility of the log house. However, in this case, repairing the first crown is very difficult, the cost of construction work increases, construction time is extended and the need arises to use a large number of consumables.
Overlay option
In this case, there is no need to talk about the complete immobility of the house, since there is no rigid attachment of the log house to the foundation. But at the same time, this option is often used, since it is simpler to implement. In addition, if necessary, there is free access to the first crown of a log house, whereas with rigid fastening, replacing the frame crown is very difficult and sometimes technically impossible.
The reliability of this method is ensured by the large weight of the logs. Practice has shown that the significant weight of log walls helps to obtain almost complete immobility of the frame crown. And it gives the same guarantees as the fastening technologies of the first option.
Installation of a log house on strip or slab foundations
Rigid attachment of a log house to strip or slab foundations requires preparation. Preparation is carried out during construction (when pouring the grillage) or after the foundation is completed.
Strong bolts are mounted into the grillage of the slab or tape, to which the frame crown logs will then be attached using pins - holes must be made in the logs for these purposes. Rigid fixation is achieved thanks to locknuts that are threaded onto the stud. A tight connection between the grillage and logs is achieved through a threaded pair.
Technological details
- After the foundation is poured, bolts are placed in the last layer of concrete. The distance between the hardware is about half a meter. In this case, each log must be secured with two or more bolts.
- At the same time, the logs are prepared by drilling holes in them for fastening.
- It is necessary to check the horizontality of the grillage by removing convexities (they are cut off) and concavities (they are filled with cement). As soon as a flat surface is obtained, a waterproofing roll material is laid on it (most often it is roofing felt).
- Logs are mounted on roofing felt, connecting them with pins. The corner joints of the crown are sometimes reinforced with metal corners on self-tapping screws.
- Finally, strong washers and locknuts are threaded onto the studs. Important! To avoid distortion, the nuts must be tightened at the same time, slowly tightening them.
Installation of a log house on strip or slab foundations without rigid fastening (overhead option) is also carried out. Only then do not install the bolts into the grillage.
Boulder base
As already mentioned, one of the most suitable areas for building a bathhouse without a foundation is mountainous and rocky terrain. In it you can find boulders and stones of different sizes and shapes in abundance. Therefore, it will be cheaper and easier to make a base for a bathhouse from them.
- Collect boulders and sort them into large and small.
- Dig a small pit and mark the contours of the future bathhouse inside. It is necessary to note both external and internal walls.
- Along the lines of the future walls, form walls from large boulders. You need to select them so that the gaps between the stones are minimal. The boulders can be held together with concrete or cement.
- Fill the space between these walls with small boulders.
- Make a grillage on top of the masonry. Additional waterproofing is not required.
Such a foundation will be very reliable and will withstand even a fairly heavy structure. A bathhouse without a foundation, but on a stone foundation can even be built from logs. Reliability and ability to withstand heavy loads are quite comparable to a real foundation.
Features of the arrangement of openings
No building is without openings, doors or windows, even a bathhouse. So I had to think about how to make them while still chopping. The fact is that each beam will shrink differently during the drying process and the openings may squint.
It was possible, of course, to install the entire frame of the bathhouse without windows and doors, and after drying it for a year, cut out the openings where necessary with a chainsaw. But in this case, there would be a lot of wood waste, and in my case, every piece of timber counted. The construction of openings during the construction of the log house would provide significant savings.
In order to “feed both the wolves and save the sheep,” I decided to leave a through beam in the openings every 3-4 rows, cutting out the rest. In this case, the shrinkage of the log house will be uniform.
Installation of a pile-screw foundation
Installation of a foundation on screw piles is possible both on uneven and flooded areas, as well as on well-groomed lawns, without causing damage to it. Thus, when installing a bathhouse on a screw foundation, there is no need to disrupt the natural topography (see also the article “Foundation for a bathhouse made of tires: construction principle”).
Site preparation
Before installation begins, it is necessary to carry out a number of preparatory work. At this stage, site preparation plays an important role.
If the construction site is occupied by construction or household waste, then it is necessary to remove all foreign objects and clear the area. Also, if there are pits and trenches, they should be carefully backfilled.
Installation of screw piles using special equipment
It is very important to take into account the presence of various obstacles at the project development stage. Such obstacles can be, for example, a large tree or a stump that has not been uprooted; sometimes there is an obstacle in the form of concrete slabs and the remains of an old foundation
Care must be taken to eliminate them.
Tool
In order to make a high-quality foundation for a bathhouse on screw piles, you need to purchase all the necessary tools:
- Shovel;
- Scrap;
- Magnetic level 30 cm long;
- 15-meter hydraulic level;
- Roulette;
- Two pieces of pipe 2-2.5 m long and 50 mm in diameter;
- Hammer;
- Sledgehammer;
- Garden drill;
- Bulgarian;
- Extension;
- Marker;
- Work gloves;
- Welding machine;
- Construction mixer;
- Container for batches;
- Hoe;
- Bucket and watering can.
Pile field marking
Before erecting a foundation on screw piles, it is necessary to first calculate the number of piles and the distance between them, and also mark out the pile field around the entire perimeter.
Screw piles for the foundation cut into dense layers of soil; to correctly determine the depth level of a stable soil layer, it is best to turn to professionals. In addition, to accurately calculate the future foundation, it is also recommended to take into account the weight of the future structure, groundwater fluctuations, soil type and climatic conditions of the area.
Marking the area for future installation of piles
The number of piles required depends on the size of the future bathhouse. The pillars must be evenly distributed under the building, not forgetting the corners of the internal walls. The length of the part of the pile that protrudes above the ground is 0.5 m, it is usually hidden behind a false base or left open.
The technology for installing screw piles provides for a sequence of work that this instruction describes step by step:
- We install the pile in the corner hole, attach a magnetic level and insert a crowbar into the mounting hole;
This photo shows screwing in a screw pile
- The pile should go 1/3 meter deep into the load-bearing soil;
- When carrying out these works, constantly monitor the position of the pipe with a magnetic level;
- In this way, four corner piles are exposed;
- Using a water level, we bring them to the same design height;
- Upon completion of the installation of corner piles, intermediate piles should be installed in the same way;
- Then the levers are extended to a length of three meters and the pile is rotated by four workers until it stands still. This means that the drill has hit a hard layer;
- At the final stage of installing screw piles, use a hydraulic level to level them according to the already installed corner piles;
- After installation, the internal cavities of the piles are filled with cement-sand mortar. This strengthens the foundation structure;
- It is necessary to install caps on the end part of the protruding screw pipes;
- We make a head from a pipe whose inside diameter is smaller than the outside diameter of the pile;
- We take a plate 250×250 mm and 10 mm wide for the mounting area of the head;
- After installing the heads, their position should be checked with a water level, then scalded;
- All welds and the head are primed and painted with enamel twice;
Installation of doors and double-glazed windows
In the places where doors and windows are installed, cut out an opening of the appropriate size. The doors and double-glazed windows themselves can be installed only after the wood has completely shrunk.
At the end, all you have to do is complete the finishing work at your discretion, connect the necessary communications, arrange furniture, appliances and interior items.
Good luck!
Video - Do-it-yourself log house
We propose to build the simplest and cheapest, but quite convenient small bathhouse, the dimensions of which allow it to be placed anywhere on the site, and the available technology and low price make it possible for anyone to have such a bathhouse if they wish. The dimensions of the building are only 3x3 meters, the height is 2 meters, the bathhouse has a combined steam room and washing room with a stove and a relaxation room. All construction work should be carried out taking into account the requirements.
For a small bathhouse, we choose cheap but quite satisfactory quality materials. What do you need to prepare?
Table of building materials
| Materials | Quantity | Illustration |
| Cement M400 | 150 kg | |
| Sawn timber 150×150 mm | 3.5 m3 | |
| 0.3 m3 | ||
| 25 m/p. | ||
| 0.5 m3 | ||
| 0.3 m3 | ||
| 500 pcs. | ||
| 10 m2 | ||
| 30 pcs. |
Nails and self-tapping screws of various sizes, metal corners for the rafter system, construction fittings, windows and doors. You can make windows and doors yourself (cheap, but time-consuming, and quite difficult) or buy ready-made ones (quick and will cost less in the end). You will need insulation, electrical cables and fittings.
We specially provided all materials in reserve. Firstly, during any construction it is impossible to do without unproductive waste. Secondly, lumber and hardware are always useful on the farm. If you have the opportunity and desire, you can make a water supply and drainage. There is no desire or opportunity - the bathhouse will “function” anyway, only the water will have to be carried into a boiler installed in the stove (for hot) and into a barrel (for cold) in buckets. We choose the simplest option - we will not deal with engineering water supply systems.
Groundwater and degree of freezing
Geological studies help determine the exact type of soil. Depending on the result obtained, the depth of concrete is determined:
- If the soil is poor and heaving, then it is worth increasing the depth of the foundation. In such areas it can reach up to 2 meters.
- If the soil is stronger, for example there is crushed stone or stones, you can go slightly deeper. In some cases, 0.5 meters will be enough. But if you have the means, you can do more.
- On rocky surfaces, you don’t have to bother at all and make literally 20-30 centimeters.
- The clay surface has a finely porous structure. That is why you can also not be too zealous with the size of the strip foundation. Its depth for a small bathhouse made of logs or wood can be approximately 0.5 meters.
Also, to strengthen the soil, you can increase the width of the base itself. This will help the wall be more stable and strong. On clay surfaces, lightweight structures do not require a deep and wide foundation.
Description of each element.
Strip foundation.
Its upper surface is leveled. All corners must be at the same level.
Waterproofing.
As waterproofing, you can use roofing felt, which we place on the surface to be protected in two layers.
Base.
It is made of red bricks in several rows.
Spacer board.
Its use is necessary:
- for uniform distribution of load from the walls of the building
- to protect the lower logs from destruction and rotting
Made from hard wood (oak). It is covered on three sides with mining or bitumen mastic. The top and end surfaces remain untouched. The board is laid on the waterproofing of the base. The width of the board corresponds to the diameter of the log house log, the thickness is 50 (mm).
Thermal insulator.
The material you can use is hemp, tow or sphagnum moss. For rounded logs and beams, flax-jute tapes are successfully used, the flax content of which should not exceed 20%. Placed on spacer boards and wall logs.
Crown.
The lower crowns are attached to the spacer boards. For structural strength, they are fastened together with wooden spikes at intervals of 1000...1500 (mm). In the top two, the interval between the spikes is halved - 500...700 (mm). They are installed in a checkerboard pattern on the lower log relative to the upper one, at a distance of 100...200 (mm).
- dowel – diameter 25…30 (mm)
- spike – 25 x 60…70 (mm)
- height – 120…150 (mm)
- the depth of the socket is 20...30 (mm) greater than the length of the spike
Self-installation of a log house
Installing a log bathhouse with your own hands is something that someone who has made the foundation for it himself may well be able to do. So, after work with the base is completed, it needs to be given some time to stand. At least this should be a week. The standing time is determined depending on the air temperature, time of year and air humidity.
The next stage is the manufacture and preparation of the log house. The best wood for a bathhouse is considered to be winter wood, which is characterized by high levels of durability and strength. This type of work can take from 10 to 45 days. This question depends entirely on the project and size of the log house. And, naturally, manual assembly will take much longer than industrial assembly.
After making the log house, it is necessary to begin assembling it on a ready-made and stable foundation. You can cut logs into a bowl or into a paw. Both of these technologies are time-tested and reliable and durable. At the same time, primary caulking is carried out. Since there are many types of materials for insulation, the assembly time for a log house can range from 10 to 40 days.
After installing the log house, it needs to be given time to shrink. As a rule, most owners prefer to wait at least a year. After this period, roofing work begins, the duration of which depends on the type of roof, its size and type of covering material. After the roof is laid, you can begin the final stage of construction of the log house - finishing work: internal and external. Thus, the installation of a log bathhouse on the foundation can be done by professionals or done by yourself. It is quite feasible for anyone who wants to do this work independently, without the involvement of a construction team.
Loghouse installation technology
Lower junction to the foundation
After the material has been selected, purchased and delivered to the site, you can figure out how to build a log frame. And we will start work from the foundation - installation of the casing crown.
What do the instructions from experts in working with wood advise us to do?
Before laying the first crown of timber, it is necessary to perform high-quality waterproofing of the base. Whatever our foundation, we lay either two layers of roofing felt or a special waterproofing membrane on its upper surface.
- We lay a lining beam on top of the waterproofing layer around the perimeter of the entire base. To make this, this tree is characterized by maximum resistance to moisture.
- The thickness of the lining beam must be at least 100 mm, and the width must be at least no less than the width of the main wall beam.
- Sometimes a profiled beam is used as a lining, cut in such a way that it rests on the base not with the tenons of the castle, but with a plane. In this case, installation of an additional lining is not required, but the waterproofing properties of the structure will suffer somewhat.
- At the corners of the structure we connect wooden beams “in half a tree”. This allows you to achieve maximum joint strength.
We thoroughly impregnate the backing beam or the first profiled blank with an antiseptic agent (Tikkurila, Senezh, etc.). In principle, if finances allow, it will definitely not be possible before installation begins.
We lay a jute sealing tape on top of the timber. If you are choosing how to lay the timber, you should keep in mind that too thick material is just as ineffective as too thin: in both cases, the risk of blowing increases. For a flat beam, a tape thickness of 10 mm is sufficient, and for glued profiled timber – 5 mm.
To avoid displacement, we fix the jute on the beam using a construction stapler.
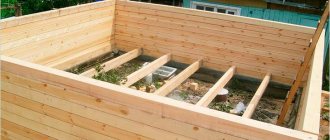
We attach brackets to the inside of the lower crown, on which we lay the floor joists. The lower plane of the logs should rest on foundation elements or special cranial bars.
In principle, logs can be embedded into the crown, but if we are talking about how to build a bathhouse from timber or build a house on relatively moist soils, then it is better to act according to the first option. This will make it easier to replace a rotten log with a new one.
Timber fastening technologies
After the first crown has been erected, you can begin laying the beams for the set of walls.
There are several nuances to consider:
In principle, high-quality dried glued laminated profiled timber can be mounted without any connecting elements at all, fastening it into a lock only at the corners (we will talk about corner connection technology a little later). But, nevertheless, to increase strength it is better to connect the workpieces.
- For connections, dowels are used - metal, wooden or plastic pins. It is best to use wooden walls, and even those with the same humidity as the wood itself.
- A hole for the dowel is drilled to connect no more than two beams: the upper beam is “stitched” through, and a nest of half its thickness is formed in the lower one.
- The diameter of the hole should be equal to the diameter of the dowel - so that the fastening element is driven into the wood with slight force by blows of the mallet.
Cutting corners
Corner connections of timber can be made in several ways.
Some of them provide for the protrusion of the workpiece beyond the plane of the wall (connection with the rest), others do not.
- The parts are connected to the rest by cutting out a recess in the workpiece - a bowl. A second beam is placed in this bowl, which can be either solid or with a corresponding cutout. The most popular connection schemes with the remainder are “into the bowl” and “into the bowl”.
- The most common technology for joining without residue is the “half-tree” joining. In this case, protrusions are formed at the ends of the beams, the thickness of which is equal to half the thickness of the parts being connected.
Another method of corner connection is the so-called “warm corner”. This technology involves cutting a vertical groove on the side surface of the beam, into which a corresponding sized tenon is inserted at the end of another element.
Windows and doors
Speaking about the construction of walls, do not forget about window and door openings:
- The openings themselves are either cut out in already laid walls, or are provided for in advance by the design (if we purchase the material as part of the so-called house kit).
- In order to maintain the shape of the openings during shrinkage, we cut special strips into their side surfaces - the so-called ribs.
- Above window and door frames, we must leave a shrinkage gap of at least 50 mm.