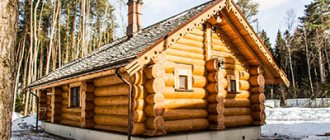
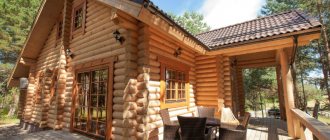
Not a single shower cabin can compare with a real Russian bath! However, the pleasure received from the bathhouse directly depends on how well it is cut down and whether the material is correctly selected and prepared. We will tell you in this article how difficult it is to make a log bathhouse, and whether it is possible to cope with it on your own.
Making a log house, at first glance, is not an activity for everyone. There are too many nuances you need to know to get the desired result. But if you stock up on time and patience, everything will definitely work out.
There are several types of cutting that are still used today, for example, chopping in the head, in the khryapu, dovetail, right angle with a spike, Canadian, Norwegian, in a bowl with and without a spike. Let's consider one of the common types - cutting into a round bowl.
Advantages of chopping into a bowl
- Good stability of the log house. Such a log house is not subject to shifts of logs relative to each other, as happens when cutting into a right angle or dovetail.
- Warm corner. Due to the thickness of the joint of the logs in the corner (into a whole log), heat loss is minimized. This is especially true when cutting a bowl with a tenon, if only the tenon is made correctly, without unnecessary gaps.
- Attractive appearance. A well-processed log house looks much more impressive than cutting it into a right angle or khrya.
- Does not require additional cladding, both outside and inside. The warm corner allows you to leave the frame as is, so it only needs to be sanded and painted.
- Convenient joining of logs. Unlike other types of cutting, the bowl allows you to join logs in any cut. In a place where there are no additional walls, simply cover the joint with a short piece of log.
Video description
In this video you will see how to caulk a log house with tow:
- Jute . An environmentally friendly type of insulation that retains heat well, but has a short service life (3 years) due to the fact that it strongly absorbs moisture.
Old jute is difficult to get out of the cracks, so it is rarely used. There are also differences between types of jute. For example, tow is too hard and has low density. Because of this, it is necessary to caulk the log house in several stages to achieve the desired density.
Flax-jute contains 50% flax fibers, so it requires additional treatment to prevent insects and rot. Jute felt consists of 10% flax fibers, but has high flexibility and good density. It also requires additional insect repellent treatment.
- Lnovatin . Due to heavy treatment with insect repellent chemicals, it is not environmentally friendly. It has a service life of 3 years and is attached to the structure using a construction stapler.
Felt made of jute Source drevtorg.rf
See also: Catalog of house projects made from hand-cut logs and timber
- Synthetic compounds . They cost more than other materials, but are easier to use.
Such substances are used in combination with natural material (cord). To do this, the thread is placed in the gap and filled with sealant, which is leveled with a small spatula.
The disadvantage of this method of sealing log cracks is that when exposed to sunlight, the sealant will dry out and begin to crumble. To do this, the place of putty must be covered with planks.
Also, synthetic compounds harden and can expand and contract with temperature changes, which can lead to cracks in the wood. To avoid this, it is necessary to use elastic compounds.
The right combination of sealing materials helps avoid the formation of damage and fungus, and also increases the thermal insulation of walls. This is necessary when constructing buildings in cold regions or when assembling a bathhouse, since in such rooms rapid cooling of the air can be critical.
Synthetic sealant for log houses Source td-artemov.ru
Disadvantages of chopping into a bowl
- Overuse of material. Due to the release around the corner, at least 20-25 cm from the log are lost, that is, the loss on one wall will be about half a meter. With a log standard of 6.1 meters, this must be taken into account; for example, inside a 6x6 log house, the useful distance will be only 5.2 meters.
- Due to the protruding corners, sheathing such a log house will be more difficult.
- It is necessary to promptly treat logs with antiseptics or paint to prevent them from darkening. Without lining, darkened areas of logs will be visible even under some types of paint, not to mention varnish inside the house.
Construction of the foundation
The next step will be laying the foundation. Since the wooden structure will have little weight, a powerful monolithic base can be abandoned. For a log bathhouse, a strip or column foundation is perfect.
Strip foundation
The construction of a strip foundation consists of the following stages:
- A trench is dug along the entire perimeter of the base, 40 cm wide and 50 cm deep.
- A cushion of gravel and sand is made at the bottom.
- Next, the reinforcement is laid.
- Formwork is constructed to a height of 50 cm.
- The concrete solution is poured.
- Sand and crushed stone are poured in strips inside the perimeter. In the future, they can also be filled with cement mortar or laid with a wooden floor.
Important: the height of the strip foundation must be at least 1 meter.
Columnar foundation
To lay a columnar base you will need:
- Make supports from brick or asbestos pipes. The supports are placed around the perimeter with a distance of 1.5 m.
- A concrete pad is made under each support.
- Reinforcement is fixed to the supports.
- A formwork 40 cm high is being constructed.
- Reinforcement is laid on the formwork and tied with rods.
- Concrete is poured.
After 4-5 weeks, when the concrete is completely dry, you can begin further construction.
Bath size
The size of the bathhouse can be arbitrary - at your own request, depending on what is planned to be placed in it. A standard bathhouse includes a sink (washing room), a steam room and a dressing room (in the modern version, a relaxation room). For a steam room, three to four square meters are enough, for a sink a little more, about five to six. The dressing room, if without sophistication, can perform its functions with a size of 5-6 sq.m. In other words, the average size of a rather modest bathhouse will be 4x5 meters, or 3x6. With a standard log size of 6.1 m, the second option will be much more economical.
Preparing a working draft
It is recommended to build a bathhouse 15 meters from a wooden house.
Design is carried out taking into account the following parameters.
- Placement - the log house is located at least 15 m from the residential building or at least 10 m if the house is concrete or stone.
- Choose an elevated location, as this makes it easier to remove moisture. It is better if the building is protected from the winds by bushes and trees or a fence.
- In a small bathhouse they plan only a steam room and a vestibule. The washing room can be combined by arranging a bucket or ladle for pouring, or placed under a canopy. If the space allows, they plan a steam room, a washing room, a locker room, and possibly a guest room.
- It is important to design effective ventilation. Otherwise, the building will become damp.
- When planning, take into account the size of the log. It is necessary to calculate where they will be joined, what is the permissible length of the wall, etc.
The use of rounded and planed logs significantly simplifies the design.
To build a bathhouse from a log with your own hands, use standard carpentry tools. Since the foundation also needs to be built, excavation tools are used. The choice depends on the design of the bathhouse, the type of foundation, and finishing options.
Log selection
It is best to harvest timber for the bathhouse in winter, from late November to early March, when there is no sap flow. Summer wood, compared to winter wood, dries out much more, so after shrinkage there will be more cracks and cracks in the log house. In addition, it darkens faster and is more susceptible to fungi and mold.
You need to choose a tree that is not affected by rot, fungus and insects, preferably with a minimum number of knots. The trunks should be smooth and not runny, that is, the difference between the diameters of the butt and crown should be no more than 50-70 mm. The most suitable type of wood for a bathhouse is pine, although the lower crown, which is most susceptible to dampness, can be made from larch.
Arrangement of openings for windows and doors, caulking of buildings
The manufacture of door and window openings is carried out after the complete completion of the construction of the bathhouse. To do this, use a saw to cut gaps in the wall structures: four for windows, one for the front door and one for ventilation.
After this, all that remains is to insulate the finished structure in order to reduce possible heat losses during operation.
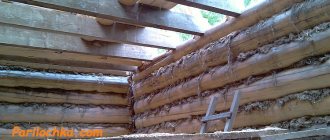
To eliminate inter-crown cracks and gaps formed after shrinkage, a log bathhouse requires mandatory insulation. For this, moss, ribbon jute and tow are used.
The insulation of a log house is carried out as follows:
- The insulation is laid out between the individual logs of the structure, starting from the bottom crown to the topmost.
- Next, corner joints, door and window openings are caulked.
- Finally, the ceiling surface of the log house is insulated.
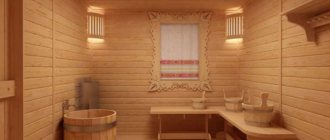
After completion of construction work, the interior finishing of the steam room, washing room and other rooms of the bathhouse is carried out.
Log processing
The prepared material is placed on a platform raised above the ground, so it will dry and ventilate better. It is much easier to remove the bark while the tree is fresh; after a week or two it will dry out, and you will have to work hard to debark the log.
The surface of the log is processed using a large electric planer with a power of 1.5-2 kW and a blade width of 100-110 mm. When sharpening, you must ensure that all flaws and damage are removed, but you should not remove too much wood, because The outer layer of wood is the strongest.
If the log house is not planed or polished, then when debarking you need to scrape the so-called more carefully. sapwood (sapwood) is a thin layer between the bark and the wood, otherwise the paintwork will fall off along with it.
Beginning of the log house
Before laying out the first crown, it is necessary to unravel the lower logs in half lengthwise, and remove 3-5 cm from those that will overlap them across the entire plane. In cross section they will look like the figure below.
Cross section of logs for the lower crown of a log house.
Thanks to this, the lower plane of the log house will be level and will ensure the tightest fit to the foundation.
When laying out the initial crown, lay the halves of the logs first, aligning them in height and diagonals. Then the transverse logs are placed and adjusted to the lower ones using a special tool - a dash, or a scriber, as it is now called.
Photo by scriber.
To do this, put on the line a size equal to the thickness of the lower half, minus 5 mm for shrinkage.
Each cup of the 1st crown will have its own size, so you will have to adjust the line for each corner individually. But this rule does not apply to all other crowns; any log is drawn in one size entirely.
With careful drawing of the line, within the longitudinal and transverse eye levels, the cup accurately copies the contour of the surface of the lower log.
The first crown of the log house of the bathhouse.
Base waterproofing
After laying the foundation, you should consider its proper waterproofing. To do this, the surface of the base is treated with molten bitumen. Roofing felt is spread on top, and after the bitumen has completely dried, the procedure is repeated again. As a result, you will get a strong and reliable two-layer foundation waterproofing.
Preparing the tools
For further construction, you will need to prepare the following tools in advance:
- Chisel.
- Axe.
- Chainsaw.
- Level.
- Plumb.
- Drill.
- Mallet.
- Damn it.
Important: the trait is a special tool that you will need to make with your own hands. To do this, take a steel wire with sharpened ends and bend it in half to make something like a compass. This tool is necessary for marking logs.
The process of cutting a log bathhouse
When the first crown is exposed, it must be secured in the corners with dowels, so that when the logs are subsequently rolled onto the upper crowns, the dimensions along the axes of the log house will not be disrupted. To do this, the corner is drilled with a wood drill; its diameter can be in the range of 25-32 mm. In this case, it will be convenient to make the hole diameter 26 mm, and buy a standard round dowel, 25 mm in diameter.
The bowl is cut out with a chainsaw; it is advisable to select a model that is quite powerful, but small in size and weight. Stihl ms230-250 saws are very popular among carpenters; they develop high speeds, have a rather narrow bar and chain - so they are less likely to be thrown out of the cut. And the power-weight ratio is optimal.
To begin with, cut out the middle of the bowl as much as possible, after which, at high speed, smooth out the unevenness along the line. The saw does not require pressure; you need to clean the bowl with light, confident movements.
Subsequent crowns are placed in the same way, but a longitudinal groove is added between the logs of the wall, which is needed to tightly join them together. The groove is taken out with a special tool - a pick. It is a cross ax with slightly curved edges.
Slots 2-3 cm deep are made with a saw along the groove lines, transverse notches are made between them after 5-10 cm, after which the excess wood is cut out with a pick. Cleaning is done with a saw. For a more convenient fit, most often, intermediate - rough - cups are first selected in logs, and with their help the log is adjusted in height. With this method, a smaller line spread is required, drawing becomes convenient and accurate.
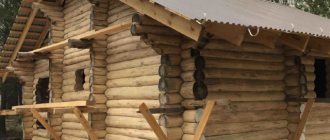
Photo of the process of cutting a log house.
During the cutting process, one must not forget about adjusting the wall logs vertically, otherwise the corner may go inward or outward and spoil the appearance of the structure. To do this, mark the middle at the end of the log, draw a vertical line through it along the level and align it with the same line of the lower log. The method eliminates horizontal deviations of corners and walls.
Since it is inconvenient to work with a log house above one and a half meters, it is usually made of two or more parts (boxes). To do this, the upper crown of the first box is drilled in the corners, like the first, marked at the ends of the height (the distance from the bottom of the log house to the top crown, the same at all ends, so as not to get confused) and diagonals, and removed to the ground. At the bottom, they assemble it onto dowels, level it along the diagonals and heights using a hydraulic level, and continue to build the frame. If there were openings (windows, doors) on the bottom frame, it is better to cover them with a removable crown, this will simplify the alignment process.
Photo of cutting the top box of a bath house.
Material calculation
How to make a log house and calculate the amount of money spent, if the dimensions of the proposed structure are known - this is an important point in the manufacture or ordering of a finished building. For example, for a bathhouse with dimensions of 3x4 m and a height of 2.4 m with a frame in a bowl.
Due to the fact that the corners of such a structure will protrude 25 cm on each side, when calculating the length and width of the building, 50 cm is added.
If the diameter of the log is known (for example, 24 cm), then the volume of wood can be calculated using the formula 3.5 x 4.5 x 2.4 x 0.24 = 9.072 m³. During assembly, a groove is made in each log, which differs in width from 0.5D to 0.67D. This reduces the final volume of wood, so this formula requires further refinement.
Wide logs for a log house Source promdrevo.ru
| Characteristics of rounded logs | Width of crown groove B=0.5*D (1/2D) | Width of crown groove B=0.6*D (3/5D) | Width of crown groove B=0.67*D (2/3D) | ||||||
| D | B | L | V | B | L | V | B | L | V |
| mm | mm | linear meters | cubic meters | mm | linear meters | cubic meters | mm | linear meters | cubic meters |
| 200 | 100 | 5,75 | 0,180 | 120 | 6,25 | 0,196 | 133 | 6,67 | 0,209 |
| 220 | 110 | 5,22 | 0,199 | 132 | 5,68 | 0,216 | 147 | 6,06 | 0,230 |
| 240 | 120 | 4,79 | 0,217 | 144 | 5,21 | 0,236 | 160 | 5,56 | 0,251 |
| 260 | 130 | 4,42 | 0,235 | 156 | 4,81 | 0,255 | 170 | 5,13 | 0,272 |
| 280 | 140 | 4,11 | 0,253 | 168 | 4,46 | 0,275 | 187 | 4,76 | 0,293 |
| 300 | 150 | 3,83 | 0,271 | 180 | 4,17 | 0,294 | 200 | 4,44 | 0,314 |
| 320 | 160 | 3,59 | 0,289 | 192 | 3,91 | 0,314 | 213 | 4,17 | 0,335 |
| 340 | 170 | 3,38 | 0,307 | 204 | 3,68 | 0,304 | 227 | 3,92 | 0,356 |
| 360 | 180 | 3,19 | 0,325 | 216 | 3,47 | 0,353 | 240 | 3,70 | 0,377 |
| L – the number of linear meters of profiled logs that are necessary for the construction of 1 m² of log wall. | |||||||||
| V – volume of log (cubic capacity of profiled log), which is required for the construction of 1 m² of log house wall. |
Based on the table, the total volume of required materials will be 7.2912 m³, which is already 1.7808 m³ less than the previous calculation. Such calculations will help save money due to the fact that excess wood will not be used.
From this video you will learn how much a log house costs:
Assembling a log bathhouse
The finished log bathhouse is marked with letters or numbers so as not to confuse the logs during the assembly process. The dowels in the log house are placed every 1-1.5 meters. Inter-crown insulation is laid between the logs - moss (in the old fashioned way), tow, linen or jute tape. This must be done carefully, without gaps or large lumps: after assembly it will no longer be possible to correct it. After the initial shrinkage, the log house is additionally caulked with the same material in places where it is necessary. Where the joints are very tight, as is the case in planed log houses, excess insulation is cut off. Don't miss the opportunity to use the Riobet casino promo code for 150 free spins for registration. Free spins are available to everyone!
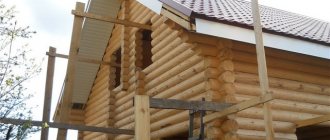
Photo of the assembly of a log bathhouse.
After assembly, all that remains is to cut the gables (if any) to the angle of the rafters, and cut out the window and door openings. The assembled log house is impregnated with a water-based antiseptic or another that does not create a film on the surface of the wood, otherwise it will prevent the logs from drying.
Stage 7. Doors and window openings
We specifically started talking about openings after construction was completed, since there are two options for their arrangement.
Installation of a casing for installing windows and doors in a log house
- In the first case, holes are created after the completion of construction work. At the same time, in the crowns located in the places of future openings, first leave small gaps (the dimensions of the latter depend on the size of the mounted products). Once you've finished laying the logs, simply cut the openings with a chainsaw.
- In the second case, leave openings during the construction process. This is very labor-intensive and expensive, since you will use bars with notches at the ends and special grooves.
How to install a window in a log house
Window installation
Bath windows
Doors for a bathhouse made of logs
Therefore, we advise you to give preference to the first option.
Useful tips for building a log bathhouse with your own hands
- It is difficult for one person to lift logs; you need at least two or three people; it is better to do this with the help of equipment. Organizations engaged in cutting log houses most often use manipulators, lifts, and hoists. Of course, it’s difficult to get equipment at home, but if you have the opportunity to use a wheeled tractor, such as MTZ, YuMZ or T-40, then you can make lifting logs easier. To do this, insert a thin log into the hitch so that its end is under the rear axle of the tractor, and the hitch rail is under it; With this lever you can lift a load up to 2-3 meters.
- The dowels should not fit tightly into the drilled holes; it is better to make them 1-2 mm thinner - in this case, the log house will not hang on the dowels during the shrinkage process.
- You can place the first and removable crowns on wide logs, after first removing the layer of grass under them. If there is rocky, dense soil, it is enough to simply level them.
- From time to time it is worth checking with a hydraulic level whether the log house has sagged on the stumps.
- A difference in height angles of 5-7 cm is allowed; there is no point in adjusting each crown to the same size.
- In the wall, the butt of the next log is placed on the top of the previous one.
- You need to remember the safety rules, use safety glasses and gloves, and work in special clothing.
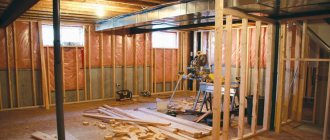
Construction of the roof structure
The next stage - the construction of the roof - can begin after the frame has completely settled to prevent its deformation.
The work is performed in the following order:
- Beams are mounted on top of the wooden structure, which are the basis for fixing the rafters. The distance between the legs of the rafter system is no more than 100 cm.
- Boards are tightly installed on the rafter elements to create a continuous flooring, and a vapor barrier is fixed between them.
- The selected roofing material is mounted on the sheathing - slate, metal tiles, ondulin, etc.
- The gables are lined with clapboard or other available material.