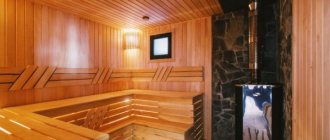
To this day, upon arrival in the village, one of the main pleasures for a city dweller remains a real, well-heated village bathhouse. Hot steam and heat, the smell of a freshly steamed broom, a barrel of cold water or a small pond nearby - everything in a village bathhouse is a real joy for the Russian soul and body.
The rustic Russian bathhouse is the most accessible and useful spa procedure, the traditions of which are carefully passed down from generation to generation. Neither Turkish baths, nor saunas, nor modern infrared baths can recreate and give the visitor that unique atmosphere that arises only in a real village bathhouse.
Compact bath project
Village baths today come in many varieties. However, if you want to save money, it is better to choose a compact bathhouse project, the foundation of which will be columnar. To do this, prepare a two-meter auger drill. 110 mm sewer pipes must be used as the casing pipe. The reinforcement will be inserted from two rods.
The next step is to carry out the strapping. 500 mm studs are laid under it. The harness is assembled from square timber with a side of 150 mm. You will need frame posts; their height should be 2200 mm. The frame is treated with Neomid-440 or another composition suitable for these purposes. Village bathhouses are quite often built using this technology. At the next stage, it involves the construction of walls. They can be assembled directly onto the harness and simply lifted.
Sheathing is carried out using DSP. To do this, you need to drill the plates, and then screw them with self-tapping screws with a semicircular head. The roof is covered with 8-wave slate, this is done to save money. When insulating, you can use any heat insulator that is suitable for a bath; Linerock Light is used for this project.
Interior decoration
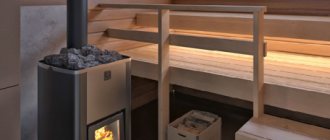
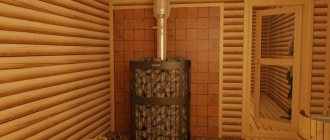
Now you can begin installing an inexpensive stove, which many craftsmen do on their own. A brick corner is laid under it. Now the master has to carry out the finishing; for this, the following are installed:
- lining;
- cashers;
- skirting boards.
At this point we can assume that the inexpensive and compact steam room is ready. If you want to improve the structural properties of the building, then the steam room should not be made too large. It should be taken into account that the walls will not be very strong.
Arrangement of the exhaust system
A private bathhouse, like one intended for public use, must have an exhaust hood. For this, an asbestos cement pipe is used; its diameter should be 12 centimeters; this is the only way you can eliminate the smell of mold in the steam room. It will be enough to lead the pipe up to the attic; during procedures and heating, hot air will penetrate through the gap under the door into the sink, and exhaust ventilation will pick up moisture through the cracks in the floor. At the same time, the feet of the steamers will always be warm.
Bathhouse project using wood concrete
Village bathhouses today are quite often built using wood concrete. This example of construction is quite budget-friendly, and the price of the steam room is not much higher compared to frame technology. The outer walls will have a thickness of 20 cm; a brick partition from the stove should be placed inside.
The layout of the bathhouse according to the budget project assumes the presence of a steam room and a dressing room inside. The process of constructing such a building is as follows. At the first stage, you need to prepare a drainage hole; its dimensions will be 1.2 x 1.8 x 1.4 m. The OPGS with stones is backfilled on both sides. It is necessary to make formwork and fill it.
Now you can dig the foundation; its width and depth will be 30 and 50 cm, respectively. The bottom is covered with sand and compacted. Now you can install the formwork and reinforcement using two rods at the top and bottom. Vertical plugs should be installed in 1 m increments. Once everything is ready, you can start pouring the foundation. Now EPS and mesh are laid in the washing room and steam room, and then the floors are poured.
The washing room also needs to be equipped with a drain. Village baths sometimes involve the use of blocks at the base of the walls. When laying them, you need to check the evenness using a level. When arranging the roof, you need to use boards whose cross-section will be equal to 50 x 100 mm. There should be a distance between the rafters ranging from 55 to 80 cm.
The roof of the bathhouse is covered, and at the next stage you can begin making a stove or purchasing a ready-made budget model. Ventilation, according to this project, will require a gap between the brick wall and the stove. The attic will house the shower tank.
The walls are finished from the inside. If possible, you can use Izospan FB, since it is intended for a bath. The canvas should be supplemented with heat-resistant tape. Izolon is excellent for ceilings, because it can withstand temperatures up to 150 °C. This bathhouse is budget-friendly and quite successful. When choosing wood concrete, pay attention to its density, because it can be used for structural and thermal insulation purposes. The density of the latter varies from 400 to 500 kg/m, while for the former this figure is equal to the limit from 500 to 850 kg/m. This material is used for the construction of self-supporting walls and is characterized by excellent sound and heat insulation.
Rules of care
Over time, the canopy may darken, the protective composition may wear off and wash out. The first problem can be solved with the help of bleaching agents.
Efficiency of wood bleach Source kelohouse.ru
It is important to note that they contain chlorine derivatives or hydrogen peroxide. Bleach lightens wood and helps destroy fungus, mold, and bacteria. The penetration depth is determined by the percentage of the base component. Since active substances can cause allergies and harm health, the room after their use must be ventilated for 1-2 days.
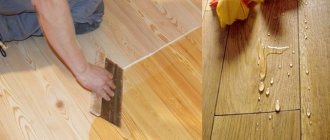
Before you make the bench in the bathhouse updated, it must be thoroughly washed, wiped and dried. It is better to apply thick protective decorative compositions by rubbing in; liquid ones are processed using a brush or sponge. After 24 hours, excess oil can be easily removed with a cloth.
Timber bath project
Projects for bathhouses made of timber are the most popular today. This material allows you to achieve savings. At the first stage, the platform should be leveled under the foundation, formwork should be put together and an opening should be left to drain water from the washing room. The next step is laying the EPS, now you can tie the reinforcement cage. At the next stage, the master should pour concrete, providing a slope for water. At this point we can assume that the foundation is ready.
Now you can start laying the frame. A board that has been pre-treated with an antiseptic is mounted under the first crown. It should be covered with roofing felt on three sides. You can put moss on the board; it has antiseptic properties, so the crown will last longer. After the construction of the walls is completed, they must be left for several months to shrink.
Next, the rafters are strengthened and the roof is covered. It is necessary to ensure the passage of pipes through the ceilings. It is made of metal corner and stainless steel sheet. A frame partition is made between the dressing room and the steam room, it is insulated with mineral wool and lined with clapboard. Now you can start laying the floor with porcelain tiles. It is located in front of the stove.
You need to leave a hole in the floor for fresh ventilation. Such projects of bathhouses made of timber provide for the pipe leading out from the furnace equipment through the roof. The passage must be ensured using Master-Flash rubber, which is resistant to temperature. The joint with the roof covering is sealed using MS polymer. At the final stage, the ceilings in the steam room are installed and electricity is installed.
Bathhouse project on a light frame
For the frame, the beams can even be made from collected firewood. The main requirement is that the material does not have knots or defects; in addition, it should be treated with an antiseptic. The first step will be to make beams for the frame, which need to be processed and dried. The building will stand on a pile-rubble foundation, and for its construction it is necessary to level the soil surface with a drill and hammer in thick pine stakes.
The top is backfilled with stone and concrete. At the next stage, the pillars are filled to the top. Now you can start assembling the frame. A hole should be prepared for draining by placing a barrel with crushed stone and broken bricks inside. There is a ladder leading out there. This option cannot be called insulated, so it will be summer. For winter, thermal insulation or heating cable should be laid.
The floor in the bathhouse must be insulated, as well as the ceiling. A film is laid over the insulation. Finnish sauna paper should be placed on the ceiling and walls. The next step is to install the stove. You need to use a model with a register, since you will need to heat the water for washing, so as not to purchase a boiler.
Why are partitions needed?
The question seems to be rhetorical, but, nevertheless, we will try to find objective and significant answers to it. The main tasks performed by the partition in the bathhouse:
- Divides the total space of the internal volume into localized zones isolated from each other, having different microclimates, equipment and purposes.
- They can, along with load-bearing walls, absorb and evenly distribute the load of the ceiling and roof. This quality is very important in such bath structures that have an increased length to width ratio.
- They act as an integral structural element during the construction of a sauna stove. A striking example is the brick partition in the bathhouse, which separates the steam room from the dressing room, to which is adjacent a sauna stove equipped with a tunnel firebox.
- It is part of the decor, emphasizing and localizing one or another functional element of the room. An example would be glass partitions for saunas and baths or a partition that is a key element of an integrated bar counter.
Detailed description of the construction of a rustic bathhouse made of timber
If you are building a Russian bathhouse, then you can choose one of the types of foundation that were described above. Molten bitumen should be applied to the surface of the base, on which a strip of roofing felt should be laid. After hardening, this procedure must be repeated.
To ensure additional insulation of the wood, before laying the first crown, one of the sides of the beams should be treated with impregnation from waste machine oil or an antiseptic. The slats, the thickness of which is 15 mm, are laid on the prepared foundation. The distance between them will vary from 25 to 30 cm. The first layer of beams is laid on top of them.
The Russian bath requires the use of slats to ensure that the timber does not come into contact with the foundation. This will additionally protect it from rotting. The free space between the embedded crown and the base should be filled with polyurethane foam. After laying the first crown, make sure that it forms a horizontal surface. Only now can you begin to fasten the beams and fill the space between the crown and the base.
A rustic wood-fired bathhouse does not provide for fastening the first crown. This is also good for when there is a need to replace the lower crown. A layer of insulation is laid on top, which can be:
- jute;
- moss;
- tow.
If you use one of the last two options, then the insulation is laid out with an overlap around the edges. These protruding edges will later be used for caulking. Once you have completed laying the second crown, it should be secured. For this, metal pins or wooden dowels are used. The two upper crowns of the beams are also not fixed. This is due to the fact that the log house will shrink, only then should you begin laying the ceiling beams. To do this, the two upper crowns are removed.
Recommendations for building walls
The bathhouse, the photo of which is presented in the article, must be built using wood that has been properly prepared. These works involve drying lumber. Almost any species can be used, except birch, which rots quite quickly. Experts advise using aspen, larch or linden, whose thermal conductivity is quite low, and whose structure allows it to maintain its original shape for a long time. For external cladding, it is best to use larch and pine, while for internal work any type of wood is suitable, but aspen is the most valuable. The bathhouse, the photo of which will help you construct, must be protected from the outside with an antiseptic; the inside of the lining is sanded and coated with two layers of furniture varnish. The exception is the steam room and sink, where it is more advisable to use a special impregnation. It is recommended to form the bottom trim from strong timber; its cross-section can be 10 x 10 centimeters. In the corners, the elements are connected in quarters and additionally fastened with nails. In order to prevent displacement of the lower trim and corner posts, they are installed on 2-centimeter steel pins, which are mounted in concrete. The same beam should be used to arrange the top trim. In order to ensure the rigidity of the bathhouse frame, 8 pieces of braces are installed in the corners.
Interior decoration of a bathhouse made of timber
A rustic-style bathhouse is usually finished from the inside using hardwood, it can be:
- aspen;
- Linden;
- poplar;
- larch;
- birch.
Only such wood does not heat up in the heat and does not release resin. It dries quickly enough when aired, so it is not at risk of fungus. Alder would also be an excellent option for the interior decoration of a steam room; it has a perfectly smooth structure and is odorless; in addition, it does not absorb foreign odors and has an attractive light brown tint with a pink tint.
A look into history
The history of the traditional Russian village bath goes back more than 10 centuries. The first mention of the bathhouse in the traditional life of the Slavs can be found in the famous “Tale of Bygone Years,” but some historians argue that bathhouses could have appeared as early as the 5th – 6th centuries.
However, whatever the exact date of the appearance of the bathhouse in Rus', we can confidently state the fact that visiting a real village bathhouse is one of the few original Russian traditions successfully practiced today. Bath rituals and accessories, rules for visiting the bathhouse, associated signs and healing systems - all this is passed down from generation to generation with an unchanging love for the bathhouse.
Interesting! For many peoples, the bathhouse is a special sacred place, with its own energy. And the Russian bathhouse is no exception. According to legends, various evil spirits live in the village bathhouse, both evil and friendly towards people. An unheated bathhouse is considered a haven of evil spirits who are afraid of the sign of the cross, so icons cannot be brought into the bathhouse, and bathing utensils cannot be taken from the bathhouse into the house.
Traditionally, village baths were located next to a pond, or in their own courtyard. The whole family went to wash and steam on Saturdays. This is where the name Saturday came from as “bath day.” Centuries fly by, but baths still accompany the life of a villager - almost every yard has its own bathhouse, sometimes not so modest, but large and comfortable, but still built with soul and in accordance with traditions.
Interior finishing technology
Interior finishing involves acclimatization of the material at the first stage. He is brought into the room and left there for a day. If you decide to use clapboard, then it requires installing a sheathing made of square bars with a side of 5 cm. The distance between the bars should be 50 cm.
At the next stage, steam and thermal insulation is installed. Now you can begin installing the wood panels. When heated strongly, they should not burn the skin, and when hot, they will begin to release beneficial substances. Installation can be carried out horizontally, diagonally or vertically. The panel is fastened with nails, but it is necessary to use those made of copper or bronze.
Each subsequent panel is installed in the groove of the previous one. The floor in the bathhouse can be made of concrete or wood. However, the surface is quite often laid out with ceramics. It is better to avoid using synthetic materials, as they will release toxic substances when exposed to temperature. Oak is quite resistant to moisture, but its heat capacity is low. In addition, the coating itself will be quite slippery.
Selection of materials for insulation and vapor barrier
When the bathhouse is combined with a residential building and is under the same roof, external thermal insulation is used to use the building all year round.
If the Russian bathhouse is a separate building, then internal insulation is enough.
In addition to insulation, it is important to provide high-quality vapor barrier protection for walls and other elements of the structure from moisture. The absence of a layer will lead to damage to the insulation and rotting of the wooden frame elements.
For vapor barrier use:
- Film. Thick film comes with or without a reinforcing coating. It costs little.
- Membrane. The non-woven fabric fits perfectly on top of the insulation and protects well from condensation.
- Foil coated sheets. Metal lavsan will help not only cope with moisture, but also retain heat indoors.
In frame structures, insulation is one of the stages of wall construction. The best material option is mineral wool.
Key requirements for thermal insulation in a bathhouse:
- hygroscopicity;
- environmental friendliness (the material should not release toxins when heated);
- low thermal conductivity;
- fire safety;
- ease of fastening;
- holding shape.
It is permissible to use the following insulation materials:
- Polymer. Suitable penoizol, polyurethane foam. Penoizol with a layer of foil is well suited for a steam room; it retains infrared heat radiation indoors.
Expanded polystyrene and its derivative polystyrene foam are prohibited for insulating steam rooms. They are flammable and release toxins when heated. They can be used to insulate the dressing room and rest room.
- Mineral. This category includes glass wool, mineral or basalt wool. They do not burn and do not emit toxins. This is the optimal solution for a bath. Minus - they can become saturated with moisture, so a vapor barrier will be required.
In frame buildings, organic heat insulators can be used - mixtures of gypsum, sawdust, expanded clay, and lime.
Preparing for bath procedures
If you are a lover of Russian heat, then you will need brooms for the bath. You can prepare them yourself. Each individual type of broom is harvested in a special period. As for birch trees, they need to be cut on the 49th day after Easter. At this time, the branches are quite elastic, and the leaves are filled with lush greenery. If Trinity turns out to be rainy, then brooms can be prepared on the first sunny day.
Bath brooms are usually made from weeping birch, because its branches are particularly flexible. They need to be cut closer to the center of the crown; the length should be approximately 50 cm. And in order for a visit to the steam room to be enjoyable, it is important to choose the right stones for the bath. They must have a homogeneous structure, this will prevent the destruction of the material when water enters. The stones must have an equal coefficient of thermal expansion in all directions.
The material must be environmentally friendly, so natural minerals are the best option. Bath stones must also have a certain shape; it must be round and smooth. This promotes efficient air circulation as well as better heating.
Structural features of the shelves
In order for the curtains in the steam room to last as long as possible, a number of features must be taken into account when assembling them:
- The design, open at the bottom, will allow you to easily clean the steam room, and will not interfere with air circulation and rapid ventilation.
- The sunbed should be positioned slightly at an angle so that any water falling on it can drain freely.
- Plastic or rubber pads under the vertical posts of shelves will extend the life of the wood and prevent it from rotting.
- During operation, the lounger should not creak or wobble, so all elements must be securely fastened. And smooth, polished boards with rounded corners will make the appearance of the structure beautiful and presentable.
Methods for fixing boards
Avoiding direct contact with the skin of any metal elements is one of the main conditions when fixing boards and other structural parts of the lounger.
So, you can fasten the boards in one of the following ways:
- By recessing the heads of nails or screws into the thickness of the wood.
- Driving the screws into the underside of the shelf.
- Using oak wedges, to do this, first drill holes in the wood. This method is the safest, but is labor-intensive.
You can attach several bars to the end wall so that you can rest your feet on them when lying on a bed - this way they warm up faster.