The best vacation is a vacation at the dacha or in a country house. Especially if this vacation includes such a pleasure for the body as a bath. When designing a bathhouse project, it is important to take into account many points. This is the choice of the location of the bathhouse, building materials, the question of how to carry out interior finishing work, how to install a stove, and other nuances. In this article, we have collected useful information for you that will be useful at the decision-making stage. With its help, you will decide how to arrange your best place for relaxation.
Types of baths
The diversity of baths arises from the difference in cultures and traditions. Thanks to this abundance of options, we can choose the microclimate in the bath that is optimal for us in terms of temperature, humidity and steam production.
The microclimate is also important for well-being, and according to it, baths are divided into the following types.
Steam sauna: Russian bath (ours is ours:)
45-70° in temperature and low humidity - 40-65%. The steam condenses on the skin, forming a kind of film, and the body heats up much more due to the thermal conductivity of the water.
Dry air (Finnish) sauna
Low humidity, 8-20%, is combined with high temperatures of 70-110°. The lack of steam and high temperature contribute to maximum warming of the body;
Steam bath: Turkish hammam
In such a bath, the temperature reaches 40-45°, humidity 90-100%. Due to such a low temperature, a soft microclimate is created. In the bathhouse you can not only have a good rest, but also take care of yourself, pleasing your body with cosmetic procedures.
Water bath: Japanese ofuro bath
A traditional bath with a temperature of 40-60° and a humidity of 100% is an exotic type of bath. This is usually a wooden barrel that is heated. Warming the skin under water promotes sweating and washing away toxins and sweat.
Wet sauna: sports
Temperature 75-95° with 100% humidity. It is one of the subtypes of the Finnish sauna. The temperature is deliberately increased by watering the stones with water. Such a sauna becomes a place for endurance competitions and poses harm and even danger to the body.
The method of heating and steam injection also differs in the baths. Knowing these features, you will choose a bathhouse with characteristics that will suit you and your family as much as possible.
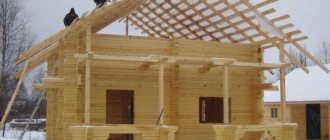
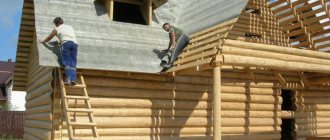
Arrangement of the roof structure
Arrangement of the roof structure
Make a template for assembling rafter structures. All elements of the rafter system are assembled below, on the ground, and, ready-made, rise up. Each element of the rafter structure must be installed above its own post.
It is better that the roof of the frame bath is ventilated. Place ondulin or other material with suitable properties between the counter beam and the rafters. Nail the sheathing directly to the beam.
Cover the gables with pre-prepared sheets. Typically, OSBs that you are already familiar with are used.
Arrangement of the roof structure
Dressing room (locker room)
Here visitors leave their clothes, brooms and firewood are stored here. The dressing room performs a number of functions:
- is a zone with a buffer function that equalizes the temperature transition from the climate outside to the temperature inside the bathhouse;
- serves as a place for drying firewood;
- often also serves as a room in which to rest.
- The dressing room door should open outward.
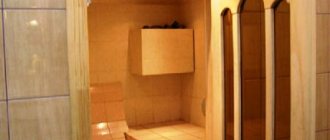
Steam room
This room is the main room of the building. This is where the temperature is maintained high and the oven is placed. In the corner of the steam room there are stones that create steam. There should be a heat-resistant coating underneath.
There are also benches arranged on steps. Two, as a rule, are intended for sitting, one or two for lying. When arranging a steam room, you need to think through the following nuances:
- The materials with which the ceiling and walls are sheathed, the nature of the thermal insulation properties - taking them into account, the depth of thermal insulation of the rooms is calculated, and constructive techniques are used;
- efficient operation of the ventilation system is ensured by a special box or swinging window with double glazing. The location of the window is opposite the stove;
- doorway - designed with a higher threshold: this way, cool air does not pass under the door and thermal efficiency is not reduced. The door itself swings outward;
- steam room and washing room are separated, otherwise the quality of steam and temperature decreases and fuel consumption increases.
Construction stages
Do-it-yourself construction of a frame bath includes several stages:
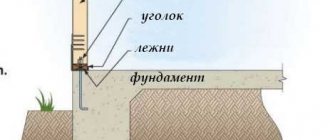
Making the foundation
For construction, a columnar foundation is quite suitable. It is easy to make it based on asbestos pipes.
Making the foundation:
- we dig holes one and a half meters deep and twenty centimeters wide;
- we insert asbestos pipes into the pits;
- mix concrete;
- Fill the holes and the middle of the pipes with the solution.
After pouring, the foundation must stand for at least a day.
Making the floor
Designing a floor in a bathhouse with your own hands is not a difficult task, but it has its own nuances.
Manufacturing process:
- Determine the location of the water outlet. We connect the sewer pipe. We install waterproofing. We place wooden beams on top of the insulation. We attach the logs to the beams and fix the cross beams on them.
- We apply sheets of facing material, preferably OSB, to the bottom of the resulting structure. We make a hole for the sewer pipe. And we fix the material with self-tapping screws.
- We lay a layer of waterproofing. It is necessary that it completely covers the floor area; we fix the joints with tape. Next, we lay the insulation. Sew up with sheet material.
- We insulate sewer drains. You will need film and sealant. Where the washing area will be located, it is better to equip the floor with tiles, and in the rest area - with clapboard.
Having made such a floor in a frame bathhouse with your own hands, you can relax even in winter. If you plan to use the building in warm weather, it is enough to lay and secure the beams to the foundation, attach the cross beam, and sheathe the surface with boards.
Harness
After the poured mortar has dried and the floor has been constructed, you can begin tying the structure. To do this kind of work, we will need slats with a section of ten by five centimeters. Before starting work, the slats need to be treated with an antiseptic. While the treated material dries, we need to mark the position of the walls.
Strapping scheme
Do-it-yourself frame bath step-by-step instructions for making a harness:
- After marking, we place the prepared slats on the outside. We fix them with nails.
- We are tying the base. To do this we use supports.
- We make the lower and upper trim from boards. During this work, you need to separate the bases a little so that the roofing material can fit.
- Checking horizontality. To do this, use a level.
- We install intermediate racks. We treat the strapping with an anti-rotting compound.
To make the structure stronger, it is recommended to fasten it using metal plates.
Walls
The walls of a turnkey frame bath are made of boards with a cross-section of 5 by 10 centimeters. Works:
- We mark the locations of the racks. Using the markings, we install racks in all corners, check the level, and temporarily fix them with slats.
- We install racks. For fastening, it is advisable to use metal corners and self-aligning screws.
- We carry out installation of intermediate parts. The step between them should be no more than a meter.
- We make the top trim. We attach all the elements of the upper part to the corner posts. To prevent the boards from bending, it is advisable to install temporary supports.
- We lay the timber between the supports in a horizontal position. After making the frame, we proceed to covering the outside of the frame. We lay insulating material in the middle and fix it. We attach insulation on top of the insulation, lay and fix another layer of insulation, and sheathe the walls with the selected material.
We have the walls, all that remains is to make the roof.
Roof construction
To make it convenient for you to make a gable roof, it is recommended to first make a drawing that will indicate the location of the rafters. Roof design process:
- We take a beam with a cross-section of 15 by 15 centimeters, lay it at the top of the racks and fix them with nails; you can also fix them using wire and self-tapping screws. It is important at this stage to carry out the work strictly to the level.
- Next, we cut out grooves in the beams for the upcoming laying of the rafters. This is done at a certain distance.
- Now you need to assemble the rafter structure on a flat piece of land. A similar design is presented in the form of triangles, consisting of timber. For additional strengthening, a transverse strut is fixed between each such triangle. A crossbar is installed at the top of the structure.
- Having collected the required number of rafters, we install them in the cut grooves. After clarifying the level, we fix the elements with screws and nails.
- Next, between the installed rafters, we attach the transverse strips. We also fix them with nails or self-tapping screws.
- Now we sheathe the roof with sheet material. Plywood is often used for this. We attach roofing felt on top of the plywood. And finally we cover the roof with metal tiles.
- All that remains is to sheathe the pediment. It is covered with OSB. To do this, elements are cut to the size of the side walls of the roof, and the material is attached to the racks with self-tapping screws. If it is necessary to organize a door to the attic, then the roof structure includes additional racks made of timber, into which a small door is installed.
The roof is installed. If you need an attic space, then it is not necessary to insulate the roof; it is enough to simply sheathe the rafters with boards. But when the attic is not needed, it is necessary to lay waterproofing, then fix the insulation to the ceiling, and sheathe the structure with the selected sheet material. If you decide to move forward and improve your construction, you can build a stove yourself.
Having studied the material we have presented, rest assured that even a beginner can build a frame bathhouse with his own hands. The main task is to adhere to all requirements and choose the right materials. And near the bathhouse, you can build a wooden gazebo and lay paths near it according to the instructions in our articles.
Wash room
The washing room is a shower stall located near the steam room. If the size of the building allows, these zones are separate from each other; in small buildings they are combined. In large buildings, a swimming pool or plunge pool is also equipped here.
The average area of the washing room is 2000x2000mm, then there is a place to take water procedures and place containers with water, hot and cold.
The window is built one and a half times larger than the window in the steam room. The doorway has also been enlarged – 1800x800mm to provide greater comfort. The requirements for heat conservation are lower than in a steam room. The threshold is made high, and the floor is laid with special tiles to prevent slipping and related injuries.
Heating device
The heating device can be either an electric or a conventional heater. In the first case, the only mandatory conditions are grounding and waterproofed wiring.
Heating device
If we are talking about a stone or brick oven, then there will be more requirements:
- the furnace is installed on a special foundation;
- the walls and floor next to it are covered with heat-resistant material (for example, asbestos);
- the oven should be located as far as possible from the shelves;
- the chimney is also insulated;
- It is advisable to build a brick screen made of good brick around the stove.
Prices for fireplaces and stoves
Fireplaces and stoves
Restroom
Designs of bathhouses with a relaxation room give room for imagination. When there is only one recreation room, it needs to be made multifunctional. Eating, drinking tea, watching TV, billiards - all this happens in this room. Zoning is done using partitions, windows, furniture, and finishing materials. Additional comfort will be created by a fireplace in the corner and a couple of armchairs in front of it.
Registration procedure
Regardless of the location of the bathhouse (in a populated area or SNT), the owner must perform a number of sequential actions:
- Before starting construction and installation work, send a notification to local authorities. The document indicates the plan and design features of the bathhouse. Attached are extracts from the Unified State Register of Real Estate and a technical plan. It is also important to prove ownership of the land (relevant documents are attached). You can contact local authorities in person, send documents by registered mail or using the MFC.
- Authorized persons check the compliance (non-compliance) of the planned facility with urban planning standards. The possibility of carrying out construction work on the specified site is also determined. If within 7-10 days the local government authorities do not respond to the appeal, the submitted plan is regarded as complying with the established standards. It can be used to build a bathhouse for 10 years.
- After completion of construction, no later than a month later, a second notification letter is sent to the local administration. Attached to it is a receipt confirming that the state duty has been paid. This is necessary for registering the property. The first notice and the documents sent along with it are also attached.
- The submitted documents are re-checked. The local administration sends information to Rosreestr to register ownership of the house.
If the owner of the site wants to speed up the registration process, you can send the relevant documents to Rosreestr after completion of construction yourself.
It is worth considering that the grounds for refusal may be a violation of building codes and regulations, or the lack of attached relevant documentation in circulation. In this case, the construction can only be legitimized in court.
Choosing a place to build a bathhouse
It is worth considering some nuances:
- The correct place for a bath should be at some distance from other objects;
- between the bathhouse and the fence of the neighboring area - 1 m or more;
- from any wooden building - from 15 m;
- be away from the garage, wells, swimming pools, children's areas;
- the optimal place to build a bathhouse is the backyard;
- you should decide in advance: the bathhouse is a separate building or an extension to the house;
- when designing, it is necessary to provide for ventilation and wastewater disposal;
- It is necessary to take into account climatic conditions and soil. The surface for construction is chosen to be flat;
- in general, the place must comply with the requirements of regulations and legislation.
Bath dimensions
The layout of the bathhouse is designed primarily taking into account the parameters of the site. There are several options for baths, differing in their sizes. Let's see what dimensions of the building exist and what is typical in such projects.
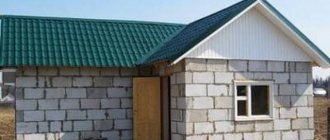
Bathhouse 2x2 m
This unassuming compact building consists of the most important things: a dressing room and a steam room. Sometimes there is a place for a rest room. Therefore, the stove must be placed so that it fits into both rooms. It is preferable to use a steel electric furnace. If desired, a washing room is located in the steam room.
This construction has its advantages:
- compactness;
- efficiency;
- ease of construction;
- little time for construction;
- The steam room heats up very quickly.
- Such a bathhouse saves space and budget. The correct layout of the structure will make it comfortable and perform many functions.
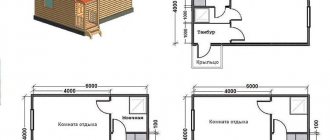
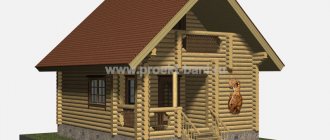
Bathhouse 3x4 m
The interior space is divided into three parts. You can add a shower room or washing room to the building. Typically, such baths have a relaxation room occupying 4.5 m2. The stove firebox is located in the dressing room - this makes it easier to maintain the temperature in the steam room. The boiler for heating water is located at the maximum distance from the entrance door.
The design assumes the presence of a locker room. The terrace will increase the area of the building.
House wall frame
A simple frame bathhouse is built with your own hands on the basis of a frame. It acts as a “skeleton” on which the walls of the building will be supported. The supporting “skeleton” of a 3x4 frame bath will consist of:
- Two horizontal rows - lower and upper trim.
- Eight vertical supports installed at the corners of the building and in the middle of its walls.
- Jib for vertical fixation of load-bearing supports located at an angle.
DIY frame bathhouse.
It is also important to protect the wooden beams of the bathhouse from moisture. To do this, they need to be impregnated with moisture-resistant impregnations.
After laying the insulation, the wooden frame will also be protected by a vapor barrier film, which is attached to the inside of the heat-insulating material.
After assembling the frame, to strengthen and strengthen it, the walls are sheathed with external wall panels. This ensures the walls are resistant to lateral shear. This is especially true when building in an open area blown by the winds.
Note: Assembling the frame and hanging the outer panels is carried out as quickly as possible, during a period when there is no rain or other precipitation.
Roof of a frame bath
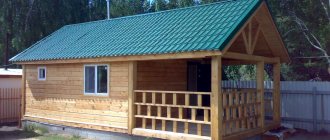
The material for the roof of a budget bathhouse is selected according to two criteria - weight and price. It should have a low price and low specific gravity. For frame houses, metal profiles or metal tiles are often used. These roofing materials are light, bright, beautiful and durable, with one drawback - they are quite expensive.
Frame bathhouse with roof for barbecue.
The roof of a frame bathhouse can be mounted with your own hands using affordable OSB panels. They are relatively inexpensive, but require protection from atmospheric moisture. The roof of the frame bath is covered with roofing felt. Afterwards, if desired, bitumen can be laid on top of such a roof. Or replace the old roofing material with a new one after a few years.
The second option for constructing an inexpensive roof is not edged boards. They are laid overlapping, ensuring water flows from top to bottom. This is the most inexpensive lumber, which will also require protection from moisture. This type of roof must be painted annually.
Note Something else to consider: the roof of the building must have sufficient overhang. That is, the distance between the edge of the roofing and the wall should be 600-800 mm.
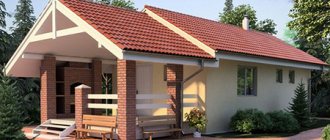
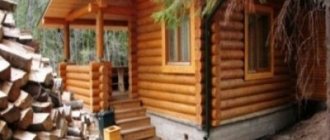
Bathhouse 4x4 m
The 4 by 4 bath design allows the steam room and washing room to occupy a larger area than in previous compact versions. Such buildings are usually built from logs, which reduces the space inside. Therefore, one room performs several tasks, for example, the dressing room also becomes a locker room and steam room. In such a room two or three shelves 0.5-0.6 m wide will fit. The corner is reserved for a wood-burning or electric stove.
You can create more comfortable conditions, for example, equip a rest room and an additional washing room. By installing a stove in the steam room, you can use it to heat the adjacent room, so it’s easy to set up a relaxation room there, combined with a locker room.
The attic, which can easily accommodate a recreation room or a place to play billiards, will help increase the usable area.
Bathhouse 4 by 4 layout inside photo
A good article if you are interested in this particular bath size.
Material calculations
A frame bathhouse of different sizes is being built with your own hands. We will consider a standard option that is suitable for construction by novice craftsmen.
The finishing of the bathhouse inside and out is often carried out with lining made from coniferous wood. The roof is equipped with a gable roof, and metal tiles are used for the roofing.
Starting from dimensions of 5 by 4 meters, to make the foundation we will need:
- two cubes of concrete;
- 0.3 cubes of edged boards;
- 80 linear meters of fittings.
A turnkey frame bathhouse requires large financial investments specifically for the construction of the frame. To make a frame you will need:
- 5.3 cubic meters of timber, section 12 by 12 centimeters;
- 36 square meters, mineral wool, 10 centimeters thick;
- about forty squares of vapor barrier material;
- 75 squares of wooden lining;
- 40 squares of waterproofing material.
If you need to save money, the timber can be replaced with a board. Floor installation is also an important point. To make a floor in a bathhouse with your own hands you will need:
- 0.2 cubes of boards 150 by 50;
- twenty linear meters of plinth;
- twenty squares of mineral wool and 20 squares of lining.
If you want to save money on the construction of a frame bath, then it is on the construction of the roof that you can do it. You can purchase the cheapest insulation and cover it with unedged boards.
But since our bathhouse will have a gable roof, the attic space can be used to store various tools and unnecessary items. To build a roof you need:
- one set of drainage;
- 0.2 cubes of slats for rafters;
- 0.1 cube of planks for sheathing;
- 0.1 cube of cornice slats;
- twenty squares of metal tiles.
In addition to the materials listed, you will need:
- asbestos pipes;
- screws and nails;
- staples;
- cement, sand and gravel.
If you are building a frame bathhouse with your own hands using step-by-step instructions, you need:
- level, square and tape measure;
- hammer, screwdrivers and pliers;
- electric drill;
- concrete mixer;
- container for dosing bulk materials;
- screwdriver;
- hand saw or electric saw.
Having made the necessary measurements and selected materials based on them, we begin to design the future premises.
Bathhouse 5x4 m
This option allows you to set up a separate washing room and steam room. The rest room becomes more comfortable and spacious, and can be combined with a locker room or dressing room. Due to the direct absence of a dressing room, this design cannot be used on cold days. The rest room is located just outside the entrance door. Its spaciousness allows you to install a sofa, armchair, and TV. The washing room is equipped with a shower, toilet, and sink for washing hands.
Convenient and free access is provided to any room.
Bathhouse 5x5 m
Such dimensions of the building make the premises comfortable. These parameters are very popular for a bath. You can combine a bathhouse with a terrace under one roof.
Often 10-12 square meters are allocated for the dressing room. m, which is half of the total space. The rest of the room houses a sink and a steam room. This design allows you to comfortably take bath procedures and relax. The relaxation area is decorated with a sofa and an armchair.
In the attic attached to the bathhouse there is a bedroom or a children's room. Now the building is ready to receive guests.
Finishing
The interior of the dressing room should not only meet the aesthetic requirements of the owners, but also complement the healing effect of the procedures. Therefore, only environmentally friendly materials should be used for cladding. The most common types are:
- Tree. It could be a lining, a blockhouse. This cladding gives a special coziness and creates the effect of being close to nature.
An example of the interior and decoration of a dressing room with wood.
Don’t forget about the healing properties of wood. Depending on the choice of breed, you can add the desired healing effect to the microclimate of the waiting room. Coniferous trees are more often used, which have natural antiseptic properties. Which has a positive effect on the health of vacationers, and also extends the service life of the cladding in fairly aggressive operating conditions; - Tile, stone. Often used for floor finishing. Provides ease of maintenance and waterproofing of the underground space, including waterproofing of the foundation. By installing a heated floor under such a system, an additional source of heating is obtained.
Often the wall adjacent to the steam room is decorated with stone and tiles. Especially if the furnace firebox or one of its walls opens into the dressing room. This cladding provides the required level of fire safety. It is worth noting that natural stone accumulates heat, this allows you to maintain the required temperature for a long time.
The combination of stone and wood gives a special coziness to the room. It is not enough to decide the question of how to build and decorate your dressing room; it is also important to create a special atmosphere of comfort by choosing a stylistic design.
Bathhouse 5x8 m
The building effectively uses the first floor and allows for the addition of an attic. It can be divided into several zones, for example, a bedroom and a billiard room. You can add a balcony. However, the larger the premises and the total area, the more acute the questions arise about how to provide the premises with heat and how to waterproof them. The issue of fire safety is important. When installing a steam room, it is important to carry out all the work correctly, which will require expert advice.
Features of pre-finishing
Finishing the dressing room implies its waterproofing and insulation. Such measures make it possible to quickly warm up the room and keep it warm for a long time:
- The ceiling in the dressing room must be waterproofed. Increased humidity penetrating the roof significantly reduces its service life.
Waterproofing the ceiling in the dressing room
Insulation with expanded clay or mineral wool allows you to retain heat and reduce the formation of condensation on the ceiling. The use of a foil reflector makes it possible to maintain the required temperature conditions. At the time of finishing, it is recommended to leave technical ventilation gaps; - The walls of the dressing room. Depending on the type of building: frame, log house, brick, etc., a wall waterproofing system is provided. For wooden buildings, a membrane film is used, and brick buildings require a thorough moisture protection system. Otherwise, the building will not last long. Insulation is carried out using mineral wool. It also uses foil material, but you should understand that it “does not breathe” and creates the effect of a thermos. Finishing is carried out with a technical gap; Scheme of wall decoration in the dressing room
- Floor. Taking into account the increased humidity from bathing procedures, it is waterproofed and insulated. Tile cladding has become increasingly used as a finishing touch. It not only provides moisture protection, but also allows you to install a heated floor system, which creates the most comfortable conditions for relaxation.
The question “how to insulate a dressing room?” special attention is paid. The level of comfort and safety of recreation and the service life of the structure depend on the quality.
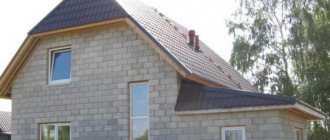
Bathhouse 6x6 m
A 6 by 6 bathhouse design is considered optimal in size. The bathhouse will provide comfort in all functional rooms. It becomes possible to install all the necessary heating equipment and furniture without much space saving. There is an opportunity to arrange an attic, veranda, terrace, further increasing the usable space. A brick stove in a steam room will ensure longer heat retention.
The bathhouse can be used by 8-10 people at once. Each visitor accounts for approximately 1.1 m. The steam room is designed larger than the washing room, and the sewer pipe is located next to the drainage pit.
There is room here to place a dressing room, a steam room, a wash room, a bathroom and several rest rooms.
Utility and other premises
Utility and other rooms of the bathhouse
Detergents and other household chemicals are stored in such rooms. The walls here are covered with washable finishing materials up to a height of 1.8 m. Hot/cold water is supplied. Dirty and clean linen are stored separately.
Also in the bathhouse you need to think about places for a medical kit and a room for massage. If desired, you can arrange a solarium. The area of the massage room is calculated as follows: 7 m² for each massage table. Sources of UV radiation are installed in the solarium. The area of the solarium is determined at the rate of 6 m² per seat, the height must be at least 3 m.