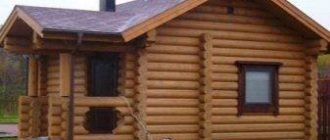
Is it possible to insulate a bathhouse with maximum efficiency without expensive and hazardous materials? The floor in a bathhouse made of bottles fully meets the requirements that can be presented even to modern thermal insulation materials. Of course, there are no regulations governing the use of empty containers in construction. Amateur craftsmen guessed about its use as insulation, rightly believing that bottles have characteristics similar to glass blocks.
The floor in a bathhouse made of bottles fully meets the requirements that can be presented even to modern thermal insulation materials
The feasibility of using bottles for floor insulation
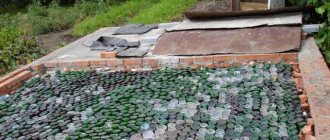
The room can be insulated with both glass and plastic containers. Empty bottles placed tightly under the floor covering will provide an air gap between it and the base. The thermal conductivity properties of air are tens of times worse than those of solids, so the effectiveness of this kind of insulation should not be in doubt.
Of course, the question may arise about how to accumulate a sufficient amount of containers. However, there should not be any difficulties in completing this task. There is no need at all to resort to such a method of accumulating building material as collecting it in garbage containers. In a relatively short period of time, the necessary supply of bottles can be made with the help of family members, relatives, friends and neighbors. There is no point in speeding up the process by buying drinks more often and in larger quantities, because the beauty of insulating the bathhouse floor with bottles is that the method is cheap. All that remains is to allocate space for storing glass or plastic containers.
Empty bottles placed tightly under the flooring will provide an air gap between it and the base
The following reviews can be heard from owners of bottle bath floors:
- The neighbors, when they learned that I made its base from glass containers, laughed at first. Now they are building the same (Victor A.).
- Under the cover in my dressing room there are plastic 1.5-liter containers. The result was a cheap and warm floor (Vlad M.).
- I find it funny when they talk about the fragility of bottle bases. They form cavities under a strong reinforced concrete screed (Sergey S.).
- Calling this design a warm floor is probably not entirely correct. The bottles do not generate heat, but neither do other thermal insulators. Their task is to minimize heat loss. Empty containers cope with this perfectly (Andrey A.).
- If there are a lot of bottles, why spend money on other materials? At first I thought of insulating only the floor in the bathhouse with them. It so happened that there was a break in construction, but I did not regularly throw out the containers, but stored them in the basement. It was also enough for thermal insulation of a concrete ceiling (Alexey N.).
Insulation of the floor in a bath
Have doubts about the advisability of installing bottle insulation been dispelled? The process of insulating the floor in a bathhouse with bottles with your own hands is not difficult.
Required tools and materials
To arrange such a floor you will need:
- Wire frame with a rod thickness of at least 7 mm and a pitch of 50 mm.
- Self-adhesive tape or bitumen mastic.
- Bayonet and shovel shovels.
- Crushed stone of medium fractions.
- Finish coating.
- Bottles.
- Cement.
- Sand.
- Tol.
Only concrete floors are insulated with bottles. Calling it “warm” is not entirely correct, because glass containers are not a source of heat. Its function is energy saving. Used glass vessels cope with this perfectly, and this is especially true for a bath room.
Insulation with glass bottles
It should be said right away that when preparing containers for insulation, you need to make sure that they are sealed. Corks rarely “part with” PET containers, which cannot be said about glassware. However, the problem of sealing containers can be solved with various available means. What if you don't close it? Air in a loosely closed container, in contact with the external environment, will have greater thermal conductivity, which will worsen the thermal insulation characteristics of the floor.
It is better to make bathhouse floors from bottles yourself in sunny weather.
Tip! Experts recommend warming up the container before sealing.
As the air in a closed container cools, it will become thinner. It is known that the thermal conductivity coefficient of a material decreases along with a decrease in its density. It is better to make bathhouse floors from bottles yourself in sunny weather: in this case, the containers heat up strongly and quite quickly.
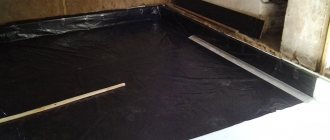
Before installing thermal insulation, you need to lay roofing felt on the subfloor.
Results
What other materials can be used for insulation, besides bottles (glass and PET)? For this procedure, you can also use glass jars, if, of course, you can set everything according to the thickness of the ceiling. True, it will be more difficult to save them, and equipping such containers with a sufficient number of lids is not so easy.
We suggest you read How to make a concrete screed - All about floor coverings
There is an option to take dishes with screw-type necks. Cans can be installed together with bottles with the bottom up, providing a relatively flat base for the screed. It is not contraindicated to make thermal insulation from dishes with different volumes, as well as containers made from heterogeneous raw materials. The main thing is that it fulfills its task - to keep the heat in the bathhouse.
Insulation of the finished floor
How to insulate the floors in a bathhouse with glass bottles if it has already been built? It should be taken into account that the height of the room will be significantly reduced. It is better to avoid this method with low ceilings. If a decision is made to implement it, then the container should be placed on the base only horizontally. It is laid in such a way that there are minimal gaps between the bottles.
Before installing thermal insulation, roofing material must be laid on the subfloor. Adjacent sheets of waterproofing must be overlapped. Ruberoid is laid with an overlap on the walls corresponding to the thickness of the future floor. All edges of the insulator are sealed with bitumen mastic or adhesive tape.
Attention! Before placing bottles in the bathing area, you need to take care of the drainage system.
The gaps between the containers laid out on the base are filled with dry sand. Now you need to lay down another layer of waterproofing and put in a reinforcing grid. It should be placed 1.5-2 cm above the membrane so that after pouring the reinforcement is immersed in concrete. The thickness of the screed cannot be less than 3 cm. When the solution has hardened, you can begin finishing the floor.
The gaps between the containers laid out on the base are filled with dry sand.
Recommendations for high-quality thermal insulation
If glass containers raise no doubts among almost no one, then a floor made of plastic bottles seems to many to be a completely absurd idea. As evidence, skeptics cite the main argument - insufficient strength. Of course, everyone is familiar with the deformation of plastic dishes. However, these bottles are used to construct floors no less often. In order for the floor to be reliable and “unshakable”, you need to familiarize yourself with several recommendations.
- To protect floors made from plastic bottles from deformation, and also to guarantee maximum strength to the coating, containers are filled with expanded clay, sand, fine foam glass, sawdust, clay (dry), or other bulk materials.
- Preparing the base and the process of laying plastic containers is practically no different from installing glass containers.
- There is still a difference between the materials: the optimal temperature for constructing a “plastic floor” is 20-25°.
- The screed for any dishes must be reinforced. The maximum cell size is 150x150 mm.
- Identical bottles guarantee less solution consumption.
There are differences between plastic/glass and “concrete work”. When preparing a solution for PET bottles, the cement-sand mixture is diluted with heated water. This operation will allow the “filling” of plastic containers to cool slowly. The result will be optimal pressure on the walls of the bottles. It will help strengthen them, thanks to which the container will be able to hold out until the solution hardens.
Insulation of the floor during the construction of a bathhouse
During the construction of a bathhouse, heated floors from bottles can be installed directly on the ground. First you need to remove its top loose layer (20-25 cm). The bottom of a small pit is leveled and compacted. A layer of sand, ASG, crushed stone or screenings is poured onto it. The drainage layer is also compacted.
Now it can be covered with reinforcing mesh. Bottles are placed on it in the same way as described above. Another layer of reinforcement is laid over the dishes. Then the bottles are filled with a concrete screed 5-7 cm thick. When it hardens, you need to lay down waterproofing and fill the floor with a finishing screed.
Advice! To make the floor in a bathhouse made of bottles retain heat even better, they can be laid in 2 layers.
After laying the first one, a reinforced screed is made. A second layer of empty dishes is placed on it. It is poured with concrete, then the finishing of the floor covering continues.
If the soil is not dense enough, thermal insulation is installed on a base filled with concrete. A rough screed is made on the ground after compacting a backfill of sand or crushed stone and laying a waterproofing membrane on it. A rough screed can be prepared from lean concrete.
Thermal insulation from bottles will be more durable if they are installed vertically. The containers must be placed with their necks down. This method of insulation will require a larger number of bottles, but the thickness of the air gap between the base and the floor will be greater. Keeping an upturned dish upright on a concrete slab is quite difficult. It is better to install it by sticking the necks into compacted soil.
Body insulation from vertical bottles is stronger than from horizontal rows
Before making the floor of the bathhouse from bottles, a furrow is made in the soil near one of the foundation walls. The necks of the containers are inserted into it. To fix them more securely, you can lightly tap the bottom of the bottles with a rubber mallet. After installing the first row of containers, the furrow is filled up, the next one is made, the second row of containers is placed, etc.
The body insulator made from vertical bottles is stronger than from horizontal rows, so the screed above it can be poured with a thinner layer, but it needs to be reinforced in any case.
Installation work
Some owners are experimenting, trying to use a cheap method - making a heated floor in a bathhouse from bottles. But it is best to use copper or metal-plastic tubes.
Having completed the preparatory work on the foundation, they begin laying a system of pipes through which the water coolant will move:
- As waterproofing, roofing felt material is used, which is laid in two layers. The joining areas are coated with mastic. Stripes in layers should be placed perpendicularly.
- Next is the thermal insulation material. But remember that you must maintain the slope towards the drain.
- To protect the insulation, a reinforcing mesh is laid, and heating system pipes are laid on it.
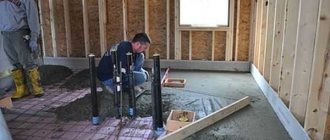
- Having completed the connection and organized a performance check, they begin to pour the concrete screed (for more details: “Filling the floor in a bathhouse - how to do it yourself”). Before this, a damper tape is laid around the entire perimeter to protect the floor from thermal deformation. The screed is made of sand and cement, reinforced fiberglass is added to the solution. It is allowed to use ready-made dry mixtures.
- The poured screed is aligned with the installed beacons. It is necessary to arrange a slope towards the drainage hole.
- After waiting the time necessary for complete hardening, floor coverings can be laid on the screed.
In a word, it is quite simple to set up a floor heating system from a stove. This method will provide an opportunity to save a lot on the purchase of a separate boiler and the cost of electrical energy.
Recommendations
Some are afraid to insulate the floor with plastic containers, considering them not strong enough for this. In addition, everyone knows that plastic dishes are subject to rapid deformation. However, PET bottles are used for floor insulation no less often than glass bottles.
Below are recommendations that you can follow to create a strong and reliable foundation:
- To prevent bottles from deforming and add strength to the future floor, it is enough to fill them with sawdust, sand, dry clay or other bulk materials.
- Work on preparing the base and laying plastic bottles is carried out similarly to installing a floor made from glass containers.
- Installation of an insulating structure made from PET bottles is best done at an air temperature of 20-25 degrees.
- When preparing a concrete solution, the cement-sand mixture must be diluted with heated water, which helps to slowly cool the air inside the plastic container. As a result, optimal pressure is created on the walls of the dish, which helps to strengthen them until the solution begins to harden.
- The screed must be reinforced, and the size of the mesh cells should be no more than 150x150 mm.
It is necessary to warm up the bottles outside on a sunny day, thus preparing them for stacking;
It needs to be filled with concrete, the thickness of which should be 5 cm
Expanded clay or dry sawdust must be poured into bottles to maintain warmth and tightness for a comfortable temperature regime;
Use tight stoppers to securely close the containers you use.
Tips for choosing insulation
The right choice of insulation is the key to success
The modern market offers a huge number of insulation materials. They differ from each other not only in their technical characteristics, but also in cost. However, you should not rely on the latter when choosing the best option.
The choice of insulation must be made based on:
- Type of flooring. Concrete floors are insulated with penoplex, expanded clay or perlite. The wooden floor is made of penoplex, as this is the only material that does not absorb moisture at all. It is undesirable to lay insulation with a fiber or open cellular structure under it, for example, expanded clay, since in this case it will be necessary to equip a reinforced layer of waterproofing. Penoplex can be replaced with foamed polymers - ecowool or Aisinin foam. Being light in weight, they retain heat well. However, electric, infrared or water heating can be installed under both concrete and wooden floors.
- The premises in which it will be installed. Organic insulation is suitable only for use in rest rooms or in the dressing room, since even treatment with fire retardants does not make them resistant to high temperatures.
- Personal wishes for safety - insulation can be organic and of plant or animal origin (felt, tow, cellulose) and inorganic (foam plastic, mineral wool and glass wool). The latter are produced through the processing of minerals and are characterized by resistance to high temperatures. However, they are inferior in environmental friendliness to organic insulation.
In addition, you need to pay attention to the specific gravity of the insulation itself. A good insulation is one that does not create additional load on the foundation
Manufacturing process step by step
Having accumulated a sufficient number of bottles, you can begin laying them:
- Each bottle must be washed and dried, heated in the warmth of the sun's rays, and securely sealed while warm. For greater strength, you can fill the bottles with sawdust or expanded clay.
- The earthen floor in the room needs to be deepened by 20-25 cm if the bottles are laid out horizontally, or a little deeper if they are installed vertically.
- A layer of crushed stone, sand, and other bulk material is poured onto a flat, compacted earthen surface.
- The filled space is slightly moistened with plain water and covered with a reinforcing mesh.
- At this stage, you can begin laying the bottles according to the chosen pattern. In any location - vertical or horizontal - the glass must be in close contact with each other. It is worth knowing that installation in a “standing” position makes the floor stronger and warmer, but requires a much larger amount of container.
- The entire structure is covered with reinforcing mesh and filled with cement screed to a height of 5-7 cm.
- Uncured concrete is pierced in several places to remove air, after which a thin layer of cement dust is spread over the top layer. This technique will help give greater strength and durability.
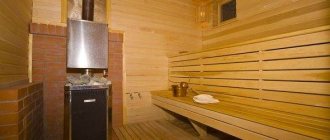
The finishing touches are laying the floor on a wooden grid pre-mounted on the screed. The floor in the steam room can be made of wood or tiles.