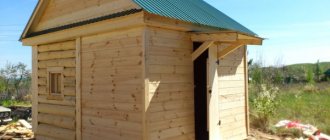
About distances to combustible structures
For the pipe in the bathhouse, you need to make a special passage through the ceiling. This is a device that provides safe distances from the outer surface of the pipe to the ceiling materials. They are regulated by SNiP 2.04.05-91. The recommendations are as follows (paragraph 3.83):
These numbers must be taken into account when installing floor beams. Their pitch is usually taken to be small - about 60 cm. With this pitch, the recommended distances will only be maintained when using pipes with insulation. For example, sandwiches.
The diameter of the furnace outlet pipe is most often 115-120 mm. If you use a sandwich with an insulation thickness of 100 mm when passing through the ceiling, the outer diameter will be 315-320 mm. There must be a distance of at least 130 mm on all sides. It turns out that in this case the distance between adjacent beams should be 130 mm * 2 + 315 mm = 575 mm. We just fall into the gap of 60 cm.
Combustible materials need protection
There are a lot of sandwiches on the market with insulation thicknesses of 35, 40, 45 and 50 mm. You can find a layer of 100 mm mainly in stores specializing in sauna stoves. Only in sauna chimneys there are temperatures from which it is necessary to protect with a 100 mm layer of mineral wool. Is it possible to use a 50 mm layer? You can, but if you want to take it easy, take 100 mm - it’s more reliable.
Let's calculate the minimum distance for chimneys without insulation. In this case, with an internal diameter of 115 mm, the safe distance from the outer edge of the pipe to flammable materials is 250 mm. The distance between the beams in this case should be 250 mm * 2 + 115 mm = 615 mm. It may be a little, but it doesn’t go away. But this calculation is for not the largest diameter of the smoke channel. There are many more. In any case, if the ceiling has not yet been made, calculate the installation pitch of the beams taking this factor into account.
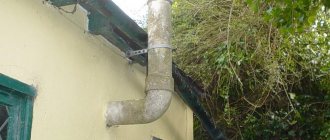
Exiting the smoke duct to the roof
Before you remove the pipe in the bathhouse through the roof, you need to take care of two factors necessary for the operation:
- select the location of the output;
- purchase the necessary items.
Place for withdrawal
The pipe outlet through the roof of the bathhouse can be done:
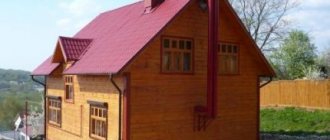
on the ridge of the roof. This location of the chimney is considered the most optimal, since snow and other precipitation does not accumulate in this place and good draft is ensured. However, in practice this is not always feasible;
Chimney located on the ridge
not far from the ridge. The location should be based on the rules shown in the figure:
Rules for the location of the chimney duct on the roof of the bathhouse
Under no circumstances should the chimney be placed in a valley (a depression in the roof formed by several slopes).
Required Items
Installing a pipe into a bathhouse through the roof is impossible without the following elements:
- cutting, similar to the passage through the ceiling;
- insulating material (compliance with safety regulations);
- a special apron that protects the chimney from precipitation.
Cuttings can be used either ready-made or self-made.
Aprons can be:
metal, ensuring a rigid connection of the structure to the roof surface;
Metal apron
flexible, made of rubber or silicone;
Flexible apron
built into a sheet of roofing material.
Sheet with built-in apron
The size of the apron is determined based on the diameter of the chimney pipe.
Instructions for removing the pipe
How to remove a pipe in a bathhouse through the roof? To do this you need:
- make a hole of a suitable size in the selected place on the roof (slightly larger than the outlet pipe);
- Carry out reinforcement work around the hole on the floor beams;
- install a groove from the inside of the roof, as when crossing the ceiling;
- bring out the pipe of the required size;
- install an apron on the outer part of the roof.
Scheme of arranging a passage through the roof
Thus, knowing the fire safety rules and instructions for arranging the main components, you can install a chimney for a bathhouse yourself. To do this, you need to purchase all the materials and basic elements of the system. Before firing the stove for the first time, time is required to dry the sealants used (approximately 1 day) and check the tightness of all joints of the chimney duct.
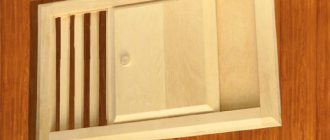
Types of ceiling penetrations
When crossing the ceiling, it is necessary to protect the “pie” materials from heat, and also somehow fix the pipe in a certain position. This task is accomplished by a ceiling cutout or, as it is also called, a “passage unit.”
The pass-through units are industrially manufactured. They are a box made of metal or mineralite, to which a stainless or galvanized steel plate is attached on one side. A hole is made in the middle of this assembly into which a sandwich is inserted. The plate on the side of the room closes the hole in the ceiling, decorating it. It also serves as a support for the heat insulator, which is used to fill the gap between the pipe and the floor beams for better thermal insulation.
This is a mineralite ceiling penetration. View from the attic
There is no disagreement regarding what material to use for the penetrations in the bathhouse: only stainless steel. The fact is that at temperatures that are typical for steam rooms, galvanization releases far from the most useful substances. Therefore, there is only one option: stainless steel.
Everything is installed simply. If the ceiling was made without taking into account the passage of the pipe, a square hole is cut in the right place (between the beams), which is 1-2 cm smaller than the size of the decorative panel. Beams and boards are covered with a layer of thermal insulation. If available, you can nail down strips of mineralite, basalt or asbestos cement cardboard (asbestos is harmful, so use it only as a last resort), just a strip of stone wool insulation. In some cases, padding of the insulation with metal strips is required (when it is needed, see below).
You can't do that - you had to cut a square hole. And the lining on the ceiling near the pipe is already charred...
When installing a pipe on a stove, the device is placed on a straight section that will cross the ceiling. The passage unit simply rises to the desired level. A strip of thermal insulation is placed under its edges that touch the ceiling boards, then everything is fixed with self-tapping screws. In many units, manufacturers even make perforations for self-tapping screws, so even this is not a problem.
What thermal insulator to use
After the device is fixed to the ceiling, they go up to the attic or second floor and fill the gap between the outer wall of the pipe and the beams with heat insulator.
Basalt wool can be used as thermal insulation. But be sure to check that the operating temperature range should be greater than 600°C.
You can use mineral wool or clay to insulate the pipe.
Some people think this option is not the best. Firstly, during production, resins are used as a binder, which release formaldehyde when heated. Secondly, condensation sometimes runs through the pipe. And mineral wool (and basalt wool too) lose their heat-shielding properties when wet. And when they dry, they are only partially restored. So this option is really not the best.
The penetration is also covered with expanded clay of medium and fine fractions. This is a natural material that is relatively light in weight. Even if it gets wet, it then dries and restores its properties. When wet, the thermal conductivity increases slightly, but it is already worse for expanded clay than for mineral wool.
In the past, sand was often used. The option is not bad in all respects, except for one detail: it gradually wakes up through the cracks. Refilling the sandbox is not difficult, but constant sand on the stove is annoying.
If we talk about natural heat insulators, then you can use clay. It is diluted to a paste-like state and the entire gap is covered. Sometimes expanded clay is used as a filler.
One of the heat insulators is expanded clay
How to make a sandbox in a bathhouse
Search posts by tags: just click on the topic you are interested in!
I will talk about the most fire-hazardous part of the chimney: the cutting of the wall - the cutting of the ceiling, aka the passage unit or passage box. Based on what I know from the Internet and from my own experience, illiterate cutting is the cause of most fires. Especially in the baths.
What does the problem look like?
The chimney pipe passes through the wall or ceiling, heats the unit, the wood is charred and, on the second, third or hundred and third kindling, it ignites. Moreover, it flares up meanly - in the attic or from the street. That is, you are sitting in a room, and at this time a building is burning where you cannot see.
4) Make all the mistakes from the first three points at the same time!
It was a good bathhouse, but the stove was expensive!
This is what the cause of the fire looks like - little by little, day after day, a charred beam, which one day bursts into flames
5) Lack of desire to understand how the tunneling is done.
There are 2 types of penetration: Homemade and industrial and 2 categories: Gost and non-Gost.
Determined by guests and snips. If you are interested in reading guest snips, then please do so
The Internet is full of links to these materials.
What is the trick of the Gostov passage unit?
Here is the link to the Gost guide.
Non-GOST ceiling passage for the chimney.
A box half a meter by half a meter with a hole. The bottom is stainless steel, and it itself is galvanized. There are 3 types (no preference).
A box made of an oval is cut in exactly the same way as a regular box: a square is cut out on the sides not of the oval, but of the flat part, the device is inserted into it and secured with self-tapping screws.
Any of the non-GOST boxes can be mounted in the following ways:
A picture to attract attention: make sure to mount the unit so as not to burn out!
A) Take Minerite or flama and beat the passage, after which it is inserted into the cutout.
All distances are filled with mineral wool or expanded clay
B) A cutout in the ceiling or wall is lined with mineralite from the inside and only then is the passage inserted.
Well, all distances are filled with mineral wool or expanded clay.
Homemade chimney passages. There are Gost ones: a meter by a meter, and there are non-Gost ones - half a meter by half a meter.
Look up and you will see a homemade passage in the previous photo. Industrial inside - there purely for reinsurance.
It’s even easier to trim the cutout on all sides with mineralite or flama, and cover it with “lids” made of flama and mineralite, the main thing is to cut holes in the “lids” for the chimney.
Remember: it is better to go overboard with the installation of the unit than to underdo it.
If it seems that there is not enough thermal protection, definitely add it.
So now the most delicious thing is what you came here for: to see how the cutting unit is installed!
Please note that nowhere inside the wood is coated with thermal protection. But I disassembled my unit in the bathhouse and saw that, despite the expanded clay and mineral wool, there was a little charring of the wood, the penetration was half a meter by half a meter. So I beat it and now I’m calm.
What I advise you to do is line the inside of the cutout with thermal protection, and then insert the box.
Installation of a Gost chimney - pay attention to how huge the hole is. But another passage would not have fit - the diameter of the fireplace is 200mm!
There is no disagreement regarding what material to use for the penetrations in the bathhouse: only stainless steel. The fact is that at temperatures that are typical for steam rooms, galvanization releases far from the most useful substances. Therefore, there is only one option: stainless steel.
Everything is installed simply. If the ceiling was made without taking into account the passage of the pipe, a square hole is cut in the right place (between the beams), which is 1-2 cm smaller than the size of the decorative panel. Beams and boards are covered with a layer of thermal insulation. If available, you can nail down strips of mineralite, basalt or asbestos cement cardboard (asbestos is harmful, so use it only as a last resort), just a strip of stone wool insulation. In some cases, padding of the insulation with metal strips is required (when it is needed, see below).
You can't do that - you had to cut a square hole. And the lining on the ceiling near the pipe is already charred...
When installing a pipe on a stove, the device is placed on a straight section that will cross the ceiling. The passage unit simply rises to the desired level. A strip of thermal insulation is placed under its edges that touch the ceiling boards, then everything is fixed with self-tapping screws. In many units, manufacturers even make perforations for self-tapping screws, so even this is not a problem.
The configuration of these products varies. Sometimes a metal cylinder is made around the hole for the pipe. The edges of the decorative plate protrude significantly beyond this cylinder. When installing a pass-through unit of this type, the hole is still cut in a square shape. A circle is also possible, but there must be a distance of at least 130 mm from the pipe to its edge if the pipe is insulated, and 250 mm if it is without insulation. With this option, please note: the size of the plate should be sufficient to mask the hole. In addition, with this form of passage through the ceiling, it is imperative to protect the wood of the ceiling not only with heat insulators, but also to cover it with strips of metal.
Pass-through units through the ceiling come in different configurations
There are passage units in which there is no cylinder around the pipe, but there are outer sides around the perimeter. They are made of metal, and can also be made of mineralite. If the sides are made of metal, the edges of the cutout in the ceiling must be lined with a heat insulator (for example, basalt cardboard or the same mineralite). If the sides are made of mineralite, then they themselves are a good heat insulator. So additional thermal insulation of the edges of the cutout is not necessary (but you can play it safe).
What thermal insulator to use
After the device is fixed to the ceiling, they go up to the attic or second floor and fill the gap between the outer wall of the pipe and the beams with heat insulator.
Basalt wool can be used as thermal insulation. But be sure to check that the operating temperature range should be greater than 600°C.
You can use mineral wool or clay to insulate the pipe.
Some people think this option is not the best. Firstly, during production, resins are used as a binder, which release formaldehyde when heated. Secondly, condensation sometimes runs through the pipe. And mineral wool (and basalt wool too) lose their heat-shielding properties when wet. And when they dry, they are only partially restored. So this option is really not the best.
The penetration is also covered with expanded clay of medium and fine fractions. This is a natural material that is relatively light in weight. Even if it gets wet, it then dries and restores its properties. When wet, the thermal conductivity increases slightly, but it is already worse for expanded clay than for mineral wool.
In the past, sand was often used. The option is not bad in all respects, except for one detail: it gradually wakes up through the cracks. Refilling the sandbox is not difficult, but constant sand on the stove is annoying.
If we talk about natural heat insulators, then you can use clay. It is diluted to a paste-like state and the entire gap is covered. Sometimes expanded clay is used as a filler.
One of the heat insulators is expanded clay
Here is a review of the use of clay when passing a bath pipe:
“Clay rules in cutting! I dismantled the chimney in my bathhouse. Or rather, I took apart what was left: there was a lot of snow, and when it melted, it blew off the entire top. Once you change the top, you need to look at the bottom: the pipe has been standing for 7 years. So here it is. There is zero burning inside, and there is no burnout of the pipe either. Condition: as soon as installed. My penetration is lined around the perimeter with basalt wool, and then everything is covered with clay. This is definitely the best option."
Not everyone recommends using insulation in the passage unit. There is an opinion that it is better to leave the gap unfilled: this way it will be possible to avoid overheating and burning out of this section of the pipe - it will cool better due to air blowing. This may be true, but the radiation from the heated pipe will dry out the nearby wood, and in this case the temperature of spontaneous combustion is significantly reduced - to +50°C.
As you can see, the pipe burned out
There are several ways to avoid overheating. The first, and most rational, is to use the heat that flies out into the pipe and heats it to extreme temperatures for your own needs. There are three options:
One way to avoid overheating is to place stones on the pipe
When using any of these methods, the pipe temperatures in the ceiling passage are significantly reduced. The likelihood of burning becomes very small. That's not all. There is a way - simply cool with air. To do this, another one of larger diameter is put on the heat-insulated pipe. A grate is made at the bottom and top through which air enters/exits. For a steam room this is not an option - it will draw out all the steam, but for a washing room it can be used. The method is especially good in the attic and when passing through the roof.
Homemade ceiling cuts
It is possible to install a chimney through the ceiling in a bathhouse without using factory components. You will need:
One of the options for fixing a pipe in a cut hole
As you can see, ceiling cutting is easy to do with your own hands. This is the simplest, but quite reliable option. Another option is presented in the video. The work is more complex, but if you have the appropriate skills, this option of passing a pipe through the ceiling can also be done with your own hands.
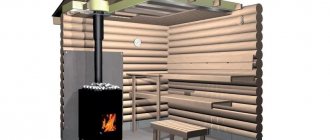
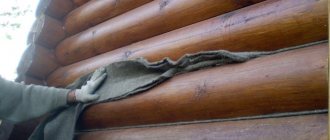
A sandwich chimney is one of the best options for removing smoke from fuel combustion in wood-burning sauna stoves. Currently, there are many design solutions for chimney devices in wooden buildings. And this applies primarily to the bathhouse with its main room - the steam room.
This article will present a chimney system using double-walled flue pipes (sandwiches) made of stainless steel. In addition, based on the presented drawings, important nuances and technology for installing a chimney with your own hands will be discussed, with a description of common mistakes.
Content
Consequences of poor installation
When organizing a penetration through the roof for a chimney, it is important to provide good protection from moisture. Therefore, you need to follow installation technology and use high-quality materials
Inadequate pipe insulation increases the fire hazard. In addition, it causes the following negative consequences:
- the brickwork is destroyed due to weakened mortar, smoke enters the home;
- Moisture accumulates inside the chimney, and fungus appears in the summer;
- heat losses increase, which forces you to spend more fuel on heating;
- sections of the roof adjacent to the pipe are destroyed by ice.
Which is better, galvanized or stainless steel chimneys?
Traditionally, the main material for constructing a chimney is refractory brick. At present, such chimneys for removing combustion products from a wood-burning stove have not lost their relevance and are unlikely to lose their use. After all, it often happens that the owner of a Russian bathhouse wants only a brick heater, and with it a brick chimney.
But modern industry also offers alternative double-walled sandwich chimneys made of stainless steel or galvanized steel. In this regard, the question reasonably arises of what steel is best to make it from.
It would seem a strange question. After all, everyone knows that stainless steel has incomparable advantages over ordinary steel, including galvanized steel. These include high properties to resist corrosion, high temperatures, and appearance, which is very important when arranging the interior of a bathhouse.
Although galvanized coating allows you to extend the service life of a steel chimney, it is not to the same extent as stainless pipes. Any mechanical damage (scratches, dents, etc.) during installation will negatively affect the durability of the galvanized chimney itself. Damaged areas will become a source of corrosion, eventually rendering the entire pipe completely unusable. And this is the first step towards a fire in the bathhouse.
But there is one drawback of stainless chimneys and components - their high price compared to galvanized steel. For example, according to the Novosibirsk price list, the price of a meter-long thermally insulated sandwich pipe with a diameter of 115×175 mm (insulation thickness 30 mm) made of stainless steel is 1,500 rubles, and of galvanized steel – 1,000 rubles.
The same products from the Voronezh enterprise Ferrum can be purchased at the prices shown in this picture:
As you can see, there is a price difference. But it is not so significant as to refuse to install a stainless steel chimney. And given the excellent performance properties of stainless steel products, you should give preference to it
.
To somehow reduce costs, you can make a combined chimney. So in the steam room with its “extreme conditions” and increased requirements for fire safety, as well as to give it a more respectable appearance, you can use stainless modular elements, and in the attic or outside the bathhouse made of galvanized steel.
However, during installation, difficulties may arise in joining modules made of different materials. Therefore, when purchasing, you should definitely check the possibility of their assembly. Purchasing products from only one manufacturer will provide an additional guarantee of assembly.
Selecting a location
Before you start building a sandbox, you need to find the most suitable place for it, because the comfort and safety of the baby depends on it. There are several rules for sandbox placement:
- the area should be open and level;
- in front of parents;
- closed from prying eyes or at least located at a distance from the street and passers-by;
- There should be no thorny bushes or sharp fences near the sandbox.
DIY sandbox
To protect from the sun, you can place a sandbox under a small strong tree or build a canopy. But you shouldn’t do this under old trees: at any time a heavy branch can fall from a tree onto a child.
Children's sandboxes
Do-it-yourself sandwich chimney in a bathhouse - assembly diagram and recommendations
This chapter will discuss only important issues regarding the installation of a chimney from a wood-burning stove. These are preparatory work, methods and order of assembly, as well as passage through the wooden floor between the steam room and the attic, and through the roof of the bathhouse.
Methods for connecting modular elements in a chimney
Installation of a chimney made of steel pipes is carried out in one of two ways: “by condensate” or “by smoke”.
The first method (“condensate assembly”) is designed to ensure that condensate, formed as a result of the temperature difference between the outside and inside the pipe, flows freely down the pipe. At the same time, the insulation located in the space between both pipes of the sandwich remains reliably protected from moisture.
The second method (assembly “by smoke”) is used when it is necessary to provide a 100% guarantee that carbon monoxide will not enter the steam room or other bath rooms through the gaps at the joint between adjacent internal pipes.
The figure on the left shows a method for connecting chimneys using condensate. In this case, the inner pipe of the upper sandwich is inserted into the socket of the lower sandwich. As can be seen from the figure, the resulting moisture cannot get inside the chimney. But smoke, finding the slightest crack, can enter the area where a person is located.
The figure on the right shows the “smoke” connection method, in which the inner pipe of the lower sandwich fits into the socket of the inner pipe of the upper module. The smoke, rising up the pipe, does not encounter resistance, freely passes through the junction, and under the influence of draft is removed from the bathhouse to the outside. However, condensation, if the joints are sealed carelessly, can get inside the sandwich. This circumstance will significantly disrupt the protective properties of the insulation and accelerate the failure of the entire sandwich.
So which method should you choose? We must keep in mind that carbon monoxide can harm our health, and condensation can only harm the durability of the chimney. What is more important is up to us to decide! In any case, sealing joints and cracks must be carried out with special care. If this is done, then the “condensate” connection method is preferable, since our health will not be affected, and the chimney will serve for a long time.
The procedure for assembling a vertical sandwich chimney
Before you begin installation, you should prepare all the elements: pipes, adapters, bends, etc. It is necessary to remove the protective film, remove all stickers and labels, and, if necessary, wipe off oil and grease stains with a rag.
The next step should be to determine and mark the vertical axis of the chimney, starting from the outlet pipe of the sauna stove and ending with the passage through the roof. The location of this axis should ensure the creation of openings both in the ceiling and in the roof, taking into account the required dimensions for their thermal insulation. In this case, wooden floor beams and rafters should not pass the cutting plane. To exclude this possibility, it is necessary to arrange them already at the design or construction stage of the bathhouse, taking into account the location of the wood-burning stove.
Assembly should begin directly from the stove socket in the upward direction. First of all, you should calculate the first connecting element of the chimney in such a way that the joining of the first sandwich pipe with the subsequent pipe is above the ceiling cutting plane. The ideal option is its symmetrical arrangement. In any case, the docking points must be accessible to visual inspection.
The assembly will be carried out using the “condensate” method, in which the inner pipe of the upper sandwich will be inserted into the socket of the inner pipe of the lower (previous) sandwich. Lightly strike the top tube with a wooden mallet to achieve a tight fit. The upper outer pipe, on the contrary, is fitted with a socket onto the lower pipe.
The gaps between the connected elements are sealed with heat-resistant sealant for stoves and chimneys, designed for temperatures of at least 1000 ˚C. The sealant is applied in the following order:
The chimney above the attic floor is assembled only using sandwich pipes, leading it through the roof to the required height.
Docking connections are additionally fastened as follows:
To reduce the load from the weight of the entire structure on the lower elements of the chimney, supporting wall brackets should be installed every 1.5-2.0 meters. But in our example they will not be needed, since their role will be played by the nodes of passage through the ceiling in the steam room and the roof.
Canopy installation
Canopies for sandboxes can have a variety of shapes and are made of different materials. The most common option is fungus. To make it, you will need a beam 3 m long and a cross-section of 100x100 mm, boards and plywood. This fungus is installed at the stage of preparing the base, since it needs to be dug in the center of the sandbox to a depth of 1 m.
The manufacturing process is very simple:
- the timber is polished and treated with an antiseptic;
- the lower part is coated with bitumen mastic to a height of at least a meter;
- 4 triangles are knocked out of boards and covered with plywood;
- connect the triangles together and attach them to the top of the beam using spacers;
- in the center of the pit they dig a hole 1 m deep;
- insert the beam, level it using a plumb line;
- fill the hole with crushed stone and soil, compact it.
There is another canopy option: vertical posts are bolted in the center of two opposite walls of the frame. Height of racks 2 m; in the upper part, the supports are connected by a horizontal rail, over which a rectangular piece of dense fabric or a special canopy is thrown. The ends of the canopy on each side are fixed with metal hooks to the walls of the sandbox.
Sandbox with canopy
The described options are the simplest and most popular; if desired, they can be supplemented at your discretion. The most important thing is that the structure is as safe as possible, then the baby will be happy to play in it, and the parents will be able to relax a little.
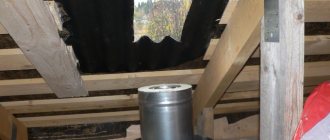
An example of a vertical sandwich chimney for a Russian bath
Below are images of a chimney in a Russian log bathhouse. For clarity, a wood-burning stove from the Finnish manufacturer of bath equipment and accessories “Harvia” is shown. The stove is serviced outside the steam room, for example, in the dressing room, and to obtain hot water, a stainless steel tank is installed on the pipe. To adjust the draft, a rotary gate is mounted above the tank.
Chimney passage through a wooden interfloor ceiling
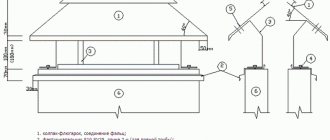
The main element is a ceiling-passage unit (CPU), which has an air gap between the steel casing and the mineralite thermal insulator. This design allows you to reduce the size of the ceiling section without losing insulating properties.
This sketch shows the design of polyurethane foam, as well as the order of laying thermal insulation in the passage through the ceiling.
Heat-resistant basalt wool is placed in the gap between the pipe and the inner wall of the polyurethane foam, and an air space remains between its outer surface and the mineralite, which is an additional natural heat insulator.
Basalt wool is also laid along the outer contour of the polyurethane foam, which in turn is adjacent to the basalt cardboard. Cardboard additionally insulates wooden floor elements from heat.
On the side of the steam room, the polyurethane foam is covered with a steel box-shaped casing with a hole for a sandwich, and in the attic with sheet mineralite. The entire cutting in the attic is first covered with a sheet flange, and then with a steel casing, which is secured to it with metal screws.
Chimney passage through a roof with a roof made of combustible materials
The roof cutting diagram is shown in the previous sketch.
The main work on cutting the roof is as follows:
Some types of components for double-walled sandwich chimneys
The main components used when installing the above chimney:
Blueprints
To build a sandbox with your own hands quickly and easily, all that remains is to provide you with a few drawings. You can build on them and take them as a basis. Adjustments can and should be made.
Drawing of a simple sandbox with dimensions
Sandbox with roof - photo and drawing
Prefabricated sidewall
Drawing of a sandbox with a canopy
Checking the quality of the chimney assembly
When the chimney is completely assembled and checked for defects or defects, you should test fire the stove with a small amount of dry firewood. Immediately after lighting, you should check the entire length of the chimney, paying special attention to the joints.
Initially, slight smoke may appear in the bathhouse premises due to the combustion of oil contaminants on the outer surface of the chimney. This one is okay. There is no need to worry about this.
If the results of the first chimney check are positive, the stove should be heated at full power for another two to three hours. This is enough to reveal newly discovered deficiencies. Special attention is needed
During operation of the chimney, a tarnished color may appear on the pipes. This is a normal reaction of steel when heated to a high temperature.
If smoke from the furnace firebox enters the steam room, this most likely indicates insufficient draft in the chimney. To increase traction, you will have to increase the pipe by another 0.5-1.0 meters.
Traction concept
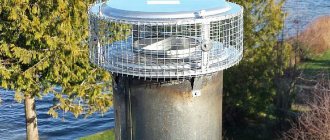
Do not allow dripping condensation to form in the chimney, which gradually destroys the inner surface of the channel. This especially happens in the cold season, when there is a significant decrease in outside air temperature. The process of moisture droplets falling out in the chimney also causes disruption of normal draft. A decrease in the rate of passage of gases from combustion products occurs not only with the internal formation of condensation; the draft force is affected by the humidity of the outside air, which can have different values depending on the weather. A deflector installed above the chimney will help you ignore this indicator.