When carrying out renovations, it is also necessary to replace the floors. Covering plays an important role in creating an interior; in addition, using creaky and sagging boards is not the best solution. To save money and effort, it is necessary to simplify the process as much as possible. For example, removing old coating is a very expensive pleasure. It's best to avoid this. Next we look at how to level a wooden floor without tearing down the boards. There are several methods, the choice between them depends on how damaged the wooden floor is.
Reasons for the formation of irregularities
Wood is a living material that is sensitive to changes in external conditions. Wood fibers sometimes swell and sometimes decrease in volume. Such vibrations lead to uneven deformations of the boards, cracking, warping, and the appearance of cracks between them. The floors begin to creak, sag, individual floorboards become loose, and in some places the fasteners come out.
This often happens if the quality of the lumber was initially low, the boards were too wet or of unequal cross-section. For flooring, it is recommended to use lumber with a thickness of 40 mm or more, with a moisture content of no more than 18%. Blue discoloration, rot, falling or tobacco knots, and deep end cracks are not allowed. The geometry must be correct, without bending or torsion.
The second reason for the fragility of wooden floors is that the thickness of the board does not correspond to the distance between the joists. Because of this, large deflections occur, the floorboards become unsteady and “shaky.” Even an initially flat wooden floor can become warped due to high humidity in the room, lack of ventilation between the boards, irregular protective treatment, improper installation, and incorrectly selected fasteners.
Creakiness
Old floors can have another very significant drawback: squeaks. They must be eliminated first.
Causes of squeaking
Each squeak is individual, but the general reasons are as follows.
- Initially, boards with high humidity were laid. After drying, they became deformed and rub against each other when loaded.
- Large distance between lags: boards sag under load.
- Thin boards.
- Due to the drying of the wood, the fasteners became loose.
- There is high humidity in the room.
Eliminating the last two is understandable, but the rest will have to be tinkered with.
You should start by tightening or replacing fasteners.
Only self-tapping screws are recommended.
They vary in color.
Black with PH standard head (Phillips). D 3.5 – 4.8; L 16 – 150 mm. Hardened, phosphated. With large thread pitch. Inexpensive, fragile, insufficiently protected from rust. The slot often breaks off. For interior work.
Yellow with head PZ (Pozidrive)D 1.5 – 6; L 10 – 250 mm. More expensive, galvanized, with good corrosion resistance. The head has diagonal rays (double cross). Reliable slot. With smaller thread pitch. They can only be tightened with a bit marked PZ. Universal, for external and internal work.
Yellow ones are recommended for all floor leveling work. In what follows, we will call them fasteners or self-tapping screws.
If the creaking does not stop, check (by the location of the fasteners) the distance between the lags. If it exceeds the recommended one, you will have to bring it into the norm.
If isolated creaks remain, a hole is drilled in these places through which polyurethane foam is poured. Rubbing powdered graphite into small and short cracks also helps.
The creaking of floorboards against each other is eliminated by making cuts between the boards with a circular saw or an angle grinder with a saw blade. The main thing during such an operation is not to get into the fastening element.
The creaking of thin boards is eliminated by laying slab material on top.
Simultaneously with these operations, it is necessary to examine the floor elements for the presence of wood-boring insects and fungal diseases. The affected areas are cut out, or the board is completely replaced. New wood materials, including slabs, must undergo fire and bioprotection.
We wrote in detail about eliminating creaking wooden floors in this article.
When to level the floor
Wooden floors can be either rough or finished. For laying finishing materials - laminate, tiles, linoleum, carpet - it is required that the base does not have irregularities of more than 2-3 mm per 1 m of length. If the rough coating meets these requirements, there is no need for additional leveling. Minor defects are leveled out with a substrate or a layer of glue.
Large flaws under the finishing coating create the preconditions for rapid wear of materials and the need for replacement. Laminate flooring, which is not as elastic as linoleum or carpet, is especially sensitive to unevenness.
Which method to prefer: price comparison
Many people are concerned about how to level a wooden floor without making huge investments. From the listed methods it follows that sanding coated with paints and varnishes is the most affordable option. The only expenses are the purchase of paint or suitable varnish. If you use the services of a hired team, you will have to pay the cost of the work. But this is much cheaper than using bulk technologies or dry screed.
Filling technologies allow you to create designer masterpieces. However, their big disadvantage is the high cost of materials. Not everyone can afford this. Dry screed is also a rather expensive method that is not available to everyone. Doing the job requires certain skills and special knowledge. Accordingly, the help of professionals will be required, which will entail additional costs.
The choice of leveling method is a personal matter for homeowners. When carrying out work independently, you need to calculate your capabilities. Taking a serious approach to the problem will help you make a decision. Think about it: wouldn't it be better to outsource the work to professionals? And, if you use a comprehensive renovation service, then for a reasonable price you can update the entire apartment at once, depriving it of all sorts of shortcomings. This way you will save a lot of time and effort, and as a result you will get stylish, functional and safe housing.
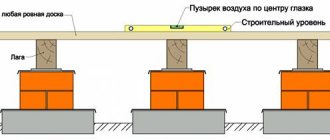
How to measure unevenness
Differences in the floor covering are determined during an external inspection. The most commonly used building rule is a wide aluminum strip with a perfectly straight edge. It is enough to install the device on the surface - and you can see the cracks and measure their height.
Using the rule, it is impossible to determine the collapse of the floor when, despite visual evenness, the zero marks in different parts of the room do not coincide. This defect appears if the logs are not positioned strictly horizontally.
You can determine the blockage using a bubble level, but the most accurate result is given by a laser plane builder. It projects the horizontal line onto the walls using laser beams, and you can immediately find the difference between the heights of all points on the surface.
Methods for leveling wooden floors in apartments and private houses
After determining the nature and size of the defects, you can begin to correct them. For local unevenness the following are used:
- sharpening or sanding protruding parts of boards using tools;
- putty with ready-made or homemade mixtures intended for wooden surfaces;
- laying sheets of plywood, OSB on top;
- self-leveling polymer floors.
To level out the general slope or very large fluctuations in the height of the boards, the following are used:
- dry prefabricated screed without opening the floor;
- wet screed using a waterproofing layer
- complete replacement of the structure including joists.
The last option is the most radical. It is recommended if the boards have dried out, rotted, and worn-out joists can no longer withstand the loads.
Dismantling old floors made of different materials
If you are laying rolled material on the floor, to dismantle it, you need to pry up the covering on one side and roll it carefully into a roll. If the material was laid on a concrete base without adhesive, it will be easy to remove. Otherwise, the coating will come off along with the layers of peeled screed. Such material will have to be removed in fragments. In an apartment, the cost of replacing a floor made from roll materials starts from 80 rubles/m².
There are cases when a well-glued coating delaminates when dismantled. Dry layers of material remain on the screed, which must be removed with a spatula or scraper, after preheating these areas with a hair dryer. You can also use a floor cleaner to moisten the old adhesive layer.
Removing parquet is a more labor-intensive task, especially if the material is attached with organic-based glue or bitumen mastic. The parquet is dismantled using a chisel and scraper with pre-heating of the elements with a construction hairdryer. To remove old tiles from the floor, the price of which starts from 150 rubles/m², you should use a hammer drill with an attachment in the form of a spatula-chisel, which switches to chiselling mode. If such a tool is not available, the work is performed using a hammer and chisel.
To remove old tiles from the floor, use a hammer drill with a chisel blade attachment.
How to level a wooden floor without tearing it down using tools
If height differences do not exceed 10 mm, excess wood can be cut off mechanically. For this, hand cycles, electric planers, and parquet sanders are used.
Manual scraping
The method is used to level parquet flooring. It is very economical in terms of material costs, but quite labor-intensive. The protrusions are removed with a special hand tool - a scraper. This is a wooden scraper with a curved sharp steel blade. After cutting off the excess wood, the treated area is sanded with sandpaper.
It is recommended to start from the center of the room. The floors are cleaned of debris and dust, moistened with a wet rag or spray. You can iron the surface with a hot iron through a wet cloth. Irregularities along with the old varnish are cut off in thin layers. You need to press with constant slight force. The direction of movement of the cycle is along the fibers towards itself.
The tool must be sharpened periodically. To achieve a good result, you may need to scrape two or three times. Leveled floors are puttied and sanded. Once finished, varnish or parquet oil is applied to the perfectly smooth surface.
Mechanized scraping
The most convenient and fastest option is to process a wooden surface using a parquet sander. The method is noisy and dusty, but quite effective. You can rent equipment and get your floors in order in 1-2 days.
The working disk rotates at speeds of up to 3000 rps, which ensures high productivity. Some models are equipped with a dust collector, this greatly facilitates the grinding process.
The floor must be dry and clean, the gap between the floorboards should be no more than 5 mm. Metal fasteners must first be deepened into the boards below the sanding thickness or completely removed.
Sanding is done first with coarse abrasives to remove the top rough layer. It is recommended to make the first penetration along the fibers, and each subsequent strip is shifted by 2/3 of the width relative to the previous one. The clamping force is adjusted with a special screw.
After the initial processing, a fine-grained nozzle with a particle size modulus of at least 240 units is installed. Then the floors will have a perfectly smooth and even surface. After sanding is completed, the wood must be soaked in antiseptic and covered with decorative and protective agents - varnish, enamel, wax. This coating can be used as a finishing coating.
Processing with an electric planer
This method is used for preliminary leveling of floors for final finishing. An electric plane cuts differences of up to 7 mm on soft wood; for hard wood, the tool’s knives will have to be sharpened frequently.
The nail heads are pre-sinked using a hammer. The depth of the metal parts must be greater than the expected planing thickness. Processing is carried out first diagonally in the forward and reverse directions, and then along the fibers. The shavings can be collected with a vacuum cleaner or blown off with a fan. The main thing is that the prison area does not become clogged and remains visible. Tool marks are removed by grinding.
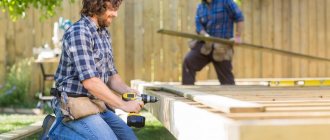
Required tools and materials
The list is as follows:
- lumber;
- linings, reinforced and fiberglass mesh;
- screwdriver, self-tapping screws;
- hammer, nails;
- jigsaw or grinder;
- level, pencil;
- metal or plastic spatula, rollers;
- container for mixing dry mixture, construction mixer.
The list of tools and materials can be supplemented: it depends on the alignment method. It is better to rent equipment to save money.
Leveling with mixtures
Filling wooden bases with liquid compositions based on gypsum or cement is not often used. Such mixtures take a long time to dry, are prone to cracking, and also weigh quite a lot. If the floors are worn out, high loads can cause them to quickly deteriorate.
It is recommended to use only mixtures intended for working with wood, chipboard, and plywood. They contain substances that prevent fibers from swelling and rotting. If the instructions do not contain appropriate instructions, the composition can only be used in conjunction with waterproofing measures.
If cement-sand mixtures are used, the layer thickness should not exceed 7 cm. Before starting work, you need to calculate the load and determine whether the supporting structures will withstand them. The weight of 1 sq.m of wet screed 1 cm thick is 18 kg. And although it will decrease as it dries, this will not happen immediately, so the maximum load value is used for the calculation.
The base for laying wet mixtures is pre-prepared:
- cleared;
- fragile elements are removed and replaced with new ones;
- large gaps are filled with putty;
- treated with a primer with antiseptic components.
The next stage is waterproofing. A dense film with a thickness of at least 150 microns is laid on the surface, extending onto the walls. If there are joints, they need to be sealed with tape. Damper tape is glued to the walls around the perimeter of the room.
Waterproofing agents and wood impregnating agents can also be used as waterproofing. The main requirement is that after treatment the surface must be clean, without oil or bitumen stains.
Filling is carried out according to the manufacturer's instructions. The mixtures are mixed with water in the specified proportion and distributed evenly over the surface. Self-leveling compounds must be rolled with a needle roller to remove air bubbles. For uniform drying, it is recommended to cover the entire area with film. The period for complete hardening of various levelers is from 7 to 28 days, but foot traffic is allowed after 1-3 days.
Homemade mixtures
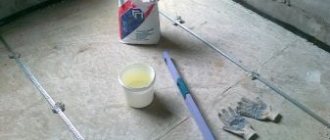
Do-it-yourself compounds are often used to fill cracks at home. They are flexible, hold up well, and the components are inexpensive.
The first recipe is classic, used not only for floors, but also for furniture. PVA glue is added to wood dust or sawdust until it reaches the consistency of soft dough. The resulting mixture fills cracks and crevices. After hardening, which lasts from 3 to 12 hours, the surface is sanded. If large defects need to be leveled, sawdust is used. For small imperfections, wood dust is better.
The second composition is used to completely level the wooden floor. Dry gypsum putty is used as a basis, but it is sealed not with water, but with drying oil. The mixture is applied in an even layer to the surface, and after drying, the entire area is sanded.
Cosmetic (surface) repair of plank coverings
This section will look at some of the ways to repair wood floors without completely dismantling them. Perhaps it will be discovered after an audit. that you are lucky, and, most likely, you will be able to get by with minimal financial investments and physical effort.
Surface scraping and damage repair
If the floors are strong and do not creak, but are covered with numerous layers of paint, and the boards are somewhat deformed, that is, they have bent or sagged along their length, then the situation can be corrected with the help of sanding.
If scraping is carried out using a tool specially designed for this purpose - a scraping machine, then the work of an experienced craftsman will take one day. This procedure will help get rid not only of old layers of paint, but also of uneven boards.
Floors after the first stage of sanding
After the floors are leveled, they should be thoroughly cleaned with a vacuum cleaner. The clean surface should be carefully inspected for cracks in the boards and excessively wide gaps between the floorboards. If any are found, they need to be repaired using ready-made wood putty or a self-made composition of PVA glue and small sawdust. Homemade putty should have the consistency of thick porridge.
Applying putty mixture to surface defects found on the floor.
The putty is applied using a metal or rubber spatula, so that the recesses in the wood are filled to the level of the main floor, and the surface is as level as possible.
Sealing wide gaps between boards
If wide gaps have formed between the boards, you cannot fill them with putty, as it will simply fall down. But to close them, you can use narrow slats or silicone tape.
Installing tape in the gap between the boards
Silicone is elastic, and the tape needs to be bent in half so that it forms a kind of channel in the gap, thanks to which the putty will stay at the desired level. The edges of the tape should be recessed into the gap and rest against its walls.
Filling gaps between floorboards with silicone
If the cracks have an average width, for example, 4÷5 mm, then silicone can be used to close them. To use it, you will need to purchase a special construction gun that will help squeeze the mass out of the tube.
After the material used for repair has dried, you can move on to the next stage of work. If putty was used for sealing, it should be sanded - this can be done with an electric hand sander - belt or eccentric.
Installation of plywood on plank floors
Sturdy plank floors with wide gaps can be used as a subfloor under plywood. There will be no problems with this if the floor surface is smooth, but most often during operation it becomes somewhat deformed and therefore requires leveling. On an uneven surface, plywood will creak and sag.
Wide gaps between the boards in a wooden floor will help heat escape quickly from the room
An important preparatory step before attaching plywood, in addition to leveling the surface, is to check the boards for reliability of their attachment to the joists, otherwise they will creak under the new coating.
If the boards “play”, then they should be securely fixed to the joists with wood screws, but so that the fastener heads “sink” into the wood and do not interfere with surface treatment. . After this, you can proceed to sanding the floors. In this case, it is not necessary to completely remove the paint from the boards, since the main task is to level the surface.
Sanding planks for plywood installation
It is recommended to treat the scraped plank covering with an antiseptic wood primer, which will protect it from rotting and from insects that destroy wood.
For flooring, plywood sheets measuring 500x500 (600) mm are most often used. If you plan to lay two layers of material, then a thickness of 10 mm is sufficient. For one layer of flooring, you should choose sheets with a thickness of 18÷20 mm. However, experienced craftsmen still recommend installing two layers, as the design is more reliable.
Attaching the first layer of plywood
It is best to use double fastening of sheets. That is, they are first fixed with glue for plywood or parquet, and then additionally secured with self-tapping screws. Each sheet is fixed along its perimeter and diagonally. Plywood rows are laid relative to each other with the seams offset by ½ of their width, tied together, that is, according to the principle of brickwork.
Laying the second layer of plywood.
The sheets laid as the second layer must be laid so that not one of the joints between the sheets of the lower layer coincides with the joints of the upper one. It is also recommended to attach the second layer with glue and screws.
When fixing plywood with self-tapping screws, their heads must be recessed into the wood. To do this, it is very convenient to use a special bit for a screwdriver - with a “skirt” limiter. If you plan to make the top layer decorative by covering it with varnish or paint, then the caps should be below the level of the main floor surface so that they can be covered with putty. If a laminate or other hard covering will be laid on top of the plywood, it is enough to recess the caps to the level of the main surface.
Sanding plywood covering
The edges of adjacent sheets of plywood should be at the same level. In case of small differences, the floors are leveled to perfection using a scraper or grinder.
The joints of the sheets of the top layer, which will become decorative, must be covered with putty, which can also be made from PVA and sawdust left over from cutting plywood.
When the putty dries, the joints are sanded so that they are almost invisible.
Before coating plywood with varnish or paint, its surface must be primed by applying two or three layers of primer. This stage is necessary to ensure that the paint layer lies evenly on the surface.
If you plan to lay one of the finishing decorative coatings on top of the plywood, the work is carried out according to the recommended technologies for the selected material. These processes can be found in detail on our website in separate publications.
Eliminating squeaks
Another common problem that occurs with old plank flooring is squeaking, which negatively affects the mood of the residents. To get rid of unpleasant sounds, it is not necessary to dismantle the boards and replace the flooring with a new covering. If the floors are durable, but squeak, there may be several reasons for this:
- loosening the fastenings of the boards to the joists;
- the wood has dried out;
- the boards have increased in volume due to increased humidity;
- in certain areas the boards “play”, touching each other;
- the fastening of the joist to the base has weakened;
To decide on the repair method, it is necessary to inspect the coating, which will help identify the areas of the floors where creaking sounds occur. To do this, you should clear the surface of carpets and furniture and walk along it along and across the flooring. If several zones are found, it is best to mark them by outlining them with chalk, after which each of them will have to be examined more carefully.
Fixing boards to joists when the fastening is loose
- Loosening of fasteners leads to the fact that the board is not firmly fixed to the support. Therefore, when you press it, a squeak may be produced from the friction of the board against the log beam or against a nail or self-tapping screw. In this case, it will be enough to remove the old fasteners and fix the board to the beam in another place. In this case, the head of the nail or screw should be recessed into the wood.
- If the board at the fastening point has dried out, and therefore the head of the fastening element falls into the wood, and therefore does not fix it on the joist, then this part (or even the entire board) should be replaced.
When you lift up a damp board, you can sometimes discover more serious problems underneath it; for weeks it’s just a creaking sound.
- If the floorboards are too moistened, causing them to swell and there are no gaps left between them, then squeaking may also occur due to friction of the parts. In this case, minor repairs are not enough, as the problem will appear again. Therefore, you will have to eliminate the source of the problem. To do this, you need to dismantle the covering, dry the base, provide it with reliable waterproofing, and only then install new floor parts. It should be taken into account that damp wood creates a favorable microclimate for the development of mold colonies and the activity of various insects, which can seriously harm the health of apartment residents.
Pouring talcum powder into the seams between boards
- If the covering boards are thin and the joists underneath them are spaced too far apart, the boards can “play”, creating a squeak. In this case, ideally, the covering should be dismantled and reinforced with additional supports. However, if this is not yet possible, then to temporarily eliminate the squeak, you can use regular talc, which is sold in any pharmacy. Powder poured into the gaps will soften friction and eliminate unpleasant sounds.
Instead of talc, you can use graphite powder, as it also softens the mutual friction of two hard objects in the floor structure.
This option is suitable if the gaps between the boards are small, otherwise the talc simply will not stay in them. This technique will temporarily solve the squeaking problem, but in the future it is recommended to carry out a complete repair of the coating, possibly with replacement of parts.
- If the floors are fastened in only one place, then unwanted sounds can be removed using polyurethane foam with a slight expansion.
Filling cracks with polyurethane foam with slight expansion
Narrow gaps are slightly widened using a spatula, and the length of the repair area is limited by drilling small-diameter holes. The seam is then filled with foam. Its excess can be removed immediately with a damp cloth, or after hardening, the mass can be carefully cut off with a sharp knife.
Strengthening the plank flooring with an anchor bolt
- If the boards are securely held on the joists, but creaking is still created, then it is possible that the fixation of the joists to the base has weakened. In order to remove the load from the log, you can make additional support for the board using an anchor bolt.
A through hole is drilled in the board next to the joist. The hole at the top of the board widens to accommodate the bolt head, as it must be recessed into the wood. Through the same hole, a hammer drill drills a channel in the base (ceiling) to the diameter of the anchor.
Then the anchor is inserted and the fasteners are screwed in, which will attract the board to the base and joist. Another option is a through hole drilled through the board and joist into the base. In this case, the bolt will attract the entire structure, that is, both the board and the joist, to the concrete base.
Leveling with sheet materials: step-by-step instructions
Small differences in height up to 10 mm can be leveled using rigid sheet materials - plywood, gypsum board, chipboard, OSB. They are laid in 1 or 2 layers. The optimal thickness of the slabs is 16-18 mm for single-layer coatings and from 9 mm for double-layer ones.
The sheets are laid directly on the floor with an offset of 1/3-1/2 of the width and screwed to the base with self-tapping screws. The pattern is crosswise and along the perimeter, the step between the fasteners is 20-40 cm. It is advisable to treat the floorboards and slabs with antiseptics to prevent the development of mold and mildew.
For unevenness greater than 10 mm, other fastening methods are used. One of them is the installation of a raised floor with adjustable bolts. Hardware is screwed into the floor boards in increments of 20-30 cm. The top is set horizontally using a level and laces.
Logs are laid on this plane, sheets of thick plywood or OSB are placed on them, and the seams are filled with polyurethane foam.
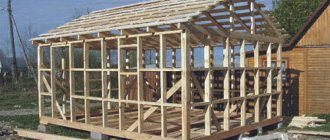
Determining the condition of the floor
To choose the right alignment method, you first need to accurately assess the extent of the damage. To do this, you need to walk over the entire surface, carefully examine every centimeter of the floor, remove 1-2 boards and inspect the joists. If rotten or bug-eaten areas are visible, serious repairs will be required, with replacement of damaged parts. If the logs and boards are in good condition, without cracks or rot, the floor does not bend or creak under load, and the only defects are peeling paint and a wavy surface, repair costs will be minimal.
Assessing the condition of the floor
One or more boards will have to be removed to assess the damage.
Small cracks or squeaks are also not a problem, since such defects are not difficult to eliminate. If the gaps between the boards are wider than 10 mm or there is a noticeable slope of the floor, the wooden surface will have to be covered with sheet material, such as chipboard.
How to level a wooden floor without tearing it down: do-it-yourself dry screed
When additional thermal insulation is needed, the best solution is to install a dry screed, or “floating floor”:
- Insulation is laid on old boards, and damper tape is placed along the walls.
- Rack beacons are installed.
- A layer of loose insulation (expanded clay, vermiculite, etc.) is poured.
- The backfill is leveled between the beacons.
- 1-2 layers of sheet materials are placed on top, which are fastened together with self-tapping screws with the joints in the rows offset by 1/3-1/2 the width.
Laminate, linoleum and other flooring can be laid over a “floating” screed. Its advantages are good sound insulation, which is ensured by the absence of contact between the floor and walls. Impact noise transmitted between structures is almost completely damped.
Installation of plywood on timber logs
A wooden floor with a large difference in height can be leveled with plywood only on block joists. For the manufacture of logs, bars up to 50x50 mm in size are allowed. To align the logs when installing them on a wooden floor, you can use “beacons”, for example, from screws - they are screwed into the wooden base of the floor to the required depth. To align the heads of the beacon screws on a horizontal plane, use a building level one to two meters long.
Wooden beams are attached to the wooden floor with screws, and the beams are installed parallel to each other at a distance of 60 cm from the adjacent one. The log beams are aligned with the heads of the beacon screws. Before installing sheet plywood, fill the space between the joists with mineral wool insulation, polystyrene foam or other material with high heat-insulating properties. The plywood sheets are fastened to the joists using screws: screw them in the center of the beams.
How to level a wooden floor in a private house by replacing joists
When floorboards and joists are warped, darkened, have deep cracks or signs of rot, it is impossible to correct their shortcomings using the methods proposed above. We will have to carry out complete dismantling and lay new flooring.
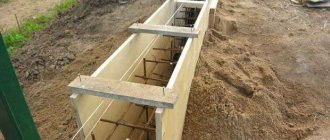
The procedure for installing the floor on joists:
- The first log is laid near the wall with an indentation of 20-30 mm. If installation is carried out on concrete, dense soundproofing pads and gaskets made of roofing felt or similar waterproofing material are used. Each beam must be treated with an antiseptic and dried.
- The logs are joined along the length of the ends tightly, without gaps. In adjacent rows, joints must be spaced at least 0.5 m apart.
- The step between the logs is 0.4-0.6 m. A sand mixture is used for horizontal leveling. It is not allowed to rest the joists on wooden spacers or wedges. Over time, they will dry out, which can cause the floor to warp.
- The tongue-and-groove boards are attached to joists installed strictly horizontally and connected with a tongue-and-groove lock. The outermost elements should retreat from the walls by 10-20 mm to compensate for temperature and humidity deformations.
- The boards are laid along the direction of the light rays falling from the window. This way the joints are less noticeable. In corridors, the days should lie along the movement of people, and the logs should lie across.
- Small irregularities can be eliminated by sharpening using a double or electric planer or a parquet planer.
A widened joist is installed in the doorways, protruding beyond the edges of the partition by 50 mm in both directions.
The joints of the boards must be placed on the joists. The planks are nailed with nails 2-2.5 times longer than the thickness of the coating. The moisture content of lumber is no more than 12%. A damp board is prone to warping and is not recommended for flooring.
Installation of plywood without the use of joists
If the floor is fairly level, the plywood is attached directly to the wood using screws. Leveling is done at the highest point of the floor, and in those places where the floor level becomes lower, pads are placed under the plywood. Plywood squares are laid in rows, the row closest to the wall should move slightly away from the wall, no more than 8 mm; it is easier to control the distance if a special strip of the required width is attached to the wall.
It is recommended to leave a gap between the rows of plywood squares, but it should not exceed three millimeters. In addition, each next row is installed with an offset relative to the previous one - at least 15 centimeters. The fastening screws must be completely recessed with their heads into the floor. To avoid damage to the plywood when attaching it to the floor, make markings - drill small holes in the plywood in the places where the screws are installed.
Leveling a wooden floor from below
If there is access to the space under the floor, you can try to raise the joists in places where there are deflections from the subfloor. This method is effective if the lumber is still strong and durable enough.
After the logs are fixed horizontally, additional columnar supports made of bricks or blocks are installed. The top of the posts is coated with mastic, and roofing felt waterproofing is laid on it in 2 layers.
Polyurethane foam
Bonding plywood or OSB boards with foam is a fairly common option for leveling the floor. But you need to know about some features of this installation method:
- firstly, the foam may crumble over time, voids will appear, and the floors will become deformed;
- secondly, the foam is attractive to rodents; they do not feed on polyurethane, but are happy to use it to make nests;
- thirdly, this is a sealing material that does not have sufficient strength; it is elastic and compressible, so the position of the slabs is unstable and they can sag under load.
It is rational to use polyurethane foam to seal joints between sheets, but not as the main leveling material.
Modular raised floor
Modular raised floors help to quickly level out any differences in floor level and implement non-standard planning solutions. They are expensive and in apartments they are used mainly for solving non-standard problems, for example, constructing podiums of considerable height or laying under the floor ducts of a ventilation and air conditioning system based on low-power units.
The main parts of the raised floor are supports, stringers and slabs. The most common slab size is 600 × 600 mm, and the height of the supports varies from 50 mm to 1.5 m.
The supports can be made of plastic (hard PVC, polyamide), steel or a combination of these materials. Floor elements are mainly made from high-density chipboard with a thickness of 38 mm. To prevent the emission of formaldehyde, they are lined with aluminum foil along the plane and with PVC tape along the edges. The cost of a set of parts starts from 2200 rubles. for 1 m2.
A more environmentally friendly solution is slabs made of reinforced gypsum (on company websites you can find the name “Calcium Sulfate”), reinforced with steel sheets, but they are twice as expensive as chipboard ones.
K&R Design
The length of the raised floor supports can be adjusted between 20–100 mm (depending on the system)
"Image Stroy"
As a rule, jumper stringers with elastic linings are placed on the supports.
"ProfileStar"
When installing podiums, the end part is covered with a special threshold profile
Schneider Unifl air
Slabs with vibration-damping coating are available for sale.
Schneider Unifl air
Also laminated in wood effect
When installing a raised floor, supports and slabs are installed simultaneously. The supports are glued to the base with high-strength polyurethane glue or secured with dowels. The position of each plate is controlled by a level. Modular raised floors create an insignificant load on the ceiling, are quickly installed and easily disassembled - this quality makes it easy to inspect and repair communications. Raised floors are combined with laminate and parquet boards; you can also purchase slabs with a finished coating.
When installing prefabricated foundations, noise cannot be avoided. Let us remind you: in residential buildings (except for new buildings) repair work can be carried out from 9:00 to 19:00, with a break from 13:00 to 15:00. Drilling is not allowed on Sundays and holidays.