- home
- Construction and renovation
- Floor
>
>
⬎
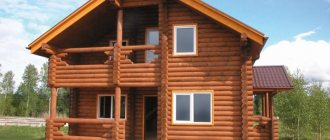
Often, people associate floors with joists with something old, creaky, rotting and obsolete. Of course, there are now many advanced technologies for floors that make it possible to insulate, waterproof and raise the floor level to a greater height, if the design requires it. However, one should not exclude good old logs - the solution is simple and, with high-quality installation, will eliminate the disadvantages typical of such floors.
Advantages of adjustable joists
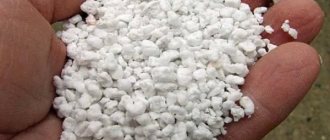
The most undeniable advantages of adjustable floors are the ability to raise the floor level to a greater height without increasing the overall weight of the structure and the speed of installation, in comparison with various screeds and self-leveling floors. The big advantage is that there are no wet processes and therefore no need for drying. Insulation of such floors also does not cause any problems - polystyrene foam, extruded polystyrene foam, mineral wool, all these materials are acceptable. In comparison with self-leveling, floating screeds, the insulation does not have high requirements for insulation density and it is possible to select a budget material.
When pouring screeds up to 5-10 centimeters thick, the advantages of lags are not relevant, however, situations often arise when the floor level needs to be raised by 15 centimeters or more. Such heights may be required when there is a large difference in floor slabs, during partial renovation of an apartment, where it is necessary to join the old floor on joists.
Of course, there are screeds with the addition of expanded clay, various floating screeds that allow you to raise the floor level and at the same time insulate. As a rule, the cost of materials and work increases, and if a 5-centimeter screed is 1.5-2 times cheaper than an adjustable floor, then with layers of more than 10 centimeters, the cost of the lag remains the same, which cannot be said about wet screeds.
Flaws
The disadvantages of flooring with joists include the risk that the floor will creak; in an aggressive, humid environment, wood is not so durable. The issue of squeaking is practically reduced to zero when choosing high-quality, dried logs and the correct fasteners. Many people are confused by the possibility of laying tiles on such floors - this problem can be solved, the joists are installed in sufficient quantities to eliminate significant deflections in the canvas, and gypsum fiber is laid over the canvas. Gypsum fiber serves as a damper; even with large fluctuations in the size of the canvas due to changes in humidity, gypsum fiber is quite stable and does not provoke the tile to snap.
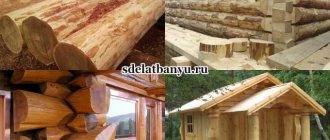
The material of the canvas laid on the joists is quite diverse: from the most budget chipboard to two-layer plywood. Planed boards, lining and OSB - you see, a very wide choice for flooring with joists.
How to calculate size and section
The reliability of the structure during operation also depends on the correctness of the calculations performed. The thickness of the timber is determined by calculation.
A gap of 2-3 cm should be left between the wall and the end of the wood end; this is necessary to avoid the formation of possible deformations due to fluctuations in temperature and humidity conditions.
To determine which timber to use to cover 5 meters, some calculations should be made.
The thickness is directly proportional to the material used and the characteristics of the floor. The calculations take into account the maximum load and the step between supports. For residential premises, this figure is 300 kg/m2, that is, 300 kg per square meter must withstand the floor covering. There are ready-made calculation data, according to which the length of the span and the cross-section that should be purchased for the work are established.
| Distance between walls (length of product required for laying) in meters | Cross-sectional dimensions, in millimeters |
| 6 | 220x180 |
| 5 | 200x150 |
| 4 | 180x100 |
| 3 | 150x80 |
| 2 | 110x60 |
It is worth noting that the building material is made in a rectangular shape, and during installation it is placed on the edge, that is, with a smaller cross-sectional size on the foundation. Thus, rigidity and reliability during operation are achieved.
The thickness size can be selected and a larger cross-section; this is necessary when planning the laying of the insulation layer. Logs for flooring are selected based on the size of the timber and other characterizing parameters.
Anchors, fasteners
To attach the logs to the concrete base, it is the anchors that are needed; plastic dowels are not able to cope with the loads to which the logs are subjected. The so-called plastic bushings, which are screwed into the joist and attached to the concrete, are very inconvenient to install; they can only be purchased from those who professionally install floors. Naturally very expensive. In addition, they have questionable reliability; the bushing is attached to the concrete base with a dowel-nail.
The most reliable fasteners can be assembled yourself, despite the cunning marketing of “wet flooring” and then naturally dried bars; they have a bent shape. You can use them, but you should carefully choose those that are smoother. Let me note that the logs do not have to be planed and smooth, preferably straight and not “screwed”. You should also avoid knots; if the hole with the anchor hits a knot, the joist will significantly lose its strength.
Prepared logs can be treated with an antifungal compound; this will not interfere in potentially damp areas.
Innovative way
Patented technology using plastic threaded bushings and dowels. The sequence of work is as follows:
We invite you to familiarize yourself with a DIY sawdust filling bath
A similar technology is used for laying plywood without boards. The base structure is carried out as follows:
Further actions are similar to the previous technology. The manufacturer offers a video that can be viewed at the end of the article.
How to cover logs
Materials can be varied, from rough to finishing. For subsequent finishing, you can lay a regular edged board - this option is more suitable for a private home. Sheet materials are suitable for both private and apartment buildings. It can be plywood, chipboard, OSB. All these materials are considered rough, with subsequent installation of linoleum, laminate and parquet boards. With additional gypsum fiber flooring, tiles are laid.
The finishing coating includes floorboards and lining. Their further finishing consists of sanding and painting (although it is often useful to do this before installation).
As a sheet material, I would like to mention plywood - it is strong, durable and tolerates moisture well. Due to the different orientations of the veneer layers, plywood is less susceptible to variations in size. There is, however, one unpleasant drawback: in most cases, the thickness of the sheets may differ slightly by 1-2 mm, and the difference may be present at different ends of the same sheet. Because of this difference, for linoleum flooring, for example, you will have to putty the seams. However, despite this, plywood is considered the best material for adjustable floors - 10 mm plywood in two layers is the most durable solution. Plywood no thinner than 18 mm is placed in one layer.
Conclusion
The process of installing an adjustable floor itself, as you understand, is not particularly difficult; all the work may be familiar to many. Your biggest concern should be the quality of the building materials used in this process. You should not save on this, as you will have to invest in repairs in the future.
In the video presented in this article you will find additional information on this topic.
In our online store you can buy SVP tile leveling systems at the best prices in the Russian Federation! All you need to do is just write in the feedback form, or call the phone numbers listed on the website! After this, our polite managers will definitely contact you and answer your questions! In general, you will definitely like our products, and the final tile installation will give you only positive impressions! We look forward to collaborating! See you in touch!
Preparing the base
A concrete base is required to securely fasten the anchors. Typically, in commercials, fasteners for joists are installed in a perfectly leveled cement-sand screed (CSS). But the reality is that for real work leveling the base is not required, moreover, usually the screed does not have sufficient strength to reliably hold the anchor. If in your case the installation will be carried out for some reason on the central fiber substation, then you should drill down to the concrete. Or check the strength of your tie by tightening a test anchor. But I still recommend attaching it to concrete.
Preparation consists of cleaning, foaming and caulking various cracks to avoid drafts. You should also mark the location of future logs; this is done on the walls, where the middle of the log will be. When marking, you should take into account the centimeter gaps of the sheets from the walls so that the seams clearly fall in the middle of the joist. The easiest way to mark is this: first, mark the logs on which the sheet joints will be, and only then distribute the remaining logs between the seams so that the distance between them does not exceed 30-40 cm.
I would like to note: usually all the lags are made parallel; at seams perpendicular to the lags, additional lags are not required for connecting sheets; more on this later. Of course, the logs can be set as you like, they can be longitudinal or transverse, the point is that there is no need to make extra crosshairs.
What are they?
The anchor bolt, which is used to adjust and compensate for shrinkage, does not have a very diverse design. Hardware can be standard or atypical, made to order. Basic options do not exceed 150 mm in length and have a size range from M20 to M30. All atypical diameters and dimensional characteristics of materials are most often made to order.
By type of design, adjusting anchors are most often driven-in. They involve the use of a brass stainless sleeve installed in a pre-prepared hole.
Installation of logs
From my own experience, I was convinced that it is more convenient to drill holes for bolts and countersunk nuts in place. If you make holes with countersunk holes in advance, you eliminate the possibility of moving the fastener; this may be necessary when the fastener hits a weak spot in the concrete, a covered void, etc. This is my personal opinion; it is certainly possible to drill holes in the joists in advance. I will describe my method, and it’s up to you to decide which is more convenient and practical. This method is not relevant with ready-made fasteners purchased in online stores - there you need to tighten the lowest nut to fix the anchor.
The joist is laid in the marked place, a hammer drill is used, and a hole is drilled directly through the joist in the concrete base. Having drilled, the anchor is immediately inserted without washers and nuts. This will prevent the jog from moving during further drilling. I would like to note that in panel and monolithic houses, in most cases, the thickness of the ceiling is no more than 10 centimeters, so drilling more than 5 cm is highly undesirable, be careful!
Having drilled, you need to clean the hole with the same hammer drill in drilling mode so that all the crumbs come out. In this way, all the joists are drilled and the bolts are tightened in the anchors. The fasteners are securely fixed in the concrete, but the logs have free movement up and down.
After tightening the anchors, the bolt heads are cut off and the joists are pulled off. Screw one nut onto each protruding stud and put one washer on. It is not easy to screw a nut onto a sawn bolt, so it is useful to have a small file on hand; trimming the sawn edges will make it easier to screw on the nut. Next, holes for the upper nuts are drilled into the joists, they are put back into place, the position of the joists is adjusted using the lower nuts, and they are tightened from above with a second nut and washer. It is most convenient to adjust the lag using a laser level. A tubular wrench is convenient for tightening the upper nuts, and an open-end wrench for adjusting the lower nuts.
After all the adjustments, the studs sticking out above the joist are cut off. The installation of the logs is complete. If insulation was planned, the insulation is laid and foamed. Excess foam is cut off and the floor is ready for laying.
Peculiarities
An adjustable anchor is a metal product that has a prefabricated structure. It contains a supporting and mating part, a threaded sleeve and fasteners screwed into it. To compensate for shrinkage, simply change the height adjustment anchor, increasing or decreasing it. The supporting parts of the plates have holes in their design, with the help of which they are attached to the surface of wooden structures. Sometimes the response platform contains guide tubular elements.
The basic rule for choosing an adjusting anchor is this: its supporting pads must be sized to match the cross-section of the log or beam that they are to hold. The operating principle of the shrinkage compensator is quite simple. It is installed strictly in those areas that were planned during the design, under a pillar or support beam, with the counter element being attached to the floor joists, roof structure, or other load-bearing element of the building or structure.
This type of hardware is manufactured from alloy or carbon steel. Hot zinc coating is used to protect against corrosion. The stud and nut have a standard design with a fairly wide thread pitch. When moving the locking element, it is possible to reduce the gap between the plates.
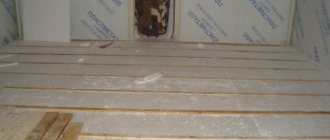
Flooring
The most important thing in flooring is to align the sheets so that the seams fall in the middle of the joists. It may happen that the seams will be significantly displaced, if the sheet does not fit onto the joist by at least a centimeter, you will have to change the layout of the sheets or make additional seams; twisting the joist is much more problematic. The seams running across the logs are pulled together from below with a bar or the same sheet material. It is important to leave a 5-15 mm gap from the walls, the canvas will have room to expand if something happens, this will in some cases avoid the floor creaking.
When laying plywood, an unpleasant phenomenon may occur: the screws may not fit into the canvas and burst, the result is not a tight fit and a squeak may appear in this place. In the place of the broken screw, you need to tighten a new one, stepping back a few centimeters. If the screws break too often, there are two options: take thicker screws instead of 3mm, for example 6mm, or before tightening, make a countersink with a drill slightly larger than the diameter of the head.
That's all, I hope I gave comprehensive information.