A weather vane is a special device used to measure the strength and direction of the wind. It has long migrated from meteorological laboratories, where more precise electronic instruments appeared, to the roofs of houses, becoming a successful and useful element of decor. Windmills in the shape of exotic animals or birds with moving parts driven by a light breeze look elegant and always attract attention. It is easier to buy complex forged products or order them from an experienced craftsman, and we will tell you how, with a creative approach and a plastic bottle, you can make a weather vane with a propeller with your own hands.
Variety of weather vanes
The production of weather vanes attracted many craftsmen. They were made forged and carved, wooden and steel. Artists came up with plot pictures with moving figures. In the old days, people were so keen on this activity that almost every building had this decoration. The types of weather vanes still impress connoisseurs to this day. During Soviet times, the production of such products died down a bit, but now the tradition is being revived.
Nowadays, the quality and variety of materials is very great. They are made by professional craftsmen and ordinary people. Knowing how to make a weather vane, even a child can perform this operation. Children already in kindergarten make simple windmills out of paper. But schoolchildren or parents with their children can make a weather vane from plastic bottles.
Weather vane "Yula"
To make a weather vane with your own hands from a plastic bottle, you need to have a 2-liter empty bottle, or you can take a colored one. Cut it in half. You need to punch a hole in the center of the round bottom and turn it several times with a heated metal rod. The temperature will melt the plastic, and the hole will have a nice, smooth edge. This is necessary so that the weather vane rotates freely around its axis.
The next step is to cut the fringe to the same length on the bottom and top half. Leave 5 cm to the edges. After this, the strips need to be smoothed towards the base so that you get a flower. Next comes the process of gluing them together. In order to get a three-dimensional weather vane, when gluing one of the strips needs to be turned over and moved by one. As a result, we have the shape of a Christmas tree lantern.
You can decorate the stripes with a pattern. To do this, horizontal lines or circles are drawn. All that remains is to put the bottle on a stick and hammer a nail through the cap. Hammer it loosely so that the bottle rotates freely.
Work order
Let's take the figure of a cat as an example.
First of all, the outline of the future weather vane is displayed on the surface of the metal sheet. Before you start cutting out the shape, you need to secure the sheet well to eliminate the possibility of it moving during work. To do this, it is better to use metalwork clamps, through which the material is securely fixed on the workbench.
You can get rid of the formed burrs after cutting with a grinder and a grinding wheel. To process hard-to-reach areas, it is better to use a thin, wide file.
Securely fix the metal product on the workbench, then drill small holes in it for the mustache, eyes and nose. You can use drills 12-15 millimeters in diameter.
You can achieve the characteristic oval shape for a cat's eyes using a needle file or a semicircular file. With their help, the holes made are gradually expanded to the desired size.
Steel wire with a diameter of 3 millimeters must be cut into pieces of 100-120 millimeters. Next, a 10-20 mm indentation is made, after which it is necessary to make an L-shaped bend. As a result of these actions, we will obtain blanks for the weather vane.
To make the nose, a 20-mm round rolled metal will be useful. Next, using an angle grinder, the edges of the rod are rounded.
To replicate the features and shape of a cat's nose as closely as possible, you need to use a chisel. To do this, appropriate marks are made on the workpiece.
Read also: How to illuminate the work area in the kitchen
The next step is to cut out the prepared fragment of the required size.
It is necessary to install the nose using a welding machine: a mustache is inserted into the holes made in front, which are then welded on the back side.
After completing the welding work, do not forget to use a grinder to sand the seams. As a result, you should get the most smooth and even surface possible.
The work is carried out in the same order if you are planning to create a weather vane in the shape of a rooster with your own hands.
The next step is to move on to making an arrow, which will indicate the direction of the wind. Contours are drawn on the surface of the workpiece, according to which a figure is then cut out using a jigsaw.
The base of the boom can be a pair of square rods 15 by 15 millimeters. Moreover, one element is welded to the tip part, and the second - to the tail. After welding, the surface is carefully cleaned.
To make a rotating unit, it is necessary to drill holes with a diameter of 13 mm in the steel ball and the cover of the future weather vane. After this, the lid is welded to a 5-centimeter pipe.
Flats are created on both sides of the steel truss - this is the name given to small recesses designed for a more secure fit of the ends of the arrow. Next, a rod with a spherical component is attached to the base of the turning unit, after which the attachment point is processed by welding.
As soon as the ball and arrow are fixed together, you can proceed to fastening the product. To fix a weather vane with a spherical part, a semicircular cutout is made at the base of the workpiece. Obviously, this area is welded at the end.
During the welding process, metal splashes should be avoided on the surface of the figure. To do this, the element should be covered with a sheet of tin.
When doing the work yourself, it is very important to accurately compare all the elements of the future weather vane with each other, and the angle between the rotating mechanism and the arrow itself must be 90 degrees. Reliability of installation of the figure is ensured thanks to the fastening areas, where the hind legs must be welded to the base of the pointer, and the front legs directly to the steel sphere
Reliability of installation of the figure is ensured thanks to the fastening areas where the hind legs must be welded to the base of the pointer, and the front legs directly to the steel sphere.
For support you need to use a piece of round rod, thanks to this the weather vane can rotate freely under the force of the wind.
Make sure that the support rod fits exactly into the pipe, after which you can weld the edges of the elements.
Next, the ball necessary for the free rotation of the cat figure should be lubricated with any viscous mixture, after which all that remains is to insert it into a wide pipe. At the end there is a brass or copper pipe.
Upon completion of the weather vane assembly, the element is painted and decorated, if necessary, and then placed on the roof of the house.
Two-tier weather vane
In order to make a homemade weather vane from 2 tiers, you need to have a very sharp blade or a stationery knife. Take a two-liter plastic bottle, mark with a felt-tip pen 2 parallel stripes at the top and 2 stripes at the bottom. The distance between the strips is different, for example, between the upper strips - 5 cm, and between the lower ones - 10 cm. Then the most labor-intensive process begins. You need to measure the perimeter of the bottle with a round meter, divide it into equal parts, and put points at the top and bottom. Between the stripes, using a pattern, draw semicircles, connecting opposite points.
Do the same with the bottom two stripes. All that remains is to cut correctly along the marked semicircles. However, this will be difficult to do with an empty bottle, so it is better to fill it with something dense, such as sand. The resulting arcs will need to be smoothed, bent in the opposite direction. Then, if you wish, you can paint the upper arcs one color, the lower ones another, and seal the strip between them with colored tape. Then the procedure is completely repeated, as in the first weather vane. You need to punch a hole in the bottom of the bottle and thread a string through the hole, hanging it on a branch.
"Ferris wheel"
At every summer cottage there is an old children's bicycle, from which the child has long outgrown. Let's use it to make a weather vane with our own hands from a plastic bottle. Although you will need several bottles, preferably an even number. For an aesthetic appearance, you can take bottles of different sizes and colors. For example, large bottles will be yellow and small bottles will be green. Next, let's start marking the wheel.
To do this, you need to draw a drawing of a weather vane with dimensions. First, trace the wheel on a piece of old wallpaper. Mark the center on the resulting circle and divide it into equal sectors so that there is an even number of radii. Place dots at the junction with the circle. After marking, we transfer everything to the wheel. Next, we drill holes in a circle, insert a bolt into each and screw on the bottle cap so that the thread is on the outside of the wheel.
The next step will be preparing the bottles. Small ones are screwed directly onto the wheel through one cover, and from large ones, part of the side wall is cut off. The result is a blade that will repel air when the weather vane rotates. Then we also screw them into the remaining places. The blades should point in the same direction.
All that remains is to make a holder for the wheel. Here you can use a wooden block, onto which a bicycle wheel is attached on top with a long bolt.
Purpose and principle of operation
The compact flag rotates around an axis due to gusts of air. The design simultaneously plays a practical and decorative role. Previously, the device was used to measure wind force, then it became an original roof decoration.
What is a weather vane
A weather vane is a simple meteorological instrument that, under the influence of air, rotates in the direction of less resistance. The design clearly shows the strength and direction of the wind. The device protects the chimney from gusts and prevents smog from returning to the home.
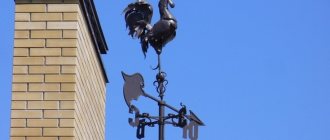
Design with a dogSource orgpage.ru
Traditionally, weather vanes were installed on the roofs of houses in Europe. A memorable detail was rarely repeated, so each home became original. The elements visually emphasized the type of activity of the property owners or had a protective function.
Components
The design of the weather vane consists of mandatory parts. A flag is a memorable, decorative part of the device, which is placed on a vertical axis. To balance the weather vane, a counterweight is needed on the opposite side. The elements have the same mass, so they stand level when installed.
The body is used as a support for the weather vane. The vertical axis of the structure is installed in the frame. The supporting rod (mast) holds the weight of the decorative part and does not break in strong winds. Bearings (balls, cylinders) inside the device ensure free rotation.
What does a windmill consist ofSource build-experts.ru
The protective cap is made in the shape of a cone or sphere and is placed above the frame. The task of the element is to protect the housing and moving parts from moisture and debris. To fix the device on the roof, use the following fasteners:
- corners;
- overlays;
- bottles;
- nuts
The wind rose is an indicator of the cardinal directions, which is attached under the flag. The part consists of two even rods connected at right angles. Rumbas with letter symbols are mounted on the 4 ends. The wind speed will be determined by a propeller made from plates. Modern devices additionally install electronic sensors (encoders).
Types of structures
The choice of weather vane design depends on the role that the device will play. Functionality is divided into 6 types:
- Anemorummeters. Meteorological models measure wind speed and direction. Professional devices have power supplies and sensors that convert air characteristics into signals. They record accurate readings and transmit the data to the equipment via cable.
- Wild weather vanes. Mechanical structures for measuring wind direction and strength at home. Additionally they have a decorative function.
- Chimneys. Mounted above the hole, blocking access to the wind. By rotating the device, they prevent backdraft in the pipe and protect the room from the penetration of combustion products.
- Scarecrow. Weather vanes make unpleasant sounds that scare away birds from nesting in pipes or landing on the site.
- From rodents. Devices with a propeller are mounted in the ground on a support. The rotating fan blades create vibrations that are transmitted into the soil and drive away mice, shrews and moles.
- Power plants. During operation, wind vanes generate electricity.
Professional anemorum meterSource ru.lifehackk.com
The devices are installed on the canopy of the house, on the roof of the veranda or gazebo. Often designs combine 2-3 functions, saving space on the roof. Bird repellent options are mounted on a pipe or trees. It is recommended to place several devices against rodents in different places of the site (along the perimeter, in the center).
Model for a pipe holeSource odymohodah.ru
Weather vane-scarecrow from birdsSource m-dachnik.com
Horizontal spinner
One of the fastest ways to make a weather vane with your own hands from a plastic bottle is to make a horizontal pinwheel. To do this, you need to take an empty 1.0- or 1.5-liter bottle, preferably a colored one. On top, at the beginning of a flat surface, mark a strip of equal width. The distance between them should also be the same. We cut along the resulting lines to the end of the flat part of the bottle, to the bottom rim.
Next, we make cuts in the strips from below, one at a time. We leave one strip in place, and the next one needs to be cut from the bottom and folded in the opposite direction. It is better to round the edge of the strip. Next, we make a hole in the lid for the metal rod. We insert one part of it into a wooden block, and the other into the bottle through the cap. We decorate the blades as desired.
Making a cone and blades for a fan with your own hands
A fan is not considered a complex electrical device. Its design includes a motor, a cone-stand, blades and buttons for adjusting the frequency of operation. Sometimes the homemade fan circuit includes a backlight and a clock.
The article will further tell the reader how to make a cone and blades for a fan with your own hands.
Example of a fan with homemade blades
Several suitable materials
There are several options for suitable materials for creating fan blades and cones:
- Plastic base. It is a favorite material for designers to create devices like fans. Plastic blades are made from the top of the bottle, which is located closer to the neck. The entire part is cut off right down to the cork. In addition, a cone and a base for a fan are made from a plastic bottle. The second piece is usually constructed from the bottom of a plastic bottle. Sometimes additional parts are required: drinking straws or cardboard.
Plastic blades for fan
Cooler as an integral part of the cone and blades for the fan
An example of creating blades from a disk
Step-by-step instruction
For each material listed previously, there are instructions for creating blades and a cone for a fan.
Made of plastic
Let's consider the algorithm of actions with a plastic bottle:
- One part of the plastic bottle with a cap will be the blades. Therefore, the base is cut in such a way that several petals are formed. The petals come off one by one.
- To give the blades their shape, you need to twist them. A candle, matches or lighter will help with this. The main thing is to carefully monitor the process, since soft plastic is susceptible to fire. It is better to keep the lighter at a maximum distance just to heat up the plastic.
Section of the first part of a plastic bottle
From the cooler
Next, consider the instructions for using the cooler:
- To turn the cooler into a ventilation device with a propeller, first the wires are prepared, and then the connecting structure. When placing the device near a computer unit, an ordinary USB cable will be useful. The connecting wire is cut and stripped of insulation. A similar operation is carried out with the cooler wiring. During the propeller assembly process, you will need a red and black wire. The first is responsible for the plus, the second for the minus. But if there are other colors in the wires of the cooler and USB cable, they can be cut off and removed. This is done to avoid confusion.
Installing the cooler on a plastic base
- Let's move on to the procedure for joining materials. First, the wires and cooler are cleaned of dust and other debris. It is better to twist the cords tightly together. Don't mix colors. An incorrect design will lead to difficulties in the process of designing parts for the fan. Twisting requires 1 cm. If necessary, most wires are cleaned and insulated later.
Wires and cooler
Final layout of parts for the fan
When the minus falls to the plus, a dangerous situation is created. Do not allow the black and red wires to touch while connecting the electrical circuit. In this case, not only the USB cable burns out, but also the components of the computer system.
Typically, a computer is not afraid of such situations if it has special protection against voltage surges built into it. The problem is much more complicated with sockets. During surges, the socket short-circuits and the entire wiring is disrupted. Therefore, care should be taken to insulate the exposed part of the wires in order to avoid complications and unusual situations.
To create a full-fledged fan of significant dimensions, you will need several unnecessary coolers. Otherwise, the device will fall due to oscillations and vibrations. This situation cannot be allowed for the following reasons:
- If dropped, the device may bounce directly into your face. But such a device will not cause deep cuts.
- If the made device falls on a flat surface, the blades will simply break. The fragments will fly to different places. A dangerous part can also bounce into the eye.
- Other dangerous unforeseen circumstances.
From disk
You can't make a cone out of a disk. But this material is useful for creating blades. Let's look at the detailed instructions for creating parts:
- Since a fan with disc blades does not use a cooler, you need to buy or find a special motor. He sets the structure in motion. But it is actually possible to use the engine from the system cooler for cooling. It is necessary to select a motor that moves with a certain part - protruding iron or plastic rods. But the disk will make a much better and stronger propeller. Parts from an old VCR and player are taken as a motor. These materials are good because the devices are based on the process of spinning disks and cassettes. You cannot use a motor from a washing machine or a broken fan. Such devices spin the propeller strongly. When you assemble a product yourself with low-quality tools, the structure turns out to be flimsy. Therefore, a motor with a suitable rotation speed is first selected. If the motor is spinning at high speed, it is likely that the disc base of the blades will break apart and scatter across the room. The running motor is connected with wires in the same way as described earlier.
Example of disk layout
Final disk fan with 2 bushings
Which materials are definitely not suitable?
The following materials are absolutely not suitable for constructing fan blades and cones:
- Paper is the most unsuitable material for creating a fan at home. The reason is simple - paper is very impractical due to its properties. It immediately gets wet if drops of water get on it. Even high humidity in the room can damage a paper device. However, some inventors make such devices for decorative purposes. Of course, such a fan will work from the wind. For a more durable paper device, you will need cardboard from boxes.
Decorative paper fan
Making a homemade fan at home is not a difficult task. All you need to do is purchase the necessary material and follow the instructions in this article.
The simplest weather vane
This option will show how to make a weather vane simply and quickly when there is absolutely no time for it, and the child urgently needs it. We take a plastic bottle, preferably a two-liter one, and make cuts in the form of a square bracket.
Bend the resulting rectangles to the side until a right angle is formed. All that remains is to make a hole in the bottom and insert a thin rod. The product is ready. At the same time, since the baby has already made you work hard, then you, in turn, give him the task of beautifully decorating the weather vane.
Roof wind deflector: design and principle of operation
Although today the weather vane is most often used as an element of decor in country houses, it is too early to write it off from the pages of history. Even in our digital age, mechanical windsocks regularly perform their service at small weather stations, in ports and at airfields. Depending on the purpose, several types of weather vanes can be distinguished:
- meteorological wind direction indicators, which are made of forged metal and are characterized by high mobility, which, in turn, has a positive effect on the accuracy of the readings;
A modern weather vane is not a simple mechanical device, but a complex electronic device
- instruments combined with a device for determining wind speed, which are called Wilde weather vanes after the name of the creator;
The rotating plate of the Vilde weather vane shows how strong the wind is blowing
- chimney - with a body that additionally plays the role of a chimney cap;
In addition to its main purpose, a weather vane installed on the chimney will protect the chimney from precipitation and debris
- decorative - serve mainly for decoration, so their flag and indicator are made in the form of figures of birds, animals, fairy-tale characters, etc.
Used as a decoration, a decorative weather vane will indicate the direction of the wind no worse than a real meteorological instrument
No matter how simple the design of the weather vane may seem, a reliable and durable wind direction can only be obtained if it contains the following parts and components:
- The vertical axis on which the flag and counterweight are mounted. The axis can rotate freely 360° thanks to a sliding or rolling unit.
- A housing that is attached to the chimney or mounted on the roof. Being the base of the structure, the housing serves as a holder for the moving axis.
- Bearing. This unit is fixed in the housing and ensures ease of rotation of the windsock axis. The design may use one or more ball bearings, as well as sliding units consisting of low-friction bushings.
- Protective cap. It is installed on a vertical axis and prevents precipitation from penetrating into the windsock housing.
- Reference angles or bearings. They are two rods crossed at an angle of 90° with printed letters indicating the cardinal directions (North-South and East-West pairs). The rhumbs are rigidly fixed to the body and during installation of the weather vane they are oriented along the compass.
- Arrow (pointer) - attached to the axis at an angle of 90° and serves as an indicator of the wind direction.
- The flag is a blade mounted on one side of the boom. In fact, the entire decorative potential of the weather vane lies in the large surface area of this element.
- Counterweight. It is attached to the other end of the pointer and serves as a balancing device that balances the boom.
The design of the weather vane is so simple that it can be easily recreated at home.
Just one glance at the weather vane diagram is enough to understand how it works. Due to the high windage of the flag, the pointer rotates even from a small movement of air masses. The blade will rotate until it is parallel to the wind - in this position the resistance area will be minimal. In this case, the arrow will be directed in the direction from which the wind is blowing, and the flag will accurately indicate the place where the air masses are moving.
Plastic scarecrow
Sometimes gardeners and summer residents, in order to preserve fruits on trees, use weather vanes that spin in the wind and scare away birds. The last version of the weather vane needs to be placed on a pole in the middle of the garden, and your harvest will be saved. To do this, take two identical 1.5-liter bottles and cut off the bottom of them. Next we glue them together. You can use hot glue with a gun, or you can wrap it several times with transparent tape. It turns out to be a long cylinder.
Next you will need six bottoms from small plastic bottles of the same size. We also take hot glue and glue 3 bottoms to the side surface, at an equal distance around the top of the cylinder. We do the same from below. The open part of the bottom should face in one direction. All that remains is to take paints or multi-colored self-adhesive tape and draw the facial features of our scarecrow. Next, we make holes in the lids and put the structure on a long metal rod.
As you can see, making a weather vane with your own hands from a plastic bottle is not a difficult task. You can come up with your own options.
How to make a bird repeller for berries?
It is necessary to make a stuffed animal from two round pieces of foam, glue on huge bright eyes, make wings as in the diagram, and hang it on a high pole above fruit trees and bushes. It will sway in the wind and float, but no one will touch your berries. You can make several of them.
Interesting materials:
What happens if you get a new tattoo wet? What happens if you pour sugar into the engine? What happens if you don’t show up to the employment center? What happens if you don't join the army until you're 27? What happens if you don't take out mortgage insurance? What happens if you don’t pay the fine from the cameras? What happens if you don't wash the meat? What happens if you don't repay the loan? What happens if you don’t sign an employment contract? What happens if you don’t close your sick leave in 2022?