Therefore, the elements can be manufactured in self-made devices. Let's figure out how to do this correctly so that neither the dimensions of the products nor their performance indicators are affected?
What are blanks?
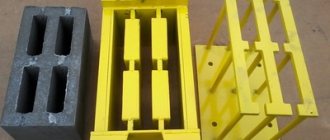
Since cinder block material varies in size and appearance , there is no single template from which standard products can be produced. Therefore, in the production of slag concrete, special collapsible containers are used, consisting of 4 walls, a bottom (in some types of blanks a bottom is not provided) and matrices (one or several replaceable ones, depending on the size and size).
The number of matrices depends on the volume of products that need to be produced in 1 day. Matrices can be made of wood or metal.
Types of designs
Blanks for the production of cinder blocks are divided according to the material from which they are made and the number of voids in the future product. For the first category, you can write the following. They are:
- Plastic.
- Wooden.
- Metal.
Plastic
Plastic blanks for cinder block products on an industrial scale are not particularly popular. They will not be able to withstand constant pouring over a long period of time . This greatly limits their scope of application. Therefore, only a few manufacturers produce for sale plastic containers for pouring slag concrete.
The plastic structure comes in only one size – 390x190x188 mm.
But the advantage of such structures is that they are light in weight and easy to operate , because the walls of the workpiece do not need to be lubricated each time with used machine oil or a special self-destructive lubricant. In addition, their price is much cheaper than the same products made of metal or wood.
Wooden
Wooden structures are a rectangular box made of laminated plywood. They can be used both in production for the manufacture of large volumes of products, and for home production of cinder blocks.
To give the walls greater rigidity, clamps are used that tighten all 4 walls . And so that the cinder block solution does not destroy the structure from the inside, the bottom and walls are covered with polyethylene.
The advantages of containers made of wood are their average, affordable price (lower than those made of metal), light weight, making the workpieces easy to move around the site and lift, as well as the number of fills - on average 50 times.
But there is also a minus - the material is sensitive to moisture , so pouring the solution into wooden forms should only be done in the fresh air, in dry weather, and the filled forms should be stored in a well-ventilated, not damp area.
Metal
Metal forms come with or without a bottom. And the presence of a bottom divides metal products into solid and collapsible. If there is no bottom in the mold, then the walls of the product do not have sufficient rigidity, so in industrial production they mainly use blanks with a bottom 6 mm thick.
The bottom can be further strengthened with channels, and special metal inserts can also be used, which will allow the production of cinder blocks with a tongue-and-groove system (for partition slabs).
The most popular metal forms are made into 35, 63 or 70 blocks of standard sizes 390x190x188 mm .
Production of cinder blocks
In order to save material, it is recommended to use molds for the production of four to six blocks at once. To create cavities, they must be equipped with cylinders .
Step-by-step process for making blocks in split form:
- The solution is mixed using a concrete mixer.
- The mixture is poured into the mold with a shovel. In this case, the matrix must stand on a flat surface.
- The container should be filled evenly with the solution. This needs to be monitored closely.
- After the mold is filled to the brim, the top layer is leveled with a shovel.
- For dry mortar, a special lid with holes is used that will cover the existing bayonets in the matrix.
- The building block, together with the container, is moved to an open area, where it will be stored in the future.
- After about half an hour or a little more, the bottom, side walls and lid are removed. To make it easier to remove the cinder block, you can use a regular hammer to knock out the longitudinal strip with the cylinders and the walls.
about three days for the building blocks to dry completely .
Is it possible to make it yourself?
For a large volume of cinder block production, you need not to have homemade equipment and blank molds, but high-quality devices that would create the ideal geometry of the products.
But in order to make blocks only for private, small-scale construction, it is not necessary to buy expensive tools and equipment . You can make molds for cinder concrete with your own hands, simply using available materials.
Even if you don’t have the material at home from which you can make molds, you can ask your neighbors, family and friends. Surely, in the bins of their garage, shed or attic there are several pieces of sheets of steel, metal, iron, wood, and boards. A little active search and perseverance - and materials for blanks will be found.
To build your own molds you will need:
- material for the walls of the mold (metal, iron, wood, plastic);
- self-tapping screws, bolts, nuts - for twisting elements together;
- grinder, metal scissors, hacksaw - for cutting the material into the required pieces according to size (depending on what material will be chosen);
- vices and clamps - for connecting the sides of the form and giving them rigidity;
- welding machine;
- a sheet of metal or steel to create the bottom (approximately 3-6 mm thick);
- a pipe with a diameter of about 9 cm or wine or champagne bottles - to create voids in the future block;
- fittings with a diameter of 12 mm.
Causes of destruction
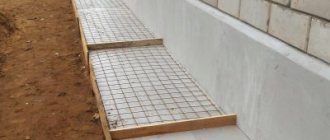
Sketch of the correct design of the structure
Often we can see destroyed fences that seemed to have such a strong structure. The whole trouble most often begins with the supporting elements. The supporting part of the fence can collapse for several reasons:
- non-compliance with installation rules, for example, small depth;
- the design of the support element pit does not correspond to the characteristics of the soil;
- the use of low-quality material in the manufacture of a product or in the construction of a foundation.
All such shortcomings will reveal themselves after the first wintering of the structure, so you shouldn’t take risks. It is better to consult with specialists, play it safe several times, than later be disappointed in the fencing structure and regret the money wasted.
Well, if all the work was done efficiently, in compliance with all standards and rules, then such a fencing structure will last for decades, especially if it is provided with decent care.
Instructions for creating homemade containers
Containers for homemade molds can be of different sizes, both standard and non-standard. It all depends on the wishes of the owner and his preferences.
Please note : the larger the blocks, the less mortar will be needed to lay them and the fewer cold bridges there will be through the seams between the products.
Large blocks in size are convenient and practical, but it is better not to make forms over 2 m in length or width , because such formwork will be bulky and difficult to transport and lift. It is better to make several formworks, but smaller ones.
To make your own mold, you need to:
- First, decide on the dimensions of the future workpiece, and then cut out the building material according to these dimensions (4 walls, bottom and, if necessary, partitions).
- Set the height of the elements and cut the walls to this height.
- The walls of the formwork must be mounted in such a way that the transverse parts are inserted into the longitudinal ones and thereby form cells of the same size.
- Form the bottom from building material or line it with cellophane instead of the bottom.
- If you need to make hollow cinder blocks, then you will also need void formers for these purposes. They can be wine or champagne bottles filled with water. Bottles can replace pipes with a diameter of about 6 cm or rectangular wooden blocks.
- Insert void formers into the container and secure them. The number of voids in the finished product should not exceed 40% of the total mass of the block.
- Pour the solution and wait a day so that the material can be removed from the mold and transferred to the place for subsequent drying.
Material requirements
The first requirement relates to block size. Dimensions are standardized: 390-190x188 millimeters. This is the optimal size for building walls. As an option, you can make blocks of 400200x200 millimeters, such parameters are also acceptable.
But the basic requirements relate to the components of this material. The ingredients used are:
- coal slag (where the name of the material comes from), which can be replaced with zytoconcrete,
- expanded clay, pre-crushed,
- gravel,
- cement,
- water.
Instead of the standard filler, you can use other additives: gypsum or crushed stone, ash or sand, as well as perlite. Before starting a large production, I recommend experimenting with the components, since they affect some characteristics of the finished product: for example, strength and thermal conductivity.
Ingredients should be chosen carefully, because the quality of the final product depends on it. Cement, for example, must have a strength grade of at least M400. Gravel should be taken with fractions from 5 to 10 millimeters.
I’ll say something about water. For some reason, many people believe that the production of building materials is rough work, and therefore you can splash liquid from the nearest swamp into the composition, cement will tolerate everything. In fact, this can ruin any endeavor.
Water taken from a river or other nearby body of water is not clean. This will directly affect the characteristics of the finished product, reducing performance. For example, such water contains various organic impurities. During the production process, they will begin to rot, releasing air. And excess air in the structure of the material automatically means a loss of strength characteristics.
In general, it’s not worth saving money and effort on such a seemingly simple thing as water. You need to take one that you personally can drink without boiling. Only then can the manufactured material boast high quality.
No less important than the quality level of the ingredients is their proportions. To obtain the correct mixture you will need 7 parts of slag, 2 expanded clay, 2 gravel, 1.5 cement and 3 water. During the mixing process, regularly test the resulting result.
To do this, scoop up a handful of the mixture, squeeze it to form a lump, and drop it on the floor. Two points are important: initially the lump should stick together well, and when it hits the floor surface it should crumble. This means that all proportions are correct.
Difficulties and errors during work
If a person does not have the ability to work with his own hands, then it is better not to undertake making cinder blocks on his own. Despite the fact that cinder blocks may not be a certified product, they must be manufactured using technology. Therefore, it is necessary to carefully calculate the dimensions of the walls and bottom of the formwork so that the finished blocks are of the correct shape and dimensions.
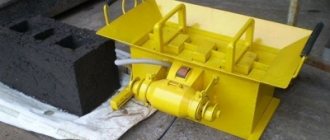
For better production of cinder blocks, you need to use additional equipment, such as a vibrating machine. This will allow you to compact the product and give it the desired shrinkage. But you will either have to buy such equipment or make it yourself.
If you do not lubricate the mold walls with machine oil, oil paint or special lubricant before pouring the solution, then it will be very difficult to remove the products from the workpiece. The elements should be removed from the mold the next day , but so that they do not crumble in your hands when removing them.
To avoid difficulties and not make mistakes when making cinder blocks at home, it would be useful to watch a video on this topic:
Types of cinder blocks
There are two types of building blocks:
- Solid cinder blocks are used for the construction of foundations, load-bearing partitions and walls.
- Hollow ones are much lighter, so they do not create a load on the foundation. In addition, they have good heat and sound insulation. Due to these characteristics, hollow blocks are used to build walls.
The very first building blocks were made from slag and a binding material in the form of cement. are obtained from concrete mortar using vibrocompression . In addition to slag, their composition may include:
- granite crushed stone;
- granite screening;
- volcanic ash;
- fight of concrete and brick;
- sand;
- river gravel, crushed stone;
- expanded clay;
- broken glass;
- cement;
- broken hardened cement;
- battle of concrete and brick.
Do-it-yourself production of building blocks can be done using a vibratory pressing machine or wooden molds .
Monolithic pillars
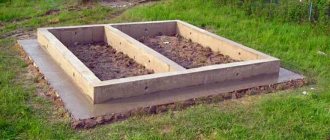
Making monolithic concrete supports is a simple process. This is an opportunity to create a high-quality base for a fence yourself at minimal cost. The great advantage of a monolithic pillar is the ability to decorate it at your own discretion. The supports can be made of any shape - round, rectangular or square, the main thing is to assemble the appropriate formwork. To create the correct shapes, boards or plywood are suitable; for round supports, a plastic pipe sawn in half.
Installation of a monolithic concrete pillar
- A hole is dug and crushed stone is poured onto the bottom.
- A reinforcement frame welded from longitudinal and transverse rods is installed in the hole. The verticality of the frame is checked by the building level.
- Concrete is poured into the hole and compacted.
The hole is left to harden. Reinforcement of a hole for pouring concrete into a pillar - The formwork is being installed. The reinforcement cage should not come into contact with the formwork, but should be located exactly in the middle.
- The formwork is filled in layers with a cement composition, each layer is bayoneted so that there are no air cavities left. After 3 days, the formwork is removed.
The resulting nondescript concrete pillar will be given a decorative touch by textured plaster, artificial stone or decorative brick.
Decorative stone for fence posts
Artificial stone is widely used for both interior and exterior decoration of buildings, foundations, finishing and cladding of fences and pillars. It is a composition of cement, sand and various additives and coloring pigments. Decorative stone perfectly conveys the texture and beauty of natural minerals and at the same time has a number of additional advantages that distinguish it from natural materials:
Fence trimmed with decorative stone
- Price. Natural stone has a high cost compared to artificial material cast from concrete.
- Ease. Decorative stone has less weight, it is easier to lay it on regular tile adhesive or cement without additional fastening. In addition, the lightweight material does not overload the supports.
- Correct form. Thanks to its straight lines and geometry, artificial stone does not require complex fitting and selection of elements.
- Resistance to negative natural factors. The facing stone is suitable for external work; it is not afraid of moisture, critical temperatures and exposure to ultraviolet radiation.
- Variety of choice. The shape, color and texture of the artificial material can be any.
Fence blocks
We're on Pinterest.
We offer concrete fence blocks. They are intended for the construction of decorative luxury fences for houses and cottages, wherever they are located in the Moscow region, near Minsk, Kiev or near London. The designs of fences made from such blocks around country real estate are varied and have not only security, but also aesthetic components.
If you are from Minsk, Logoisk, Dzerzhinsk, Zhodino, Smorgon, Vileika or Volozhin, then you can order from us both textured blocks for pillars, wall and ordinary blocks with the same textures, concrete fences made of decorative panels (concrete fences).
[email protected] , +375 29 6276284, +375 33 6034357(viber)
See other elements for building a fence on the page Stacked fences and fence construction
| Fence post block Torn stone 30 x 30 x 20 cm Weight 25 kg |
| Ordinary fence block Torn stone 40 x 20 x 20 cm Weight 25 kg |
| Private fence block Pebble 40 x 20 x 15 cm Weight 18 kg |
| Ordinary block Mosaic for fence 40 x 20 x 25 cm Weight 30 kg |
| Pillar block Bricks 32.5 x 32.5 x 23 cm Weight 26 kg |
| Ordinary block with stone40 x 20 x 20 cmWeight 25 kg |
| Block Stones, acid painted 40 x 40 x 20 cm Weight 40 kg |
| Pickup from Molodechno. |
Decorative concrete blocks for fences, measuring 30 x 30 x 20 cm, are used for making textured fence posts around plots, houses and cottages. They have an internal cavity for placing reinforcement in them and pouring concrete. The color scheme of such decorative blocks for a fence can be any. This is achieved by final painting of the surface with acrylic facade paints after the installation of decorative concrete fence posts has been completed.
Weight of 1 block is 25 kg. Molding a block of decorative fence posts
carried out by manual pressing without additional reinforcement with crushed stone.
Orders for a basic block of decorative fence posts
are made upon prior request.
Along with pillars, there are ordinary decorative concrete fence blocks, various types of caps and hats of decorative fence posts
, the possibility of making recesses for embedded parts.
Installation of decorative fence posts
This design is recommended to be made only in the warm season, so that the concrete poured inside the pillar has time to gain strength before the onset of frost. Otherwise, the pillars may be destroyed by the solution freezing inside the block.
Some of the most beautiful and aesthetically pleasing are solid fences made from a combination of various materials: stones, concrete blocks for the fence, wood or metal.
Most often, prestigious fences have frames made of reinforced decorative fence posts
and panel structures attached to them using embedded parts.
Decorative fence posts
do not have to be solid.
To construct textured decorative fence posts,
it is more logical to use block technologies.
Moreover, the texture pattern of decorative blocks for a fence
can be selected from several available shape options.
How concrete posts are made and installed
The process of making pillars is carried out using various methods:
- by pouring concrete on a separate site into horizontally located reusable forms. Finished products are removed from the formwork after hardening and installed according to the developed sketch;
- by filling vertically installed forms of the required profile with concrete mixture. Formwork structures are mounted in a vertical position along the perimeter of the fence at the installation site.
The process of making pillars is carried out using various methods
Regardless of the specifics of manufacturing, the technology involves the following steps:
- Assembly of the formwork structure.
- Manufacturing of power grid.
- Preparation of cement mortar.
- Pouring concrete mixture into molds.
Giving preference to the preliminary production of supports, carry out installation work according to the following algorithm:
- Plan the perimeter and mark the coordinates for installing the pillars.
- Remove the soil, ensure the walls of the pits are vertical and compact the base.
- Fill the pits with crushed stone-sand cushion, compact the mixture of sand and crushed stone.
After performing these operations, the following remains:
- Fix the support in a vertical position.
- Seal the surface of the well with polyethylene or roofing felt.
- Prepare a concrete mixture and pour it into the cavity.
Having completed concreting, adjust the position of the pillars within half an hour after pouring. Each stage of work has its own characteristics. Let us dwell in more detail on the specifics of performing the main stages.
Each stage of work has its own characteristics
Site preparation and marking for installation of concrete fence posts
At the preparatory stage, a number of works should be performed:
- Clear the surface around the perimeter of the fence from large stones.
- Remove bushes and small vegetation with their roots.
- Level the soil surface.
The marking process is quite simple:
- Drive the outer pegs into the soil.
- Pull the cord for orientation.
- Drive in the remaining stakes at the specified pitch.
Having completed the preparation, remove the soil and prepare pits of the required depth.
Preparing the base for concrete pillars
To ensure the stability of the supports, prepare an acceptance base that serves as a foundation.
To do this you need:
- Level the bottom of the pit.
- Mix sand with gravel.
- Pour the mixture into the bottom.
- Level the surface of the bedding.
All that remains is to thoroughly compact the array by pouring water.
The installation of monolithic support posts for a fence consists of several successive stages
How to choose the location of the formwork and install the load-bearing frame
The formwork is assembled from pre-cut blanks
You should pay attention to the location of the formwork:
- When pouring fence supports at the installation site, the formwork is installed vertically. Immobility is ensured by spacers;
- When pre-concreting the pillars, the formwork should be placed horizontally on a solid surface.
It is important to ensure the tightness of the formwork and perform the reinforcement correctly. The power frame consists of the following parts:
- four parallel rods with a cross section of 1.2-1.8 cm;
- transverse rods with a cross section of 0.8-1 cm, fixed in increments of 10-15 cm.
When installing the frame, maintain a distance of 20-25 mm from the reinforcement to the concrete surface.
How fence posts are poured with concrete mortar
Pouring racks involves performing the following operations:
- Coating the inside of the formwork with lubricant.
- Placement of reinforcing lattice in the formwork.
- Filling the mold with concrete mixture.
- Product seal.
After hydration is completed, the finished support should be removed for further drying.
How to decorate finished concrete supports
Decorating concrete pillars improves aesthetic perception. Various decoration methods are used:
- cover the concrete with decorative or mosaic plaster;
- apply acrylic or rubber-based protective paints to the material;
- treat concrete pillars with a polyurethane compound;
- the supports are decorated with mosaics or lined with bricks;
- plastic panels are mounted on concrete.
Application
The spread of the trend with decorative pillars began several centuries ago, and in order to get a rough idea of architectural traditions, just look at the design of palaces in St. Petersburg or Paris.
The classic combination of metal and stone has been borrowed by modern builders for fencing government buildings and luxury mansions.
Installation at the dacha
The modern construction industry, which has mastered dozens of new materials, has expanded the concept of decorative fence posts. Brick and natural stone remain the classic option for any type of fence.
But concrete, mesh structures with crushed stone, and plastic appeared, which decorate the most primitive options. There are multiple price lists with numerous examples that give an idea of what decorative blocks for fence posts are.
Variety of options
The use of pillars has expanded the scope of demand, but has not limited it, and on modern construction sites you can find many unconventional options for using decorative pillars - from an enclosed atrium and veranda to a large balcony, observation deck, canopy in front of the house, equipped for decorative purposes.
The differentiation of the scope of use of pillars, pillars and columns has led to the need for a targeted choice made taking into account all components.
Fence of a private house
The criteria for selecting the necessary style components were:
- design options and methods of its installation, construction and stability;
- manufacturing material, in which there are possibilities for stylization, replacing natural decorative stone with no less expressive fakes made of plastic;
- durable frame devices, giving the chance to use lighter and cheaper raw materials without loss of visualization and strength;
- dimensions, parameters and configurations to create a unique or standard constant of the same familiar brick fence;
- additional decorative elements (balls and cones, lamps, combinations with metal elements, stucco or its imitation);
- color scheme (contrasting, similar in color perception and tone, combined, imitating geometric or abstract patterns);
- modification of shape (parallelograms, rounded outlines, cones, columns with pedestals or pedestals).
Storage of finished racks