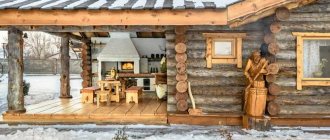
A cold floor in a bathhouse is a common problem when using this room. This situation is explained by the extremely unfavorable operating conditions of the coating and, accordingly, of all building materials and architectural structures. The floor is always wet, which increases the thermal conductivity of surfaces. How to fix this problem? Read more below.
Cold floor in the bathhouse, how to fix it
Bathroom floor insulation
Cold floor in the bathhouse: looking for causes, eliminating consequences
What kind of stupid, and sometimes downright crazy, advice an inexperienced reader will glean while searching the Internet for information on the topic “cold floors in the bathhouse.” The “kings” and “queens” of rewriting, competing in their attempts to distort the information message of the original source beyond recognition, go to extremes in their “expert” opinions, such as “complete dismantling of the floor, followed by the construction of a structure that meets the necessary requirements” or “increasing the height of the floor steam room, due to the use of high-quality insulation.” Such advice is harmful and does not lead to anything good. The temperature environment in the bathhouse, and especially in its steam room, has a pronounced vertical gradation. The lowest temperature is located near the floor, the highest in the ceiling space. Heated air tends to rise upward, which was once used with great success by the inventors of the hot air balloon, the Montgolfier brothers, while cold air “settles” below. It is on these principles that the phenomenon of convection of air masses in the steam room and the operation of supply and exhaust ventilation in the bathhouse are based. The thermosiphon circulation of liquid manifests itself in similar dynamics in pumpless sauna boilers with a water circuit. Naturally, where at the level of the top of the head the temperature exceeds 100 degrees Celsius, 25 degrees at the level of the feet will be felt quite acutely by some people, due to certain characteristics. Therefore, before you arm yourself with a hammer drill or nail puller and start tearing up the floor, naturally, pay close attention to “expert” Internet recommendations and soberly assess the situation. Perhaps there are simply subjective sensations based purely on the physiological characteristics of temperature perception, and simple bath slippers will reduce the problem to absolute zero. In the figurative, not the literal sense of the word.
Signs that there really is a problem
You can make sure that the floor in the bathhouse is really cold by the following direct and indirect signs:
- Before starting the heating of the bath, the floor surface, in any of its functional zones, has a lower temperature relative to the rest, where it is more or less leveled. First of all, this concerns the washing and steam room.
- In frosty weather, you may find localized areas on the floor that are covered with frost. In conditions of warming and rising temperatures, such places simply become steadily damp.
- Bathhouse visitors with bare feet clearly feel the movement of drafts across the floor, and it is impossible to clearly localize their source, they seem to be “blurred” in space.
- The heated bathhouse quickly cools down, and this happens extremely unevenly. The walls and ceiling are warm to the touch over the entire surface. A lighted match, lighter or candle brought to them does not show the deviation of the flame caused by active air leaks. At the same time, it is tactilely felt that the lower, near-floor area of the room loses temperature most quickly.
- Walking on the floor for a long time, even in bath slippers, causes persistent discomfort in almost all bathhouse visitors, regardless of their gender, age, physical condition and level of perception of temperature stimuli.
Elimination of causes and leveling of harmful consequences
In this section we will try to consider rational ways to solve the problem, cold floor in the bathhouse, how to fix it?
The process of eliminating negative factors can be divided into several groups, and it directly depends on the cause of the problem of cold floors. Moreover, these reasons can be removable, partially removable, difficult to eliminate, or completely irremovable, that is, the nature of the latter lies directly in the design flaws of the structure. Let's consider the most typical and acceptable methods:
Damage or lack of thermal insulation
In this situation, figuring out how to insulate the floor in a bathhouse will be a little more difficult. First you need to understand what is the main source of heat loss - the lack of thermal protection or its violation. If there is a layer of insulation, but it does not perform its function, it may be exposed to moisture. Many heat-insulating materials are very sensitive to water and, when wet, almost completely lose their properties. A complete replacement of the insulation and its high-quality waterproofing will be required.
If the ceiling is assembled incorrectly, the cause of cold may be the lack of a thermal cushion - an air gap between the ground and the insulating material. It should take on the role of an additional shield against the cold and if there is no gap, then the insulation may be insufficient. The solution here is especially complicated - you need to increase the thickness of the heat-insulating layer or create the necessary gap.
Why is the bathhouse floor cold? How to fix it?
Building a bathhouse is not an easy process. Of course, everyone is trying to think through everything down to the smallest detail and build the ideal building. But, as you know, it is quite difficult to avoid all mistakes. Bathhouse owners often encounter the problem that walking on the floor is unpleasant because it is cold. This article will discuss why there are cold floors in the bathhouse and
Development of a plan taking into account site conditions
You should also take into account the location standards of the bathhouse in relation to other buildings. Minimum distances from the sauna to various buildings:
- From a residential building and a separate shower room - 8 m;
- To the barn and summer kitchen – 1–4 m;
- Toilet, well - 12 m.
Remember that the shadow from the bathhouse should not fall on the neighbors’ property. To fulfill this requirement, calculate the distance from the fence to the building. It should be equal to its height. Example. A one-story bathhouse 7 by 9 will be located 4.6 meters from the fence of the neighboring site, which corresponds to the height of its roof.
You may be interested in: Nuances when planning a 6x6, 4x6, 3x6 bath: zoning the space and choosing suitable materials
Cold floor in the bathhouse: how to fix it
So, you have a cold floor in your bathhouse, what should you do? Let's consider some situations.
Most often, those who have a concrete screed in their bathhouse face the problem of a cold floor. Concrete conducts heat well; even in a heated room, its temperature will remain quite low.
When thinking about a drainage system, some people leave small holes in the concrete surface to allow water to flow through them. But often they cause drafts and mold.
In this case, you can correct the situation as follows: make a regular wooden sheathing. This is a simple and budget option that is perfect for a bath. Walking on the sheathing will be more pleasant and warmer. In addition, it can be easily dried and, if necessary, replaced with a new one.
Source
Laying principles
To reliably protect insulation from moisture, you need to know how to properly install vapor barriers on different surfaces.
Ceiling
Stages:
- Cover the prepared rough ceiling with boards. The thickness of the coating should be 6 cm.
- Secure the foil film over the formed sheathing.
- Lay out softened clay.
- Place a vapor barrier.
- Lay out the insulation.
- Secure wooden decking or moisture barrier membrane.
Walls
Stages of vapor barrier installation:
- Stuff the frame from bars with a cross section of 50x50 mm.
- Lay insulation in individual sections of the sheathing.
- Secure vapor barrier material. Installation must begin from the far corner. The joints are taped with metal tape. It is recommended to fix the film using a construction stapler.
- Stuff the frame with slats to create a ventilated gap.
- Fasten the finishing material.
Floor
. Stages of arrangement:
- Cover the wooden flooring with a layer of coating waterproofing.
- Basalt wool is fixed on top of the dried coating.
- Cover the insulation with a vapor barrier layer.
- Place wood flooring.
If you want to make a floor covering from tiles or porcelain stoneware, you need to form a concrete screed.
Cold floor in the bathhouse, how to fix it: finding the cause and solving the issue with step-by-step actions
A cold floor in a bathhouse is a common problem when using this room. This situation is explained by the extremely unfavorable operating conditions of the coating and, accordingly, of all building materials and architectural structures. The floor is always wet, which increases the thermal conductivity of surfaces. How to fix this problem? Read more below.
Cold floor in the bathhouse, how to fix it
Bathroom floor insulation
Defrost, but do not damage!
Removal of ice or snow crust should be as gentle as possible. Here are a number of rules, violation of which will shorten the life of the refrigerator:
- Do not sprinkle salt on the ice; salt crystals may damage the plastic parts and surfaces of the device.
- Do not use a knife to remove large chunks of ice.
- Ancient methods of defrosting using a pan of hot water are certain death for the freezer. Using boiling water won't speed up the process much, but it will certainly damage the equipment.
- Hot air from a hairdryer is also a big mistake. This leads to overheating of the plastic parts of the case, which are not designed for high temperatures. This method is no less dangerous for the internal parts of the freezer.
Reasons for a cold floor in a bathhouse
There are several factors that negatively affect the floor temperature in a bathhouse:
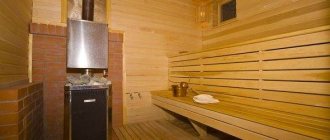
In the photo - there should always be a drain in the steam room, but often the floor is so cold that it is necessary to lay wooden walkways
The steam room is the main section of the bath and has special requirements. The room must retain heat well and not be afraid of dampness and high temperature. To arrange the floor in the steam room, you should familiarize yourself with all the possible options, choose the type, materials, and suitable design. You can familiarize yourself with the material in more detail in a special article.
These are just a few reasons, each building may have its own nuances. Before specifically considering the problem of a cold floor in a bathhouse, you need to learn a little about the specific requirements for coatings. This knowledge will allow you to avoid mistakes at the construction stage (and this is the most optimal way to solve the problem of a cold floor) or make the right decisions on insulation already during the operation of the bathhouse.
Schemes for installing floors for bath structures
Table. Specific requirements for the construction of the floor in the bathhouse.
Maximum moisture resistance
| Name, photo | Short description |
| The floors in the bathhouse have long-term direct contact with water at elevated temperatures. These conditions are the most favorable for the development of putrefactive processes and fungi. It should be borne in mind that currently there are no impregnations that can completely protect lumber for a long period of time. Only the integrated use of various construction and technological measures guarantees long-term use of the bathhouse. | |
| The underground must have natural ventilation | There is no point in hoping that problems with rotting lumber can be solved only by impregnation with antiseptics or sealing; even theoretically, they cannot guarantee a long-term positive result. Natural ventilation, accordingly, cools the floors, this must be taken into account during their installation. But there is no way to do without it. |
| Water drainage issues should be addressed | To do this, it is necessary to install drainage sewer pipes, make receivers or settling tanks, etc. All these utilities make the arrangement of floors in the bathhouse even more complicated. |
Floor ventilation in the bathhouse
It is very difficult to make a high-quality, durable and at the same time warm floor in a bathhouse, even using the most modern building materials and technologies. What did our ancestors do? Very simple. For the floors, coniferous logs sawn in half were used; the thickness of the coating reached 15–20 cm . Due to this, they did not freeze, were not afraid of underground ventilation, and remained strong for several decades. After 30–50 years, the frame was raised, the rotten floorboards and lower crowns were replaced with new ones. After such repairs, the bathhouse again served regularly for several decades. Currently, this technology is not used for various reasons. What to do if you need to insulate the floor of a bathhouse in use?
Insulation of floors in the bathhouse
Expanded clay insulation technology
Do-it-yourself insulation of the floor in a bathhouse with expanded clay is carried out in the following sequence:
- Cement, sand, expanded clay of various fractions, and vapor barrier material are purchased in advance. Prepare accessories for marking, a tool for distributing mixtures, and a container for preparing working solutions.
- Clean the surface of the insulated bath floor from the old decorative coating. If it is missing, level the ground and carry out thorough compaction. Wooden floors are treated with antiseptic agents.
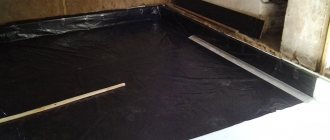
- To prevent moisture absorption into the expanded clay, waterproofing is provided. For this purpose, special materials or thick polyethylene film are used, the installation of which is carried out with an overlap on the walls of the room above the line where the insulation is placed. After the final installation of the insulation, the excess waterproofing is cut to the required length. The film joints are connected using standard tape or another method.
Laying waterproofing under floor insulation
- They ensure the same height for laying insulation on the floor surface by placing construction beacons. The technology for their installation is standard, taking into account the filling height of expanded clay granules of at least 150.0 mm. In this case, it is necessary to provide for a slope of the coating towards the sewer drain.
- Expanded clay granules are filled to the level of the “beacons” by sequential compaction of the sections. It is allowed to lay expanded clay in packaging bags without breaking the integrity. The gaps are filled with a scattering of composition.
- In order to strengthen the insulating cushion made of expanded clay, reinforcement is carried out with a special mixture, the composition of which includes cement in a ratio of two parts to three sand with water up to 20 percent by weight. The voids between the granules are evenly filled with the finished composition. This technology provides additional protection against moisture penetration and strengthens the insulation layer, preventing subsidence. Builders call the mixture “milk.”
- After the “milk” has completely dried, they begin work on forming a concrete screed, the thickness of which is 30.0 - 40.0 mm. There are no special requirements for the screed.
- If the floor covering is made of wooden planks, then the insulation is placed in the niches between the joists with a preliminary laying of a protective polymer film in them.
Based on the above information, we can conclude that the point of view of individual owners about the optional insulation of the bathhouse from the floor side is associated with significant costs of money and time - wrong. They will more than pay for themselves with a comfortable pastime in a room with warm floors and a hot steam room. The absence of heat loss will allow you to warm up the bath faster and with less energy, and the heat will remain for a longer period. At the same time, floor insulation work does not require the owner to have any special training - household skills and tools available in a country house are sufficient.
The procedure for carrying out work by floor insulation specialists is presented in the video below.
Procedure for floor insulation.
average rating
more than 0 ratings
Share link
Step-by-step instructions for repairing a cold floor
First, let's consider the most labor-intensive option for floor repair; it requires not only a loss of time, but also money. With a properly organized process and practical experience, it will take approximately two to three days to complete the work. The floor was made without insulation from edged boards; water drained through the cracks between them. In winter, cold air entered through the cracks, which created inconvenience during water procedures. Insulation work is carried out in several stages.
How to insulate the floor in a bathhouse
The first stage is the dismantling of old coatings
Step 1. Remove the old floor. If the boards are screwed to the load-bearing beams with self-tapping screws, they will have to be unscrewed. Use an electric drill or cordless screwdriver. Hardware can be reused; use a handkerchief cup to collect them. If the floor is on nails, then use a nail puller. To reduce damage to the boards, place pieces of boards under the metal part of the tool when pulling out nails.
Dismantling the floor - unscrewing the screws
Step 2. Remove the boards and inspect the condition of the wooden floor structures. In most cases, problem areas will be visible, eliminate them before starting work. If serious damage to the beams is discovered, they will have to be replaced with new ones.
If there are problem areas, they need to be eliminated
Step 3: Unscrew the floor joists. They are fixed with metal squares and self-tapping screws; removing the structures is not difficult. As before, collect old screws in a container; the hardware will come in handy in the future, and you won’t need to buy new ones.
Step 4. Using an electric planer, remove the top damaged layer from the beams, process the lumber until completely healthy wood appears. There is no need to specifically control the thickness of the logs; lumber may differ slightly in size. All the same, in the future their planes will not be located on the same line, but will lie at an angle.
Removing the damaged layer from beams
Step 5. Remove mold from the wall trim boards around the perimeter of the bathhouse. To do this, you can use toilet cleaners that contain acid. It perfectly disinfects lumber and destroys mold roots. To enhance the effect, you can repeatedly wipe the surfaces of the boards with ordinary table vinegar.
Mold around the perimeter needs to be removed
Step 6. Install a heat gun and thoroughly dry the surface of the floor and walls. If desired, dry boards can be soaked again with factory-made antiseptics and dried.
Everything is coated with used antiseptic.
After repairs, it is recommended to drain the water into the sewer; this method prevents the surfaces of the lumber from getting wet and is strongly recommended by professional builders. Do not rush to start repairs, give time for all surfaces to dry. If everything is normal, then you can lay a new, now insulated floor.
Stage two – laying a new floor
The floor will be laid with a slight slope, the water will be drained into a special tray located at the far wall.
Step 1. Determine the angle of the floor. To do this, use a long, flat board. Place it along the room from the bathhouse door to the drain tray. First, determine the position of the skirting boards; you can use ordinary cheap plastic elements with flexible rubber sides at the bottom. The sides will prevent water from getting onto the wooden cladding of the walls of the bathhouse.
The position of the plinth is determined
Practical advice. It is much easier to work with a laser level. If it is not there, then the markings can be made with a water level, but you will have to work with an assistant and lose more time.
It is more convenient to use a laser level for work.
The upper plane of the skirting boards should be 1–1.5 cm below the threshold level, otherwise they may be damaged when walking. Find these lines and subtract the height of the baseboard from them. This will be the floor level at the front door. The slope of the floor should be within a centimeter per meter. There is no need to do more; too much of a slope creates inconvenience when walking on the floor.
Step 2. Decide on the installation location of the tray, measure its length and cut the adjacent boards to size.
The installation location of the tray is determined
Step 3. Install the logs with an inclination towards the tray. To do this, first put the two outer ones in place, stretch the rope between them and secure all the remaining ones along it. Instead of a rope, you can use a long, flat strip or board, but it is more difficult to work with them. Fix the logs not only to the lower rim, but also to the concrete strip of the foundation; use metal corners and dowels for this. The optimal mounting option is two corners on each side of the joist and one at the bottom. If the design does not allow the logs to be lowered for tilting, then they need to be sawed at the bottom; the depth of the cut must correspond to the angle of inclination of the floor. If deviations from the plane are detected, you can use shims. There is no need to worry that they will sag over time; the logs are firmly held in place by three metal corners.
The joists are fixed using metal corners
The logs must also be attached to the concrete foundation strip
Practical advice. If you do not have a special tray for floors, then you can use an ordinary street one. To do this, before installing the grinder with a metal disc, remove the vertical stiffening ribs, this will make it possible to place the boards under the tray.
Removing vertical stiffeners from a street tray
Step 4. Place the prepared tray in place. If its width is less than the distance between the joists, then the gap should be closed. You can use boards or durable extruded polystyrene foam for this. The second material is much easier to work with, and great strength is not needed to fix the tray. Check the slope and position of all joists again with a laser level. If all parameters are within normal limits, then you can continue working on flooring.
The tray is put in place
To install the tray on the boards, their ends should be prepared and chamfered. The width and depth depend on the size of the sides of the trays. Before installation, the ends of the boards and all fresh cuts must be treated with antiseptics; you can soak them several times in sunflower oil. Before fixing the boards, coat the landing sites with a high-quality sealant. The fact is that it is very difficult to make perfectly even seats; it is much easier to use sealant for these purposes. The tray is screwed to the boards with small self-tapping screws. After fixing, it is also recommended to seal the drain perimeter. Pay great attention to these places. This is where water accumulates and lingers for a long time. Getting the boards wet at the ends is a very unpleasant situation. Moisture travels through capillaries to great depths, drying takes a long time, and there are not enough breaks between bath procedures. As a result, the boards rot, the tray collapses, and the floor in the bathhouse requires repair.
The slope of the future floor is shown
Practical advice. It is strongly recommended to insulate the side surfaces of the foundation along the perimeter; fix polystyrene foam on them using any method available to you. Do not forget to leave holes for ventilation, this is a prerequisite for the long life of the bath.
The foundation is insulated with polystyrene foam, a hole was left
Step 5. Attach drain pipes to drainage containers. These can be metal barrels with a capacity of 100–200 liters dug upside down. Use a grinder to cut holes on the sides of the barrels to allow water to drain out. In order to completely prevent freezing of water in pipelines, insulate them with soft polystyrene foam. But it is not necessary to do this; warm water and pipes do not have time to freeze during water procedures. Moreover, the angle of inclination of the pipelines is large and the water quickly goes into the barrels.
Example of a prepared drain
Connect drain pipes to drainage containers
The third stage - floor insulation
To insulate the floor in a bathhouse, it is better to use expanded polystyrene rather than mineral wool. The fact is that mineral wool is very afraid of increased humidity, a wet heat insulator sharply increases thermal conductivity, and the insulation efficiency approaches zero. In addition, wet wool takes a long time to dry; all this time, wooden structures are operated in very difficult conditions. As a result, the appearance of mold and rot, the need for extraordinary repairs not only of the flooring, but also of nearby wooden architectural elements.
Extruded polystyrene foam for floor insulation
Expanded polystyrene does not have the above disadvantages; it does not absorb moisture at all, even with direct, prolonged contact with water. The only problem with polystyrene foam is that the material is damaged by rodents, but to prevent damage there is a simple way - to cover the ventilation holes with metal grilles.
Step 1. Nail any pieces of boards, slats or OSB boards of appropriate sizes to the bottom plane of the log; the insulation will lie on them. The distance between the boards does not matter, the main thing is that the boards have a stop in at least four places.
There are slats nailed to the bottom of the joists for installing insulation.
Important. The thickness of the insulation layer should be at least ten centimeters; if it is less, the effect of insulation will be minimal. Professionals recommend laying two layers of slabs, each 5 cm thick. To minimize heat loss, joints should be placed in a checkerboard pattern.
Using polyurethane foam, seal all gaps between the slabs and walls. After hardening, it must be carefully cut with a mounting knife.
Insulation is laid, joints are sealed with polyurethane foam
Step 2. After all layers of thermal insulation have been laid, you can continue laying the floor. You should start with one of the walls, fasten each board with self-tapping screws that remained after dismantling the old flooring. The thickness of the floorboards is approximately 20 mm, specific values are selected taking into account the distance between the joists. The boards must be tongue-and-groove and as even as possible.
Step 3. Seal the gaps between the floor and wall trim around the perimeter of the bathhouse with foam. Once hardened, trim off excess.
Excess foam is removed
Practical advice. If the walls in the bathhouse are covered with clapboard, then there is no need to remove foam from the profiled grooves. In any case, these cracks need to be sealed with silicone, and foam will significantly save the amount of silicone. The baseboard must be hermetically sealed not only to the floor, but also to the walls. Remember that water that gets into the gap will never dry out, and the lumber will inevitably begin to deteriorate prematurely.
Step 4: Sand the floor using an electric sander. Be sure to connect it to a vacuum cleaner, this will reduce the amount of dust and make final cleaning of the bathhouse much easier. During sanding, make sure that sharp protrusions between adjacent boards are removed; as for the evenness of the surface, there are no strict requirements. If there is no special tool, then you can grind it manually, especially since the bathhouse floor area is small. Prepare the device, attach sanding paper number 25-N or more to a medium-sized smoother. According to the international classification, sandpaper must be class P60 or less.
Alternatively, you can sand the floor by hand.
Step 5. Clean the floor from dust, cover the surface with durable acrylic varnish. Buy only high-quality material; the varnish should not be afraid of high humidity and release harmful chemical compounds into the air. You can cover the boards with an ordinary brush. The number of layers is at least three, each subsequent one is applied only after the previous one has completely dried.
The floor is covered with wear-resistant acrylic varnish
Step 6. Along the perimeter of the bath, treat the cut foam with sealant, try to completely close all open pores. Give the sealant time to set.
The foam around the perimeter must be treated with sealant
Step 7: Install baseboards. They are fixed with self-tapping screws, first a mounting plastic plate is attached, and a decorative plinth is snapped onto it. Carefully seal all gaps between the baseboard and wall trim with sealant. The sealant should be matched to the color of the boards.
Sealing cracks with sealant
At this point, the repair of the cold floor is completed, give the materials time to dry and you can use the bathhouse.
We looked at the most complex, expensive and time-consuming option for floor insulation, but there are also very simple, but no less effective, methods of dealing with a cold floor.
Wooden grates on the floor in the bathhouse
You may find recommendations to close the underground ventilation holes during cleaning. This method can be used to solve the problem, but do not forget to open the vents again immediately after washing. Lack of ventilation is the main problem with bathhouse flooring.
Another misconception. To improve the microclimate in the bathhouse, there are experts who recommend taking air into the stove firebox from the underground space. They are sure that in this way the movement of warm air is improved, it is drawn from the underground into the oven, and warm air is lowered in its place. This is not true, there is no need to do such experiments. The fact is that new air in the underground will not come from the room, but from the vents in the foundation, that is, from the street. As a result, the floor will not warm up, but will cool down even more.
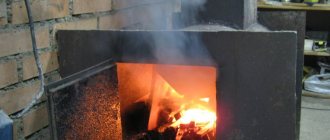
Homemade metal stove in the bathhouse
Real insulation due to the blower can be done only when the stove is located directly in the bathhouse. Place it in such a way that the air vent is as close to the floor as possible. In this case, the effect will be that instead of the used cold air, warm air will fall and warm the floor. But moving the stove just for this effect is not economically feasible. And the increase in floor temperature is not so significant as to break the stove for the sake of it. Above we have given examples of more effective and less expensive methods.
Prices for the Ballu BKX-3 heat gun range
Peculiarities
It is necessary to insulate the premises of a wooden bathhouse. Even the relatively low thermal conductivity of wood itself does not guarantee acceptable thermal protection. Ancient log structures could simply be laid with something between the crowns. But the advent of more advanced and practical rounded logs made this approach impossible. Meanwhile, any bathhouse should be designed as a kind of thermos, stably maintaining internal heating regardless of the outside temperature.
If the building is built from expanded clay concrete blocks, the approach should be slightly different. The main role in this case is played by thermal protection from the inside. Heat should be saved only at the moment when the bath is warmed up.
Stone blocks warm up faster and more significantly than wood, so wood cladding is usually installed on the outside, and insulation is placed underneath it
Despite the importance of thermal protection inside, the quality of its external contour cannot be ignored. It determines how resistant the walls will be to severe freezing.
In addition to wall planes, additional insulation is required:
- ceiling;
- floor;
- foundation underneath.
Quite a lot of bathhouses are built on the basis of cinder blocks, and here you also need to decide which thermal protection option will be the best. As with other stone pieces, it is recommended to use both an outer and an inner layer. A layer of thermal insulation is created on the floor, which is twice as thick as the main walls. Only then is the screed installed and the finishing done. A sheathing is formed along the walls using slats. The thickness of each slats is at least 5 cm; The thermal protection is covered with foil materials that hold back water.
Savings on waterproofing or external finishing of cinder blocks often result in serious material losses and the inability to retain heat. Maximum attention should be paid to preparing air gaps. But besides slag concrete, private developers also use other economical construction materials.
Thus, you can find dozens and hundreds of bathhouses built from sleepers. These are reliable and proven structures that can withstand strong mechanical loads, but they will also need to be insulated.
The gaps from one part to another are filled with polyurethane foam. The insulation is laid out over the first crown, and later over the subsequent ones, as soon as a certain tier is completed and mechanically fastened. Much more often, however, than the “railroad” bathhouse, you can find structures made of boards. You can insulate a frame structure:
- mineral wool;
- fiberglass;
- expanded polystyrene;
- the maximum available penoizol.
The actual practical properties of these materials differ much less than their manufacturers try to show in advertising.
Therefore, the main attention should be devoted not to choosing the ideal solution, but to strict adherence to technology. Expanded polystyrene requires almost no waterproofing
But a vapor barrier will have to be built in any case. The latest thermal protection for frame buildings, such as penoizol, is occupying an increasingly strong position on the market.
If you want to use an old chopped sauna, there is no reason to refuse it for technical reasons. Modern technologies even make it possible to raise the characteristics of such buildings to a new level. It is logical to use the most natural insulation materials for a log house that do not impair its environmental characteristics. The vast majority of professional teams prefer basalt wool in this case. Tow, which has been used for many centuries, does a good job of holding back drafts and preventing heat from escaping, but it serves too little.
Among the various varieties of moss, the best is cuckoo flax, which is impervious to moisture. But any mosses are easily damaged by moths. Special treatment prevents such a development of events, but there is no need to talk about the complete naturalness of the coating after it. The combination of flax and jute has an increased service life; The disadvantage of this combination is the increased cost. But the convenience of insulation and the impossibility of rotting will please any consumer.
Conclusion
A cold floor in a bathhouse can only exist if it was built by illiterate and irresponsible builders. It is much easier, cheaper and smarter to prevent problems from occurring than to correct them later with heroic efforts. This rule, by the way, applies not only to floors, but also to all elements of a bathhouse or any structure or building.
Even in a steam room, where fragrant wood is an indispensable attribute, tiles can be found in the design of the floor and plinth under wooden through flooring. This material is not afraid of temperature changes and high humidity, it is easy to care for and is highly decorative. In a special article we will tell you how to make a floor in a bathhouse from tiles.
Video - Cold underground in the bathhouse
Material selection
Traditionally, when building a bathhouse, profiled timber or rounded logs are used. The tree has thermal insulation properties and is frost-resistant. Walls made of timber and logs do not require finishing. However, such materials are flammable and subject to shrinkage. To prevent cracks and deformation of load-bearing elements, it is necessary to provide temporary boxes for window frames and doorways, and leave gaps between the partitions and the ceiling. A rounded log requires special care: caulking with moss, tow or jute. The procedure should be carried out during construction or after it if you find gaps after shrinkage after 1–2 years.
Construction from a frame will cost less. The binding of the main elements of the building is made from edged boards 50x150 mm. Then the frame is insulated and covered with finishing material. This technology is suitable for miniature buildings 3x7 and quite spacious 7x8, 7x9.
Less commonly, bathhouses are built from brick and foam block. Artificial stone requires additional moisture insulation and interior finishing.
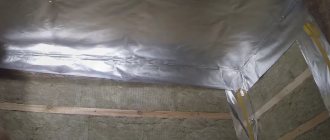
The components of the walls and ceiling of the steam room must be protected from high temperatures. The structures are covered with construction foil and mineral wool insulation. The final finishing of the walls and ceiling is lining.
Walls
Insulation of external walls is extremely rarely carried out separately. After all, it will then lead to improper distribution of heat throughout the material. The walls, floor and ceiling will warm up first, and only then will the air temperature begin to rise. This, of course, is not at all what is expected from a quality bath.
Formally, there is no need for a counter-lattice. But any experienced craftsmen install it to make it easier and faster to create a ventilation duct. The wood must be impregnated with an antiseptic. If installation is on a brick wall, it is advisable to use dowels; they compensate for the excessive rigidity of the structure and speed up installation. Foamed glass is technically perfect, but it turns out to be too expensive to use.
Bad experience
In the spring I started remodeling, the first thing that seemed most obvious to me was to insulate the walls, ceiling, and most importantly, make a wooden floor. The floor was raised by joists by 15 cm, the height of the ceiling did not allow for more, the walls were covered with planed boards, at that time there was no lining on sale, at least for us. A new winter approached and the result did not impress me, no, of course it became much warmer and the duration of the fire was reduced, but the temperature gradient along the altitude still remained significant. The floor was still quite cold; I had to pour boiling water on it before starting to wash. I will not describe in detail how I experimented in subsequent years, until I realized that the reason was not so much good insulation, although this is also important, but poor air circulation in the bathhouse.