Set of socks, Omsa socks
349 ₽ More details
Set of socks, Omsa socks
349 ₽ More details
American women
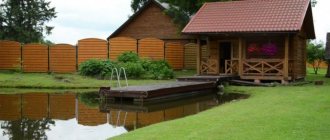
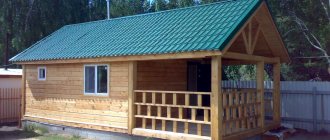
A polycarbonate bathhouse is an original and practical solution for a personal plot. It can only be used in the warm season, but such a structure is easy to install, and it is inexpensive. From this article you will learn how to build a summer bathhouse with your own hands.
Do you need to build a foundation?
To ensure that the greenhouse is not blown away by a strong gust of wind, and that the entire structure is sufficiently rigid and stable, it is necessary to make a foundation. This will take very little time and will allow you to easily move the greenhouse to a new location if necessary.
Here, as you can see, the greenhouse is installed on a wooden foundation
Here is a simple set of materials that will be required to build a foundation:
- wooden beam 12x12 mm;
- roofing felt;
- wood screws;
- hacksaw;
- roulette;
- antiseptic;
- shovel.
A trench is dug along the perimeter of the structure being erected, its width and depth exceeding the timber by 5-7 mm. Roofing felt is laid in the trench. Next, pieces of timber of the required length are prepared and treated with an antiseptic composition. After this, the timber is laid in the trench, and the edges of the roofing material are wrapped towards the foundation (if necessary, the roofing material can be secured to the timber with a construction stapler). All that remains is to securely fasten the beams with self-tapping screws - the foundation is ready.
Example of a foundation for a greenhouse
DIY Greenhouse Plans with Raised Bed | Home Guides
Raised beds in a greenhouse provide more accessible growing space than container gardening, and the growing season is extended beyond what would be possible in outdoor beds. Vegetables grown indoors, especially root vegetables that need deep soil, benefit from the good drainage and improved soil conditions available in raised beds.
Greenhouse floors
Most greenhouse floors are made from soil, gravel, or concrete. Raised beds are easiest to install on gravel or dirt floors, which will allow for good drainage under the beds. If you build beds in a greenhouse with a concrete floor, drainage will be an issue. In this case, raised beds will need to install crushed stone, gravel or drainage tiles over the concrete and under the soil to allow water to drain away. Raised beds deeper than 18 inches will also benefit from gravel or tiles to improve drainage.
Layout of beds
The size of beds in greenhouses will depend in part on the size of the greenhouse. Raised beds can be as long as space allows and should be 2 feet wide if they can only be reached from one side, or 4 feet wide if they can be reached from both sides. Most vegetables require six to eight hours of sun per day to produce high yields, and the greenhouse should be located in a sunny location for best results. To maximize sun exposure, orient beds for low-growing crops in a north-south direction. When growing taller vegetables, the beds can be oriented east to west so that shorter crops can be planted on the south side of the bed.
Construction of a raised bed
The elevating base can be made from pressure-treated lumber, cedar or redwood, synthetic wood from recycled plastic and concrete, or decorative blocks. Avoid using wood treated with creosote or pentachlorophenol, as these can leach into the soil and harm plants. Beds made of pressure-treated wood with perforated plastic covering. On concrete, make sure there is space between the floor and the raised floor walls to drain water, and drill drainage holes at the base of the walls if necessary. For beds deeper than 18 inches and on concrete floors, add gravel or tiles for drainage before filling the bed with soil.
Filling with soil
The soil for the hill should be light, well-drained and rich in organic matter. Fill the bed with a mixture consisting of any combination of store-bought topsoil, compost and peat moss or fine pine bark mulch. Alternate layers of topsoil and organic matter 2 to 3 inches deep each in a raised bed and work with a shovel or mini rotary tiller. If you are working in a greenhouse with a dirt floor, till or churn the soil in the bed and leave at least one-third of it soil in the mixture in the lowest layer of the bed.
.
Where to buy a house kit for a small frame bath
Modular sauna, bathhouse or spa complex in a house or apartment
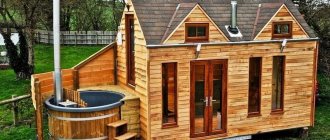
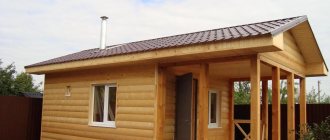
It is much easier to build a frame bathhouse with your own hands, using a kind of construction kit - a house kit, which includes all the large-format elements for construction. The main components of a frame bath house kit are beams and panels. You can use ready-made house kits only if there is a foundation. All components are adjusted to size (if necessary), assembled and secured to the base.
A finished small frame bathhouse installed on a foundation of concrete pillars
House kits for small frame baths have some advantages over structures erected permanently. Firstly, the compact dimensions of the mini-bath allow its structure to be installed even in a modest area. Secondly, it is possible to quickly dismantle the structure and transport it to another location.
Thirdly, the presence of internal communications wiring allows you to quickly connect and immediately use the bathhouse for its intended purpose. Factory-made house kits are accompanied by bathhouse designs with assembly drawings and architectural sections. At the customer’s request, the company can offer services for obtaining permits and obtaining technical specifications for electricity, gas, and water supply.
Frame bathhouse of a small area, built with your own hands
House buildings
Any personal plot is simply unthinkable without a good greenhouse. And if earlier.
How to make a barbecue with your own hands from metal: making a convenient portable barbecue
Do-it-yourself ventilation in a bathhouse can be done according to different schemes.
Step-by-step photo instructions: how to make a playground with your own hands. Tips, drawings, videos.
Arrangement of the floor in the bathhouse is one of the important and quite important.
In order for the bathhouse to become not only a place for regular washing, but also a kind of home “medical institution” where one gains strength and health, from time immemorial, firewood with the fragrant, tart aroma of forest and various resins was chosen for burning it. What kind of firewood is best for a sauna?
Baths can be found in many Russian suburban areas. The purpose of the bath is...
How to dry the cellar yourself and extend its functionality, and also not.
The method of drainage from the bathhouse must be thought out before its construction.
Water tank for a bathhouse - how to choose, types of tanks, connection instructions
When arranging a bathhouse in a suburban area, it is important to take into account several important criteria.
The bathhouse premises are exposed to varying degrees of humidity, high temperatures, and hot temperatures.
Most often, when building a bathhouse, wood is chosen as the wall material.
When building a bathhouse on a country site, it is important to choose the right material. Wood comes first, but it is expensive. In addition, the log house requires time to shrink. Large-format blocks are popular for quick construction. One of their varieties is expanded clay concrete.
The bathhouse premises have a special microclimate, which differs from the conditions in residential ones.
A bathhouse is a room with a special microclimate, so it is important to ensure quality.
Simple gazebos for a summer residence are built with your own hands in one or two days. Create.
How to quickly build a reliable and warm garage inexpensively? Of course, using LSTK technology, using the universal construction profile “Samostroy-KA!” for the construction of the frame. The galvanized metal frame is environmentally friendly, fireproof, and not subject to corrosion. An ideal solution for both a detached garage and one attached to the house. Pros and cons of the new one.
What is the most economical way to heat a garage? And what is better to use.
Today's article will help you choose the most suitable project for a one-story house with.
When the snow turns white outside the window or the dank gray sky frowns, pouring.
Outdoor recreation on your own plot should be comfortable and...
Building a sauna with your own hands is not without encountering a number of problems.
Do-it-yourself brick gazebo: step-by-step instructions with photos
Polycarbonate gazebos are quite popular today. In this publication.
The veranda attached to the house can be open or closed. Usually.
One of the conditions for being in the garden or vegetable garden.
As a rule, a garage is a room in which there are no.
Probably everyone, without exception, loves products prepared using smoking technology.
Concrete is one of those materials that you cannot do without.
If there is no natural body of water suitable for the family’s country estate.
Movement is life. And for a car, by the way, too. Only.
Paint for concrete floors in the garage: choose according to parameters
A gazebo, open veranda or terrace always become favorite places to relax.
As a rule, a personal bathhouse in a suburban area is not large in size.
Having your own bathhouse in the courtyard of a private house or cottage is a dream.
shown 36 out of 100
House extensions are not only a bathhouse, a garage and a shed for storing garden tools. This phrase also includes swimming pools and swimming pools, summer kitchens with barbecues and barbecues, garden greenhouses, cellars, extensions directly to the house, outdoor restrooms, premises for keeping animals, tree houses, playgrounds, carports, etc. The range of construction is quite wide, and which of the proposed buildings to build yourself, you can decide for yourself, focusing on your own needs, the area of the land plot and the size of the budget. We will help you in all your endeavors, providing the most detailed instructions, important tips and skills lessons.
Of course, all the necessary knowledge cannot fit into a few sentences, so our section is quite voluminous, but you will spend significantly less time reading several articles than professional training in the construction profession. You will be interested to know how best to place extensions on the territory, focusing on the letter of the law and the ease of use of the premises, how to remodel existing greenhouses and sheds, transform verandas and canopies over the entrance doors. Such information will be useful to every owner of a summer house and private house. It will not be difficult for you to prepare materials and build a bathhouse, sauna, heated garage, attach a porch to the house, make a greenhouse with a stove, select and install gates, sliding windows on the terrace or even a loggia.
Advantages of a self-made small bathhouse in the country
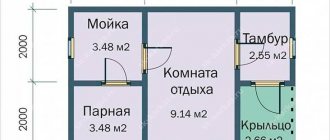
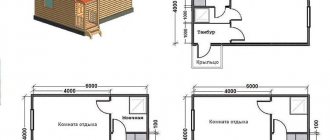
Bathhouse: layout and amazing solutions for compact buildings
Before building a mini sauna for a summer house with your own hands, the project is the first thing you should think about. Without it, nothing meaningful will happen.
You can make such a bathhouse if there are no neighbors nearby and there is nothing to be embarrassed about
Of course, a small bathhouse in the country is a necessary thing, and therefore such a construction is worth starting, despite the apparent complexity. Well, if you have a complete lack of desire and desire for construction, you can purchase a ready-made steam room, which will be delivered to you directly to your yard. The only thing you need to do is prepare a flat area for it.
Related article:
What extensions should be made in front of the bathhouse?
The bathhouse could use a small simple canopy. For ease of entry, you can add a porch equipped with a canopy and railings. A terrace is also attached to the bathhouse. It is appropriate to place a grill or barbecue on it, as well as place furniture for relaxation.
Foundation
Bathhouse with a gazebo under one roof
To ensure maximum durability and rigidity, polycarbonate greenhouses must be attached to a fixed base. Considering the small mass of this structure, we can limit ourselves to using a point foundation, which is made from any strong material. This could be timber, brick, aerated concrete blocks, and so on.
A distinctive advantage of a timber foundation is its affordable price, despite which it is capable of supporting greenhouses weighing up to 120 kg. In order to prevent soil erosion, as well as to protect plants from sudden temperature changes, it is best to bury it in the ground.
There is no need to completely wrap the beam in film, since the structure will quickly become unusable due to the condensation that collects. To prevent the supporting pillars from being washed away by water, it is necessary to place a cushion of sand or crushed stone under them.
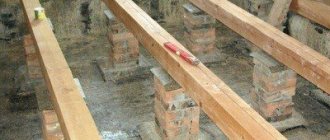
One of the most popular foundations today are timber foundations, for which old sleepers can be used. The main advantage of this material is that it can last at least 40 years even in conditions of very high humidity.
The sleepers must be laid in a small trench so that the top edges are level with the ground and can be secured with construction staples. Piles for such a foundation can be made from concrete, blocks and bricks.
If the greenhouse is on a metal structure, then it will be necessary to install a strip foundation. The main disadvantage of concrete is that it is a rather poor conductor of heat, so it takes an extremely long time to warm up, which is not very good in severe and winter cold. That is why such foundations can be erected only in those rooms that will be distinguished by the presence of artificial heating.
Peculiarities
A log bathhouse is a traditional Russian building.
Such baths were built in Ancient Rus', but since then the technology has been somewhat changed and improved. In particular, this is due to the fact that the technology of making logs has changed greatly. The requirements for bath buildings have also changed. So, now it is necessary that the bathhouse be equipped not only with a dressing room and steam room, but also with a shower, toilet, relaxation room, and billiard room. The size of the bathhouse and, accordingly, the amount of material depend on how many rooms will be equipped. Wooden baths differ from their brick counterparts in a number of advantages.
Wood has a wonderful effect on human health. The healing steam in such steam rooms improves mood and overall well-being. Depending on which wood is chosen, the effects produced differ. For example, if you choose coniferous wood (spruce, pine) for construction, you can be sure that after visiting the bathhouse your mood will improve and insomnia will disappear. In addition, the evaporation of the resin emitted by these rocks has the ability to kill viruses in the human body.
- The timber is an environmentally friendly material, so even in the process of destroying the bathhouse, no harm will be caused to the environment. Disposing of logs is also very easy: you just need to unload them somewhere in the forest. This will turn your garbage into useful fertilizer.
- Ventilation in wooden buildings is high. This is due to the fact that timber naturally has excellent ventilation properties, so there will be no problems with stagnation of moist air. Thanks to this feature, during bathing procedures a microclimate is formed that is most suitable and comfortable for steaming in principle, and as a result, the best results are achieved.
- Wooden baths retain heat well and do not cool down quickly. Wood has low thermal conductivity, which cannot be said about brick. Low thermal conductivity provides another advantage: in winter, a log bathhouse will warm up many times faster than a brick one.
- Thanks to natural ventilation and low thermal conductivity, there will be no need to spend additional funds on equipping a wooden bathhouse with ventilation, and there is also no need to insulate it additionally. As a result, this will allow you to save much more money than was spent on purchasing logs.
- The surface of the wood is attractive in itself, so no additional cladding or interior finishing of the bathhouse is required. If profiled timber was chosen for construction, then the building will look neat and tidy and will not “sag” or warp. In addition, the soundproofing qualities of wood are excellent.
A wooden bathhouse on the site is evidence of the high status of the owner. It can even be called a status thing. In addition to the fact that it is convenient and beautiful, a sauna made of timber makes it possible to gather with a company or family and have a good time with intimate conversations in the intervals between procedures in the steam room.
How to choose a design
If you decide to build a polycarbonate greenhouse with your own hands, it is advisable to choose a design that allows you to use the main advantage of this material - its ability to bend. These are two types with curved roofs with arch-shaped supports.
In one design, the arcs extend from the ground itself. If they are curved in the form of a radius, a lot of area is lost at the edges, since it is very inconvenient to work there due to the small height.
If a radial polycarbonate greenhouse is made according to this drawing, it will be possible to work near the walls
Another design solves this problem - with a composite frame welded from several pieces. Straight posts emerge from the ground/from the base, which rise to a height of at least one and a half meters. An arc is welded to them. With this arrangement, the roof is rounded and the walls are straight. You can even work along walls without problems, standing up straight to your full height.
Option with composite frame
But the rounded greenhouse roof has several disadvantages. The first is that it is more difficult to make ventilation windows in it than in a straight line. The problem can be solved by making transoms in the walls rather than in the roof. The second disadvantage of a rounded roof in a polycarbonate greenhouse is that snow falls off from it worse than from flat, sloping surfaces. If you live in a region with snowy winters, you will either have to make reinforced trusses, or make a pitched roof - with one or two slopes.
If you weld two half-arcs at an angle, the snow will melt better
There is a third solution - to make a rounded part of the roof from two arches, welded at an angle, which forms a kind of ridge. With this structure, the snow melts well and the ridge can be protected with a wide strip of metal. This will improve snow melting and protect the joint from leaks.
Arrangement of greenhouses inside: planning tricks
Improving the inside of greenhouses is a very important step in the life of a novice gardener. How comfortable it will be to grow plants and care for them depends on this. Well, the condition of the herbs themselves, flowers and seedlings also depends in almost everything on how the correct local climate is created in the room.
Layout
This process depends on what crops will be grown and what technologies will be used for this. But in general, standard bed sizes should not exceed 1.2 meters. If you do more, it will be difficult to care for them. And in the future there will be no ability to reach the plants and pick something needed.
In one small greenhouse you can equip about 3 beds. The passage between them should be a little less than a meter.
Usually, in a greenhouse, one passage is made completely narrow, and the second is wider. In some cases, small transverse transitions are made in the beds themselves. To do this, you don’t even have to lay real paths - you can simply lay the boards on the ground.
Foundation
When the question arises: do you need a foundation for polycarbonate greenhouses, the answer is unequivocal - yes. And also of good strength, since such greenhouses are easily blown away by the wind.
The foundation can be manufactured in the following types:
Tape option. These foundations for buildings are expensive, but the most reliable, serving for many years. If the greenhouse is intended for year-round use, the foundation is laid in depth, slightly deeper than the freezing point of the soil.
Concrete-brick type. The most common option: optimal in terms of cost, complexity and production time. You can lay it out with small concrete foundation blocks and fill it with mortar.
The building material can be ordinary bottles, stacked in rows and filled with concrete. This creates an incredibly warm and economical foundation. Strength will suit even serious buildings.
Pile frame production. This type of foundation is not frost-resistant, but is quite reliable and will last a long time.
Types of polycarbonate
There are three types of this coating:
Monolithic production. Outwardly, it is similar to a glass coating, but more light penetrates through it, it is much stronger and lighter than glass. The thickness can reach forty millimeters.
The downside is that the cost is quite high. It may consist of several sheets with different qualities (one may have high strength, the other may not transmit ultraviolet rays).
Corrugated type. It is made from monolithic sheets by giving it a corrugated shape. This polycarbonate has a thickness of 0.8 to 1.2 mm.
Cellular version. May consist of more than two polycarbonate sheets connected by ribs. The quality and shelf life of the material depend on the configuration and parameters of the jumpers.
The thickness of structured polycarbonate is from 4 to 32 mm. It is advisable to make greenhouses from multilayer polycarbonate with a thickness of at least 10 mm.
Polycarbonate greenhouses: features, advantages and disadvantages
A distinctive feature of polycarbonate is its honeycomb structure of optimal thickness in mm. Each honeycomb consists of special cells filled with air. This allows the structures to retain heat inside. To increase thermal insulation, the sheets are coated with special varnishes, which also increase resistance to ultraviolet radiation.
Polycarbonate is easy to process, which allows you to install it yourself, drilling, gluing and other work. The material can also be cut with a jigsaw or reinforced scissors.
The use of polycarbonate sheets in greenhouse production has many advantages;
- long service life, resistance to damage;
- possibility of repair;
- a light weight;
- the unique structure of the sheets retains heat inside;
- flexibility and plasticity simplify processing and installation;
- increased sound insulation;
- the variety of sheets allows you to stitch spans and install internal partitions;
- you can use the buildings throughout the year, which is due to the resistance of greenhouses to negative climatic factors and aggressive substances;
- safety, no toxins during combustion;
- quick installation and dismantling of objects that you can do yourself without the help of specialists;
- good strength, density, resistance to mechanical loads and temperature changes.
To preserve all the properties of sheets, you must follow the basic rules. It is necessary to protect the ends, wash the sheets from contamination with soft cloths, and do not use alkalis, abrasives or acids. In winter, during snowfalls, you need to open the top of the structure. Due to the insufficient durability of the finished structure, it is necessary to create a reliable reinforced foundation. Other disadvantages of the products are the susceptibility of the metal frame to corrosion and the complete transparency of the walls. To do this, they have to be galvanized and strengthened.
In the photo you can study the structure of the material in detail.
The cost of a polycarbonate coating is significantly lower than the price of a glass greenhouse, but more expensive than film material. In the modern market, everyone can find the best option in terms of quality and price. The manufacturer produces all the elements and parts exactly and supplies them disassembled, which simplifies the process of assembling or disassembling the finished greenhouse.
Interior arrangement
In the process of internal arrangement of the greenhouse, it is necessary first of all to deal with the soil.
In order for the selected soil to perform its assigned functions as fully as possible, it is necessary to pay close attention to its selection.
First of all, the soil should be provided with good air permeability and an optimal level of humidity. In addition, it will be necessary to add special nutritional supplements to the soil and remove weeds. For disinfection, you should use special products for this type of soil. The soil can be purchased in specialized stores or you can prepare it yourself.
The interior arrangement of the greenhouse also involves proper design of the beds. And some believe that in this case it is necessary to be guided only by the convenience of the gardener, but this is not so. Improper placement of beds can cause a lack of harvest in the future.
Arranging a greenhouse according to Mittleider is considered the optimal and effective way. The essence of this technique is that for optimal plant life, the beds must be at least 45 cm wide, and the passage must be at least 90 cm. It is in such options that plants can receive the necessary amount of air and sunlight, without which it is impossible to grow any kind of plant. or crops.
Almost any modern greenhouse can boast of vents and doors. This means that ventilation can be carried out not only using technological equipment, but also manually. To do this, you just need to open and close the windows in a timely manner.
Now it’s time to take care of heating the polycarbonate greenhouse, which can be done using solar heating. However, in some regions this is not enough, especially in the winter, so you have to resort to installing special heating systems. One of the most popular on the modern market is the installation of heated floors, which is characterized by accessibility, low price and efficiency. The ease of design of such a system allows you to install it at home on your own.
In order for the crop to grow as quickly and efficiently as possible, it is necessary to take care of a modern irrigation system. Of course, you can use barrels or a hose, but this method of irrigation is not entirely convenient and requires the owner to be constantly in the greenhouse.
If you have enough finance, you can install a drip irrigation system, which features automatic watering and can save a huge amount of time. A distinctive feature of this method is that watering will be carried out using water droplets that directly flow to the roots of the plants.
Types of baths made of polycarbonate greenhouses
There are winter, summer and universal baths of different sizes.
For a summer version of a bathhouse, a simple wooden frame structure covered with polycarbonate is quite suitable. The calculation is based on the fact that air and water are heated naturally under the influence of sunlight.
In the winter version, polycarbonate walls are supplemented with insulation and sheathed with facing material, a stove is installed, or a portable heater is used. For fire safety purposes, you will need a metal tray.
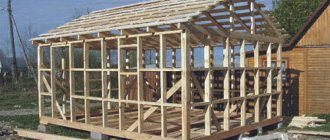
How to calculate and build walls
Now that the base has hardened and the floor is done, you can begin to build the skeleton of the walls of the bathhouse. To begin this work, the wood must be thoroughly dried. It is not recommended to use birch for these purposes, as it is susceptible to rapid rotting.
The design diagram of a frame bath will help in construction
Before proceeding directly to the construction of walls, it is recommended to carry out a preliminary calculation of the material. At the same time, remember that you need to purchase it with a reserve. The construction of walls takes place in the following order:
- Start with the bottom trim. To install it, purchase strong beams with a cross-section of 100x100 mm. Connect them at the corners in a quarter, secure them well with nails. To prevent the bottom trim and attached corner posts from moving, place them on steel pins 20 mm thick, which need to be embedded in concrete.
- The same section of timber is used to create the top trim.
- For greater rigidity of the frame, install eight braces in the corners of the bathhouse.
- Along the perimeter of the walls, place intermediate racks made of the same timber that was used to make the frames.
Selection of building materials.
Below is a list of materials that will be needed to build a bathhouse from timber:
a) timber 150x150 mm, although it is possible to use timber with a cross-section of 100 mm or 200 mm;
b) floorboard (edged board 150x50 mm 4 meters long is excellent);
c) hardwood boards for ceiling construction (usually lining with a width of 100 mm and a thickness of 20 mm or more is used);
d) material for wall decoration (as a rule, the same lining is used);
e) material for vapor barrier (an excellent option would be to use a vapor barrier film);
e) waterproofing (it is advisable to use penofol, although polyethylene film is suitable);
g) ceiling insulation (mineral wool materials are a good option);
h) sheet asbestos for insulating wooden structures from temperature influences, including for walls near the stove and elements located next to the chimney;
i) cement, sand and crushed stone for foundation construction (recommendation - cement should be purchased before starting construction);
j) roofing material for the roof, which can be selected based on personal preferences and the main thing is that it fits seamlessly into the surrounding roofs of other buildings;
Thatched roof is comfortable unusual and cheap
Bathhouse roof made of shingles
The best time to start construction is spring, since after completion of the main construction work it is necessary for the timber to dry and shrink. This requires at least 6 months.
Do-it-yourself veranda for a bathhouse: projects, photos, ideas
The veranda is a building that can be accessed from the bathhouse and from the street. It comes in different shapes: square, rectangular, U-shaped, etc. It does not have to have even corners; a round veranda will look original. But keep in mind that its construction will be much more difficult.
The easiest option to make a veranda is to attach it to the house. The advantage of this arrangement is that less materials will be needed for its construction, since it will already have one of the walls - this is part of the bathhouse.
The traditional location of the veranda is in front of the front door. The advantages of such placement: you don’t have to change the layout, make an additional doorway, the veranda will fit organically into the interior and will be easy to use.
The veranda can “encircle” the bathhouse on several sides, in which case it will be quite spacious.
If on the site, in addition to the bathhouse, there is also a house located nearby, then a veranda connecting the two buildings would be an excellent solution. In this case, even on a rainy day you will be able to walk from the house to the bathhouse, remaining dry, the roof will protect you from bad weather.
If the bathhouse is located next to the road, then it is better to place the veranda in the courtyard so that you can relax in privacy and away from dust.
The plan of the veranda may vary. Some people limit themselves to a table and benches, while others make a full-fledged recreation area on the terrace. Here you can put sofas and armchairs, a plunge pool and even make a swimming pool!
If the area of your veranda is large, then a great option would be to make a sauna with a barbecue: place a stove on the veranda and cook food on it.
If you choose a closed veranda, then in the summer it can be used as a guest room or bedroom. Then it is desirable that it has a bed or a folding sofa, for example.
Below are projects of verandas for the bathhouse:
Bathroom layout: recommendations
What could be more enjoyable than gaining strength in a steam bath! However, before building a bathhouse, you need to create its layout. Here are some recommendations to help you get the best sauna.
First, figure out the area of the building. Consider the basic rule, five square meters. m. per person! Accordingly, if there are 3 of you in the family, then the area of the bathhouse should vary from 15 sq. m.
Next, you definitely need to make a layout and include a steam room, shower (washing room), relaxation room, and dressing room in the layout. Scatter these points until you reach the most optimal placement.
After this, it is imperative to complete a general drawing of the bathhouse, including everything in the drawing: starting from the foundation, pumping in the filling.
Finding an example of a drawing and making your own is not at all difficult, since there are a lot of different variations on the Internet. And so as not to waste time, you can find a diagram specifically for your footage.
If you do not trust the Internet, or you do not have friends who could share projects, you can always contact the appropriate specialists; and they will already make the drawing and layout.
How to do it yourself?
Sooner or later, every owner of a summer cottage has to think about the issue of expanding a house or bathhouse
Before you start building extensions to the bathhouse yourself, it is important to take into account their design features and draw up the project correctly. If you plan to build a major extension, then you must also decide in advance on the type of foundation
Most often, a columnar or strip foundation is chosen for this.
To build a frame extension, the following types of work should be performed sequentially:
- draw up a project;
- choose a material (for frame structures it is recommended to use timber pre-treated with antiseptics);
- establish a reliable foundation (it should be the same as the foundation of the bathhouse itself);
- lay a waterproofing layer and seal the seam between the walls of the steam room and the extension;
- dismantle part of the roof of the main building;
- install doors and windows;
- carry out the interior arrangement by covering the walls with clapboards and placing furniture.
The construction of an extension made of wood differs from the construction of a structure made of brick or foam blocks. But in both the first and second cases, an estimate should be drawn up, then the site should be cleared. When erecting a frame structure, first of all, the lower crown is laid, then a bundle of beams from the walls of the steam room is made with the lower crown and an angular connection is made “into a tenon” or “into a paw”. The walls of the extension should rise above the level of the bathhouse.
As for the construction of extensions made of brick or foam blocks, it has its own characteristics and consists of the following stages.
- The site is being prepared for construction. To do this, the perimeter of the area for the future structure is cleared - the top layer of soil is removed, stones, debris and vegetation are removed.
- The foundation is being installed. First, a trench is dug under the concrete base according to the design, then holes up to 50 cm deep are drilled, and rods are driven into them. Next, the trench is covered with a layer of gravel and sand, the strapping is welded, the formwork is laid out and it is filled with concrete.
- Foam blocks are being laid. It can be done using cement mortar or special glue.
- The roof is being installed. To do this, it is recommended to wait until the walls settle (2-3 months). It is difficult to install a common roof for the steam room and the extension, since you first have to disassemble half of the roof and then reassemble it. Therefore, many craftsmen prefer to install a separate roof; it is assembled in the shortest possible time from boards with a section of 15x50 cm and 10x40 cm.
- Upon completion of construction, the internal arrangement of the extension is carried out. Thus, anyone can add a veranda, spacious terrace or gazebo to the finished steam room.
DIY School Greenhouse Kit
| Side wall | n/a |
| Frame | Thick extruded aluminum |
| Color | Silver |
| Coating | The 9ft 8in beam has 8mm double-walled polycarbonate panels on the roof and sides; 10mm on 14ft 2in W end walls with 16mm double skin polycarbonate panels |
| Door(s) | Heavy duty door with key lock; width 30" x height 72" / 79" |
| Roof vents | (2 or 4) large 37.5" x 39.5" (automatic) |
| End vents | 1-30" wide x 42" tall with adjustable arm |
| Side vents | 0 |
| Base | Built-in |
| Foundation | Options - Bets; Treated 4x4; Concrete footings or slabs Additional foundation information |
| Guarantee | Rama - 15 years; Coverage - 10 years |
| Management | Included |
Our educational greenhouse package is an affordable solution for schools on a budget. Although affordable, this German-made greenhouse features durable aluminum profiles, 16mm triple polycarbonate cladding and large skylights for optimal natural ventilation. Best of all, simple installation will save you the cost of professional installation, providing the most space for your budget.
Easy to assemble Sliding design
The unique "channel" design of the aluminum components allows for simple "slide and fit" assembly, saving time and money. Easy-to-follow step-by-step assembly instructions are included with each design.
Durability
The greenhouse frame has the thickest, most durable polycarbonate cover of any of our educational packages. These 16mm thick panels are not only incredibly durable, but also significantly reduce heat loss, thereby saving energy and making the greenhouse less expensive to heat during the colder months.
Note: The greenhouse included in this package is durable but is not engineered and cannot be used if planning permission is required. Please contact your Greenhouse Megastore sales representative to discuss any specifications.
Included in the package
x 14 inches: 10 mm
| Size | Glazing | Roof windows | Shadow fabric | Heaters | Drip irrigation kit |
| 9'14 9'14 Width | 2 Automatic | 50% Aluminet | (1)HT-3000 | (1) CG-TP-IR | |
| 9'8"W x 17'2" | Roof: 8 mm End walls: 10 mm | 4 Automated | 50% Aluminet | (1)HT-3000 | (1) CG-TP-IR |
| 14'2"W x 19'8" | Roof: 16 mm End walls: 16 mm | 4 Automatic | 50% Aluminet | (1)HT-3000 | (1) CG-TP-IR |
Financing available! $$$
Greenhouse Megastore works with HFS Financial and Pinnacle Capitol to provide financing to homeowners and businesses.
Order by phone
We understand that you may want to talk to a real person instead of ordering online. Call us toll free at 1-888-281-9337 to speak with a Greenhouse Megastore sales representative.
Quick offer
Fill out our quick quote form to receive a custom quote for your greenhouse project.
Get a free, personalized, quick quote
Free shipping
This item ships free by motor freight carrier - almost anywhere in the continental United States!
In rare cases, restricted delivery addresses such as islands or major metropolitan areas (such as New York City) may incur additional shipping charges; In this case, you will be contacted to confirm additional shipping charges before your order is processed. Shipping to Alaska or Hawaii qualifies for free shipping to any West Coast port. Contact us for special shipping rates from the West Coast to Alaska or Hawaii.
Road Freight Agreement
- Full-Size Semi-Trailer: Your location must be able to accommodate a full-size semi-truck up to 70 feet in length. in length.
- Someone must be present: You or another authorized person must be present to unload the cargo. The exact delivery date will be agreed upon by telephone with the transport company.
.
Preparing to work with polycarbonate
Before purchasing material you need:
- Prepare a project, draw what a homemade gazebo will look like;
- Decide what the support posts and roof rafters will be made of.
Wood supports are the cheapest, however, wood quickly loses its beautiful appearance and will dry out or swell. Another drawback is that the tree needs regular care, otherwise moisture and temperature changes will quickly destroy the supports. In order to preserve the properties of wood, impregnations are used. Most often, metal parts are used as supports: pipes, profiles or corners. This frame has maximum strength, and practically no maintenance is required.
After selecting the frame, the area allocated for the construction of the gazebo is marked, paying special attention to the places for the support posts. The next stage is installation of supports in the pits, alignment and pouring of cement
If you need to pour a concrete platform that will be the base of the gazebo, this should be done simultaneously with the installation of the pillars so that the structure is stronger.
If a metal corner is used, it can be joined not only by welding, but also with ordinary bolts and nuts, having previously drilled holes in the support. Assembly of the metal frame precedes work with polycarbonate.
Before screwing on the polymer material, it also needs to be prepared: cut into parts, marking the dimensions. Separate parts of the walls and roof of the gazebo can be of different colors to ultimately create an ornament. The polycarbonate sheet is carefully marked using a pencil or wax chalk: all the contours of the parts are transferred to it. Then the sheet can be cut - with a regular knife, jigsaw, saw, hacksaw or simple cutter. You should mark holes for connecting the sheet to the metal base so as not to waste time on this during installation.
It is worth thinking about whether the load on the polycarbonate gazebo roof will be too great. You probably need to reinforce it with a beam from the inside or plan for additional support.
Roof for a gazebo made of polycarbonate
Which frame to choose
The frame for a bathhouse from a greenhouse is made in the same way as for greenhouses from various materials: metal pipes, aluminum profiles and metal corners, wood, including planed timber.
How to make a reinforced, load-bearing metal frame
Metal is an expensive material with high performance characteristics. The connection of a metal structure is carried out with standard hardware products; during assembly it is necessary to combine several types of connections. In this case, you will additionally need to use a welding machine.
Wooden harness
Lumber frames are affordable, easy to make yourself, reliable and durable. The downside is the risk of pests, rot and fungal infections. As a preventive measure against damage, treatment with special antiseptic agents made on an organic basis can be used.
How to make a frame based on planed timber
Such a frame is assembled in full accordance with the design and assembly process diagrams. The classic scheme is a gable structure on racks. The frame elements are fastened together with bolts with spacers, steel angles and self-tapping screws.
Initially, a foundation is built with waterproofing and anchor bolts installed for mounting the frame. Then the roof racks and slopes are installed.
What materials to choose for cladding a bath
The baths are lined with a block house - it consists of wide semicircular planks that imitate a log house. The best option for interior decoration is considered to be lining.
Types and materials for the greenhouse frame
We continue to answer the question of how to build a greenhouse with your own hands. If you have decided to build a greenhouse on your site and have chosen the type of roof for your future greenhouse, then now you need to think about choosing the material for the greenhouse frame. What to build a greenhouse from?
The greenhouse frame can be made from:
- tree
- metal
- pvc
Wooden frame
Wooden frames are very easy to work with. Wood is easy to process and can be used to build almost any type of greenhouse. The disadvantage of such construction will be the wood's susceptibility to rotting. Therefore, all timber must be treated with special impregnations before construction.
Greenhouse made of wood and film. Video construction instructions
Metal
In order to assemble a metal frame, good skills are required. After all, the metal will have to be either welded or bolted. Such a frame for a greenhouse is very expensive. But it is very durable, reliable and will last for decades. This frame is suitable for a permanent greenhouse.
Video of building a glass and metal greenhouse
Plastic
Today, the construction of greenhouses from plastic pipes is gaining popularity. This type of construction is relatively cheap, even beginners can do it. Moreover, such a construction will not take much time. The disadvantage of such a frame will be its low strength. Over time, plastic pipes bend and the greenhouse loses its shape. Therefore, such a frame is not suitable as a permanent structure.
Forms
A distinctive feature of a polycarbonate greenhouse, which distinguishes it qualitatively from greenhouses and other similar structures, is its ability to maintain heat. To heat the greenhouse, natural sources are used, including the sun, vapors from manure or biological waste.
In order for the steam to be covered as well as possible, it is necessary to reduce the amount of heated space. In addition, for working with plants, it is necessary to provide the presence of folding hatches.
The main advantage of the greenhouse is that everything here is built on artificial heating, so the height of the structure can be much higher than the height of a person.
Among the most popular and in-demand forms of polycarbonate greenhouse structures on the market, several types can be distinguished:
Arched polycarbonate greenhouses. This form is considered optimal, as it provides a high level of comfort when starting and using. Assembly is carried out by bending polycarbonate sheets and gluing them to the frame, making it quite easy and comfortable for people to move inside the greenhouse. The presence of an arched roof allows snow and other precipitation not to linger.
Baths, saunas and swimming pools
A shower in the country is an essential attribute of comfort and a great opportunity to freshen up after gardening work. However, not every owner of a house in the middle of nature can boast of a comfortable shower cabin that gives a powerful charge of vivacity and positive energy. However, if this problem is familiar to you first-hand, there is no need to despair - the matter can be fixed. And modern material - polycarbonate and useful information on the topic will help with this.
Content:
- Polycarbonate shower: features
- How to build a polycarbonate shower?
- We are developing a project
- Setting up a shower stall
- Summer shower: we use it not only in summer
- Choosing a tank
- How to heat water?
- Making a drain
- What are the benefits of a polycarbonate shower?
- Summer shower made of polycrabonate: video
Polycarbonate shower: features
Before we talk about building a polycarbonate shower with your own hands, you need to figure out what kind of material it is and what are its features?
Polycarbonate is a polymer plastic with a unique structure. Polycarbonate sheets are made from granules through extrusion. This ensures thermoplasticity and the ability to restore their original properties when solidified (no matter how many times they are melted). But this is not the only advantage of the material. The list of advantages is more than impressive.
- ease. Cellular polycrabonate is 6 times lighter than glass, which allows you to create interesting designs that weigh almost nothing;
- strength. The molecular structure guarantees high impact resistance. The sheets can withstand impressive weight and wind loads;
- sound and heat insulation. Thanks to the air filling the internal voids, the sound and heat insulation characteristics of this synthetic polymer are at a high level;
- flexibility. The plasticity of the sheets makes it possible to erect structures of complex geometric shapes;
- wide temperature range. Polycarbonate can withstand temperatures from +120 to -40 degrees.
The list of advantages is completed by ease of installation, low maintenance requirements, resistance to chemicals and precipitation, and safety.
How to build a polycarbonate shower?
If you want to build a country shower from polycarbonate, then you can realize your dream in two ways. The first is a light summer shower with a small water tank. The second is a more solid structure with a foundation and heating.
The location of the booth is of no small importance. It should be reliably protected from the wind; it’s good if the area is warmed up by the sun’s rays - in the evening of a hot day you can swim in warm, pleasant water. To organize good drainage, choose a location on a hill.
We are developing a project
The first step towards realizing what you want, namely a polycarbonate shower for a summer house, is a project. Incredibly, even a basic schematic drawing can facilitate the construction of a building.
The shower stall should not be cramped. The best option is when even the tallest family member can freely bend over and raise their arms.
It is important! Most often, the size of the washing room is 1 m2, the height is 2.5 meters. Whereas for a locker room a room of 1 x 0.6 m is sufficient.
The constituent elements of the structure are an individual moment. But the most popular option is a booth, drain and stationary water barrel. By the way, when developing a project, consider the water source and drainage location. Ideally, the drain is located near the drainage pit.
Setting up a shower stall
We mark the territory and install a columnar foundation. We drive wooden pillars into the corners of the resulting rectangle. Pre-treat them with a moisture-repellent solution and antiseptic. We assemble the metal frame, fastening the individual parts with long bolts. A dressing is made inside the frame, which will serve as the basis for the floor.
Between the supporting pillars, slopes are laid, and logs are placed on them. To ensure unhindered flow of water into the drainage, make the floor with holes - lay the logs at small intervals. The only thing is that taking a shower with such a floor in cool weather will not be entirely pleasant due to the air flow from below.
Installation nuances
It is necessary to cut polycarbonate sheets to the same dimensions as the roof. Secure the sheets with self-tapping screws. You will need washers with soft spacers. When you start laying the material, the stiffening thread when laying it should be perpendicular to the cornice. Be sure to make caps at the ends of the roof to protect from moisture and dust.
The interior wall needs to be sheathed with polycarbonate. When installing the second layer, the wall will be opaque, thereby maintaining the privacy of the interior space.
There should be a hole on the floor in the bathhouse through which water will drain. To prevent it from clogging, put a mesh. It is better to cover the dressing room with OSB tiles, and the wall between it and the steam room with polycarbonate. The outer walls must be treated with a water-repellent agent. After this, you can install doors and window blocks.
Hot water will be supplied to the bathhouse by a pump, because a stove will not be installed in such a room. In hot weather, a summer bath will always be supplied with hot water heated by sunlight. For drainage it is necessary to create a special hole and drainage.
Varieties
The bathhouse can be built both winter and summer. In winter, the room will warm up perfectly at an outside temperature of minus 10 degrees. Even if there is wind, it will not penetrate inside. There is a stove inside with pebbles on it. They retain heat in the room for a long time. In addition, you can make a portable heater in the bathhouse. Make it from an old iron bucket. Attach a grill instead of the bottom. Place small cobblestones in it and heat the bucket with them on the fire. Then take it to the bathhouse. Spray water on these cobblestones. Soak the broom in hot water earlier.
Remember! The heated heater must be placed on an iron tray. Be careful when handling heated stones.