In modern conditions, people use a large number of electrical appliances. All of them require connection to an electrical outlet, but it is not always possible to connect all devices to the network in a room. For a temporary connection, the best solution would be to use a household extension cord or remake the power point. Installing two sockets instead of one is not a difficult task, but it is not always technically feasible. Before reconstruction, you should familiarize yourself with the features and nuances of how to make two outlets out of one.
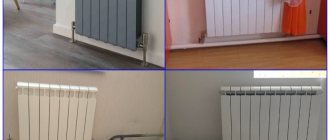
Advantages and disadvantages
Double socket
Plus the scheme for connecting one or more electrical outlets to the main power point - convenience. The user will not worry about not having enough space to connect, and will not be disturbed by wires or a falling tee.
But such a connection also has disadvantages. The main disadvantage is the maximum load. Typically, 1.5 or 2.5 square meter wires are used for sockets. Such cables are designed for a certain power of connected devices. If there are more connectors for connecting equipment, the load will increase and the wires may fail.
All electrical outlets provide additional resistance to electrical current. If you connect a powerful electrical appliance to the last outlet connected to the main power point, the previous contacts may become hot. Also, under the influence of electric current, vibration will occur, deteriorating the quality of the connection.
It is not recommended to make such a connection in the kitchen, where all powerful household appliances that consume more than 1.5 kW of electricity are collected. For the same reason, it is dangerous to connect the power point in the bathroom.
Connection diagrams for other types of lamps
To correctly connect other types of lighting devices, you must first know their operating principle and familiarize yourself with the connection diagram. Each type of lamp requires certain operating conditions. The filament filament process is not designed to emit light at all. In the area of high power and area, they have been noticeably replaced by gas-discharge devices.
Fluorescent lamps
In addition to incandescent lamps, both halogen and fluorescent tubular lamps (FL) are often used. The latter are common in administrative buildings, car painting bays, garages, industrial and retail premises. They are used a little less often at home, for example, in the kitchen to illuminate the work area.
The LL cannot be connected directly to a 220 V network; ignition requires high voltage, so a special circuit is used:
- choke, starter, capacitor (optional);
- electronic ballast.
The first scheme is used less and less often, it is characterized by lower efficiency, throttle hum and flickering of the light flux, which is often invisible to the eye. The electronic ballast connection is often shown on the housing.
Either one lamp or two are connected in series, depending on the situation and what is available, also with electronic ballast.
A capacitor between phase and zero is needed to compensate for the reactive power of the inductor and reduce the phase shift; the circuit will start without it.
Pay attention to how the lamps are connected; when lighting with fluorescent light, you cannot use the same rules as when working with incandescent lamps. The situation is similar with DRL and HPS lamps, but they are rarely found in everyday life, more often in industrial workshops and street lamps
Halogen light sources
This type is often used in spotlights on suspended and suspended ceilings. Suitable for lighting places with high humidity, as they are produced for operation in low-voltage circuits, for example, 12 volts.
A 50 Hz mains transformer is used for power supply, but the dimensions are large and over time it begins to hum. An electronic transformer is better suited for this; it receives 220 V with a frequency of 50 Hz, and leaves 12 V AC with a frequency of several tens of kHz. Otherwise, the connection is similar to incandescent lamps.
Choosing the appropriate wiring method
Table of the ratio of core cross-section to current loads
All methods of getting power from an outlet for another outlet can be divided into several groups. According to the method of fastening - inside the wall, outside or from the outside of the main power point with the wires leading out. Further work is carried out in a similar way.
Key operating points:
- Cable thickness. The cross-section of the child outlet should not be less than the parent one.
- Design decision. Directly depends on the interior of the room and does not affect the technical characteristics.
- Connection procedure. Household appliances may have two or three contacts. In the first case, these are phase and neutral wires, which are connected to different contacts. With a three-wire connection, grounding is added. It is connected to a mounting bolt on the device body.
- Grounding. If the main outlet has it, subsequent power points should also have it. According to the requirements of the PUE, the cable must be solid.
An additional power point is connected in parallel. But for lighting devices on the balcony, a serial connection can be made.
Is it possible to connect sockets in series?
Connecting sockets in series mode has a number of disadvantages and limitations. In a large room and a significant number of powerful electrical appliances, this method cannot be used - the load is too high. It is better to parallel the sockets or use the ring type. The recommended quantity per chain is 5-6 pieces.
Another disadvantage is the uneven distribution of voltage at power points. Each outlet accounts for a portion of the total electrical flow. Therefore, serial connections are not used in residential and industrial premises. But you can use it in Christmas tree garlands and others.
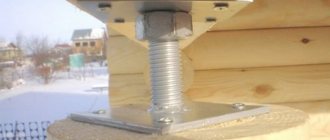
External electrical wiring
Open wiring in retro style.
Used in wooden houses or in retro-style rooms.
In a wooden house, wiring is laid in copper pipes. This is due to fire safety requirements, since cables cannot be laid in wooden walls. This is a complex type of connection that requires additional plumbing work.
For retro wiring, the visual component is of great importance. If you connect one outlet to another, you can disrupt the picture created by the designer. In this case, to maintain the style, it is better to install a new power point. If this method is not possible, an additional socket is installed next to the old one on the same dielectric substrate. It is important to choose an outlet of the same style so as not to disturb the appearance.
Some tips
Since these units are still considered new, it is necessary to provide several recommendations regarding how to connect an outlet with a switch.
- If installation is planned in a wooden house, then the socket box should be metal.
- When the unit is mounted near a doorway, the part that is the switch is located closer to the door.
- If you don’t have enough knowledge in electrical engineering, no work experience and no confidence in the correctness of your actions, it is better to entrust the work to professionals.
- Often home craftsmen make various mistakes when connecting. The most “popular” mistake leads to the fact that the socket is in working condition, but the switch refuses to function. In this “severe” case, the incorrect distribution of wires is to blame - confusion with the phase and neutral on the socket. The solution is to connect the phase conductor to the jumper and return the neutral conductor to the socket.
Sometimes such designs become the only possible solution, and in this case the owners no longer have to think about the pros and cons of the blocks. Understanding how to connect an outlet with a switch will make it possible to cope with similar work in the future.
An example of such a connection can be seen in this video:
Hidden wiring
Hidden wiring
With this type of installation, all wires are hidden in the wall. Even at the stage of repair work, special grooves are cut into which the cables are laid. Afterwards, the grooves are sealed with gypsum or cement and finishing work begins.
If you need to install an additional electrical outlet from an existing power point, you should find out whether it is possible to cut out another groove and make a hole for the socket box.
Working surface
How to properly remove power, and where is the best place to do it for small household appliances? Finding the answer to this question is a serious challenge for many.
Here it is necessary to take into account the possibility of simultaneously connecting the necessary kitchen appliances. For example, it is quite possible that you will need to turn on a kettle, toaster, coffee machine and mixer in one zone, so it is advisable to remove the block of 4 sockets in the appropriate place.
Naturally, it is impossible to provide for everything, so it is recommended to additionally provide for a reserve.
As practice shows, there are never too many sockets. It is considered normal to place blocks at 3–4 points at intervals of 1000–1200 mm along the entire length of the work area table top.
Please note that, for safety reasons, it is prohibited to install sockets closer than 500 mm from the gas pipe riser and wet areas, including the sink mixer.
In relation to the tabletop, electrical fittings should be placed at a height of at least 100–150 mm, which is 900–950 mm from the floor level. The final dimensions are determined taking into account the selected tile - so that the blocks fall on its center. If the electrical installation has begun, but there are no tiles, it is enough to simply separate the wires with a reserve, and install the socket boxes closer to the start of the tiling work.
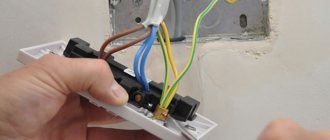
Combined wiring
Combined electrical wiring
This method is used when you need to connect additional ones from one electrical outlet, but you cannot drill into the walls. The procedure for installing and connecting wires in this case is as follows:
- Power outage. It is necessary to de-energize the entire apartment or room in which the work will be carried out. Using a tester, you need to make sure that there is no voltage.
- Removing the protective cover from the main power point.
- Removing the socket by loosening the retaining contacts.
- Connecting wires to the new power point.
- Next, it is checked whether the limiter will not squeeze the wires. If it interferes with the cables, you need to carefully break off a small piece from the socket box or wall to the size of the wire.
- Reinstalling the socket.
- Creating a hole in the decorative cover for the wire.
- Installing the cover.
The wire is led to the desired power point and attached to the wall using brackets every 30 cm.
How to steal electricity through grounding. How to steal electricity from an apartment
In Russia, illegal connection to the power grid is quite common, through which electricity is stolen. Electricity is stolen from private and apartment buildings. There are several ways to steal electricity from the network.
Methods of theft:
- Remake the counter;
- Affect the operation of the meter.
With certain skills and knowledge of the design and operation of meters, you can remake them in such a way that they begin to count electricity by 30 - 50% less. For this purpose, these devices are equipped with additional elements.
For example, if the meter is electronic, additional transistors and electronic devices are soldered into its circuit, with the help of which the meter is remotely controlled.
If the device is mechanical, then in this case, the operation of its mechanical parts is changed. For example, they reduce the number of teeth on a gear.
Note! You are responsible for illegal connection to the power grid. If electricians discover an illegal connection to the electrical network, then a huge fine will be imposed on the consumer.
There are several ways to influence the operation of the meter. But in most cases, you will need access to the electrical elements of the device. In older models, it was possible to change the polarity of the connection, due to which the counter began to spin in the opposite direction.
To bypass the meter, some craftsmen will shorten the phase input and output of the meter with a jumper. Thus, the phase bypasses the counting mechanism of the device.
Older models of devices were stopped mechanically, using various wires or plates.
You can influence the operation of the meter using a powerful magnet. But it is worth noting that modern models are equipped with additional protection.
How to hide a wire
Methods of using elements to hide the wire
The method of fixing the electrical outlet depends on its use. It can be screwed to the baseboard or left as a carrier. This method is used for outdoor products. The cables can be hidden in a special cable channel, which is glued to the wallpaper or secured between the baseboard and the socket cover.
If the socket is installed for a long period, the wires can be hidden under a layer of plaster. If the wall is covered with wallpaper, you can cut it along the laying line. Next, you need to carefully peel off a small part of the wallpaper and make a hole in the wall for the cables. The wires are laid in the furrow made, puttied and covered with wallpaper.
Installation in plasterboard
Marking and cutting holes for sockets
Installing power points in drywall is both hidden and exposed wiring. The wires are invisible to the eye, as in hidden electrical wiring, but they are not located inside the wall and can be reached, as in open installation. The work requires professional tools and steel wire.
How to make several outlets from one:
- Removing the socket and socket box from the wall.
- Thread the steel wire through the hole in the direction of installing the new power point. This is done in order to make sure that a corrugated pipe with a cable can be installed between the profile and the wall.
- Drilling a place for a new socket box.
- You need to twist the rope to the wire and pull it back out.
- Using a rope, a corrugated pipe is pulled between two sockets.
- Wires are pulled into the corrugation.
The final step is to connect the electrical wires.
There are times when there is no space between the wall and the profile for corrugation. Then you have to unscrew the sheet of drywall, stretch the cables for the new outlet and install everything in place. The joints need to be puttied and a new power point installed.
A typical example of combining a socket and a switch in one unit
Often in a corridor or hallway there is a need to combine a network connection point (socket) and a switch for several lighting groups. This method solves several problems:
- An extensive electrical outlet network in the corridor is usually not needed: there are no constantly used electrical appliances. However, there is a need to connect a vacuum cleaner or charger. In addition, a radiotelephone base unit can be installed in the hallway.
- There is little space on the walls in this room; there are wardrobes, a mirror, and a hanger. Part of the corridor is usually occupied by the input switchboard and metering device (meter). Therefore, compact placement of switching equipment is a key issue.
- By combining the socket and switch, wiring is saved and installation of an additional junction box is not required.
- If you additionally connect a second device: a switch to a socket, or vice versa, there is no need to damage the wall or organize a route for the power cable. The connection is made with minimal impact on the room.
As can be seen in the illustration, to implement the entire circuit you will need one circuit breaker (in the panel it can be called “corridor: lighting, socket”), and one distribution box.
The zero bus N (blue color) passes through a kind of transit to the lighting groups and to the socket. The PE grounding is inserted into the socket body, and (if one of the lighting groups is in the bathroom) into the lamp body. The phase after the machine is connected to the socket through the distribution box. The disconnection occurs in the socket box. In this case, any terminal block is used: for example, WAGO.
A small section of wire connects the phase terminal in the socket and the input terminal of the two-key switch. Next, a phase is laid from the output terminals to each lighting group.
This scheme is usually used during design, since you still have to lay cables to different lighting groups. If such a solution is optional, you do not install additional boxes. The hole for the switch or socket box is made next to the already mounted device. All that remains is to install additional wiring.
If there is a need to connect the socket and lighting to different circuit breakers (for example, a power socket is used for a powerful electrical appliance), the phase is initiated along different power lines.
There is no need to use an additional distribution box; the phase wire passes through it in transit, without disconnection.
Tip: Leave a loop on each phase wire in the distribution box. With the future expansion of the network, you can cut the wiring and quickly organize the connection using the blocks.
In any case, this installation method saves both wiring and wall space. For example, let's look at the classic version of connecting a socket and switch to a distribution box.
Two cable routes were laid, the connection was in the junction box. Looking at the diagram, it becomes obvious that connecting the switch directly to the outlet is more efficient.
Basic mistakes
Brown wire - phase, blue - neutral, yellow-green - grounding
Installing an additional socket is usually not difficult. But beginners can make the following mistakes:
- Wrong choice of wire cross-section. You need a cable of the same thickness as the main outlet.
- Using a wire made of a different material. Connecting two different wires causes additional difficulties, and the contact itself is less reliable.
- Violation of the order of connecting wires. Particular attention should be paid to the grounding conductor. If it is not available in the house (especially in old buildings), it is better to purchase sockets without ground.
- Unreliable contact. You need to familiarize yourself in advance with the existing methods of creating a contact and practice connecting on spare sections of wires.
- Installing wires diagonally. Standards only allow vertical cable routing.
There is also a risk of buying a model that is not suitable in design. This is not a critical error from a technical point of view, but can disrupt the overall concept of the room. Therefore, when purchasing, it is recommended to select the color of the product, its shape and size in advance. Manufacturers of electrical products offer a wide range of products; any buyer will find a product that suits the style.
Kinds
A new outlet is selected based on a number of important technical parameters.
type of instalation
There are two options:
- mortise: installed in a hole drilled with a crown;
- overhead: screwed onto the wall with self-tapping screws.
Mortise ones in combination with hidden wiring (cables are hidden in grooves and sealed with mortar) are installed in residential and other premises with high aesthetic requirements.
Invoices with open wiring are used in garages, country houses, etc. - they are easier to install.
Presence of grounding contact
Grounding household electrical appliances is desirable because it protects the user from electrical injury. But it can only be implemented in houses with a grounding system organized according to new standards (type TN-CS).
In older houses with a TN-C system, grounding is not connected to sockets; therefore, you should purchase a product without a third contact.
Even if the house has a modern TN-CS grounding system, you should not rush to buy an outlet with a grounding contact. Since it was decided to power the new point from an existing outlet, you first need to make sure that a 3-wire wire is connected to it.
If it is connected with a 2-wire wire, then even if there is a grounding contact on it, there is no point in buying a socket with grounding.
Socket diameter
There are two types of sockets:
- Soviet model;
- Euro sockets: with sockets of increased diameter.
The choice of outlet depends on the type of plug on the electrical appliance. The error is not critical: there are adapters for connecting Soviet-style plugs to European sockets and vice versa.
Terminal type
This determines the quality and reliability of the contact in the socket. If the contact is poor, the wire becomes very hot, which can lead to burnout or fire.
Sockets are equipped with three types of terminals:
- flat spring. The most reliable variety;
- screw with pressure plate. To fix the wire in the terminal, tighten the screw against the copper plate. The terminals are flat spring, inferior in reliability, but quite acceptable;
- screw without pressure plate. The option where the cores are simply pressed with a screw is the worst; purchasing such a socket is not recommended.