We have already mentioned the fact that most of the time a person spends going to the bathhouse is spent not in the steam room, but in the dressing room or relaxation room. And in these rooms the most important piece of furniture is the table. This unique king of the feast can be a standard one, purchased at a nearby supermarket, or it can be unique down to the last piece, made independently. Today, we choose a table for the bathhouse, meticulously and competently.
When shape and size matter
It must be said that a bathhouse, in most cases, has quite limited dimensions of the interior spaces and this circumstance must be taken into account when making superficial design sketches or when serious and detailed interior design. In any case, it is necessary to take into account the unwritten rules of the domestic bath tradition:
- The table for the bath, however, like the rest of the bath decoration, should be as practical as possible. If you are faced with a dilemma between choosing an elaborate and elegant one or a modest but very comfortable one, give preference to the second. You will never regret it.
- The interior decoration of a real bathhouse should be natural. You should also not overuse various decorative chemicals, which give simple wood the charm and shine of exotic varieties. Believe me, there are many ways to refine wood without resorting to impregnations, stains, paints and varnishes. An exception may be perhaps completely substandard wood, the defectiveness of which should be masked with the help of global toning. And objects treated in this way should be located away from the steam room, with its temperature and humidity.
- Internal space should be used rationally. Surely it’s worth sacrificing one seat, rather than all the participants in the feast experiencing global inconvenience.
- If the interior space, after installing the furniture, in particular the table, looks excessively cramped and cluttered, then it is necessary to use bath tables with high legs and focus the visual perception on the horizontal elements of the structure.
- When placing such a large object as a table in the internal volume, always use the golden rule - the farther from the steam room, the better and more durable.
- Don't get hung up on stereotypes and dogmas. You need to feel free to experiment. For example, with wicker furniture. Lightness, openwork, naturalness, along with sufficient strength and durability make you look closely at objects of this type. Leather furniture can also be good, but only natural, with sufficient strength and resistance to the difficult conditions of a bathhouse. It is necessary to select an appropriate table for it, which will look harmonious and natural, framed by leather splendor.
Healing properties of wood
A Russian bathhouse is a special place where you do more than just wash yourself. Here you can cleanse and strengthen the body. Hot steam helps cleanse the circulatory system, normalize the functioning of the heart, liver, lungs and other systems. This has been known since ancient times. In Rus', all diseases of internal organs were treated with a steam room. Therefore, the furniture for the bath should be appropriate. When making it, the bioenergy of each breed known from the Druid heritage is taken into account. Solid wood products produced in Moscow are not only amazingly beautiful, but also have healing properties.
Wooden splendor
The wooden bath table continues to be an unfading classic of the genre of domestic bath interior. Wooden objects have many advantages:
- High ecological purity of the product, its naturalness and naturalness in the interior decoration;
- Low thermal conductivity and heat capacity, which is a very valuable quality in relation to the realities of a Russian bath;
- A wooden table for a bathhouse has the necessary margin of strength and natural durability with relatively simple and unpretentious maintenance;
- Wood is easy to process and to work with it you need a fairly small list of available tools.
To be fair, it is worth mentioning the use of other materials from which it is theoretically possible to make a bath table:
- Plywood and MDF are unique substitutes for solid natural wood, in the production of which various chemicals are used, including alkyd resins;
- Plastic - some of its types, manufactured to food grade tolerances, are suitable for the production of furniture and tables in particular. Products based on plastic masses are durable, lightweight and sufficiently strong. Caring for them is easy. However, the presence of plastic in the bathhouse interior negates the charm of the bathhouse itself;
- Metal - due to the characteristics of steel, cast iron and tables made of non-ferrous metals and their alloys, their presence in the bathhouse is appropriate in the form of individual elements, but not the structure as a whole.
Types of wood for making bath tables
A wooden table for a bath is made from certain types of industrial wood that have the necessary consumer qualities. These include the following:
- Linden. A pleasant, easy-to-work wood with well-structured wood of uniform color and a pleasant aroma. Retains its original qualities for a long time;
- Alder. Wood of this species should also be classified as a priority. It is easily and predictably processed, and is satisfactorily resistant to warping under conditions of frequent temperature changes. The wood texture has an attractive appearance with minimal decoration and processing. When choosing commercial raw materials, special attention should be paid to the degree and quality of drying; for alder raw materials this is fundamental and important;
- Aspen. It is distinguished by good quality solid wood, in which knots and other serious defects are rarely found. Materials of this type are affordable and well processed. Among the disadvantages, it should be noted the tendency to warping and drying out. It is worth remembering that aspen tabletops do not withstand significant mechanical loads very well;
- Poplar. In terms of their characteristics, materials made from this type of wood are close to aspen. However, despite being cheap and accessible, poplar products are not particularly durable;
- Oak. It’s especially nice to make a table for a bathhouse with your own hands from this wood. Its noble color, deep original texture, and spicy oak aroma distinguish it from a host of other species. Excellent strength and record durability put oak furniture beyond competition. The disadvantages include the high cost of conditioned wood and the tendency to split when fastened with self-tapping screws.
A word from Experienced! You can avoid chipping when fastening with self-tapping screws by pre-drilling. Drilling of the fastening channel is carried out with a tool whose diameter is 25% smaller than the diameter of the self-tapping screw used.
It is worth mentioning separately about the use of coniferous wood in our carpentry practice. Spruce and pine are among the most affordable lumber on the domestic market. However, making a table for a bathhouse with your own hands from such raw materials is not always rational. Firstly, all conifers are quite resinous, secondly, it is unlikely to obtain a beautiful and bright texture without subsequent processing and, finally, using them in conditions of high humidity means dooming them to a short life. From coniferous wood, it is worth using cedar and larch, and the latter is more preferable in terms of the cost of raw materials.
To summarize this section, we present a table reflecting the hardness of various types of wood, which directly determines the durability of the countertop and the resistance of its surface to mechanical stress:
| Wood type | Compliance with its hardness class, according to current industry standards |
| Boxwood, dogwood, white acacia | I class, very hard |
| Hornbeam, pear, ash | II class, hard |
| Beech, English oak, European maple | III class, moderately hard |
| Birch, elm, larch | IV class, moderately soft |
| Pine, spruce, alder, chestnut | V class, soft |
| Linden, aspen, poplar | VI class, very soft |
Choosing the shape of the tabletop and legs
The design idea is played out around two main elements of the table design: the table top and its legs.
When discussing the shape of countertops, we can distinguish several main, key types:
- Round - they look original, they unite the bath company in the manner of King Arthur’s knights, but they set strict requirements for the usable area of the rest room. It is worth remembering that a table for a bathhouse with your own hands, which has radius elements in its design, is much more difficult to process than rectilinear ones;
- Oval - in terms of the totality of consumer qualities, they are close to round, but are even more demanding on the space of the room. An important positive quality of both types of tables is the complete absence of sharp corners, which has a beneficial effect on the level of household injuries in the conditions of a particular bathhouse;
- Square and rectangular are classics of the bath genre. They are compact and practical, more convenient to manufacture and finish than their curvilinear counterparts.
The next component of the table, on which, in fact, the tabletop rests, are the legs. Their variety is small and the main types should be considered as follows:
- A table with four legs is a classic design. Allowing maximum stability over a large area. This solution frees up space under the tabletop, providing ample freedom for the legs of the participants in the feast;
- A table with three legs is a less common solution. Due primarily to the insufficient stability of the entire system as a whole and requiring the use of a tabletop of a certain shape;
- A table with two legs is a simple and well-deserved design. Suitable for massive countertops in a simple rustic style. The overall strength of the table is determined by the use of additional fastening elements, which somewhat limits the free space below;
- Table with one central leg. This solution is applicable for round and oval-shaped countertops. For acceptable stability, the surface area of the table should be limited to accommodate a group of 4 people.
Self-production: from a set of tools to the finished product
Before you make a table for a bathhouse with your own hands from wood, you should definitely take care of the availability of high-quality raw materials and a minimum sufficient set of tools.
The choice of raw materials consists of selecting boards, timber and slats. Lumber must meet a number of requirements:
- Have acceptable geometric parameters regarding straightness and absence of signs of warping and torsion;
- A sign of good quality material should be the absence of through knots, the so-called “nails”;
Important! When purchasing lumber made from larch, you should know that the wood of this species very often has “knots and nails” and purchasing a board that is absolutely free of such defects is a real success.
- The wood should not show signs of damage by insect borers, fungi, molds or other biological defects.
The list of tools needed to make a wooden sauna table with your own hands is also not particularly sophisticated. The minimum set includes:
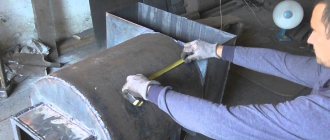
- Tape measure or carpenter's ruler. Provides preliminary and assembly marking of workpieces;
- Bubble building level. Allows you to control the straightness of the structure, both at the cutting stage and during assembly;
- A wood hacksaw or circular saw, the so-called parquet type. Will help in cutting blanks into the necessary individual structural elements. When making a table with a large number of radius curves, it is worth taking care of the presence of an electric jigsaw equipped with a blade for figured cutting;
- A screwdriver, corded or cordless, or a screwdriver with a Phillips-shaped working part;
- Sanding paper on a wooden block or belt sander. Necessary for finishing the external surfaces of the structure;
- Hand router with collet chuck and set of wood cutters. It is not a mandatory tool, like a jigsaw, but it will significantly improve and decorate the product by milling edges and applying decorations of a different nature;
- Fastening elements. These include self-tapping screws, wooden nails - spikes, bolts, studs, nuts. In the case of merging parts using a classic tenon joint, high-quality wood glue will be required;
- To eliminate defects, wood putty is a good help. Often such material is tinted to match the color of solid wood of a certain species.
Step-by-step manufacturing instructions
We offer several options for making a wooden table for a bathhouse with your own hands. Option one is classic and option two is budget.
Classic table
It is a tabletop with a straight two-meter long side and radius rounded ends, which is mounted on four legs 75 cm high. This design will allow you to accommodate at least 6 participants in the feast in fairly comfortable conditions. To make it you will need:
- Board with a cross-section of 250×40 mm, length 2000 mm, 4 pcs. for making countertops;
- Board with a section of 100×20 mm and a length of 1600 mm. - 2 pcs. 800 mm long. - 2 pcs. 750 mm long. - 2 pcs. for structural piping;
- Beam with a section of 100×100 mm. 750 mm long, 4 pieces for legs. The timber can be successfully replaced with turned balusters, which will somewhat enliven the surroundings of the structure.
Making a countertop
- A set of tabletop boards is laid on a flat and rigid base, tightly fitted to each other, and the radius of the ends is outlined using any available object, as a template: a bucket, basin, hoop, etc.
- The ends are formed using a jigsaw according to the outlined template.
- Using transverse supports placed at a distance of 400 - 450 mm from the edge of the end, a set of tabletops is secured.
- The formed tabletop can be edged with a milling cutter or simply processed with sandpaper with sequential alternation of grain from 60 to 240.
Making table top lining and installing legs
- A structural set is strengthened from the bottom of the tabletop, which will hold the legs and border the tabletop from the inside.
- The legs are installed and secured in the seats formed by the structural set.
- This design allows for free space in the leg area, without weakening the structure in terms of rigidity.
X-shaped table
This option is relatively budget and inexpensive. To make it you will need:
- Board with a section of 250×25 mm. 1750 mm long - 3 pieces, to form a tabletop;
- Board with a section of 150×25 mm. 900 mm long - 4 pieces for making legs;
- Board with a section of 100×25 mm. 1100 mm long - 2 pieces for fastening at the bottom of the legs, as spacers;
- Beam with a section of 20×40 mm. 900 mm long. — 3 pieces for making crossbars from the bottom of the tabletop.
Making a countertop
The tabletop boards are laid on a flat, hard surface with a spacing of 5 mm and secured with cross bars.
The edge is processed by milling or sanded with sanding paper.
Making legs and tying them
- On the board for making legs, 80 mm is set aside from the edge and a line is drawn from the notch to the corner. According to the resulting projection, the edge is cut off to form the supporting surface of the leg. In the same way, using the finished leg as a template, the rest are prepared.
- The legs are combined in pairs, in an oblique cross, so that the cut edges are located in the same plane.
- At the junction of the two legs, holes for the mounting bolts are marked and drilled, one above the other, in a vertical plane.
- In the lower part of the legs, notches are made “in the back” in which the boards of the longitudinal fastening of the table are strengthened.
- At the last stage, the tabletop is fused with the legs, the straightness and correctness of installation is controlled using a bubble level.
- When installing the table in place, the legs can be cut in place, adjusting the correctness of its installation relative to the floor.
What types of wooden tables are there for a bath?
In the vast majority of cases, the table is placed in the locker room (dressing room) or rest room. It is equipped with stools, chairs, benches or benches.
Types of bath furniture
| Photo | Table design |
| Table with four straight legs This is the simplest furniture option. It is comfortable and stable. The table frame consists of four vertical supports. They are complemented by eight horizontal drawers (straps). A lid is fixed to the upper four slats, and the lower ones connect the pairs of legs together.
Stages of table assembly:
| |
| Furniture with X-shaped supports. This option is similar to the previous one, but it has a different support configuration. When assembling such a table, you have to select grooves on the supports. This makes the job more difficult. The frame of such a table consists of:
Stages of furniture assembly:
| |
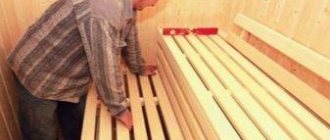
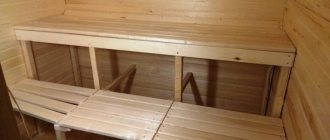
| Table with benches or benches. There is no need to equip it with seats, since they are already included in the design of the furniture. The benches are fixed directly on the table supports. The cross bars to which the seats are screwed additionally act as tie rods for the supports. The benches are also longitudinal strapping. Step-by-step table assembly algorithm:
| |
| Table made from half logs This type of furniture will appeal to lovers of Russian antiquity. However, such furniture is only suitable for large dressing rooms and rest rooms. Furniture manufacturing stages:
|