Pros and cons of ceramic tiles
Roofing has inherent positive and negative qualities. They must be carefully analyzed before choosing and purchasing material for the roof of your house.
Pros:
- When considering the advantages of ceramic tiles, the first place is to highlight the environmental friendliness of the material. The main components are clay and water. Non-toxic plasticizers are used as additives.
- Based on the raw materials used, one can judge that the roofing material is 100% resistant to fire. In addition, the manufacturing technology involves firing the tiles, which doubly confirms their fire safety.
- Low thermal conductivity contributes to reduced heat loss in winter. In summer, the roof warms up slightly, keeping the inside of the house cool.
- The tiled roof looks beautiful and adds aesthetics to the entire building.
- In terms of service life, tiles made from natural materials come first. A properly installed roof will last up to 100 years.
- The high sound insulation coefficient of the material manifests itself during rain or hail. There is silence inside the building.
- Roofing ceramic material is slightly exposed to the negative effects of all natural phenomena.
Minuses:
- One of the main disadvantages of ceramic roofing is its heavy weight. It will be necessary to create a reinforced rafter system with additional supporting elements.
- The disadvantage is considered to be weak resistance to impacts. A lot of fight appears from careless transportation or packing.
- To ensure the tightness of the roof, it is necessary to lay lining material under the tiles, which requires additional costs.
- Complex production technology is reflected in the high cost of ceramic roofing.
Having assessed the main pros and cons, it is easier for the developer to decide whether he needs such a roof.
Advice! Despite the existing disadvantages, a ceramic roof still outperforms its competitors in terms of economic benefits. Initially, more cash investments will be required, but the costs will be recouped due to the long service life of the roof.
Installation of a gable overhang.
• For sheathing pitches less than 33.5 cm, use side tiles with a cutout of 11 cm, and for larger pitches, with a cutout of 8.8 cm. Secure each tile with two galvanized screws 5x50 mm.
• The gap between the ends of the sheathing and the inner surface of the side tiles should be 1 cm.
• Another option for constructing gables is using lightweight side tiles made of painted aluminum. In this case, lay the row tiles on the gable overhang flush with an additional 50x50 mm bar.
• Place the side piece over the shingles and secure it to the gable beam with a roofing nail at the top and a screw and sealing washer near the bottom edge. The next element will cover the place of fastening with a nail.
Do not fasten the two lightweight side tiles with an overlap with a screw!
Types of ceramic tiles
Ceramic roofing varies in many ways. The first of these is the profile type:
- low-profile elements have a plane for water drainage and the presence of an internal locking connection;
- wave ceramic elements similarly have a lock, but the surface is made of a large convex arc and a concave depression for drainage;
- gutter-shaped elements are equipped with an internal locking connection and a flat gutter for water drainage;
- for smooth elements, a concave drainage groove gives a wavy appearance;
- elements with a smooth surface have an internal locking connection and a central stiffening rib, which gives strength to the ceramic product;
- the ceramic roofing element of the Roman type has an arched shape and an internal lock;
- a separate type of tile called “monk-nun” is a classic and is used more often by restorers of historical architecture;
- in private housing construction, Mediterranean tiles are in demand, the aging effect of which gives the roof a hundred-year-old look;
- ceramic elements with a Romanesque profile are related to Mediterranean tiles, but they originate from Roman roofing material.
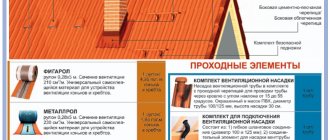
Ceramic elements with different profile shapes are designed for installation on roof slopes. The visual effect of completeness of the roof is given by additional special tiles:
- decorative ceramic ridge tiles are intended for installation on the roof ridge;
- for gable overhangs, gable elements have been created, which can be universal, right- or left-handed;
- supporting elements are installed if it is necessary to create a chimney bridge or snow retainer;
- ventilation elements are laid on the roof, where there is a possibility of blocking the ventilation space with tiles on the slopes;
- ridge elements are connected with ceramic tees or doubles;
- the crosspiece is the top of the hip roof, where the ridge is completely absent;
- the final and initial ceramic elements, as well as ridge caps, serve to aesthetically decorate the edges of the roof;
- The antenna and ventilation nozzle element is a pass-through ceramic product that allows air duct risers and antennas to be installed on the roof.
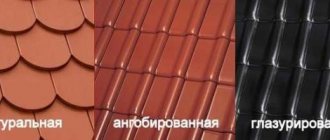
Roofing materials differ according to the method of processing during production:
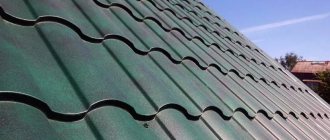
- Untreated tiles are fired in a kiln at a temperature of 10,000 °C. Oxidation of iron contained in clay gives ceramic elements a brown or orange tint. Under the influence of natural factors, over time, roofing made from untreated tiles darkens.
- Engobed tiles have a more attractive appearance. The technology is similar to glazing, but creates improved protection for ceramic elements from the effects of natural factors. At the production stage, the surface of the tiles is treated with a solution of powdered clay with mineral additives before firing.
- The edelangobing technology is similar to engobing, only glass particles are added to the solution of clay and minerals. After firing, the ceramic surface becomes shiny. Sintered glass particles form a surface that resists moisture and sunlight.
- Glazed ceramic roofing elements have a glossy surface. The glaze contains glassy substances and metals. The tiles come in different colors and look beautiful. The disadvantage of glaze is its poor resistance to temperature changes, which leads to cracks in the tiles.
More information about ceramic material is presented in the video:
Installation of connections to pipes and walls using self-adhesive tape BRAAS Vakaflex.
Technical characteristics
Material: polyisobutylene mastic (PIB) with a reinforced aluminum mesh, adhesive tapes made of synthetic rubber 2 cm wide are applied on the reverse side along the edges of the roll. Size: length 5 m, width 28 cm. Temperature resistance: - 40...+100 C to DIN 52 133. Colors: red, brown, black, green. Weight: 5 meter roll approx. 5 kg. UV stability: complies with DIN 16 726.
Tool for working with Wakaflex • Roller • Folding meter • Pencil • Scissors
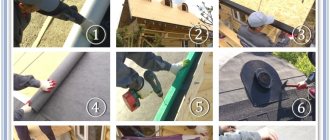
• Operating procedure
1. Arrange the bottom of the pipe. 2. Make side connections. 3. Glue the top of the pipe. 4. Install a Waka strip with heat-resistant dowels around the perimeter of the Wakaflex. 5. Apply sealing compound K.
• Lay the tiles around the pipe with a gap of 2...3 cm. If necessary, cut the tiles under the pipe to continue the row line and secure them to the leveling bar with 5x50 mm screws.
• IMPORTANT! Tiles and wall surfaces must be clean and dry. If you work at air temperatures less than +5 degrees. C, then use a technical electric hair dryer to warm them up.
Bottom of pipe
• Cut off the bottom strip of Wakaflex (length of strip = pipe width + 5 cm extra on each side of pipe).
• Fold the Wakaflex strip into a corner.
• Remove the middle protective film.
• Remove the protective film from the adhesive strip and glue the top part of the Wakaflex.
• Roll the adhesive strip to the pipe and the entire surface with a metal roller.
• Remove the film from the bottom edge of the Wakaflex and glue the roll only along the top of the waves of tiles.
• Glue Wakaflex onto the entire surface of the tiles using a roller.
• Cut the upper non-adhesive part of the Wakaflex at an angle of approx. 450, without cutting 1 cm to the point of intersection of the slope and the pipe line.
• Glue the cut sections onto the pipe and tiles.
Pipe side
• The side roll of Wakaflex should start from the bottom edge of the already glued strip and end 10...15 cm above the top of the pipe.
• Glue the side roll of Wakaflex to the pipe and tiles, roll it up with a roller.
• Stepping back 2...3 cm from the pipe line, make a cut to the point of intersection of the slope and the pipe. Do not extend the cutting line approximately 1 cm to this point.
• Cut the side parallel to the water drainage line. This piece will be useful to you later.
• Use scissors to round the bottom edges of the side strips to reduce the effect of wind.
• Glue the bottom of the roll and roll it with a Waka roller.
• Cut the top of the side roll towards the point where the line of the pipe and the slope intersect. Do not extend the cutting line to approx. 1 cm to this point.
• Glue the cut pieces onto the pipe and tiles and roll them with a Waka roller.
• Glue the left and right corners of the pipe in the upper part (remaining from the side strips) with pieces of Wakaflex to protect against sliding snow and ice.
• The overlap of the bandage strips on the side of the pipe should be approx. 2 cm.
Top of the pipe
To protect the roof from melt water, make the top roll of Wakaflex double.
• Cut two strips to the required length.
• Remove the protective film from the top strip and apply it to the bottom strip with an overlap of 5 cm. Roll the joint with a Waka roller.
• Place the double roll in the groove with a slight slope in any direction and glue Wakaflex to the pipe.
• Remove the protective film from the top strip and glue Wakaflex to the waves of the tiles.
• Glue and roll Wakaflex over the entire surface of the tiles, with the exception of the lower area (adjacent to the pipe and not covered by tiles) to drain rainwater and dirt.
• Make a cut down parallel to the pipe line, stepping back 2...3 cm from it. Do not bring the cutting line approximately 1 cm to the slope line.
• Cut off the bottom of the roll and use scissors to round the bottom edge.
• Glue the cut pieces onto the pipe and tiles and roll them with a Waka roller.
• If a snow bag may form above the pipe, then to protect the roof from the penetration of melt water during a thaw, bend the upper edge of the Vakaflex in the form of a bumper by 2...3 cm.
• Lay the tiles on Wakaflex.
Working with the Waka bar
Bottom of pipe
• Cut the bottom strip to the required length: The length of the strip is equal to the width of the pipe + 5 cm outlet in both directions.
• Cut the upper part 1 and bend it along the line of the pipe.
• Cut the lower part 2 and bend it along a line 1 cm away from the corner of the pipe.
• Bend the upper flange of part 1 with a hammer to the pipe.
• On the bottom 2, cut a corner parallel to the slope line.
• On the top part 1, mark and drill holes for dowels d 6mm
• Mark along the strip and drill 6x40 mm holes in the pipe.
• Secure the strip to the chimney with heat-resistant dowels and screws.
The fastening step is no more than 20 cm!
Pipe side
• Place the side strip parallel to the slope line and mark on it the outline of the bottom strip and the pipe line at the top.
Top edge of the side bar
• Cut part 1 along the pipe line.
• Cut part 2 along a line 1 cm away from the corner of the pipe.
• Secure the side strip with screws.
The fastening step is no more than 20 cm!
Top of the pipe
• Cut the top strip: Length of the strip = pipe width + 2 cm outlet on both sides.
• Mark the outline of the installed side strips on the top strip.
• Mark the upper part 1 and bend it along the pipe line. To do this, make sequential cuts u and v.
• Bend the lower part 2 along a line 1 cm away from the pipe. To do this, make cuts x and y.
• Cut off the raised edges w and z at the rake angle.
• Mark along the strip and drill 6x40 mm holes in the pipe for dowels.
• Attach the top strip to the pipe.
• Using a construction syringe, apply Sealant K into the flange of the plank along the entire perimeter of the junction.
Appearance of the finished junction
• The upper edge of the Wakaflex is protected from precipitation by a Waka strip, secured to the chimney with heat-resistant dowels and corrosion-resistant screws.
• Sealant K is applied to the flange of the strip - a one-component synthetic rubber that does not contain silicone.
Properties of ceramic tiles
Roofing material is produced by different companies, which is reflected in the characteristics of the final product.
Ceramic tile weight
The weight depends on the size and thickness of one product. Classic tiles weigh 4.5 kg. Elements of other shapes and sizes have their own mass. On average, 1 m2 of roofing weighs from 40 to 70 kg.
Important! The large weight of a ceramic roof requires reinforcement of the roof rafters.
Ceramic tile thickness
Dimensions and thickness are non-regulated characteristics. Each manufacturer sets its own parameter. The only requirement of GOST is the maximum tolerance for bending or chipping - 3 mm. The error allowed is 5 mm in length and 3 mm in width.
Specifications
Among the main characteristics are:
- The service life of roofing tiles reaches 100 years. The material is not susceptible to corrosion or other external factors. A ceramic product is only weakly resistant to impacts.
- Ceramic roofing is 100% fireproof. The tiles can withstand direct contact with open fire.
- Resistance to snow and other loads reaches 500 kg/m2 of ceramic roofing. Three people can stand on one section of the roof at the same time.
- The tiles can withstand at least 300 freezing and thawing cycles.
Burnt untreated tiles are brown in color with a reddish tint. The product has a dense structure.
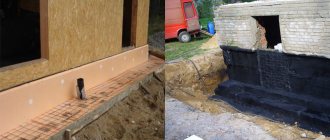
Construction of the lower roof.
• If the slope angle is less than 16 degrees or increased demands are placed on waterproofing due to the complexity of the roof or climatic conditions, then a lower roof must be installed under the tiles: a continuous deck of edged or tongue-and-groove boards and roll polymer-bitumen or polymer waterproofing.
• To make a waterproof bottom roof, fill a trapezoidal counter-lattice with a thickness of 40...50 mm over the decking, and only then fuse the waterproofing.
• When installing a lower roof, be sure to leave ventilation gaps at the ridge and ridge, similar to the film.
9. Laying the valley groove
• Bend the edges and profile the groove along the block. No special roofing tools are required for this operation.
• Start laying the gutter from the eaves (bottom to top). Place the groove on the flooring or thick sheathing and trim it along the contour of the inner square with a margin of 3...4 cm.
• The overhang aerial element or leveling bar must reach the visible valley line (13...15 cm from the axis of the groove) to securely support the first cut tile.
• Secure the groove to the substructure with six brackets using 2.8x25 mm galvanized roofing nails. You cannot nail the groove itself along its length with nails.
• Stepping back 1...2 cm from the top edge, nail the groove to the flooring with two nails to prevent it from sliding longitudinally.
• The minimum overlap of the next groove on the bottom is 10 cm; when laying, align the transverse ribs of the grooves.
The junction of the valleys below the ridge
• Lay the grooves with a gap of approx. 1 cm, secure them with nails and seal the joint with sealing tape of the appropriate color, profiling it along the edges of the groove.
Installation of joints at the same level for multi-gable roofs
• Lay and secure the grooves with nails. • Equip the ridge with aero elements or Figarol. • Seal the joint of cut ridge tiles with sealing tape or Wakaflex.
Bird and leaf protection
• The best protection against birds, dirt, snow and leaves getting under the tiles is provided by self-adhesive foam strips with water-repellent impregnation.
• If a foam strip is not used, then nail the eaves grille along the edge to the decking with galvanized nails.
The second way to lay the groove is on top of the thick sheathing
• This option is used when installing valleys of dormer windows or valleys over wide pipes, when the groove is released onto the tiles.
• In this case, nail the brackets to additional bars, otherwise the brackets will interfere with the even laying of the tiles. Bend the edge of the groove inside the valley. The foam strip can be trimmed to a height of 30...40 mm.
Release unit for the groove on the ramp
• Glue the outlet of the groove with Wakaflex and begin laying a groove 70...80 cm long with an overlap of the groove on the tile of at least 12 cm. • Use scissors to round the bottom edge of the groove and shape it to the shape of the tile using a hammer handle or a rubber mallet. • Construct valleys in the same way using grooves made of copper, zinc and galvanized steel.
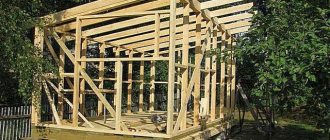
Do-it-yourself installation of ceramic tiles
Erection of a roof from this material requires extensive experience in construction work. It is allowed to lay ceramic tiles only on a reinforced frame. If the rafter system is weak, it will not support the heavy weight of the roof.
Lathing for ceramic tiles
The roof frame is assembled from dry lumber treated with protective impregnations. For rafter legs, blanks with a minimum cross-section of 50x150 mm are used. The pitch between the rafters is calculated using load tables. Typically this parameter is 60-90 cm. During calculations, the weight of the roofing material and the snow load are taken into account. They provide for allowance for the influence of other factors: wind load, movement of people on the roof, the presence of additional structures.
The next step is to equip the rafter system for ceramic tiles with a ridge strip. The element is positioned so that a distance of 35-45 mm is maintained between it and the top point of the roof. The thickness of the counter beam is selected taking into account the length of the slopes:
- up to 6 m – 24 mm;
- from 6 to 12 m – 28 mm;
- more than 12 m – 40 mm.
You cannot save on the thickness of the counter beam. In the future, it is necessary to ensure that the top element of the sheathing does not come close to the ridge. The absence of a gap will block the ventilation of the under-roof space.
The finished rafter system is covered with a vapor barrier membrane on top. The canvas is laid with an overlap at the joints of at least 150 mm. The membrane is secured to the rafters using sheathing slats. The process requires special attention. Initially, the pitch of the sheathing under the ceramic tiles is calculated so that all roofing elements match for fastening. To do this, a double row of 12 tiles is connected on the ground. Measure the pitch of the sheathing slats. Typically, for most types of tiles, the parameter is approximately 36 cm with a permissible difference of 3 cm in a smaller or larger direction.
When the pitch of the sheathing has been calculated, marking cords are pulled on the rafter system, and slats are nailed along them.
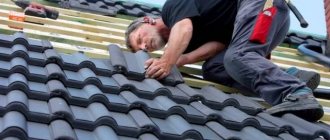
Technology for laying ceramic tiles
The installation of ceramic tiles begins by checking the width of the roof slopes for symmetry. Laying is done from right to left. The beginning is taken from the end of the ramp. The method of fastening each element depends on its design. The manufacturer provides detailed instructions for installing ceramic tiles; failure to comply with these instructions does not apply to the roofing warranty.
Elements can be fastened with nails, clamps, locks and with the additional use of polyurethane foam using Western technology. Most often, ceramic tiles are fixed with self-tapping screws. The manufacturer provides mounting holes on each element. They can be non-through to protect against water. During installation, roofers themselves drill it in the right place.
Advice! Most manufacturers make blind holes in the tiles that do not need to be drilled. The membrane is easily broken through with a self-tapping screw.
When laying ceramic tiles, every third element is fixed with a clamp. Fasteners are standard with an anti-wind clip and are designed for installation on the ridge and valley.
When installing a ceramic tile roof, it is important to think in advance about the location of the ventilation elements. If the roof length is limited to 4.5 m, ventilation tiles are not needed or they can be installed anywhere at your discretion. When the length of the roof is greater than the specified parameter and reaches 12 m, the elements are laid out in one row among three rows near the ridge. If the roof length is more than 12 m, the ventilation row is made first from the ridge.
The next step is laying ceramic elements on the ridges and ridge. Fixation is carried out with universal holders included in the kit. In the valley, before laying the waterproofing, the internal joint of the roof frame elements is reinforced with boards. To successfully attach the valley gutter, the sheathing is cut to a depth of approximately 15 mm. The ceramic tiles themselves also require trimming to fit. The elements are drilled independently and fixed with special clamps.
Verification as part of the preparation phase
In order to avoid any errors during the installation of the sheathing, such as those associated with material misalignment, the parameters of the installed rafter system must be measured before the actual installation begins.
- First, the direction in which the horizontal laths are located is adjusted, placing them according to the fan principle. In this case, the space left between the slats should increase towards the larger gable.
- Any deviations in the vertical direction should be removed using the same fan principle, forming a slight backlash of parts in the desired direction.
It is worth starting testing work with pitched diagonals. Provided that their parameters differ from each other, each side of the slope should be measured separately.
Care of ceramic tiles
Ceramic tile roofing does not require special care. Dust pollution is considered a common negative factor. However, the dirt is washed away by rain over time. If the building is located near production facilities, the roof is subject to increased contamination with soot. Dirt is removed using detergents. Likewise, the roof will have to be cleaned manually if the house is located in a damp area. Moss grows on the surface of ceramic tiles due to dampness.
Advice! Cleaning a roof is a difficult and dangerous task. It is better to entrust the work to cleaning companies.
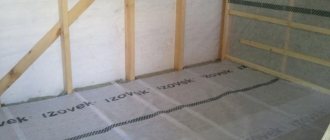
Calculation of the amount of waterproofing material
If you install ceramic tiles yourself, it is worth remembering that if the roof slope is less than 22 degrees, then it is necessary to lay a layer of waterproofing. It is best to use rolled material for this, which is laid according to the principle of overlapping the canvases at a distance of 10 centimeters, overlapping the gable and pitched overhang lines by 15 centimeters, observing overlaps through the corners protruding over the top by 15 - 20 centimeters. To calculate the required amount of material, you need to multiply the total pitched area by 1.4.
Laying the waterproofing membrane at a distance of 30 centimeters from the ridge can guarantee normal ventilation to the structure. The ridge itself must be equipped with a special insulation tape.
In the area of the chimney passage and the junction of the walls, it will be necessary to leave an inlet if the bathhouse on which the roof is mounted is attached directly to the room.
Tips and tricks
To build a beautiful and high-quality roof, you should listen to the advice of professionals:
- the weight of 1 m2 of ceramic tile covering must correspond to the load-bearing capacity of the roof in order to avoid its destruction from overload;
- the color of the ceramic tiles is selected so that the roof harmoniously combines with the facade and other buildings of the architectural ensemble;
- ceramic tiles are purchased after accurate calculations, allowing for a 10% margin for trimming and breaking;
- It is better to calculate additional elements with an experienced roofer.
Ceramic tiles made from fired clay are considered an eternal material. After careful dismantling of the old roof, the entire elements are suitable for reuse in small buildings. Old ceramic tiles can be used to cover a canopy, gazebo, or outbuilding.
Sheathing device
• Calculate the pitch of the sheathing separately on the left and right gable, because
Cover lengths may not match. Mark the rows with a string, pulling it on the outer counter battens, and at the same time measure the difference in height of each counter batten. When further filling the sheathing, place slats or bars of the required thickness under it, leveling the plane of the slope. If the rafters are of high quality, then fill the sheathing using templates. • For lathing, use sawn softwood timber without wane and passing knots, meeting the requirements of SNiP II-25-80 “Wooden structures” with a maximum humidity of 25%.
“Roofing pie” design
Very often we hear from builders or designers the combination “roofing pie”. When laying flexible tiles yourself, it is important to understand that the durability and practicality of the roof will depend on the correctly installed “roofing pie”. The cake is made in layers and includes: rafter system, films, insulation, lining carpets, and so on. Each layer is laid sequentially and performs its important function.
The “roofing pie” for a cold (without insulation) and warm (with insulation) roof will be different. It is not difficult to guess that a cold roof is much easier to deal with. An approximate diagram of a cold roof is below:
1. Flexible tiles 2. Underlayment carpet 3. Base (OSB board) 4. Wooden sheathing 5. Rafter leg
The “roofing pie” for an insulated roof has many more layers. The diagram of the entire structure looks like this:
1. Flexible tiles 2. Underlayment 3. Film (Windproof membrane) 4. Insulation (mineral wool) 5. Vapor barrier film 6. Base (OSB board) 7. Sparse sheathing 8. Counter beam for creating a ventilation duct 9. Rafter leg 10. Sheathing under insulation 11. Attic filing
Preparatory work
Before starting work, you need to make sure of the strength of the house's rafter system and the geometric accuracy of the location of the wooden elements of the rafter system. If the house design initially includes a roof made of clay tiles, you can immediately proceed to the next stage: checking the geometry and measuring the roof, including the lengths of the slopes, ridge, valleys, and ridges. Then you need to contact your clay tile supplier to calculate the number of products. If the project was developed for another type of covering, for example, metal tiles, you need to increase the cross-section of the rafters or reduce their pitch, and in some cases do both.
Roof measurement