The construction of wooden houses and baths is gaining unprecedented popularity. This is explained by the environmental friendliness and safety of wood, as well as the availability of assembly of wooden structures.
Modern felling of log houses is represented by both the simplest and technologically complex methods, which provide maximum protection of the finished log house from the adverse effects of the environment.
The final stage of wooden construction is the assembly of the frame. Often, for the construction of wall structures, rounded logs are used, which are securely connected to each other using special tenons and grooves.
Preparing regular logs for laying
Before cutting down a log house with your own hands, you need to perform two important operations: form a groove along the entire length and a corner connection without additional fasteners. Not only the strength characteristics depend on the quality of their execution, but also the most important property of the structure – the ability to retain heat inside for a long time.
The geometry of the longitudinal recess of the arc profile largely determines the thermal conductivity characteristics of the room. The width of the inter-crown groove has a double meaning. On the one hand, an unreasonable increase in the parameter reduces the useful height of the log, on the other hand, additional widening of the groove has a positive effect on maintaining the internal temperature.
Given this state of affairs, the logical resolution to the contradiction is the following: use a wider ditch when constructing structures in the northern regions.
The profile of the crown groove comes in several interpretations:
- lunar;
- tongue and groove;
- lunar with additional undercut.
Russian lunar profile is considered technologically advanced : the geometry of the excavation accurately repeats the ridge of the response log. This type of log cutting is described in detail in numerous videos due to its wide popularity.
To make a groove you need to have :
- line (a tool similar in functionality to a compass);
- pencil;
- axe;
- adze;
- chisel;
- hammer.
A medium power chainsaw with a good chain will intensify the initial stage of the ditch gouging process. The groove must be made in the lower part of the log to prevent the formation of additional pockets of moisture collection.
The technological process of forming a longitudinal recess includes the following operations:
- put the log of the future crown on top of the existing layer, center and fix it;
- mark a horizontal line on the top workpiece with a length equal to the width of the groove (at least 12 cm);
- adjust the line and draw a corresponding arc line on the surface of the lower one at the end of the upper log;
- draw a groove line along the entire length;
- use the nose of the chainsaw bar to make longitudinal cuts 1.5-2 cm less than the calculated depth of the excavation;
- make a longitudinal cut to the same depth;
- cut out one half of the groove, then the other.
It should be noted that in search of a solution to how to cut down a log house with your own hands faster and easier , experimenting with the shape of the longitudinal groove is not recommended.
The common belief that a triangular shape is no worse than a semicircular shape is erroneous. When connecting, the angular profile not only reduces the contact area, but also provokes the formation of cracks in the log.
From trunk to log
Of the three varieties of wood - construction, lumber and timber - the first, growing on sandy soils and reaching a height of more than 24 m, belongs to the “extra” class materials and is optimal for the construction of houses. Sawlog, due to its knotty and conical nature (significant difference in the diameters of the butt and top), is considered not the best option for house building. The same is true for the podtovarnik, which grows up to 15–18 m and has a small taper, but due to its small diameter (11–20 cm) is not able to provide the walls with sufficient thermal protection.
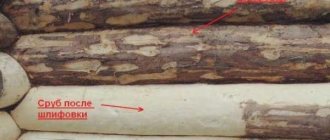
After cutting, the tree is debarked - the bark is removed from it. Since this is usually done without the use of mechanized tools, the wood fibers are ultimately preserved intact, but in some places traces of the subbark (or bast)—the lower layer of bark adjacent to the trunk—remain on the log. As it dries, it darkens, giving the surface a natural “spotty” appearance. True, this decorative effect has a downside - the bast can become a source of rotting. That is why it is advisable not only to debark the log, but also to plan it with an electric planer, completely removing the underbark.
According to their shape, logs for log houses are divided into round timber, carriage (hewn on both sides - into two edges) and semi-carriage (hewn only on the inside - into one edge).
The latter are preferable when finishing interior walls with clapboard or panels, since this consumes less usable space. Please note: cutting a log by one edge increases the cost of a log house by 35–50%.
Making openings in a freshly built log house inevitably leads to skewing of the walls, so cutting them and installing window and door structures should only be done after the initial settlement of the log house
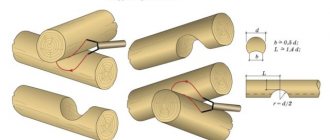
Types of cutting corners of a log house and informative videos on their implementation
A characteristic feature of the construction of a wooden structure using the technology under consideration is the natural fastening of the logs to each other only through structural measures without the use of additional fasteners . ways to correctly implement a corner connection :
- "in the paw";
- “in a state of rage”;
- "into the bowl";
- "in a big way."
The first joining method is the basis of the so-called waste-free technology.
The next three provide additional projections beyond the plane of the walls. The often demonstrated corner cutting of a log house in the video is the last one on the list.
The advantages of joining logs “in a clap” are:
- lower location of the bowl, preventing the accumulation of moisture inside the ligament;
- a closed corner structure, which is formed by the ends of the logs protruding beyond the plane of the wall;
- high strength and reliability.
Before you cut down a corner frame with your own hands , you need to acquire a standard carpentry kit, which was also used when forming a longitudinal groove.
A chainsaw is also welcome here. The bowl is marked as follows:
- lay the log of the future crown and fix it with staples;
- the legs of the line are moved apart by half the diameter of the lower log;
- a line is placed on the cross-laid wooden blanks and the contour of the bowl is drawn, constantly maintaining the contact of the legs with the logs and their verticality;
- Transverse and longitudinal cuts are made according to the intended geometry, the bowl is chopped and its surfaces are cleaned.
Upon completion, the log is placed in the bowls and the gaps are checked. defective if the actual depth of the bowl is greater than the design one . The way out is to wedge or lay a thicker seal.
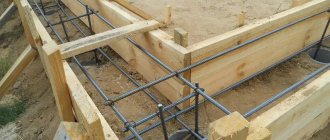
Foundation for a log house
The main tasks of any house foundation are as follows:
- holding the base and structure of the house in one, solid plane and, as a result, maintaining the integrity of its walls
- preventing the house from sinking into the ground under its own weight
- preventing the house from freezing from below the ground during the cold season
In addition to the above-mentioned requirements for the foundation of any house, some more requirements should be added to the foundation of a log house:
- Height and moisture protection . The height of the foundation of the log house should be higher than for a stone house . The optimal foundation height for a wooden house above ground level is 50-60 cm or higher. Such a rise is necessary to maximally prevent contact of wooden walls with moisture emanating from the ground.
- Ventilated base. If you are planning a wooden base for a log house, then it should be well ventilated from below. This measure will increase the longevity of the floor. For this purpose, the optimal foundation for a log house will be one of the varieties of pile, columnar foundation, as well as a strip foundation with ventilation.
log house on a pile foundation
- No heavy foundation needed. The weight of wooden houses is much lighter than stone ones and therefore a log house does not require a deep, massive and heavy foundation. For a small log house up to 80 square meters, budget foundation options are well suited: pile and columnar.
Read more about the types and properties of pile foundations
Read more about the properties of a columnar foundation
log house on a columnar foundation
strip foundation
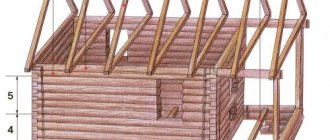
Stage 6
Assembly
Watching the video of cutting down one crown of a log house “into a bowl” , you should note the sequence of processing the log: first you need to form the geometry of the “bowl”, and then start cutting out the longitudinal groove. Sometimes the issue is solved differently: simultaneously with marking the bowl, mark the location of the longitudinal groove from the end of the log to the corner joint and combine the operations.
When starting the practical implementation of the planned solutions, you need to clearly know the sequence of assembling the crowns together :
- an inter-crown sealant (tow, linen wool, moss, etc.) should be spread over the already formed layer;
- It is customary to connect several crowns together with dowels (wooden spikes) at intervals of 1.5 - 2 meters;
- the orientation of the wood fibers should be as follows: less dense (southern) fibers “look” inward, northern fibers “look” outward.
After cutting the log house yourself, experts recommend erecting a temporary roof and allowing time for the structure to shrink (1.5-2 years) . Afterwards, you can coat the ends of the logs with a protective compound.
Having developed the skills of cutting the geometry of a corner joint and a longitudinal groove, you can begin to construct a wooden structure. When developing a construction method, you should use the preferred options for the location of technological surfaces: it is advisable to base the bowl and longitudinal groove in the lower part of the wooden workpiece. When assembling, do not forget to place sealing material between the rims and fasten the layers together with dowels.
Method of cutting "in the cloud"
Logging is the simplest and most affordable option for constructing various types of log houses, which is done manually. The process of preparing building material itself does not require much time and labor.
This method involves removing logs from the corners of the log house at a distance of up to 25 cm, which leads to a reduction in the size of the finished structure on all sides. For this reason, it has another name - cutting with residue.
This construction option provides additional strength to the structure, and protruding elements protect the corners of the frame from damage and destruction.
The bowl is made in the shape of a semicircle with a smooth surface and is not equipped with locks. To prevent possible rotting of logs, it is recommended to carry out timely caulking of the walls outside and inside.
How to choose the right material for construction
Rounded log
The Russian bathhouse is the best place to relax not only the body, but also the soul. Now entire bath complexes are being created, which include relaxation rooms, swimming pools, and billiards. Natural wood and a number of other modern materials are used for their construction.
But a private bathhouse for personal use is best built from wood. This is the most environmentally friendly material, unsurpassed in its qualities and technical characteristics.
The construction of a bathhouse from a log is justified by the fact that it is easy to breathe inside the room and a unique aroma is preserved. In addition, wood does not need additional insulation, as it retains heat perfectly.
Log quality requirements:
- Smooth, straight, without visible flaws;
- The thickness is at least 20 cm, otherwise the bath will be cold;
- Length from 3 to 6 m. It all depends on the size of the bath;
- The difference between one end of the log and the other is no more than 3 cm;
- Preference should be given to coniferous species, they are more durable due to resin and essential oils;
- Trees must be harvested in winter. They are more durable and will retain heat better.
In order for the bathhouse to meet all the owner’s needs, it is necessary to take a responsible approach to the choice of material. Not every tree is suitable for construction.
Where to start construction
The construction of a log bathhouse begins with the foundation
The construction of any building begins with the choice of location. First you need to decide whether the bathhouse will be adjacent to the house or built separately. Then coordinate the project with all authorities and only after that begin construction.
You can use a standard project, the price of which suits you.
Example of a two-story building project
Stages of preparation for work
- Make markings on the ground according to the plan;
- Depending on the size of the building and the type of soil, make a foundation. It can be strip, columnar, pile;
Pile foundation for uneven terrain is the best choice
- Prepare the logs - cut off the branches, sand them, cut grooves. Calibrated logs are already ready for work, you don’t need to do anything with them;
Preparing the base material for installation
- Aspen or oak is used for the lower crowns. They are not afraid of moisture and are not subject to rotting;
- For the roof and rafters, it is best to buy edged boards and timber, as well as roofing covering;
- Prepare windows, doors, finishing materials.
Note! A bathhouse made of rounded logs needs additional impregnation to prevent rotting. This will not be necessary for hand-processed logs.
Layout of a chopped bath
At the design stage, it is necessary to designate which rooms will be in the bathhouse and how to rationally distribute the total area between them.
As a rule, a bathhouse includes several rooms:
— vestibule, with an optimal area of 1 m2: the main function of the vestibule is to prevent humid or frosty street air from getting inside, otherwise condensation will freeze on the front door and it will be impossible to open it;
- locker room or rest room: according to the recommendations, the standard locker room area is determined at the rate of 2-4 m2 per person; if a small bathhouse for 4-6 people is being built, it is enough to allocate 8-10 m2 for this room;
— washing room: according to the standards, 2.7 m2 per person is allocated for this room, some owners combine a washing room and a steam room;
— steam room: according to the standards, 2-3 m2 are allocated per person to make it comfortable to steam, the area can be calculated with some margin.
We offer you several options for planning a bathhouse.
Results
A wooden log house is one of the most environmentally friendly buildings. Such a house will literally “breathe”, since there is constant air exchange through natural wood. Due to the optimal humidity levels, it is even healthy to live in a wooden log house!
The service life of such houses is much longer than even the most solid buildings. Frame structures, in which the beams are impregnated with an anti-corrosion and fire-resistant composition, can become excellent housing for several generations of a family. Interestingly, the thermal conductivity of a log house is 2.5 times less than that of a house built of brick, and this ensures warmth inside the house in winter and pleasant coolness in summer. The external walls of the log house do not require insulation.