One of the most important stages in the construction of any building is thermal insulation, so the choice of material is very important. It should provide comfort in the home, be safe and energy efficient. The process of insulating walls with penoplex is simple, so you can do it yourself.
What is important to know about Penoplex
To choose the right insulation for walls, you need to consider the properties, advantages and disadvantages of the materials offered on the market. Penoplex is extruded polystyrene foam with high density and strength. During production, the initial granular raw material is melted and mixed with gasifiers. Next, the foamed mass is pressed through the nozzles of the extruder and hardens, turning into a long white tape of a given thickness.
After this, the material is cut into standard size pieces. As a result of a chemical reaction, air bubbles isolated from each other are formed inside the sheets. The material is used to insulate floors, walls, and ceilings. It has the following advantages:
- low thermal conductivity coefficient;
- resistance to moisture (its absorption is only 0.5% of the total volume);
- high level of mechanical strength (the product does not deform over time);
- simplicity of installation work and low cost;
- the ability to provide good insulating properties with minimal material thickness;
- fire resistance;
- long service life;
- no need to use expensive or bulky installation equipment;
- resistance to rotting, development of fungal pathologies and mold.
There are no restrictions for insulating the outside of a house with penoplex. It is even allowed to be installed in rooms characterized by high humidity. However, the product has disadvantages: it does not burn, but melts, emitting toxic smoke.
The slabs do not allow steam to pass through, so the insulation is suitable for finishing a brick house, and not a wooden one (from the inside) or a frame one. Moreover, it can be installed both under plaster and under siding.
Technical characteristics of expanded polystyrene (EPS)
Penoplex is produced by exposing polystyrene granules to high temperature and pressure. By adding a mixture of carbon dioxide and light freon at the next stage, a porous mass is obtained, which is then squeezed out of the extrusion plant. After manufacturing the slabs in the cells, the residual freon is relatively quickly replaced by ambient air.
Penoplex is distinguished among materials for thermal insulation by the following characteristics:
- Low thermal conductivity . The thermal conductivity of penoplex in comparison with other thermal insulation materials is significantly lower and amounts to 0.03 W/m K.
- High compressive and bending strength. Extrusion allows you to achieve uniformity of the material structure. Evenly distributed cells improve the strength characteristics of the material, which does not change its dimensions even under heavy loads.
- Low water absorption (no more than 0.2 - 0.4% by volume in 24 hours). During the tests, XPS boards were left in water for a month. In this case, the liquid was absorbed in small quantities only for the first 10 days, after which the material stopped taking up moisture. At the end of the period, the amount of water in the slabs did not exceed 0.6 percent of their total volume.
- Low vapor permeability (vapor permeability coefficient 0.007-0.008 mg/m·h·Pa). A layer of slabs made of this material, only 2 centimeters thick, has the same vapor permeability as a layer of roofing felt.
- Durability (service life - more than 50 years). Repeated cycles of freezing and thawing the slabs showed that all the characteristics of the material remained unchanged after testing.
- Resistant to combustion . In the manufacture of this material, freons are used, which are safe and non-flammable. They are not poisonous and do not destroy the ozone layer.
- Environmental safety . Most chemicals used in construction are not able to react with penoplex. Exception: toluene, xylene, benzene and similar hydrocarbons; formalin and formaldehyde; ethers, both simple and complex; gasoline, kerosene; oil-based paints and other organic solvents.
- Wide operating temperature range (-50ºС to +75ºС). However, if exposed to excessive heat, the material may melt and ignite.
For clarity, let us highlight all the physical and mechanical properties in the form of a table:
| Indicators | Test method | Dimension | Types of PENOPLEX (old types) | |||||
| Penoplex (31C) | Penoplex wall (31C) | Penoplex foundation (35 without anti-friction) | Penoplex roofing (35) | 45C | 45 | |||
| Density | GOST 17177-94 | kg/m² | 25,0 — 35,0 | 25,0 — 32,0 | 29,0 — 33,0 | 28,0 — 33,0 | 35,0 — 40,0 | 38,1 — 45,0 |
| Compressive strength at 10% linear deformation, not less | GOST 17177-94 | MPa (kgf/cm²;t/m²) | 0,20 (2; 20) | 0,20 (2; 20) | 0,27 (2,7; 27) | 0,25 (2,5; 25) | 0,41 (4,1; 41) | 0,50 (5; 50) |
| Ultimate strength during static bending, not less | GOST 17177-94 | MPa | 0,25 | 0,25 | 0,4 | 0,4 | 0,4 | 0,4 — 0,7 |
| Elastic modulus | UNION DOR SRI | MPa | — | — | — | 15 | 18 | 18 |
| Water absorption in 24 hours, no more | GOST 17177-94 | % by volume | 0,4 | 0,4 | 0,4 | 0,4 | 0,4 | 0,2 |
| Water absorption in 28 days | % by volume | 0,5 | 0,5 | 0,5 | 0,5 | 0,5 | 0,4 | |
| Fire resistance category | Federal Law - 123 | group | G4 | G3 | G4 | G3 | G4 | G4 |
| Thermal conductivity coefficient at (25±)°С | GOST 7076-94 | W/(m °K) | 0,03 | 0,03 | 0,03 | 0,03 | 0,03 | 0,03 |
| Calculated thermal conductivity coefficient under operating conditions “A” | SP 23-101-2004 | W/(m °K) | 0,031 | 0,031 | 0,031 | 0,031 | 0,031 | 0,031 |
| Calculated thermal conductivity coefficient under operating conditions “B” | SP 23-101-2004 | W/(m °K) | 0,032 | 0,032 | 0,032 | 0,032 | 0,032 | 0,032 |
| Sound insulation of the partition (gypsum plasterboard - penoplex 50 mm - plasterboard), Rw | GOST 27296-87 | DB | 41 | 41 | — | 41 | — | — |
| Improvement index for structural noise insulation in floor construction | GOST 16297-80 | DB | 23 | 23 | — | 23 | — | — |
| Standard sizes | Width | mm | 600 | |||||
| Height | mm | 1200 | 2400 | |||||
| Thickness | mm | 20,30,40,50,60,80,100 | 40,50,60,80,100 | |||||
| Operating temperature range | THAT | ºС | -50 to +75 | |||||
Expanded polystyrene is usually sold in packages of 0.25 - 0.3 m³. Depending on the thickness of the sheet, the surface area that can be covered using one package will also vary.
How to choose penoplex?
Before insulating with penoplex, you should choose the right material. The following characteristics are taken into account:
- density and thickness of the product (to insulate a wooden house from the outside with penoplex, sheets with an index of PBS-15 are required, for a concrete house - PBS-25);
- weight and dimensions of sheets;
- coefficient of moisture absorption, thermal conductivity, compressive strength;
- climate zone;
- cost of the material ( prices depend on the manufacturing company, technical parameters ).
The manufacturer is also an important criterion for choosing penoplex. It is better to give preference to those companies that have earned positive user reviews and a good reputation.
Is it profitable to use?
Standards recommend that private owners create economically feasible insulation so that it pays off at current energy prices over a certain period of time - up to 12 years. Therefore, in the design documentation for private houses and apartments, heat insulators are laid out that are quite reliable (durable), but at a reasonable price - insulation should be beneficial for the owner.
You won’t find too expensive foam glass in projects. But cheap high-density polystyrene foam (foam) is widely used.
In house designs, extruded polystyrene foam is used strictly for its intended purpose.
No one will use extruded polystyrene foam where polystyrene foam, which is much cheaper, can be used. Otherwise, the meaning of insulation is lost - it simply will not pay for itself in normal terms, and violation of the standard threatens with deprivation of the design license, for example.
Principles and rules for façade insulation with Penoplex
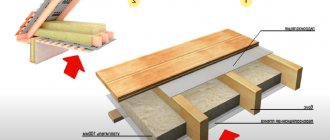
When insulating walls with penoplex, the technology provides for subsequent finishing with plaster. It performs two functions: decorative and protective. The mounting diagram for extruded polystyrene foam is as follows:
- The outer surface of the wall of a structure.
- A layer of special glue designed to fix the panels.
- Sheets of a given thickness.
- The outer layer of fiberglass mesh is thick with glue.
- Decorative coating.
Gluing panels is also characterized by some features. They need to be fixed not only with adhesive, but also with mechanical fasteners - dowels. In order to properly insulate houses with penoplex, any external corners are reinforced with special metal elements that protect the material from possible mechanical damage.
If there is glue at the joints between the sheets, it must be removed. The connecting seams should be offset, which increases the adhesion of the insulating material. When applying a decorative layer, all work should be completed in one approach. However, its thickness should not exceed the thickness of the slabs.
Costs for building materials
Today, the construction markets of Moscow and the Moscow region can offer buyers the following materials at prices:
Penoplex in packs, thickness 100 mm for outdoor use, RUB 1,550;- Penoplex in packs, thickness 50 mm for interior work, RUB 1,250;
- primer solution 10 l, 300 rub.;
- plaster mixtures, 25 kg, 360 rubles;
- fiberglass mesh for reinforcement, 35.50 rub/m2;
- profile fasteners, packaging, RUB 740;
- glue for fixing plates, 25 kg, 230 rub.;
- mushroom dowels for Penoplex, 3 rub. /PC.;
- dowels for fastening supporting parts, packaging, 740 rub.;
- starting profile, 120 rub.;
- facade paint for finishing, 15 kg, 513 rub.
Cost of work in the Russian Federation
The technological process of installing Penoplex on brick walls also consists of many separate operations that determine the total cost of work per 1 m2 of brick wall area.
Prices for finishing work depend on the region where the property is located, transport links and the height of the building.
Average prices by region of the Russian Federation for different types of work:
- Insulation of external brick walls, RUB 380. /m2.
- Internal protection of brick walls, RUB 310. /m2.
- Reinforcement of a brick wall with fiberglass mesh, 410 RUR/m2.
- Rubbing walls with glue, 220 rub. /p.m.
- Primer of walls, 80 RUR/m2.
- Application of decorating plaster, 380 RUR/m2.
- Wall painting, 110 RUR/m2.
If you are interested in how and with what you can insulate brick walls from the inside and outside, take a look at this section.
Required materials
To insulate the outside of a house with penoplex, you need to select the necessary consumables. In this case, the work will go smoothly. For insulation you need:
- Penoplex boards. Their number is calculated depending on the area of the base, as well as adding a 10% margin for cutting.
- Primer liquid. It improves the adhesion of sheets to the base. The type of substance depends on the material used to make the walls: for brick surfaces , plastered surfaces made of gas silicate blocks, a deep penetration primer (300 ml/sq.m.) is suitable, and for concrete surfaces, Concrete Contact containing quartz sand (400 ml/sq.m.).
- To insulate external walls with penoplex, a starting profile is required. It is needed for proper fastening of the first row of slabs. The element is installed around the perimeter of the entire building. Included with it are spacer washers that allow you to correct minor unevenness in the base. The number of profiles is calculated depending on the length of the walls, and fasteners - 1-2 per joint. To fasten the supporting elements, dowels are used, the distance between which is 30 cm.
- To insulate walls with extruded polystyrene foam, you need special glue. The average material consumption at the first stage is 5 kg/sq.m. An additional layer will be required to secure the layer of reinforcing mesh. In general, it will take up to 10 kg/sq.m. material.
- Dowels are “fungi”. They can be hammered or screwed. It is better to choose products with a thermal head or a plastic expansion nail. For each square meter of area you will need 6 elements.
- Reinforcing mesh. It is better to purchase fiberglass-based material. For finishing you will need up to 1.1 sq.m/sq.m.
For the decorative plaster layer, materials with different textures are used, so the consumption is calculated after external insulation.
Preparing the sheathing - step-by-step installation
To make the lathing, you need to decide on the material from which it will be made:
- aluminum;
- tree.
Wood is more environmentally friendly, but more complex in terms of installation. The aluminum frame is much more convenient and practical. Let's move on directly to installing the sheathing:
- The first step is to clean and prepare the surface for future lathing.
- At the second stage, you will need certain tools to attach the frame to the prepared wall.
- The third step is to mark the entire surface where the sheathing frame will be installed.
- After all the preparatory work, you can begin installing the sheathing elements according to the marked marks.
Preparing the sheathing
Required thickness parameter
To insulate the outside of the house with penoplex with your own hands, you need to choose the appropriate thickness of the product. Here you should pay attention to the climate zone. When purchasing penoplex, insulation is carried out taking into account the fact that the insulating cake must provide a total heat transfer resistance of no less than that established in building codes and regulations.
For the calculation, the thermal conductivity coefficient of the insulation is additionally required. To find out the thickness of penoplex , you can use the following formula: P (thickness, m) = R (heat transfer resistance, which can be taken from official SNiP sources) * k (thermal conductivity index).
Finishing
The final stage of insulation with Penoplex is puttying. Apply the putty slowly, layer by layer, ensuring even distribution.
After the first layer, a metal or plastic reinforcing mesh is attached.
The first layer of putty is about 10 mm, the second and subsequent ones can be thinner. It is advisable to apply the third layer by spray, no more than 0.5 cm thick.
Technology of insulating facade walls with Penoplex
To properly insulate the facade with penoplex, compliance with the installation technology is required. The necessary tools are pre-selected and the base is prepared.
Preparatory stage
According to the technology of penoplex insulation, the preparation stage is the first, and this procedure concerns not only the surface of the wall, but also the insulator itself.
Preparation of materials
To insulate a house with penoplex, the material needs to be prepared. The surface of the slabs should be slightly rough. To do this, polystyrene foam is processed with a needle roller. If it is not available, a stationery knife is suitable, which makes small notches.
Preparing the walls
Before insulating a wall with penoplex, it also needs to be prepared. It is cleaned of dust, old finishes, grease stains, and weak areas of plaster. If there is fungus or mold on the surface, they must be removed and the base treated with fungicides and antibacterial agents. Protrusions on the wall or remnants of masonry material are knocked down to the general level.
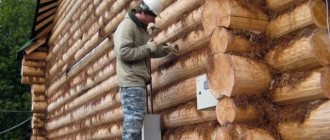
Cracks of any size are cleaned, treated with a priming liquid, and then covered with a repair compound. As for wooden walls, it is necessary to completely eliminate damaged areas, which are treated with antiseptics. The cracks between the logs need to be caulked.
After cleaning, the vertical and horizontal level of the base is checked. If the differences are significant, the problem needs to be corrected. For this, a solution based on cement and sand is used. All metal structures are treated with a special anti-corrosion compound. You can begin attaching the thermal insulation a month after the preparatory procedures.
Marking the zero line and setting the starting profile
Before insulating walls with penoplex, you need to mark the location of the lowest row of sheets. For this, a laser or water level is used. The material must be attached so that it is 30 cm below the floor level of the first floor. This way you can avoid the appearance of dampness in the room. The markings are carried out in such a way that there are no even minimal errors that could lead to significant distortion of the slabs in the upper part of the wall.
The starting profile is attached along the perimeter of the building (below the highest point of the building foundation). The clamps are mounted every 30-50 cm. At the points of contact with the base, the elements must fit tightly to it. If there are even small gaps, they can be eliminated using spacer washers. To connect adjacent profile elements on a straight wall, special fasteners are used. In addition, there must be a gap of 3 mm between them.
Preparing and cutting penoplex boards
The insulation of the wall is carried out after adjusting the foam boards. At the corners, the sheets are mounted with a toothed lock. To do this, the fragments through the row are shifted outward at a distance slightly greater than the thickness of the material. All pieces that border the profile should not be narrower than 20 cm.
In the area of window and door openings, you need to use elements cut in the shape of the letter “L”. In this case, it is important to leave an allowance inward for proper joining with the slope insulation. For cutting slabs, heated wire (nichrome), a hacksaw with fine teeth, and a stationery knife are used.
Preparation of adhesive composition and installation of insulation boards
To insulate walls with penoplex from the outside, special glue is used, which is prepared immediately before starting work. Preparation of the mixture and fastening of the material is carried out according to the following instructions:
- The glue must be mixed in accordance with the proportions and in the sequence indicated on the package. The first stage lasts 5 minutes, after which the composition should stand for 10 minutes. Next, it is kneaded again for 5 minutes. The product must be used within 2 hours. The glue must be used at a temperature of at least +5 degrees.
- Glue is applied along the perimeter of the slabs in a strip of 10 cm. The maximum layer thickness is 2.5 cm. The sheet must be filled to 40% of the entire area.
- The first row is laid on the starting profile so that the edge of the material rests tightly against the limiting edge and does not extend beyond it.
- After applying the glue, each fragment is pressed tightly to the base. Excess mixture is removed immediately. In this case, you need to constantly monitor the horizontal and vertical levels. You can adjust the position of the plates by tapping with a grater.
- 3 days after laying the panels, they are additionally secured with “fungi” dowels.
Since when using penoplex to insulate walls, gaps may remain between the slabs, which are filled with polyurethane foam-based polyurethane foam.
Creation of a reinforced protective plaster layer
After installing the insulation, it is covered with plaster reinforced with fiberglass reinforcing mesh. Its specific density is 140-160 g/m2. The insulated facade is plastered with the same compound on which the slabs were attached, but its consistency should be more liquid.
Strips of mesh, 30 cm wide and 1 m long, must be fastened starting from the corners and slopes. Next, an adhesive composition is applied to it. The layer thickness is 0.2 cm. After this, a metal corner is mounted. The mesh must be completely hidden in the plaster. There is no need to make the stripes too long. Adjacent elements must be overlapped by up to 10 cm.
After the solution has hardened, it is grouted. Next, a leveling layer of adhesive plaster is applied. Its thickness is 4-5 mm. After hardening, the surface is thoroughly rubbed.
Decorative finishing
When insulating walls from the outside with penoplex with siding, you will have to make wooden or metal sheathing. It is attached directly to the insulation using dowels or long screws. The sheathing must be fixed firmly, but the insulation must not be allowed to crumple. Sometimes another method of forming a frame is used: fixing the brackets to the base before laying the insulation. It is on them that the sheathing will be fixed.
There must be a ventilation gap 2 cm wide between the siding and the penoplex. In this case, there is no need to use a vapor barrier. Another finishing method is decorative plaster.
External thermal insulation
Do-it-yourself wall insulation can be divided into five main stages:
- wall preparation;
- vapor barrier sheathing;
- arrangement of sheathing;
- installation of penoplex;
- home decoration.
Before starting work, it is necessary to check the foundation. The base for the heat-insulating device must be reliable.
Preparing the walls
The wood must be dried. If there is paint on the surface, it must be removed. The joints between the beams are also checked. They must be caulked along their entire length.
If there are protruding parts on the outside, they must be cut down. The last step in preparing the surface should be treating the wood with special impregnations.
Sheathing with vapor barrier
Along the entire perimeter of the walls, wooden slats with a thickness of 25–30 mm are installed. The step between them should be no more than 1 meter. A vapor barrier is laid on the slats and secured with nails or a stapler.
Due to the stuffed slats, a gap is formed between the logs and the vapor barrier material for ventilation.
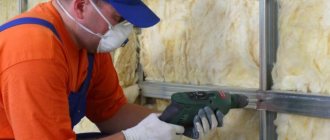
Arrangement of sheathing
It must be made from bars measuring 25×50, 50×50 or metal profiles. The arrangement of the sheathing is necessary for the installation of thermal insulation material. The pitch between the padded beams is selected according to the width of the insulation sheets.
In order for the penoplex to be firmly installed in the formed openings, the size between the beams should be 5 cm smaller.
Installation of penoplex
A heat insulator is placed in the openings between the guides. If two thermal insulation layers are used for insulation on the outside, then the insulator can be laid in two ways:
- sheets of two layers are placed offset to avoid cold bridges;
- the arrangement of two layers is carried out in perpendicular directions.
Let's take a closer look at the second do-it-yourself installation option. The lathing is laid on the vapor barrier first in a horizontal direction and the first layer of penoplex is laid into it. Then vertical bars for the second row of thermal insulation are installed perpendicularly on top of it.
Finishing
Before you begin finishing work on the house, you need to install another row of sheathing. It is nailed directly to the base of the building. This sheathing is necessary to create ventilated channels. After its arrangement, you can begin cladding the outside of the building with finishing materials; siding is most often used for this work.
Penoplex is widely used for insulation of various industrial and residential buildings. It has a number of advantages, but also has its disadvantages.
As a result of shrinkage of the walls of wooden houses, significant heat loss occurs. Such houses especially need high-quality insulation.
Let's consider whether it is possible to insulate a wooden house with penoplex, methods of its installation, advantages and features of working with materials.
Curtain facade
Insulation of the walls of a house can be done in the form of a curtain wall. First you need to prepare the base. All areas with crumbling finishing material are cleaned. The destroyed brickwork is being restored. Since the panels can be installed correctly only after marking, maximum attention is paid to this process. The distance between the brackets is taken into account: 40-60 cm horizontally and 80-140 cm vertically.
Frame installation and wall insulation
Before attaching the penoplex to the wall, you need to mount the sheathing. It is fixed with screws on the base. However, it is worth remembering that if the masonry was carried out with hollow bricks, then holes for fasteners should not be drilled using a hammer drill. After installation, the brackets need to be aligned so that they are in the same plane.
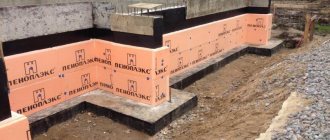
Next, you can insulate the base, but do not forget about waterproofing. Penoplex boards are attached with glue and additionally secured with dowels. They need to be laid from bottom to top in two layers with bandaging of the seams. A waterproofing film is attached over the material.
Finishing
Decorative panels imitating wood, porcelain stoneware, and brick are used as finishing materials. Natural stone is often used for cladding.
FAQ
Is it possible to do without fixing with dowels when installing slabs on an external wall?
Not worth it. Savings may result in material delamination, especially when it comes to exterior work or insulation under plaster.
Is it possible to glue penoplex in the cold?
Some compounds with frost resistance F100 allow this. But still, working in the cold is not advisable.
Can Penoplex Comfort be used to decorate the walls of a bathhouse?
No. This type of Penoplex cannot work in rooms with high temperature changes. They can be used to cover walls only in heated, dry rooms.
How many bricks does PENOPLEX replace?
On average, 1 cm of PENOPLEX replaces 25 cm of brickwork. But it should be taken into account that for each individual type of brick (silicate, ceramic, clinker) this comparison will be different.
Insulation of walls from the inside with penoplex
Insulating walls with penoplex from the inside is rarely done, since the material practically does not allow steam to pass through. But with the right approach, its installation becomes possible. In an apartment, this procedure is carried out only if there is no thermal insulation layer outside the building. The thickness of the penoplex will not be large. The work is carried out in the following sequence:
- Cleaning the base from dust and dirt. To insulate the walls from the inside of the room, they need to be leveled. There should be no cracks or crevices in them.
- To prevent condensation from collecting on the walls of the apartment, they are covered with a vapor barrier membrane before installing the penoplex. It should extend to the edges of the walls and floor. It can be secured using construction tape.
- Preparation of glue. To attach the internal insulation, you should use a composition intended specifically for such work. When stirring, there should be no lumps left in the mixture. It must be applied both to the slabs of material and to the base.
- Laying slabs. Insulation of walls from the inside with expanded polystyrene is carried out end-to-end. The seams between the rows should be offset. If there are gaps between the plates, they should be sealed.
- Additional fixation with dowels.
- Organization of the reinforcing layer using fiberglass mesh and adhesive solution.
After insulation from the inside of the room has been completed, you need to wait at least 20 days before finishing.
Video description
Watch in this video how to mix the solution yourself:
It is also important to remember about the beacons - without them you cannot start the pouring process. Otherwise the surface will be uneven. The filling technique itself involves working from the far corner (here we will work with a level). After leveling the previous layer and before pouring the next one, a reinforcing mesh is placed.
It is important! Before carrying out work, you should consider the further use of the room, since the thickness of the screed depends on this. Thin slabs are suitable for an ordinary living room. For heavy structures, it is better to give preference to dense sheets.
To prevent cracks from appearing in the frozen surface, you need to water it with water for three days. Drying takes several days. Only after all these procedures is the facial finishing performed.
Self-leveling mixtures
To understand what thickness of penoplex to choose for insulating a floor with a screed made from a self-leveling mixture, it is necessary to take into account the type of room. The greater the load on the floor, the thicker the slab should be.
In this case, it is important to take into account the thickness of the layer of the mixture itself under the screed - in this case it is no more than 2 cm Source remstroidomufa.ru
3 advantages of self-leveling mixture:
- does not require manual alignment;
- distributed with a needle roller;
- dries faster than cement.
On a note! The leveling of such a surface is carried out under the influence of gravity. The kneading process itself is described on the packaging of the material. This base polymerizes in just a few hours.
The importance of leveling the underlying base should be kept in mind. If any defects remain, there will be a difference in height, and, as a result, an uneven screed.
Attention ! Waterproofing must be installed as close to the finished floor as possible. Some people put it under penoplex - this is a mistake. If water penetrates into the floor, it will not be possible to dry it. The surface will remain wet for a long time, since the slabs have a water-repellent effect.
The finishing itself can be anything - from ceramic tiles to wooden parquet. If the technology has been followed, the result will be excellent.
Subtleties and advice from professionals
In order to insulate the outside or inside with your own hands correctly, you need to take into account some of the nuances of the work:
- instead of polyethylene film for waterproofing, it is better to use a multilayer membrane;
- to insulate a wooden house from the inside, it is better to choose vapor-permeable types of materials;
- polystyrene foam must be laid tightly against the wall;
- there should be good ventilation in the room.
Penoplex insulation has its own characteristics, but if all installation rules are followed, the material will provide high-quality protection against heat loss and will last a long time.
Protective covering
In order for the insulation surface to look beautiful and be durable, it must be protected. The simplest and cheapest way to protect insulation is plastering, which is carried out in stages.
Video instruction:
In general, attaching penoplex to concrete and brick walls, as well as insulating the foundation of a building, is not difficult. It is enough to follow the installation technology and carry out the work carefully to ensure that the insulation is attractive and durable.
Source
Damage
Thus, heat insulator extruded polystyrene foam glued to a large area of walls causes significant damage to the owners.
In addition, only very dense concrete can withstand vapor barrier almost painlessly. Brick and porous materials will easily acquire high humidity, the same as indoors, which is not very useful. And in cases of poor-quality gluing, along the edges of the area, or some kind of steam leaks through the outer shell, it is quite possible that the wall will be soaked with condensation formed at the border of the wall and the insulation.
Also, in rafter systems, in wooden floors, in contact with wood, experts generally recommend the use of vapor-permeable insulation, ventilated from the outside, ensuring the durability of the structure.
In addition, polystyrene foam inside the room is unsuitable for fire requirements, it is extremely dangerous when melted, without fencing from the living space with a fireproof partition
Sheet sizes, types
Penoplex is produced under the names “Wall”, “Foundation”, “Roof”, “Road”, “Universal”... From name to name the density varies mainly from 25 kg/m3. for “Wall” up to 40 kg/m3. for “Road” and, accordingly, the strength of the material.
Evgeniy Filimonov
Ask a Question
The standard density of conventional extruded polystyrene foam for wide applications is 35 kg/m3. But in the case of Penoplex, for example, the “Universal” type, somewhat contradictory data are given - density from 28 to 34 kg/m3.
The desire to save money in production is obvious - a weaker, lighter material with slightly increased water absorption is proposed. as if “Economy-Light extruded polystyrene foam”.
But it is likely that other manufacturers’ products may be “lightweight” or may not even meet the stated technical characteristics...
Application errors
A typical mistake in using Penoplex is more likely to do with belief in some “miraculous” properties of the material, or with the usual reluctance to delve into questions.
Nomadic teams of insulation workers impose their opinions on thermal insulation, seeking their own benefit. Penoplex is often imposed as a more expensive material for insulating walls, floors, and roofs, instead of foam plastic or mineral wool that is economically or technically feasible.
And so that the owners do not find it too expensive, they simply use sheets 20 mm or 30 mm thick to insulate the walls.
The heat saving effect from such a thin layer is minimal, or even practically unnoticeable. And the significant costs for gluing and plastering using the Wet Facade technology are wasted money.