If you set yourself the goal of insulating the floor of a house at the lowest cost and at the same time not losing quality, then wood waste can be considered such an irreplaceable material.
Sawdust or shavings can be purchased cheaply at any nearest carpentry shop without any trouble.
To perform insulation, you will need to work hard, since mixing sawdust with binders and installing it on the ceiling is somewhat more labor-intensive compared to ready-made insulation. But the operation of a house protected from cold masses in this way will pleasantly surprise the owners, and they will not regret the time spent on work.
Rules for choosing wood material
- If you make a choice between shavings and sawdust, the choice falls on the second option. The smaller the wood waste fraction, the higher the thermal insulation properties of the material.
- Sawdust of different types of wood have different properties. Coniferous species are lighter in weight and contain more resins in their composition. They will better insulate the home. Deciduous and fruit trees are heavier and denser; birch is considered the champion.
- Dry sawdust should only be used if it is mixed with dry lime for backfilling. In various other cases, when connecting them to components in a wet state, the dryness of the sawdust mass is not of fundamental importance. When choosing sawdust, it is not the humidity itself that plays a role, but the age of the raw material. It is impossible to carry out insulation from sawdust of fresh wood. They must gain age and “shake out”, preferably within a year.
- When choosing a chip or sawdust mass, you must check that the composition does not contain tree bark waste. Bugs and insects nest in the thickness of the bark; it is necessary to most effectively prevent them from getting into the insulation.
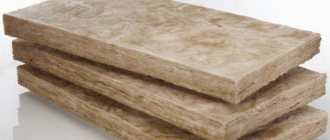
Arbolit
In the 60s of the last century, a building material called wood concrete was patented. Currently, slabs made from it are actively used for ceiling insulation in private homes. This type of material is nothing more than ordinary lightweight concrete. Such panels, 100 mm thick, can be prepared at home, using a homemade method, if you dry the mass in special flat molds.
To make them, they are used for sawdust and shavings. All wood-based materials contain sugary substances that contribute to the destruction of the concrete structure. To neutralize them, the shavings are treated with lime milk before use and then dried. After such preparation, it is an ideal filler for the manufacture of insulation boards.
Choosing sawdust for insulation
Before talking about the application technology, let's consider the quality of the source material.
When purchasing sawdust for home insulation, we recommend taking into account several features . The first thing you need to pay attention to is the size of the sawdust. Their properties as insulation directly depend on this
- Large sawdust is suitable for the rough layer, as it has a larger volume and forms an air gap;
- but small sawdust retains heat better, although in practical use they are not so convenient - they generate dust and get clogged in all the cracks;
- For mixing with cement or other fillers, medium-sized sawdust is best.
The second property of sawdust that you need to pay attention to is its moisture content.
It is important that the material you use to insulate your home is dry, as wet sawdust will rot and also attract bugs. In a workshop for processing freshly cut wood, sawdust will be wet; it is better to prefer waste from a workshop for cutting boards, since the wood is thoroughly dried before this work
In a workshop for processing freshly cut wood, sawdust will be wet; it is better to prefer waste from a workshop for cutting boards, since the wood is thoroughly dried before this work.
In cases where the origin of the sawdust is unknown, you can check them for moisture yourself: if, when clenched into a fist, they crumble and crunch, then the product is dry, and if they gather in lumps, the product is wet.
Wet sawdust can be dried, but this will require space and time. You can spread the sawdust over the summer in a dry, ventilated area (for example, in the attic), and stir it periodically.
Recommendations from professionals
Only fatty types of clay are suitable for forming insulation. A mixture that is too dry will crumble after drying and will not provide the required plasticity when wet. It’s easy to distinguish oily clay from dry clay: you need to squeeze the wet mixture in your fist - after unclenching, your fingers stick together a little, which means the clay is good.
Do not take the mixture from the bottom of reservoirs - there is a lot of silt there, which does not have compressive strength. The material can be checked this way: wet it, roll it into a ball and flatten it - if the clay has not changed color, but moisture appears on the surface, the mixture is good, but a change in shade indicates that there is plenty of silt here, it is better not to take such clay.
A high-quality mixture, rolled into a ball and crushed in a fist, will not fall off if you turn your palm up - the pieces will fall off slowly, leaving small fractions on your hand. And a thin rod of wet mixture wrapped around a finger will not tear - this indicates the elasticity of the raw material, which is also good when laying out insulation.
And the last piece of advice: if you squeeze a dry piece of high-quality clay, it will break into small fragments, which are crushed only under the blows of a hammer; such pieces do not crumble in your fingers.
Clay insulation
There are several options for clay mixtures: with sand, with sawdust or with straw. The principle of operation in them is usually similar. But it also has its own characteristics. A very important point is the correct preparation of the working mixture. The quality of the insulation, its durability (if the proportions are not met, the material may crumble or break), and the ability to retain heat depend on this.
Sand and clay
Any repair begins with the preparation of a working solution. Sand and clay are loaded into a concrete mixer and water is added. You can mix them yourself, but this is a very long and labor-intensive process, because you need to achieve a uniform consistency, like thick sour cream.
The resulting solution is coated with the boards. The layer should also be uniform, approximately 5-7 cm. The mixture is allowed to dry for at least 2 weeks. Then sand is poured over the clay; the layer should be thick, at least 2-3 cm. This will not only protect the mixture from sudden temperature changes. Over time, cracks may appear in the clay. Sand will fill the voids as necessary. Thermal insulation will not deteriorate.
The process of laying the clay layer is completed by treatment with liquid steam and then dry. It turns out that the material first gets a little wet, and then, as it were, hardens.
Clay with sawdust
Clay with sawdust
Then 2 buckets of the resulting liquid clay are poured into a concrete mixer and sawdust is added to the bowl. The finished solution will resemble a concrete screed in its consistency. It is poured onto boards and leveled. It is advisable to compact the layer a little when insulating the ceiling with clay and sawdust in order to get rid of excess voids.
Clay with straw
Clay with straw
Clay is moistened and mixed with chopped straw. The result should be a thick mass similar to liquid plasticine. It is applied to the floor boards in a layer 8-10 cm thick. After drying, expanded clay, sawdust, wood chips or a mixture of these materials are poured on top. After drying, cracks may appear on the surface; repairing them is easy: just cover the top with a thin layer of clay.
It is not difficult to insulate your house or bathhouse with clay. But repairs will take a lot of time, because this material takes a long time to dry
On the other hand, it has excellent thermal insulation properties and does not burn, which is so important for houses with stove heating
What does clay mortar for plaster consist of?
So, how to prepare clay plaster? It turned out to be very simple. There are three recipes:
- sand-clay;
- sand-clay with the addition of fiber (sawdust, straw, pine needles);
- clay with fiber.
Also, the strength of the clay mortar can be increased by adding lime to it. Lime is a natural component - it is obtained from limestone or chalk. In addition, it has excellent antibacterial properties, which prevents the formation of fungus.
Sand percentage
Sand is very important for our mortar, but there are no clear instructions regarding its quantity. It all depends on the plasticity of the clay. It is only known that there should be quite a lot of it - at least half of the total solution. But it is also not recommended to put more than 80%. You will have to find your own share through experience. Don’t forget to also rinse the sand thoroughly before adding it to the solution so that there are no foreign bodies or any debris in it.
Why is fiber needed?
To a modern city dweller, the process of adding straw, pine needles, sawdust or horse manure to the solution (there is such a recipe) seems like shamanism and prejudice. But in fact, fiber has many functions, it reinforces the mortar (not only the front part, like a mesh, but in all directions), increases the stability of the plaster, and its wear resistance. In traditional recipes, the role of fiber is played by straw, which also serves as an excellent insulation material due to its thermal conductivity properties. Of course, you can choose fiber to suit your taste, or even buy industrial fiber if you are not too keen on environmental friendliness and naturalness. If you decide to go with straw, make sure it is very fine; this will have a positive effect on the final smoothness of the wall. An alternative to straw, just as natural and cheap, is regular sawdust. They should also be small.
When working in urban environments, it is sometimes wiser to buy polypropylene fiber - a synthetic fiber. It is made from thermoplastic polymer. This fiber significantly improves the technical and operational characteristics of mortars and mixtures.
Clay insulation
There are several options for clay mixtures: with sand, with sawdust or with straw. The principle of operation in them is usually similar. But it also has its own characteristics. A very important point is the correct preparation of the working mixture. The quality of the insulation, its durability (if the proportions are not met, the material may crumble or break), and the ability to retain heat depend on this.
Sand and clay
Any repair begins with the preparation of a working solution. Sand and clay are loaded into a concrete mixer and water is added. You can mix them yourself, but this is a very long and labor-intensive process, because you need to achieve a uniform consistency, like thick sour cream.
The resulting solution is coated with the boards. The layer should also be uniform, approximately 5-7 cm. The mixture is allowed to dry for at least 2 weeks. Then sand is poured over the clay; the layer should be thick, at least 2-3 cm. This will not only protect the mixture from sudden temperature changes. Over time, cracks may appear in the clay. Sand will fill the voids as necessary. Thermal insulation will not deteriorate.
The process of laying the clay layer is completed by treatment with liquid steam and then dry. It turns out that the material first gets a little wet, and then, as it were, hardens.
Clay with sawdust
Clay with sawdust
This is the most common insulation option. Any sawdust will do. You can get them almost free of charge at any carpentry workshop. The mixture is prepared as follows: first soak the clay so that it becomes liquid. To do this, 5 buckets of clay are filled with 2 buckets of water. Allow to absorb a little moisture and stir until smooth. Then 2 buckets of the resulting liquid clay are poured into a concrete mixer and sawdust is added to the bowl. The finished solution will resemble a concrete screed in its consistency. It is poured onto boards and leveled. It is advisable to compact the layer a little when insulating the ceiling with clay and sawdust in order to get rid of excess voids. The thickness of the layer should be at least 10 cm. It is left to dry for 1-2 weeks. If cracks appear after drying, they are covered with a thin layer of clay.
Clay with straw
Clay with straw
The clay is moistened and mixed with chopped straw. The result should be a thick mass similar to liquid plasticine. It is applied to the floor boards in a layer 8-10 cm thick. After drying, expanded clay, sawdust, wood chips or a mixture of these materials are poured on top. After drying, cracks may appear on the surface; repairing them is easy: just cover the top with a thin layer of clay.
The repair is completed by covering the insulation with boards or wood boards. Then the ceiling will look complete.
It is not difficult to insulate your house or bathhouse with clay. But repairs will take a lot of time, because this material takes a long time to dry
On the other hand, it has excellent thermal insulation properties and does not burn, which is so important for houses with stove heating
Application of various auxiliary components
Regardless of the type of binder, the general principle of their use is the same - after drying/hardening, the substance binds sawdust, forming a monolithic layer.
However, for each type of work they use their own technology, which makes it possible to make maximum use of the qualities of both the fresh mixture and the frozen insulation.
In addition, each of the binders has its own optimal proportion of components , as well as the lifetime of the finished composition during which it must be used.
Therefore, we will briefly talk about the use of binders for insulating various parts of the house, and then we will show the difference in the technologies for using different types of this substance.
The process of insulating a house with sawdust can be divided into several stages , that is, insulation:
- gender;
- walls;
- ceiling;
- attic.
To insulate the floor, wood sawing waste is poured between the joists so that they separate the lining or screed from the subfloor boards. Therefore, there is no particular difference between insulation with clean sawdust and waste with binder.
However, the binder increases the service life of such insulation, because it stops the processes of decay and rotting, which you can read about in this article (Humus from sawdust).
This is especially important for rooms where there is a high probability of water spillage or where high humidity often occurs .
This technology is used on both wooden and concrete floors.
If you want to learn about it in more detail , we recommend reading this article (Floor insulation).
Therefore, in most cases, when insulating a floor, the choice of binder does not play a special role, with the exception of those wooden floors where, for some reason, it is difficult to make a lining from a sufficiently durable material.
Therefore, it is advisable to use PVA there, because the specific gravity of the finished composition will be less than with another type of binder.
Wall insulation is carried out in three ways :
- pouring or pouring insulation into the space between boards or bricks;
- filling the space between the wall and the decorative facade or false panel with insulating material;
- coating the surface of the wall with an insulating compound.
In the first case, none of the binders described in the article have any serious advantages, because after preparation the mixture is poured into voids and compacted , after which it hardens.
The only difference is the life time of the mixture, so gypsum is used very rarely, because it hardens very quickly.
Therefore, even the use of hardening retarders does not allow the solution to be used for more than half an hour, which is very little time to fill even a small section of the wall.
If the wall is insulated using the method of moving formwork or gradually filling individual pieces, then gypsum mortar can be used to fill between the wall and the decorative facade or false panel.
In this case, the short lifetime will not be a significant disadvantage due to the small volumes.
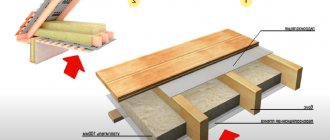
To insulate the ceiling, the same technology is used as for insulating the floor - the finished mixture is poured into the space between the joists.
The only difference is that it is more convenient to insulate the ceiling through the removed floor covering of the next floor.
The same technology is used for the attic floor, however, in attics with an attic it is also necessary to insulate the walls. The exception is roofs where the roof is insulated.
We also recommend reading these articles Insulation of a frame house, Ceiling and Roof, they talk in detail about various methods of insulation with sawdust.
Stage one. Selecting raw materials
The best option for use as insulation is sawdust of the middle fraction. The reason is extremely simple: it is difficult to work with fine starting material, and coarse sawdust has insufficient thermal insulation properties. Sawdust from cutting in carpentry production is considered the best, because it has low humidity, so it does not require additional drying, and will not begin to rot when used.
If sawdust is available exclusively from round timber, which has natural moisture, then before laying it should be spread out under some kind of canopy and dried thoroughly. There is no need to cover, otherwise they will start to rot.
Choosing sawdust for ceiling insulation
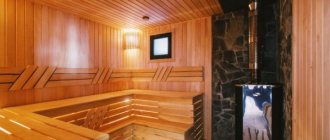
What types of sawdust are more suitable? Give preference to coniferous species - they contain a lot of resin, which creates a lot of inconvenience for various types of pests. But if you are insulating a bathhouse, it is preferable to use sawdust from deciduous trees.
Also, before laying, sawdust should be left to rest for up to 1 year - during this time the level of sugars, which provoke rotting, will noticeably decrease
Pay attention to ensure that the raw materials are free of debris and other foreign impurities; if any are present, sift the sawdust and remove large debris manually
Sifting sawdust
Preparatory work
How to insulate a ceiling with sawdust in a private house? Whatever method is chosen, preliminary preparation of the wooden base is required. Initially, the elements on the ceiling are processed. As a rule, during construction they use material that has already undergone appropriate processing. However, in some cases this procedure is skipped. Then you need to do it yourself.
The treatment is carried out with special protective compounds. It is carried out in several stages, since comprehensive protection is required. Initially, wooden parts are coated with antiseptic compounds designed to protect against rotting and insect damage. Next, fire-bioprotective agents are used, which increase the material’s resistance to fire and exposure to elevated temperatures. The next stage is treatment with water repellents. They prevent previously applied compounds from being washed out of the wood structure, help remove excess moisture from the material, and protect against water penetration.
For processing, it is recommended to choose drugs from the same brand. Some manufacturers offer products that perform several functions at once, for example, protect against fire and high temperatures, prevent rotting and insect damage. The bathhouse must be treated with special products that are resistant to high humidity and high temperature.
After processing and drying of wooden structures and ceilings, the substrate is laid.
Initially, all gaps and cracks should be sealed. To do this, use polyurethane foam and acrylic sealant. Large cracks are treated with foam. Gaps and joints are sealed with sealant. It is allowed to use bitumen mastic, but not for finishing the ceiling of a bathhouse. This is due to the low resistance of the material to high temperatures.
You need to seal not only the holes in the wooden ceiling, but also in the roof itself. This increases the thermal insulation properties and eliminates the impact of external factors on the internal elements of the roof.
After drying the sealant and foam and removing excess material, the substrate is laid. It is necessary to protect the interior space of a private house from the penetration of dust from sawdust, and serves as a vapor barrier between the ceiling and sawdust insulation. The substrate must be vapor-permeable, since warm air and steam rise up. If it does not pass through the ceiling and further into the space under the roof, condensation will form. This will lead to gradual rotting, the formation of mold and fungi.
An excellent and inexpensive option is to lay cardboard. It can be any type of material. The main condition is that the cardboard must be dry. The sheets are laid directly on the ceiling, with an overlap of 15-20 cm on each other. If the cardboard is thin, then it should be placed in 2-3 layers. The joints are fastened with staples. The perimeter of the junction of cardboard and walls is treated with polyurethane foam or sealant.
PVC film is often used as a backing. It is also laid with an overlap of 10-15 cm, and additionally secured with staples using a stapler. The edges of the film around the perimeter should extend onto the walls/roof by 10-15 cm.
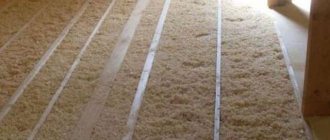
Dry installation of insulation
After the preparatory work, you can begin laying dry insulation. It is recommended to pour the shavings in 2 layers. To create the first, sawdust of a large fraction is used, for the second - a small fraction. This device prevents dust from entering the house and provides good thermal insulation.
The first layer of the coarse fraction is laid 10-15 cm thick, then thoroughly compacted. A layer of fine sawdust of the same thickness is placed on top, which is also compacted. The better the insulation is rolled, the better it will retain heat in the house. For greater shrinkage, it is allowed to slightly moisten the sawdust. With a thickness of 20-30 cm, the insulating layer provides reliable thermal insulation.
It is recommended to lay clay, sand, and slag on top of the layer of shavings. This powder improves thermal insulation properties and provides additional protection against mold, fungi and insects.
What is the reason for the popularity of the method?
Close attention has always been paid to home insulation. The modern market offers a wide range of thermal insulation materials
All insulation materials have their pros and cons. Despite this, insulating the ceiling with sawdust in private homes still remains relevant. What is this connected with? Why do we still insulate houses using this material?
Firstly, the method is quite effective, as proven by many years of using sawdust. And numerous positive reviews confirm this. Secondly, the material retains its properties for a long time. Thirdly, insulating the ceiling with sawdust will be very cheap. Compared to all modern insulation materials, wood shavings are several times cheaper. This factor is especially preferable for consumers. Moreover, some construction companies give away the material completely free of charge or offer it at a purely symbolic price. And fourthly, this method is easy to install. Even a person without experience will be able to cope with the work with his own hands.
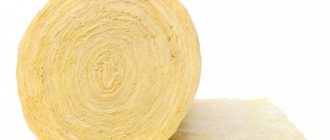
Mineral wool
Modern materials are more effective in terms of thermal insulation, and therefore ceiling insulation with ursa or mineral wool is now the most popular. Such insulation materials are available in rolls and in the form of slabs of various thicknesses. These materials have many advantages: lightweight, extremely plastic, durable, wear-resistant. Insulating the ceiling in this way does not require much effort; you can handle it alone. The most important thing is to follow the technology, then the ursa will not lose its properties, and the house will always be warm.
All types of mineral wool retain heat well and do not allow noise to pass through, they are not flammable, do not emit harmful substances, and rodents do not like them. To ensure maximum insulation, the material is laid in two layers, overlapping the beams and tightly hammering the corners.
Of course, this insulation also has disadvantages. For example, mineral wool must be carefully covered with waterproofing, otherwise it will pick up moisture and lose its properties. It should also not be compacted so that there is as much air as possible in the fibers of the material.
Detailed installation diagram of sawdust with clay
If you make a mixture that consists of clay and sawdust, you will get an excellent material with waterproofing and thermal insulation properties.
It is well suited for insulating the walls of a house built in any region.
This mixture will keep the house warm in severe frost and will not allow the room to warm up during the summer heat.
Insulating walls using sawdust-clay material is not as simple as it might seem at first glance.
Therefore, during the work process, you must strictly adhere to the following recommendations:
- When preparing the mixture, you must adhere to the exact quantitative ratios of the ingredients.
- The finished mixture must be applied to the walls at a certain thickness. This is the only way you can achieve maximum effect.
- For thermal insulation of walls, you need to make slabs from clay and small sawdust.
Lathing for insulation
A mixture of clay and sawdust can be made and laid in several ways; we will consider one option, that is, laying the wet substance on a sheathing pre-fixed to the wall.
What proportions must be maintained to make the mixture plastic?
IMPORTANT!
You need to take a bucket of clay, diluted to a thick sour cream, and 2/3 of a bucket of sawdust. The clay should be filled with water in a 1:1 ratio. It should swell for at least a day. Then it needs to be mixed until uniform. It's best if you soak all the clay at once. It will not deteriorate if left in water for a long time.
Clay diluted with water should be mixed with sawdust in a shallow metal container. You can use a concrete mixer to mix the composition. The finished composition must be applied to the walls.
You can also insulate the walls with such a mixture by pouring it into the formwork attached to the frame wall. If you fix shingles on the wall, then you can spread the clay in a layer of no more than 30mm.
After the sawdust-clay layer has dried, it needs to be leveled with cement-sand mortar and only then plastered.
Manufacturing and laying of slabs
Insulation with sawdust: pros and cons
Every year more and more new generation insulation materials appear on sale. The biggest drawback of such high-tech products is the cost of thermal insulation material. At the same time, it is unknown how they will behave in a couple of decades. Therefore, the old ancient method - using sawdust as insulation - remains relevant to this day.
The main advantages of chip insulation are:
- environmental friendliness. The raw materials are completely harmless to a person living in a building insulated with wood waste. Since the insulation does not emit any toxic substances. Therefore, even allergy sufferers feel comfortable in such houses;
- low cost. If there is a sawmill or any woodworking enterprise nearby, you can obtain production waste completely free of charge. Costs will be spent only on cargo transportation;
- reliability. This has already been mentioned above, but the durability of insulation made from wood chips is its undoubted advantage. Nowadays various antiseptics are added, which help protect the insulating layer from insects, thereby extending the life of the insulation;
- versatility. Raw materials can be used to insulate the entire structure - from the floors to the roof. The installation process is simple, so you can do it yourself. Due to the fact that sawdust has a fine fraction, raw materials can be poured into even the most inaccessible places without the use of special devices and tools.
The material has few disadvantages, but it is often because of them that many refuse to use sawdust as insulation:
- wood waste has a high flammability class. That’s why today they are increasingly being mixed with non-flammable substances and additionally treated with fire retardants;
- the use of loose wood particles leads to rodents and insects settling in the “fills”. Those who have encountered a similar situation are recommended to add tobacco or slaked lime to the insulation;
- If you use only sawdust as thermal protection for households, over time they will cake and voids will form. Therefore, special binding components are added that eliminate this drawback.
Having considered all the pros and cons of the material, we can conclude that sawdust-based thermal insulation is an excellent alternative to many modern insulation materials.
Installation of internal insulation of a concrete ceiling
It is much easier to install thermal insulation for concrete floors from the attic side - it will be quite convenient to carry out each stage of the work. However, this is not always possible, so you have to insulate the ceiling in the house from the inside, forming a frame for thermal insulation materials under the ceiling.
For installation you need to prepare the following set of tools in advance:
- Hammer or drill (for drilling holes in the ceiling);
- Screwdriver and drill set;
- Building level;
- Cord and marker for marking.
Also, even before insulating the ceiling, you need to purchase all the building materials:
- A sufficient number of metal profiles for drywall (a good alternative would be wooden blocks of square section 40x40 mm);
- Hangers for profiles;
- Fastening elements (crabs are best suited for suspended ceilings);
- Thermal insulation material (foam boards or mineral wool, or roll insulation);
- Sheets for external cladding of the frame (plasterboard or plywood);
- Vapor barrier film.
Insulation of the ceiling from the inside in a private house is as follows:
- First you need to apply markings. In order for the structure to ultimately be in its place, the markings must take into account the characteristics of the frame and the room. The frame itself consists of transverse and longitudinal posts, which are attached to each other using “crabs” and held on the ceiling by suspensions.
- To simplify the work, it is worth mounting the longitudinal posts in such a way that the pitch between them coincides with the width of the selected insulation. However, an excessive increase in pitch (over 80 cm) will also not lead to anything good - as a result, the rigidity of the structure will be insufficient.
- The marking itself is applied to all the walls along which the frame will be installed. The markings are applied in accordance with the cord, which is pulled between the corners and checked for alignment with a level. Having marked the walls, you need to go to the ceiling and make all the necessary marks on it.
- Now you need to mount the profiles. First of all, a guide metal profile is installed, which must be positioned in accordance with the markings on the walls.
- The next step is to install the hangers. These elements are usually located on the ceiling in increments of about 80-90 cm. Having decided on the mounting points, you need to drill the required number of holes in the ceiling.
- Now it’s time to form the frame by installing the longitudinal and transverse posts. Of course, when installing these profiles you need to follow the markings.
- The selected insulation is installed into the assembled frame. To keep it in place, you need to bend the edges of the hangers - they will ensure the fixation of the material during installation.
- Next you need to install a vapor barrier layer. You need to work with the film very carefully - it has a fragile structure and is very easy to damage with anything sharp. The vapor barrier film is carefully stretched between the frame posts and secured with double-sided tape.
- The last stage is covering the frame. Sheathing sheets must be fastened in such a way that there is a minimum gap between them. The optimal location of the sheets is perpendicular to the guides. The sheets are connected to each other in the middle of the profile. For fixation, self-tapping screws are used, the heads of which need to be slightly recessed into the thickness of the material. The distance between the screws for reliable fastening should be about 30 cm, and about 3-4 cm should be retreated from the corners of the sheet.
Ceiling insulation
When the thickness reaches 10-12 cm, the work can be considered complete. In summer and ancillary non-residential premises, a five-centimeter thickness of insulation is sufficient. Make sure there are no microcracks.
The design of some houses is such that the construction of formwork is not required to insulate the ceiling: its functions are performed by closely spaced ceiling beams. In this case, the voids between them are filled with clay and sawdust.
To form and install insulation you should have on hand:
- boards in the required quantity;
- nails and hammer;
- putty knife;
- tape or stapler;
- waterproofing film;
- cardboard (used in ceiling insulation).
Cement with sawdust
Cement with sawdust is heavier. The disadvantages are that such a layer is susceptible to getting wet and will not be able to retain water. Leveling the cement-sawdust screed is carried out according to construction rules.
Since cement provides additional strength, it is possible to use a layer of insulation as a base for further finishing of the attic floor.
The ratio of the solution in this case is 1:2:6 (cement, sand, sawdust). This material is called sawdust concrete. First, sand and cement are mixed, then sawdust is mixed in, then water is added. To facilitate and speed up the work, it is possible to use concrete mixers.
Wall pie device
One of the most important factors when building a house is the correct design of the walls. It doesn’t matter whether you carry out all the construction work yourself, or order a ready-made option, in any case, you must know the correct composition of the “pie” of a frame house.
Layers of the correct “pie” of the wall:
- Frame made of wooden beams.
- There should be insulation between the racks.
- Fiberboard (OSB).
- Horizontal sheathing.
- Insulation.
- Multifunctional membrane.
- Vertical lathing.
- Finishing.
- Vapor barrier.
- Internal lining.
If you use sawdust as wall insulation, you need to make a lathing.
First of all, you need to mount the frame. Then, at a certain distance, you need to attach wooden slats to the wall and lay the sheathing on them.
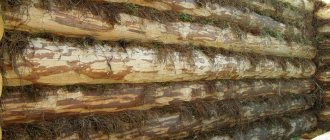
Chock: birch or coniferous
Wood in houses built using Cordwood technology ranges from 40 to 60%. The rest is the solution and insulating mixture. 30 different types of wood are used, but softwood stumps are preferred: Pacific yew, juniper, bald cypress, cedars. Chunks of Douglas fir, western larch, pine, and poplar are also suitable. You can take alder and aspen, but not birch logs! Birch logs are the most unsuitable material for such projects; all stories on the topic “I built a house from birch logs” end sadly.
Before use, firewood must rest for a year, or better yet, three, otherwise significant shrinkage is possible (up to 10 cm).
Member FORUMHOUSE Metamorphos:
– Of course, the type of wood is important. As you know, oak only gets stronger from moisture
It is important how to treat the wood: stain (to enhance the color and texture), moisture-bio-fire protection, resin-based compositions (crystallize the structure of the wood, blocking the pores), as well as various waxes and varnishes (give the wood shine and water-repellent properties). At a minimum, end machining is required.
After it, the hut will have a luster.
Well-dried wood is prepared for construction: the bark is removed from the hemp, the end edges of the firewood are sanded to smooth out burrs that will accumulate moisture.
Before you start stacking firewood (or at least its ends), it is advisable to soak it with an antiseptic or burn it with a blowtorch.
Solution for laying firewood: choosing the best
Experts give various recipes for mortar for building with firewood. Here it is: 9 parts sand, 3 parts sawdust (preferably from softwood), the same amount of building lime, 2 parts Portland cement. For external waterproofing, silicate plaster and linseed oil are used. Another recipe suggests mixing 3 parts sand, 2 parts wetted sawdust, 1 part Portland cement and 1 slaked lime.
Some builders plant firewood on a mixture of clay and sand or straw. The name of this “clay” technology is “clay mortar”.
Houses made of clay, photo. Projects in Russia.
According to FORUMHOUSE member Vatar, it is undesirable to do this:
“It was our Kulibins who began to make clay mortars, sculpt them from clay, and then scrupulously cover up the cracks every year. I know from my own experience working with clay mortar how difficult it is to choose a composition with the least amount of cracking. In addition, the clay for the solution must sit outside during the winter. Alternatively, you can experiment with the composition clay-lime-sand-sawdust, and the ratio of clay to sand should be no more than 1 to 4.
If the gazebo is made of logs and clay, processing the ends with a blowtorch will be more organic.
Gazebo made of logs and clay, processing of ends.
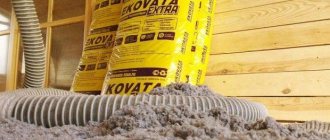
Sawdust with lime (or a mixture of sawdust soaked overnight with vermiculite), polyurethane foam, fiberglass, cellulose, and polystyrene are used as an insulating layer when building a block house.
Metamorphos forum user suggests this solution:
– To reduce the thermal conductivity of cement, you need to knead foam concrete (perlite concrete, expanded clay concrete, or, at worst, sawdust concrete), use various additives in the form of lime, PVA glue (this will ensure a reliable bond between the cement and the wood), and all sorts of plasticizers. It would be good to tint the concrete with pigment at the mixing stage, because the whitish-gray color does not look very good with wood. As an option, during laying, concrete is placed in the inner layer (about 15 cm), and the outer layer (the same amount) is filled with two-component polyurethane foam with a density higher than 35 kg/cub.m. This will provide the necessary strength, the absence of cracks when drying and good thermal insulation, and the yellowish color of the polyurethane foam in this case will not spoil the appearance.