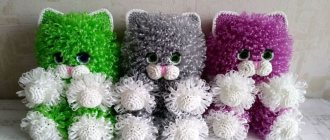
Fur, fringe, boucle, curls - these are different names for crocheting elongated loops - a knitting technique that is indispensable when creating fluffy elements that require the presence of “pile”. Scarves, mittens, booties can be decorated with fringe or made “curly” entirely. A hat knitted with this pattern will resemble a fur one. A pillowcase for a decorative pillow or a blanket will be soft and cozy. Such loops will become an original element when used in the design of bags. Well, fans of knitted toys know firsthand that with their help, for example, the perfect curls of dolls and lambs, the spines of hedgehogs and Christmas trees are created.
Crocheted loops in the round
This method is used when the loops must be located very densely. With this knitting, elongated loops will be located in each row, since there are no return (purl) loops.
Read also: how to make a fraction in power point
The specificity of circular fabric is that sometimes knitting occurs in a spiral, without lifting loops for each new row. In other cases, traditional row formation is performed, with lifting loops and connecting posts at the end.
The latter method is justified if you plan to change the color of the rows during the knitting process. Elongated loops, crocheted in a circle, are best suited for making the tops of knitted boots and the cuffs of jackets.
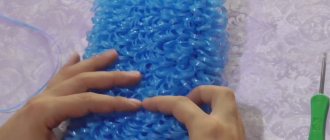
Sponge - pipe
This option can be knitted using circular knitting. We dial 32p. and switch to knitting in the round with 5 knitting needles. We distribute loops 8 pieces per joint. Further - see the previous master class: several rows of faces. satin stitch, then elongated loops, then knit again. Ch. And be sure to tie the ropes. If desired, they can be replaced with ready-made ribbons to match the color of the yarn.
You can put a piece of foam rubber inside (the edges of the pipe are then sewn up). This washcloth will foam perfectly.
Relief pattern with knitting needles with an elongated loop
We cast on 32 loops (or any other number that is a multiple of six) and knit:
1st row - knit 3, purl 1, slip 1 (thread behind the loop), purl 1, etc. to the end of the row; 2nd row - knit 1, slip 1 (thread before loop), knit 1, purl 3, etc. to the end of the row; 3rd row - purl 1, slip 1 (thread behind the loop), purl 1, knit 3, etc. to the end of the row; 4th row - purl 3, knit 1, slip 1 (thread before loop), knit 1, etc. to the end of the row; 5th row - repeat the pattern from the 1st row.
How to crochet elongated loops: basic principles for making fringe
This technique can be used to design the edge of a product or as the main pattern for the canvas.
Option 2 is used if you need to get imitation fur. With the right choice of color and texture of thread, elongated loops help to recreate the appearance of sheepskin, which will be needed for knitting collars, cuffs, jackets and coats, as well as when working on knitted boots. men's crochet patterns
The pattern for crocheting elongated loops looks clear because in the following photo.
openwork crochet cardigan
The 1st row should always be continuous (single crochets are ideal). Next, a lifting loop is made, the working thread is wound around the finger of the left hand. Depending on the length of the loops needed, one or more turns are made. The next step is knitting a regular single crochet. It is better to tighten the knitting so that all the loops are of the same length. When the column is ready, the thread is lowered from the finger and the subsequent columns begin to be made in a similar way. The purl row is knitted with single crochets or with connecting stitches. The latter have the smallest height, which means the fringe will be thicker.
Read also: Felting a bunny's face
crochet pointed flower
Before crocheting elongated loops, you must definitely practice on a control sample. This is not a recommendation, but a rule. This way you can significantly optimize the process of knitting a product, avoiding unnecessary alterations and unraveling.
crochet for beginners download
Crochet air loops
When knitting not in a circle, but in a back and forth direction, the initial row is knitted, consisting of air loops. In addition, air loops are actively used in knitting various patterns.
To knit the initial chain stitch, take the yarn in your left hand, the hook in your right, it should look like this:
We make a loop.
Insert the hook into the loop going around the finger.
We pick up the thread that goes to the skein (this is the working thread).
Pull the working thread through the loop and remove it from your finger.
All that remains is to tighten the resulting loop: release the working thread and hold the short tail.
Ready!
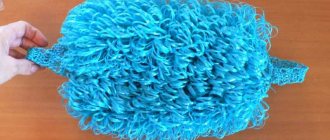
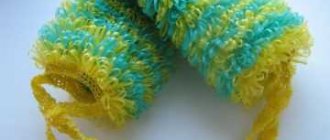
How to knit a round washcloth
This wonderful massage sponge consists of two parts: a handle and a round base.
Description
Cast on 20(30) sts and knit the length of the fabric. It should be several times larger than the width. If at the beginning of every second row you add 1 stitch, and at the end you knit from 2 stitches. one, then we will get a slightly beveled product - this solution also looks very nice. For a round pen, dial 5p. and knit 15-17cm long. Pull the free end of the lace on one side and sew tightly. We do the same on the second side. We connect both ends and sew them together. We get a washcloth in the form of a circle.
Picked up elongated loops
The procedure for performing this technique is shown in the photographs below.
To form long loops you will need a template. This could be a ruler, a strip of cardboard, a thick knitting needle, or any other long object of appropriate size.
When knitting each row, the template should be applied to the fabric and the thread should be wound around it first, and then the loop for the single crochet should be pulled out. By the way, this method can be used instead of winding the thread around your finger, described in the previous paragraph. How to crochet elongated loops and the sequence of further actions can be clearly seen in the photo.
When a row with long loops is completed, you need to make as many lifting loops as necessary to move to the level of the new row. A pattern with elongated loops is formed when, when performing single crochets of the second row, the long loops of the first are picked up. You can immediately remove them from the template or do it gradually so as not to get confused.
The third and subsequent rows can repeat the first and second or form a completely different pattern. In any case, such a canvas looks very expressive and attractive.
Video instruction
The step-by-step video instructions below show the entire knitting process in dynamics. Clear and intelligible explanations from the master will help you in your learning.
Now you also know how to crochet elongated loops and get an original “fur” pattern from elongated loops. Using the knowledge gained, you will be able to make beautiful and original things for the home and toys for children. What kind of things do you crochet for home or as gifts for friends? Share your experience in making them in the comments to this article.
Step-by-step training in knitting elongated loops
An accessible master class for beginners teaches how to crochet elongated loops. Ways to crochet elongated loops step by step and correctly, ways to make loops with and without crochet.
First method (single crochet)
- At the beginning of knitting, you need to cast on the required number of air loops, not forgetting about the air loop for lifting. Knit the first row with a single crochet. The first stitches are always knitted as knit stitches.
- Make a single crochet from the next two stitches. Insert the hook into the second loop from the hook under its upper wall, hook and pull the thread. Your hook will have two loops. Next, grab the thread with your hook and pull it through these two loops.
- Next, start knitting the elongated loops. To do this, place your thumb under the working thread from below and pull the thread towards you, about 3-4 cm.
- Press your finger against the yarn to the right side of the knitting under the hook. The length of the thread that wraps around the thumb determines the length of the “fur.”
- Place the hook over the thread.
- Insert the hook under the top stitches of the next stitch.
- Grab the working thread with your hook and pull it onto the hook.
- From the two received loops, knit a single crochet.
- Form an elongated loop again by placing the working thread on your finger. Place the hook over the thread, pass it under the upper loops of the next stitch, pull the thread, forming a second loop on the hook.
- Knit the entire row in this way. The result will be a blank in which long loops will form a three-dimensional pattern.
- Turn the knitting over. If you knit a row with single crochets, the “fur” will not be very thick. To obtain a denser pattern, knit a row with elongated loops.
- Knit the first and second loops together with a stitch.
- Place the middle finger of your left hand over the working thread.
- Pull the thread to the desired length with your finger (it must be made to correspond to the length of the loops of the first row), placing it on the front side of the work.
- Insert the hook under the top loops of the next stitch, grab and pull the thread through them. This creates a second loop on the hook.
- Knit two threads on the hook in a column. Knit the entire row in this way.
Second method (with double crochet)
- In this method, when knitting, the thread is always pulled back, and the fur is made on the wrong side of the product. Knit three instep stitches.
- Yarn over and pull the thread behind the work with the middle finger of your left hand.
- Insert the hook under the top stitches of the next stitch.
- Grab the thread and pull it through.
- Double crochet the resulting stitch with the other two stitches.
- Yarn over the hook and pull the thread to the wrong side with your middle finger.
- Now the working thread needs to be pulled through the upper loops of the next stitch.
- Double crochet the loops on the hook. So knit the entire row.
- When knitting in this way, the front row is knitted with a single crochet, and the purl row is knitted with a double crochet and elongated loops of elongated threads.
To obtain a thicker pattern, use the first method, that is, knitting without a crochet; in the case of knitting with a crochet, both the front side (the fur itself) and the back are less dense compared to the first method. Please note that knitting using the first method requires much more yarn. This type of knitting is not particularly complicated; an elongated crochet loop is a good way to make knitted “fur,” a rug, a hat, or washcloths that look very original.
Multiple raises
If we need to add several loops at once on each side of the knitted fabric, we should knit additional air loops in these places.
We propose to figure it out together, focusing on this diagram:
Progress
So, we use a 17th century hook. p., then we stick the working tool into the 4th p. of the chain and knit 1 s each. s n. into each of the loops.
Now we knit the second row: we perform increments of 5 s. s n. at the very beginning and at the very end of the row, for this at the end of the previous one. R. we knit several air stitches. p. + air loops for lifting - in our case, this is 4 in. p. + 3 v. p.p. (we count lifting air loops as one double crochet).
Next, we need to turn the fabric and insert the hook into the 4th stitch from the edge. and knit with. s n.
And again, 1 s. s n. in the next 3 stitches.
and that's it, we just knitted an increase at the beginning of the row, consisting of 5 s. s n. After this we knit with. s n. until the end of the current row.
Next, according to the diagram, we need to perform an increase of 5 s. s n. at the end of the row. There are two ways to do this.
Method one
We perform the addition by knitting a chain from c. n. We fix it to the base of the outermost s. s n. new thread (leftover yarn will do just fine).
We knit a chain of 5 v. p. + 1 v. p.p., tighten the knot, we will hide the thread later.
We knit 5 s. s n. working thread.
Now you need to dial 3 v. p.p., let's start a new row.
Having turned the knitting, we knit the third row with. s n. no additions.
In the new row we again make increments of 5 s. s n. at the beginning and end of the row.
So, we knit 7 in. P.:
Next, insert the head of the hook into the 4th century. p. chain and knit further 4 s. s n.
This is the increase at the beginning of the row that is connected. Next we knit one s. s n. in each subsequent loop of the row.
Method two
We need to knit 1 s into the outer stitch of the row. with 2 n., like this:
Now we put the working thread on the hook like this:
We insert the working tool into the lower crossbar of the previous one. column.
Knit 1 s. from 2 n.
Next we knit another 4 s. from 2 n.
Important! When using this method, you must not forget that the outermost stitch should always be knitted one crochet higher. For example, if we knit fabric from s. from 2 n., last s. and we knit all subsequent increases with 3 stitches.
If everything is done correctly, we will get a sample like this:
Braided pattern
The sample is knitted with 20 loops, 8 rows high, repeat is indicated by arrows:
- First row – edge stitches, knit stitches, edge stitches.
- Second row – edge stitch, *2 quilts, 1 purl loop (IP)*, edge stitch.
- Third row - edge, * 6 loops cross to the left, to do this, lower all yarn overs from 6 loops onto the right knitting needle, then return everything to the left knitting needle, remove 1,2,3 loops on an additional knitting needle before work, knit 4,5,6 RL , then 1,2,3 LP*, chrome.
- The fourth row is edging, IP, edging.
- The fifth row is like the first.
- The sixth row is like the second.
- Seventh row – edge row, 3 RS, yarn overs, *cross 6 stitches to the right, to do this, lower 6 yarn over loops onto the right knitting needle, then transfer to the left, transfer 1,2,3 loops to an additional needle at work, knit 4, 5,6 loops and 1,2,3 loops from additional needles LP*, 3 LP, remove yarn overs and unravel, chrome.
- The eighth row is like the fourth.
The note! In the descriptions, asterisks (**) indicate rapports, i.e. repeating knitting techniques until the end of the row.