Sometimes you want to take a break from all the hustle and bustle and go to the countryside to relax. Do things you love that you enjoy. One of the most favorite things to do at the dacha is, of course, a bathhouse.
View this publication on Instagram
Publication from Wooden Houses from SBK (@dom_iz_brusa_sbk)
You can entrust the construction of a bathhouse to professionals. But you can build on your summer cottage and landscape it on your own. You are freed from unnecessary costs and the money you save you spend on landscaping and finishing your desires and preferences. A self-built sauna will be more enjoyable.
Features and advantages of small bath buildings
For a summer house, you can build a small wooden bathhouse.
The most popular material for building a bathhouse is wood, which is highly flammable. This imposes a number of fire safety restrictions: the need for treatment with fire retardant compounds, strict adherence to fire safety standards when installing the stove and chimney. When building any bathhouse, even when using non-combustible material, it is necessary to maintain the regulated distance to neighboring objects located on the site.
Construction of a steam room is a fairly simple and quick procedure. In most cases, small baths for a summer residence do not require a solid foundation and the purchase of a large volume of raw materials. In addition, in the process you can use up timber and other available materials left over from the construction of other structures.
The raw materials used should not have rotten areas, wormholes, cracks or other signs of destruction.
Other advantages include:
- no need to spend money on a massive foundation;
- speed of construction;
- small area occupied by the object, which is especially advantageous if the site is small;
- the ability to fit the building into different types of landscapes due to its compactness.
Features of the construction of a bathhouse made of timber and foam blocks
The construction of a bathhouse from timber has a number of characteristic features:
- No additional finishing is required when using laminated veneer lumber. It can only be carried out at your own request.
- there is no need to carry out additional preparatory work beforehand
- When using timber, there is no need to additionally insulate the building.
- It is durable, attractive and environmentally friendly material.
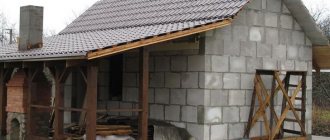
Building a bathhouse from foam blocks is another option. It certainly has distinctive features. This:
- The weight of the finished structure is small, therefore, the level of load on the foundation is low.
- Thanks to the use of foam blocks in construction, protection of the bathhouse from frost and wind is more reliable.
- Due to the porous structure of the material, a bathhouse can be erected in a short period of time.
- You can work with it without using additional special tools.
Stage two - selection of materials
In general, bathhouses are usually made from various building materials - bricks, blocks and even sandwich panels. But the best option is a tree and here's why:
Bathhouse built using frame technology
When constructing a bathhouse, the environmental cleanliness of the constituent elements plays a special role. It's all about the high temperature, due to which building materials that are harmless under normal conditions begin to release compounds that negatively affect the health of those washing. Therefore, it is extremely undesirable to use any artificial insulation - mineral wool and polymers - in a bath house. What to use:
- dried timber with a section of 15 x 15 or 10 x 15 cm;
- edged boards 150 x 50 or 150 x 40 mm;
- finishing lining;
- materials for caulking – jute, moss, flax;
- natural insulation materials - expanded clay, sawdust, clay and so on.
Log bathhouse
A few words about how best to build a bathhouse from lumber, or more precisely, about the design of the walls. There are 3 methods to choose from:
- Installation using frame technology.
- Prefabricated timber structure.
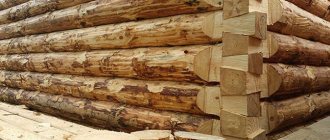
- Walls made of logs (log house).
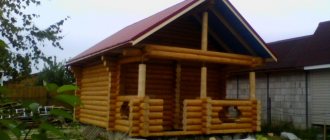
The preferred option is a bathhouse built with your own hands from timber, shown in the photo below. It meets all the requirements and is relatively inexpensive. Yes, a frame building is cheaper, but it uses basalt wool for insulation, which releases carcinogenic substances when heated. A log house is environmentally friendly, but requires a strip foundation, and this increases the cost of the project. In addition, the logs must be able to be connected correctly to make the structure beautiful and warm.
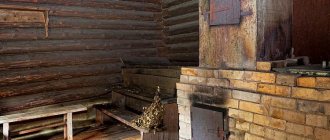
Oven and shelves
The shelf is made of hardwood and mounted on a frame. The stove is installed in compliance with fire safety standards and insulation of the nearest walls and chimney. It is installed on a special monolithic foundation. More often, metal stoves or heaters are installed in bathhouses.
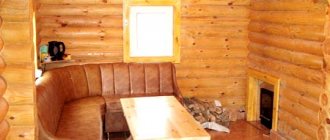
After construction is completed, you can install a table and benches in the dressing room. Place ladles, buckets and basins in the washing room. Prepare brooms.
You can also make many parts for arranging a bathhouse yourself. The best sauna is the one you create with your own hands. It is in it that it will be most pleasant to steam and relax.
Insulation options
When creating a mini-bath, one of the important points is its high-quality insulation. Before doing this work, it is necessary to eliminate all the cracks that are present in the walls. When installing a layer of thermal insulation, it is optimal that its thickness be at least 15 cm. In regions with harsh climatic conditions, this figure can be increased to 25 cm. The process of laying the material occurs staggered. This technique allows you to completely eliminate the appearance of cold bridges. If they are present, the heat will quickly leave the bath. This cannot be allowed.
To create a layer of thermal insulation, you can use a variety of materials:
- mineral wool;
- sawdust with clay;
- expanded clay
If you need an inexpensive solution with high performance, then you can hardly find anything better than polystyrene foam. Many are skeptical about its use in the bathhouse. But it still provides good thermal insulation performance. A 12 cm thick layer of insulation based on it is enough to replace an 80 cm layer of mineral wool. This material can operate effectively in the temperature range from -100 to + 80 ° C.
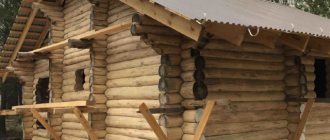
Construction of walls and installation of roofing
The most common material for bathhouse walls is 150x150 timber. The first crown is treated with special antiseptic substances and placed on waterproofing.
More often, the timber is connected “into the paw”. The first crown is checked for the presence of right angles, then the assembly of the walls begins. Each crown is laid with a layer of thermal insulation and connected with iron or wooden pins.
After the walls are erected, the rafters are mounted using metal brackets. The roof of a bathhouse most often has a gable shape. In this case, the rafters rest on the walls and are connected at the top into a ridge. Lathing is installed on the rafters, then steam and waterproofing layers, and insulation. Finally, the roof is installed.
What do you need for a bath?
The most necessary component of a sauna holiday is a stove. There are a huge number of mini sauna stoves on the market. But if you have welding skills and an inverter, you can weld a stove yourself.
Stove in a barrel
Typically, mini-ovens for small volumes are metal structures designed to generate steam. As an example, consider the Varvara “Mini” sauna stove.
Wood-burning stove Varvara Mini with a water circuit for a saunaSauna stove Varvara Kamenka mini
This is a wood-burning stove with overall dimensions of 48x66 cm and a height of 88 cm. The steel structure of the firebox itself is covered on top with a casing, inside of which there are convection channels. The air, heating up in the firebox area, escapes into the heater through the holes in the casing, thereby quickly heating the stones. As a result, the oven heats up very quickly, warming up a small room in a very short time.
In addition, there are also simpler stove designs in which the heater is heated directly by exposure to heat from fuel combustion. When using a mini-stove for a wood-burning sauna in a steam room, you need to provide a place for storing fuel, a woodpile or a shed not far from the sauna.
For small steam rooms, in some cases it is advisable to use electric sauna stoves and electric heaters.
Kamenka
Mini-pools for baths
Additional installation of a swimming pool in the sauna will expand the functionality of the sauna and add comfort. It is worth noting that it is better to initially provide for the installation of a swimming pool in the bathhouse design, since mini-pools for a bathhouse require water supply systems, water drainage, and heating.
Pool
For this reason, embedding a pool into a finished bathhouse is quite troublesome and costly. There are several types of pools designed for installation in a bathhouse:
- Stationary. In this case, the pool is initially included in the bathhouse design, a pit is dug under it, the walls of the pool are concreted and covered with a decorative coating. This type of pool is used mainly for full-size bath buildings.
- Font. A metal or plastic structure designed for installation in a pre-prepared bed. To put it into operation, you only need to connect the font to the water supply system.
- Portable pools. Metal structures with plastic trim. Just like a font, they are installed in a prepared bed, after which they are connected to the water supply system.
Swimming pools can be equipped with water heating systems and hydromassage equipment, but in this case, connecting them requires the help of qualified specialists.
Mini sauna for a summer residence
A sauna is distinguished from a bathhouse by the type of steam and temperature. In order to make a sauna out of a steam room, it is enough to install an electric steam generator, an electric heater or a wood-burning sauna boiler inside the steam room. When using a steam room for a sauna, it is recommended that the interior be made from one type of wood: pine, linden or alder. A mini-sauna in a country house should be as closed as possible, practically airtight
Particular attention should be paid to its thermal insulation. This is necessary to maintain a high temperature inside the sauna for a long time, with minimal energy consumption
Mini sauna and shower in the portable sauna
Important requirements for bathhouse premises
In order for a bathhouse to become a favorite place to relax, you need to take into account a number of certain nuances during its construction.
Steam room
- The size of the steam room should not be large, otherwise it will be difficult to heat it and maintain the desired temperature in it for a long time. It is important to consider the length of the bench - it should be comfortable for each family member. Often the length of the bench is about 2 meters, and the size of the steam room is from 2.5 by 2.5 meters to 3.5 by 3.5 meters.
- The height of the ceiling in the bath should not be lower than 2.5 meters, so that you can raise your arms in the steam room, as well as to maintain the correct volume of the steam layer - otherwise the steam layer will be unstable.
- The entrance door to the steam room should have a threshold 25–30 cm from the level of the threshold of the entrance door to the bathhouse. Or the floor height in the steam room should be 25–30 cm higher than other rooms in the bathhouse. For what? So that the cold air from the dressing room does not “flow” into the steam room. To preserve heat, it is better to make the width of the door to the steam room no more than 60 cm.
- Flowing ventilation must be provided. This could be a window in a steam room, an exhaust vent, or a view in a chimney. The window in the steam room should be no higher than 1 meter from the floor and size 40 by 50 cm
Bath broom Source moydom.media
Bake
If the bathhouse is planned to be heated from only one stove, then all rooms must touch it, or, in other words, be adjacent to the stove.
It is desirable that the furnace firebox opens into the vestibule. This will allow you to avoid dragging dirt, bringing in firewood and removing combustion products, and will also provide an additional flow of oxygen to the stove, the wood will burn better.
Restroom
There must be at least two doors to the relaxation room from the steam room. Otherwise, it will be damp, and the steam from the steam room will cool and settle in this particular room.
Washing and changing room
It is not necessary to have a washing machine in the bathhouse. However, if it is provided for by the project, there must be a window for ventilation. The recommended window size is 60 by 60 cm.
Many bathhouse owners believe that if the relaxation room is furnished with upholstered furniture, then it is worth adding a dressing room with a bench and a hanger. Or you can set up a locker room in the washroom, and drying yourself in it is a matter of taste. If you abandon the locker room, you can increase the area of the rest room.
Tambour and toilet
The vestibule is one of the most controversial places in the bathhouse. Some people don’t need it, while others consider two doors and a micro vestibule between them sufficient. Often its presence is dictated by the habit of steaming in winter. To use the bathhouse in the cold season, it is better to include a vestibule in the plan.
There is also no consensus on how much a toilet is needed in a bathhouse. Much again depends on whether the bathhouse will be used in winter or not, whether it is a separate building or combined with the main house, on the wishes of the homeowners, and also on whether the bathhouse will also serve as a guest house in the winter season.
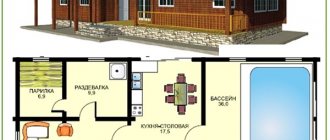
The ratio of the areas of the relaxation room, washing room and steam room should be 2: 1.5: 1. In other words, if the steam room is planned to be 6 m², the washing room should be 9 m², and the room should be 12 m²
Comfortable rest is the main goal of building a bathhouse Source ru.dreamstime.com
Choosing a site for construction
The location of the building is chosen taking into account its design; if the building is erected on a foundation, its placement in the dacha is determined by SNiP standards. If it is a mobile or ergonomic structure, or a converted shed without a foundation, it can be placed literally anywhere.
General requirements:
- it is prohibited to place a bathhouse closer than 5 m from the red line;
- if the building is wooden, it should be 10–15 m away from the residential building;
- It is better to remove the bathhouse from the reservoir or block - 15 m;
- It is recommended to build on a hill.
To save on insulation, choose a place protected from the wind.
Bath floors
Plank floors are laid in this way: first, brick pillars with a cross section of 25-25 cm are installed on the concrete layer, and logs are laid on top of them. Boards 20-30 mm thick are laid over the joists:
Stone bath floors last much longer. Concrete mortar must be poured on top of the gravel bed. Such floors are durable and reliable, however, they still have one big drawback: they are cold. Therefore, wooden ladders or planks must be laid on top of the concrete floor.
You can also make a warm floor. For its manufacture, any heat insulator is used: glass wool, mineral wool, basalt wool, expanded clay, perlite, expanded polystyrene.
Small indoor sauna
You can also set up a small steam room in your home, for example, in the bathroom. This can be achieved in two ways. In the first case, you will need to install a removable shelf on two bars. The height from the floor should be no more than one meter. The bars are secured to the wall with reliable anchors. Above the bathtub, the height of the shelf should be between 400–600 mm.
To climb onto the shelf, you will need to make several steps or a ladder using rubber bearings. Tie the ladder to the shelf with twine. The shelf width should be 600 mm. This steam room is heated by an electric stove. It can be installed on a special stand, for example, above a washbasin. As a heater, use a basin or metal bucket, which should be filled with stones and placed on the stove.
Another option is to create a sitz steam bath on your bathtub. It will be covered with removable wooden panels. The shelves will be used as a seat, and you can rest your feet on the durable panels. To make the room remind you of a bathhouse, cover the walls and ceiling above the bathtub with clapboard or install removable panels. They can be installed and removed without much effort. Heating is performed by an electric stove with a container of hot stones placed on it.
Choose your version of a small bathhouse, plan your actions and get started!
Recommended reading:
DIY infrared sauna;
Interior decoration
First, communications are carried out: electricity, water, sewerage. A drainage well should be dug next to the bathhouse, into which water from the washing room will flow.
When making a floor in a bathhouse with your own hands, you should remember that it must be leaky, that is, have gaps for the passage of water.
Then the walls are insulated and finished with clapboards and electrical appliances are installed.
Who most often chooses two-story bathhouse projects?
First of all, these are people who need a large living space. In such buildings, the first floor is allocated for a steam room, a washroom and a relaxation room. On the top floor there are common rooms. Usually these are bedrooms, guest rooms or children's rooms.
Thus, clients actually receive a second home, adapted for living no worse than the main cottage.
Also, a large two-level building is necessary if it is planned to be used for permanent use. It is easy to adapt a bathhouse for permanent residence. The result is a building that can be used in any weather and at any temperature.
Arrangement of the roof of the building
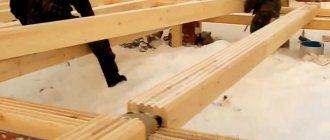
For such a small structure as a bathhouse, you can build a gable roof. It is safer to assemble all roof elements on an open plot of land. The rafter system is made of timber with a section of 150x50 mm. To avoid mistakes, it is better to make a preliminary layout and then repeat the assembly of the rafters.
For the roof frame, you need to nail the two rafters together at the top end. The bottom of the rafters must be placed on support points and secured. Use a crossbar (crossbar) to connect the legs of the rafters using screws.
When the frame is ready, you can begin installing it. First fix the front structural elements. Use a construction cord as a guide, stretching it between the pieces. It should run along the line of the roof ridge. The remaining elements must be mounted at its level
The distance between the rafters can be selected individually; usually 1.2 m is used. Between the rafters, the location of the chimney must be taken into account. Use a plumb line to check the level of each element being installed. If there are deviations from the vertical, level the position by placing a piece of board under the rafter leg.
Now start lathing. If you plan to use soft roofing material, for example, ondulin, for example, then the sheathing pitch should not exceed 10 mm.
You can insulate the roof with the same materials that were used to insulate the walls. Next, the roof is covered with roofing. The final step will be to install a galvanized corner on the roof ridge.
How to choose a site for construction
The construction of a bathhouse usually begins with choosing the most suitable location and drawing up a construction plan
When preparing calculations, it is important to comply with the rules and regulations that govern the conditions for locating a steam room in the residential sector. The specific structure must be located at a distance of no closer than 1 meter to the boundary of the neighboring plot
If there are wooden buildings in the neighbors' yard, there should be more than 15 meters from them to the bathhouse.
A separate bathhouse or one built as an extension to a house can only be built taking into account the rules and regulations regarding natural, plant, and protected areas. The permissible distance to a reservoir is 5 meters, an artificial well with drinking water is 12 meters, tall trees are 4 meters, and a forest area is 15 meters.
In the house
You should plan the construction of a steam room in your home at the building design stage. The bathhouse will require special waterproofing, finishing, and processing of materials. More often they make mini-rooms, but they are spacious enough for a comfortable stay. The advantages of planning a residential building with a bathhouse include the following factors:
- Saving space in the garden area;
- Possibility of free movement between rooms, without the need to go outside;
- Simplified firebox. All necessary materials are located in the living area;
- Close location to the bathroom.
The disadvantages of organizing a bathhouse right in the house include a high fire hazard. Even high-quality and systematic treatment of a room with fire retardants does not provide 100% protection against fire and smoke. Additional vapor barrier will also be required. Due to high humidity, complex ventilation will have to be done. Good air exchange can be ensured by installing expensive internal equipment.
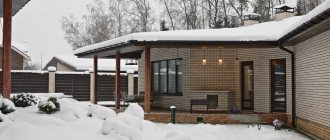
Extension to the house
It is possible to attach a bathhouse to a residential building only if the house is made of brick or foam blocks. In other cases, being too close may be unsafe. You can use a ready-made terrace or fill a separate area with the foundation for a sauna. Before laying the floor covering, it is necessary to consider good protection from moisture and a high-quality sewer drain.
You can make a bathhouse extension 2 years after the shrinkage of the main residential building. It is easy to bring communications into the room and make it heated. Disadvantages include a high risk of fire due to open flame. The danger increases if the frame part of the dacha extension is made of budget timber or poorly processed wood materials. Dirt and debris from the firebox easily enter the house, and high humidity destroys the wall covering, leading to inevitable frequent repairs.
Freestanding
The best option for building a bathhouse on the site. The easiest way to make it is from a log house. You will need a lightweight foundation, timber for making a roof truss, and basic material for the walls. Construction will take a minimum of time. You can safely implement your favorite design and furnace equipment with any characteristics.
The disadvantages include the use of an impressive area for construction and a large amount of building materials and improvised means. Due to the distance from a residential building, heating costs will increase, and attempts to save money will lead to a deterioration in technical parameters.
Features of a bathhouse in the country
Before starting construction, it is necessary to determine the location for installing the bathhouse. Simply pointing your finger at a free space on the site will not work; the washing complex must comply with certain standards.
It must be located in no less than:
- Three meters from the neighbor's fence;
- One meter from other outbuildings, trees and bushes;
- Six to eight meters from a residential building.
Usually, for the construction of a bathhouse, a backyard is set aside, completely covering the building from the road. It is advisable to choose a southern site, in which case visitors to the bathhouse will receive the maximum amount of sunlight as a reward.
You can install a bathhouse in the depths of the site, while observing fire safety standards and sanitary instructions. In addition, you will have to make sure that vacationers do not disturb their neighbors and that water does not flow onto their territory.
It would also be useful to take care of the water supply: walks with buckets will be interesting only at first.
Determining the size of a small bath
The size of the bathhouse should be determined depending on the number of people who will regularly visit it at one time. If your family consists of 2–4 people, then you can get by with the budget version of this building. In this case, the length of the bath will be 6 m, the height will be 2 m, and the width will be 2.2 m. There should be four separate rooms inside. Each of them will perform its own function and have a certain size. For example, each room will have a certain size. The width of the bathhouse is 2.2 m, and the length is:
- dressing room 1300 mm;
- rest room –2100 mm;
- shower –1000 mm;
- steam room – 1600 mm.
For the steam room and shower room, it will be necessary to perform separate calculations for the area, because shelves must be placed in the steam room, and a tray must be placed in the shower room.
A small bathhouse should be built in the usual sequence. The construction rules for its construction are no different from those by which other buildings are erected.
Arrangement of the bathhouse
The essence of the whole bathhouse cannot be realized without a real stove. This will be the most enjoyable part of the work. A good stove will do its job perfectly and will give you many warm hours! The stove can be wood-burning, stone or brick. There are also electric heaters.
The stove is lined with bricks, the pipe is taken outside, and foil is attached to the ceiling and walls in the steam room to keep the temperature longer. It is advisable to sheathe the walls inside the bathhouse only after a year, since the beams will shrink naturally. Therefore, do not rush to arrange everything too quickly. Give your bathhouse a chance to catch its breath and calm down after construction.
When time has passed, you can cover the walls with clapboard. To decorate the bathhouse, hardwoods are used : alder, linden, aspen, larch. Finally, you can install shelves, benches, a relaxation area, a shower and other attributes of a real bathhouse!
How to build a small sauna for your dacha with your own hands
Before construction, you should familiarize yourself with the designs of already built baths and choose the most optimal option. Do-it-yourself mini-bath projects for a summer residence (both frame and timber) are quite widespread, and finding them is not difficult. Before you build a small bathhouse with your own hands, you need to decide on the type of bathhouse, the material for its construction and its location.
Mini sauna barrel
After all organizational issues have been resolved, you should proceed directly to the construction process. First of all, build the foundation and pour the base, and then proceed to the construction of walls, roof and interior decoration.
Related article:
The main requirement during construction is accuracy. Everything needs to be done calmly and without haste. This will allow you to build a bathhouse in a short time without any incidents in the work.
Mini mini sauna
An important point when building a bathhouse is not to forget about ventilation. For a small steam room, a channel in the wall is sufficient; for larger rooms, a fan will be required. This is necessary so that our small bathhouse at the dacha is a place of comfortable relaxation, and not a carrier of miasma.
Watch this video on YouTube
Related article:
Stages of building a bathhouse: foundation, walls, floor, roof.
Foundation
The bathhouse construction technology involves pouring the foundation. After calculating the estimate, choosing a location and consumables, you need to begin this process.
A foundation is required for the existence of every structure. Many people have a question: how to fill it? It is poured in accordance with the weight of the building. The weight depends on the consumable material used to construct the walls.
It is not recommended to save money on the foundation, because it is the basis of the bathhouse and must be strong, reliable and strong.
It is best, according to experts, to pour a strip foundation , because it is intended for clay and stone soils. The height of such a foundation is no more than 60 cm. When calculating the width and length of the foundation, it is not necessary to take into account the depth of groundwater.
How to make a foundation for a bathhouse with your own hands? Instructions for pouring the foundation:
- First you need to prepare the construction site. Marking is an important step and to carry it out you will need to use fragments of reinforcement along with a simple fishing line. The use of the latter device is due to its excellent qualities.
- The next step is the construction of a pit. In the case of building a bathhouse, you just need to dig a trench. To do this, it is necessary to determine the lowest point from the outside of the marking, then calculate the depth of the pit in accordance with it.
- Next, you need to lay a sand cushion. It is necessary to reduce the load on the base. Its upper part must be compacted together with the bottom of the trench. After this, it needs to be leveled. To speed up the work, it is recommended to tension the fishing line at a level equal to the thickness of the future pillow. Next, you just need to pour sand up to it and carefully compact it using a special roller. The amount of sand required for the pit is equal to the product of the length, width and height of the trench.
- The next stage is formwork from edged boards. This design is used to give concrete the required shape. It can be of two types: removable and non-removable. Creating formwork can be considered a labor-intensive process during foundation construction. The production of shields for it is carried out from edged boards. It has a large number of advantages: smoothness, strength, reasonable cost. The edged board has clear and specific parameters, so it is possible to control the height of the formwork. On the inside, the shields are fastened with nails, on the other hand, they are bent. The end parts of the shields must be assembled using self-tapping screws. This will allow the boards to fit snugly against each other.
- Reinforcement of the foundation. Thanks to reinforcement, it is possible to achieve a qualitative change in the properties of concrete. As a result, a high level of mechanical strength is achieved. The reinforcement plays the role of a kind of skeleton, its task is to make the foundation more durable. The reinforcement grid must be placed at a distance of 5 cm from the border of the base. It is recommended to use a grid with a cross section of 12 mm. Its installation is carried out as follows: two rows of reinforcement on a brick.
- The next stage is foundation ventilation. Every building requires it. It is recommended to carry out ventilation using a plastic pipe with a diameter of 10 cm. During the pouring process, to prevent the solution from getting into these gaps, it is best to hide them with sand.
- Pouring the foundation. If you have the opportunity to order an automixer for pouring, which independently performs all the work, then it is better to use such services. In other cases, the solution is prepared by hand. For this, it is recommended to use concrete of the following grades: M-200, 300 or 400. The choice will depend on the relevant weather conditions. The solution is prepared using crushed stone, cement and sand. Their proportions: 3:1:3. Along with this, it is necessary to pour water until the required consistency is obtained. Concrete must be poured gradually. In this case, it is necessary to ensure that there are no gaps. A previously installed reinforced mesh will help with this. From time to time you need to tap on it, so the concrete will lie down better.
One of the modern and budget options for creating a foundation for a bathhouse is a foundation on screw piles . Read more about this type of foundation here.
The second stage is the construction of walls. Cover crown
The structure of the bathhouse and the quality condition of the log house will largely depend on the installation of the casing crown (lower crown). At the same time, defects or errors in work should not be allowed, because this will affect the structure.
Laying the first crown on a strip foundation begins with selecting the best and thickest logs. There will be a lot of pressure on them, so they must cope with it. If you have the opportunity to lay the first three crowns from larch logs, then you should take advantage of it.
Step-by-step instructions for laying the crown molding:
- First you need to roll out the rolled waterproofing in two layers.
- Next, on top of it, on the opposite walls, you need to lay fire monitors , pre-treated with bitumen mass. Their thickness should not exceed 6 cm. Logs are laid on top, and their root parts should be located on different sides.
- The next step is to level both logs horizontally using wedges.
- After this it is necessary measure the largest gap between the boards. Next, add a value equal to the radius of the log to this indicator and make corresponding marks on the logs. These levels require hammering nails.
- Next, the logs must be removed from the foundation and turned over. Afterwards you need to secure them with staples and trim each log along the line of nails. At the end of the process, lay the hewn logs back on the base and level them.
- Two transversely located logs must also be adjusted. However, there is a difference - when calculating edges, you need to take not the radius of the log, but a quarter of its diameter.
- Initially, they must be laid opposite the butts of two other logs , and then placed on the horizon, removed and trimmed.
- On the last two logs it is necessary to make marks for corner notches.
For further construction of walls, you can use two methods:
- On the dowels.
- Using wooden dowels.
The first option is a knot made up of a rectangular block. Its essence is that a dowel is driven into the first crown, then the next log with a groove is laid. The groove and the dowel are aligned, making the connection of the logs strong and reliable.
This method is practically not used today due to its complexity. Instead, a fastening option using wooden dowels is used.
While working, do not forget about windows and doors. They need to be cut down first. This will make the work process easier in the future and will not waste time on it.
Construction of walls using wooden dowels
The logs should not roll out or change their shape, so they are fastened together with special dowels. In addition to the function of maintaining the shape of the material, they make the connection stronger and more durable. The diameter of such a rod is no more than 30 mm.
One dowel can firmly connect three logs at the same time. Its length should be 20% less than the total depth of the drilled holes. The dowel can be made of oak or larch.
It is recommended to fit the dowel with an interference fit. Due to the gaps, the logs will begin to loosen, as a result of which the strength of the bathhouse will decrease. This wooden rod should not interfere with work, so its end is placed 2–3 cm into the hole. Thanks to this, the log house will shrink freely.
The dowels should be spaced at a distance of two meters from each other. When drilling holes, it is necessary to maintain strict symmetry. The basic rule in this case is that one crown must be fastened to the lower and upper crown. This is how you need to connect the logs until the required height of the walls is reached.
Flooring
We are building a bathhouse with our own hands, and the next step is laying the floors. Bath floor installation:
DIY brick sauna stove. - there is more useful information here.
- It is necessary to lay logs from edged boards on the concrete base. Their thickness should be about 5 cm. They need to be treated with a special antiseptic to repel water.
- Next, another layer of boards is laid on the logs. They are planed on every side except one. The distance between laid boards should not exceed 5 mm. It will be necessary for water drainage. All work must be carried out with great care so that no damage remains on the front side of the boards.
- Fastening the boards to the joists should be done using metal screws.
How to make a floor in a bathhouse, video:
After finishing the flooring, a little sanding of the surface . This completes the installation of floors in the bathhouse.
Roof of the bathhouse
The construction of a bathhouse includes the construction of a roof. This process must be carried out in accordance with the instructions below. So, how to build a roof on a bathhouse?
You will be interested in this article - Do-it-yourself sauna stoves.
- Installation of rafters on a bathhouse frame. They should not be longer than the walls. The maximum possible projection beyond them is half a meter. Otherwise, additional support will be required.
- Wooden rafters of any shape must be mounted on the upper crown. Next, they need to be secured using metal brackets. The distance between the rafters must be at least one meter. At the highest point of the roof, you need to cut off the parts and connect them end-to-end.
- The next step is laying the covering. It could be wood, tiles, slate.
- And the last step is thermal insulation. To do this, you need to lay insulating material between the rafters, and then place it on the rafters and under them.
After building the roof, you need to decide on the ceiling. Several varieties can be used:
- The ceiling is lined with additional boards on the lower side. This will require laying insulating material to prevent steam penetration. On the modern construction market you can find special products that can withstand high temperatures.
- Ceiling produced by the flooring method. Its installation is carried out immediately under the roof. In this case, it is recommended to use foil or a layer of clay as a material insulating from steam.
What to heat - choosing a stove
When choosing a stove for a sauna, first of all you need to pay attention to the power. This indicator must correspond to the volume of the steam room
The presence of uninsulated areas and the material used to make the door are also taken into account. According to the type of fuel, sauna stoves are as follows:
- Wood-burning. The classic version of the firebox allows you to create a special atmosphere. A ubiquitous tree does not require additional communications. You can independently prepare all kinds of varieties to create different effects.
- Gas. Units of impressive size can only be connected by a qualified gas technician. In such stoves there is no need to constantly add firewood and control the flame. They have no firebox or ash pan. Gas furnaces significantly increase the fire hazard of the entire structure.
- Electric furnaces. Miniature devices heat the room evenly and quickly. The installations are absolutely safe, with great functionality. Due to the high electricity consumption, the operating cost will be high.
Mini sauna made of boards
A mini-sauna made of boards does not contain anything superfluous; it often combines a steam room with a washing room, and the dressing room is made purely symbolic; no rest room is supposed to be inside.
An extremely functional bathhouse. The video shows a really tiny sauna with a potbelly stove. The bathhouse is 15 years old, it is made of boards, with sawdust inside between them. The bathhouse is designed for 1 person. However, it is worth noting that this is not a Russian bathhouse, but a sauna with a washroom. Utilitarianly, everything about it is good. Some people will be completely satisfied with this option. For those who have not yet decided on a plan, we recommend reading our material about what layout options exist for baths of various sizes.
***
Other interesting projects of economy baths
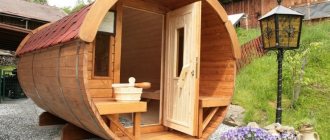
A very unusual, but no less comfortable barrel sauna is a cylindrical wooden structure on two supports, internally divided into 2-3 compartments, the farthest of which is a steam room. The sauna is mobile, takes up little space, is economical and economical (very little fuel is needed to warm up a small steam room).
Barrel sauna
Sectional view of a bathhouse barrel
Turnkey barrel baths cost from 35 to 220 thousand rubles. In practice, to assemble such a bathhouse yourself, it takes half as much money and not a lot of effort and time.
Barrel sauna project
Assembly and disassembly of the bathhouse is possible due to the boards used 45x90 or 50x90 mm with a tongue-and-groove connection. The length of the barrel, depending on the boards used, is 2.5-5 meters. The structure is secured with metal hoops. Additionally, the bathhouse can be equipped with a porch, roof, and canopy.
The water in the barrel bath is drained through holes in the floor. If you plan to install such a bathhouse at your dacha, you should remove the layer of soil, fill it with crushed stone, compact it, and install the bathhouse itself on a pair of stable, massive concrete blocks. The rules for installing a stove and laying electrical wiring are standard for any type of wooden bathhouse, including economy class.
Fastening elements for sauna barrels
Do-it-yourself barrel sauna
Requirements for the future bathhouse project
There cannot be just one correct bathhouse design. Planning requires an individual approach, since everyone has different preferences.
The most important thing you should pay attention to when choosing a project is that the bathhouse should have as few doors and turns as possible on the path from the steam room to the street. And for fire safety purposes, all doors in the bathhouse from the steam room to the street must open outward during evacuation.
What is the area of the bathhouse? This is the first question people ask when choosing a project. There is no clear answer. You need to take into account how many people it is designed for, the height of the tallest member of the family, whether you need a veranda, whether you are planning a plunge pool, a swimming pool, whether you want to organize a kitchen in the bathhouse, and maybe a second floor as a bedroom to accommodate guests.
Steam room in a wooden bath Source catalog-plans.ru
Schemes and projects of baths of varying complexity
The minimum set of required premises is considered to be:
- steam room;
- shower;
- restroom;
- dressing room (dressing room).
Average room sizes in a Russian and Finnish bath:
- Ceiling height – from 2.1 m.
- In a steam room, there should be at least 1 square meter per person. m.
- Locker room - 2.15 sq. m or 850*1150 mm.
- Suitable washing dimensions are 1.49 sq.m or 1150*1300 mm.
Calculations were carried out taking into account the average height of a person.
When developing a project, you will need to create several drawings from different angles, diagrams of individual structural elements. Among them:
- general diagram, construction plan;
- separate drawings of each department;
- schematic representation of the foundation arrangement;
- drawing of the roof structure;
- planning of fastening of beams, floors, ceilings;
- installation plan, layout of the furnace.
There are three ways to create drawings:
- Perform accurate calculations and create it yourself at home.
- Take a ready-made sample from the Internet as a basis.
- Ordering the development of a project from a professional architect who will complete all the drawings in accordance with the requirements of current legislation will help you obtain a building permit.
When designing, it is important to take into account sanitary standards (sanpin) of the distance of the bathhouse from other buildings, the boundaries of two plots, the house and the neighbor’s fence
Even with a small bath area, it is important to remember that the steam room is the most important room. You can't skimp on its size
For two people, the minimum room size will be 1*2 m.
A good option for a spacious bathhouse with an attic. The main rooms for procedures are located on the first floor, and the relaxation area is located on the second floor.
An interesting project for a bathhouse with an open terrace and a separate room for storing firewood. The main material for construction can be timber, logs or bricks.
Bathhouse foundation
The base for the bathhouse must be chosen before construction, since it will no longer be possible to change it after pouring the concrete. The main task of the foundation is to uniformly distribute the load on the ground. The service life of the entire building will depend on the type of structure. There are several options for pouring concrete, differing in the installation method. When building steam rooms, the following options are most often used:
- Pile. Used on soils slightly saturated with moisture. According to the installation principle, it is divided into pile-screw, pile-driven, and columnar. The choice of suitable installation technology depends on the degree and direction of earth movement.
- Tape. A wide concrete strip is installed around the perimeter of the entire building. This approach simplifies the construction of bathhouse walls; there is no need to further strengthen the structure. You can make a purely strip or block base.
- Monolithic. Cement mortar is poured around the entire perimeter of the future building. The thickness of the solid slab must be at least 30 cm.
Construction of a building
The process of building a bathhouse can be divided into several separate stages. Each of them has certain characteristics.
Foundation and floor
Under a wooden bathhouse you need to make a strip foundation. It is suitable for different types of soil and can withstand the weight of a two-story building. Construction of the foundation:
- Mark the boundaries of future construction and trenches.
- Remove all trash from the designated area, cut down trees, and uproot stumps. If possible, remove the fertile layer.
- Dig trenches. Their depth depends on the freezing point of the soil. The suitable range is from 50 to 80 cm.
- Place a 20 cm layer of sand at the bottom of the dug trenches, pour water over it, and tamp it down.
- Assemble wooden panels from boards and bars. Cover the inner sides of the boards with thick polyethylene film. It is needed to prevent the cement from leaking out.
- Put together the panels into a single formwork and install them along the boundaries of the trenches. Spread with bars.
- Tie a reinforcing frame from reinforcement and install it inside the trenches.
- Pour cement mortar. Stretch it evenly over the entire base. Tamp the solution so that air bubbles come out.
The foundation will take about 30 days to dry. After this, you can dismantle the formwork, level out the unevenness, and begin further work.
Construction of a strip foundation (Photo: Instagram / artem_pososhkov)
Walls
Construction of walls:
- Before laying the crowns, you need to cover the concrete base with liquid mastic and lay out 2 layers of roofing material.
- It is recommended to cover the beams for the first crown with used motor oil to protect them from rotting, the spread of fungus, and mold.
- The assembly of the crowns occurs through choppers, which are driven into the drilled holes. It is necessary to lay out jute or flax between the crowns.
- The rounded timber is placed in special grooves, which are located in the corner joints.
A frame house is assembled differently. A strapping crown is fixed on top of the foundation. Vertical racks with braces are installed on top of it. The entire structure is connected by an upper strapping crown.
Windows and doors
The arrangement of window and door openings can be done in two ways:
- Cut openings in the finished log house using a chainsaw.
- Designate the location of doors and windows in advance. Lay out the timber in a certain sequence.
The ends of window and door openings need to be reinforced with metal corners.
Windows for a bathhouse (Photo: Instagram / tovary_dlya_bani_)
Ceilings and roof
Arrangement of the roof, ceilings:
- Ceiling beams are fixed on top of the last crown at intervals of 60 cm from each other.
- Identical pieces of boards are placed on top of the ceiling beams, which will be the rough ceiling.
- Separate sections of the rafter system are assembled on the ground, installed on top of the ceiling beams, and assembled into a single system using lathing.
- A vapor barrier wire is secured to the sheathing with a construction stapler.
- A counter lath is placed on top.
The last stage is the installation of roofing material.
Communications
Communications are an important stage in the construction of any private house or bathhouse. If you do not lay a water supply pipeline or install a sewer system before starting interior finishing, problems with dismantling may arise.
Electricity
Wires can be laid over the finishing material, closing them in special protective boxes. You can also hide them inside the walls if you pass them through corrugations made of non-combustible material.
Sewerage
Sewage drains in summer cottages are carried out to drainage wells or septic tanks. They are assembled from large-diameter plastic pipes, since this material is cheap and more resistant to chemicals and liquids.
Septic tank (Photo: Instagram / aqua_search.ru)
Water supply
To assemble a pipeline for supplying technical and drinking water, it is better to use plastic pipes. The system needs to have a drain point so that liquid can be removed before the onset of winter.
When laying a pipeline along the street, it is important to protect it from the effects of cold with a special protective casing
Wall treatment
When treating wooden surfaces in the steam room, you cannot use chemical antiseptics or fire retardants. Surfaces can be impregnated with special oils or wax for saunas and baths.
Thermal and waterproofing
Thermal and waterproofing consists of several layers - a vapor barrier film, a wooden frame made of bars, insulation, foil film, slats, and finishing material.
When purchasing insulation, you need to consider what zone it will be used for. For the dressing room, you can use mineral wool. For a washing room or steam room, it is better to choose foam glass.
Do-it-yourself bath step-by-step instructions
Step I - preparing the place you have chosen
You will need to remove all debris, bushes, stumps and anything else that will get in the way when working on the foundation.
Step II - building the foundation
If you have a bathhouse made of timber, then a columnar foundation is suitable for it; it is not expensive and is excellent for the construction of small wooden and frame structures.
To create it, you need to dig a certain number of holes for installing supports. We will now calculate how many holes we will need as follows - supports are placed in the corners and at the intersections of the walls of the structure and with a certain step along the perimeter.
View this post on Instagram
Publication from HOUSE.BATH.STAIRS.SYNDICAT (@syndicat_individual)
To choose the right step, you need to take into account the type of soil and the total load of your structure. The depth of the hole should be 1-1.5 m; the depth of freezing in your area also depends and it can affect the depth of the funnel. The material you need is asbestos-cement pipes and fittings.
Fill the bottom of the funnel with a mixture of sand and gravel about 10-15 cm. Then install an asbestos-cement pipe of the required length into the hole vertically and secure it. Place the reinforcement rods inside the pipe and secure them.
Then prepare a cement mortar and pour it into the hole and into the pipe itself. After you have poured the concrete solution, wait about a couple of days for the concrete to completely harden. Then lay out a wall about half a brick thick between your pillars.
View this post on Instagram
Publication from Vladimir STROY/Building houses. (@vladimir.stroy)
Step III - Construction of walls and roofing
The standard material for the construction of walls is timber measuring 150x150 mm. Before installation, you must install waterproofing. You need to treat the lower part of the beam with an antiseptic. Often laying timber is the “Into the paw” method
You need to make the first installation even to the geometric parameters - all your angles must be strictly 90 degrees. When you lay out a wall, do not forget about the future of windows and doors, do not forget to insulate each row of timber with heat-insulating material. Use metal or wooden pins to connect the beams to each other.
After the walls have been erected, proceed to the roof. You need to fix the rafters, which are attached to the upper crown with brackets.
If you are installing a single-pitched roof, then the supports are secured either with two external ones, or with one external and one internal support. When choosing a gable roof, you need to fasten the rafters so that all support is on the wall, and connect them together from above.
You mount boards across the fixed supports (lathing), then lay insulation, waterproofing, and vapor barrier. The final stage of our roof is that all that remains is to lay the roofing material you have chosen.
Step IV - Interior work
The first step in interior decoration is to start with communications - water, sewerage, electricity.
It is necessary to lay the sewer system at the stage of drawings or construction of the foundation. Next to your future bathhouse, you need to dig a drainage well into which a sewer pipe will be laid at an angle from the bathhouse to remove wastewater from the washing compartment.
After completing installation work with the sewerage system, we make a finishing floor; it is usually made of wood or concrete. A concrete floor will last longer and is most often covered with tiles or porcelain tiles.
If you choose a wooden floor, then such a floor must be made to leak, the boards must be made with a small gap so that the water can drain, or a small drain must be made in the floor. Make the floor with a slight slope towards the drain.
Then you need to insulate and vapor barrier the walls and ceiling using the materials you have chosen. Make high-quality wiring and plumbing.
Next, we install windows and doors, and perform final finishing using lining or other materials. After completing the interior decoration, install the necessary electrical appliances that you have chosen.
Step V - Installation of the Oven and Shelves
There are many ways to place shelves, keep the correct dimensions, they need to be made from hardwood. Installation is easy - create a frame from timber and attach boards to it.
The installation of the stove must comply with all fire safety regulations. Wooden devices should not be exposed to the high temperature of the stove and chimney. If the stove is heavy, it needs a foundation.
You choose the oven according to your preferences. This is a standard stove on stones and wood, an electric or even a gas stove for a bath.
Mini-sauna for a summer residence. Advantages and disadvantages
The main advantage of a mini-bath is the area occupied during its construction. The second, no less important parameter is the cost of building a mini-bath in the country.
To create such a bathhouse you do not need a lot of building materials. You can either purchase a ready-made bathhouse, in turnkey condition, or build it yourself. This does not require many years of experience working with tools, nor any special builder skills.
Mini sauna on site
The advantage of small baths is that the structure fits into almost any landscape, a miniature bath structure, and very often the sophistication of stylistic forms.
Mini-sauna integrated into the landscape
Such baths have only one drawback - they have a small internal area. Most often, these baths are a steam room with a relaxation room. The washing compartment is often combined with a steam room or is absent altogether. These baths are not designed for a large number of visitors; 2-4 people is the maximum for a mini-bath.
A small bathhouse in the country is comfort, convenience and savings in one building. Although with limitations in size and space.
Preparing the area for construction.
Before starting construction, you need to choose a location and decide on the dimensions of the future bath complex. Naturally, the size of the bathhouse will directly depend on the size of the area allocated for it.
Therefore, the first stage is choosing a place for construction. When choosing a territory for development, be guided not only by personal wishes, but also by sanitary and hygienic construction standards.
Consider the presence of slopes in the area. It is not recommended to build a bathhouse in a low-lying area, since all moisture from the site will flow down under the foundation. Naturally, sooner or later the bath complex will become unusable due to constant flooding.
Also, an important point is the nature of the soil on the site being built. For example, if the soil is sandy, then before building the foundation it must first be strengthened.
Consider the location of communications. If you are planning a separate bathroom and electricity in the bathhouse, then include this in the project in advance.
Decide on the seasonality of using the bathhouse. A summer bathhouse at the dacha will require less construction costs, since it does not require additional thermal insulation.
What material is best to build from?
Many owners of suburban areas dream of having their own bathhouse. But building it according to all the rules is not at all easy. Due to the presence of a furnace, very stringent requirements are imposed on such buildings. When choosing the base material, you need to rely not only on the price and ease of building a home sauna, but also take into account compliance with the conditions inside the steam room.
Baths are often built from wood or brick. These materials are capable of providing high levels of thermal insulation. They do not emit toxic compounds when heated and are highly resistant to humid environments. Each type has its own characteristics and is used for the construction of a steam room, taking into account its size, number of floors, and climatic indicators.
From wooden beams
The wooden structure retains heat well and quickly removes toxins and gases. The light weight of the bath allows the installation of building materials without additional reinforcement of the foundation. The type of rock gives the structure special characteristics. Among the popular varieties are the following:
- Pine. The budget material has an attractive appearance, light color and sufficient moisture resistance. Due to the release of resin when heated, the formation of mold is slowed down. It is not recommended to decorate the steam room with pine, since when heated, thick sap is released, which can easily burn the skin.
- Linden. Due to low moisture resistance, only specially processed varieties are suitable for making baths. A material with excellent heat resistance begins to darken after a couple of years.
- Aspen. The density of golden rock only increases over time, making it difficult to process and repair. The waterproof material retains heat well, but is not included in the budget category.
- Alder. Boards with a beautiful reddish tint practically do not shrink, but quickly darken when in contact with moisture.
Made of brick
The main advantage of brickwork is durability. A bathhouse made of such material will easily last up to 20 years. There is no need for additional cladding, since the brick itself looks attractive. Also an undeniable advantage in favor of this type of bathhouse will be its non-flammability, the absence of fungus and mold on the walls.
The considerable weight of the brick requires the installation of a strip base under the steam room. This increases the duration of construction work. First you need to pour a concrete foundation, wait for it to completely harden, then install the brick walls and roof in stages.
You can build a bathhouse from red or gas silicate bricks. For any of the types, it will take at least 1 hour to warm up. The building will also need to be insulated from the inside. Fireclay bricks are used to lay out the hearth and other places in contact with open fire.
From foam blocks
The disadvantages include the hygroscopicity of the material. But special treatment makes it possible to reduce the transfer of heat to the outside. Foam blocks of the lowest density and thermal conductivity are suitable for building a bathhouse.
Other materials
Special materials are suitable for waterproofing. In addition to protecting surfaces from moisture, they:
- Calmly tolerate high temperatures and retain heat;
- Prevents the appearance of mold and mildew.
As a last resort, you can use regular plastic film and impregnate the walls with antibacterial agents.
The insulation is presented:
- Mineral or basalt wool;
- Fiberglass;
- Slag-like;
- Expanded clay.
It is better not to use polystyrene foam and its derivatives, as they emit harmful fumes when overheated.
Order the construction of a bathhouse or buy a ready-made structure
How to build a sauna for a summer residence? If the issue of the need for a bathhouse on the site has already been resolved, all that remains is to choose whether to order construction from scratch or buy a ready-made bathhouse. When ordering construction, you can choose a standard project or make an individual one for the customer. Ready-made compact baths for summer cottages “arrive” to the customer already assembled. You can see it from the inside immediately before purchasing; the cylindrical baths are especially interesting.
Features of ready-made baths:
- The bathhouse is mounted on a wooden frame;
- Inside and outside, the frame of the bathhouse is covered with clapboard, it is possible to use profiled timber, then the cost of the finished bathhouse will be higher;
- The heat source is an electric heater;
- The bathhouse is divided into 3 rooms, transforming into each other: dressing room, washing room, steam room;
- The water tank is mounted on the roof, and there is a drain pan under the floor. The wastewater is discharged through a special pipe.
Finished cylindrical bathhouseSource pinterest.com
Recommendations and tips
To facilitate the construction process, it is recommended to follow a few tips, because they can provide important assistance. These include:
- Before you begin attaching a log or beam to the foundation, you need to lay a waterproofing layer.
- It is recommended to fasten the corners in half a tree. This will allow them to be quickly replaced in case of rotting.
- It is necessary to caulk the log house.
- When building a roof, it is recommended to make the “ridge” as high as possible. This will protect the building from the wind.
- When laying the first crown, you need to carefully apply the bitumen mass. It plays an important role, so the layer must be thick.
Available materials for the construction of a budget bathhouse
Before you build a budget sauna for your dacha, you need to decide on the material for the wall structures. As a rule, natural wood is used to build a private steam room - timber, a simple or rounded log, but increasingly, in order to save money, site owners prefer simpler and cheaper materials. The most popular of them are:
- Brick.
- Foam blocks and gas blocks.
- Wooden beam.
- Edged board.
- Steel frame with wood cladding.
- Plastic corrugated sheet.
Each material has its own strengths and weaknesses, which can be used to advantage when building a compact steam room.
Roofs
The roof should fit into the surrounding landscape and, preferably, repeat neighboring elements.
Commonly used:
- Tree;
- Aluminum sheets;
- Ruberoid;
- Slate.
Small bathhouses can even be closed with polycarbonate.
Roofs made of straw or clay mixed with dry leaves (sawdust) will look unusual.
Bath stove
An important element when arranging a bathhouse of any type is a stove. Modern manufacturers offer a wide selection of electric models designed for heating baths.
The advantage of electric stove equipment is that there is no need to store firewood and install a chimney. Modern equipment is economical and provides sufficient heat with low energy consumption.
Electric sauna stoves have in their design a specialized module for heating stones. This makes it possible not only to quickly warm up the room and retain heat, but also to organize a steam room.
Another advantage of using electrical equipment for heating a bathhouse is the absence of carbon monoxide
But during installation and operation, it is important not to forget about electrical safety.
Bath stove
If you are planning to build a stove or fireplace, please note that the foundation for them is poured separately. The stove is a necessary element of the bath complex, since the degree of heating of the bath depends on it. The stove can be purchased ready-made in a specialized store. You can also purchase a homemade stove.
For small bathhouses, an iron stove similar to a potbelly stove is sufficient. The stove can be equipped with a water tank or without it. If the stove does not have a built-in tank, then purchase a horizontal stove on which you can place a water tank.
A brick oven has high fire resistance, but it requires a solid foundation, since its weight sometimes reaches 1.5 tons.
In addition to heating large rooms, such a stove can retain heat for a very long time. But it heats up longer than a metal one, and is larger in size. The metal stove is compact and heats up quickly.
When building a bathhouse, follow the above recommendations. If difficulties arise during the construction process, do not neglect the help of specialists.