Sooner or later, faucets in the bathroom and kitchen fail. It is necessary to take measures to eliminate the leakage of the mixer. If it is an expensive and high-quality model, repairs are made by replacing gaskets or broken parts. A cheap Chinese faucet is easier to replace. But in any case, you need to dismantle the faucet or disassemble it to replace the required part. The first question is how to unscrew rusted or stuck faucet nuts.
Mixer device
There are several nuts on the mixer that can be unscrewed:
- one attaches the gander to the body of the plumbing fixture;
- the second, called the clamping one, holds the faucet itself on the sink or sink;
- Two nuts on the shower mixer secure it to the hot and cold water pipes.
There is also a way to attach the device to a sink or sink using two nuts located below.
All of them are exposed to the negative effects of moisture and oxygen, which means they “stick” so that it will be difficult to unscrew them. Therefore, you will need to deal with each option separately.
Basin mixer Adiante AD-27021 CR 6915 RUR
Basin mixer Adiante AD-26021 CR RUR 7,077
Basin mixer Cezares SIESTA-LS-01 9200 RUR
Basin mixer Cezares PRIZMA-LSM1-01-W0 RUR 19,800
Basin mixer Cezares PRIZMA-BLI-03/24 51420 RUR
Pipe sealing device
It is probably necessary to briefly describe the design of the device for shutting off the water and its operation. It is a pin, at one end of which a valve made of elastic material is attached - a piece of rubber hose, and at the other end a nut is screwed on. And between them there is a piece of pipe into which the pin fits freely. The length of the pipe should be shorter than the section of the stud from the valve to approximately the middle of the thread, so that after installing the device in the right place, it is possible to tighten the nut on the stud and, thereby, compress the elastic valve, sealing the annular gap between it and the inner wall of the riser outlet pipe.
Purpose and design of ceramic crane axlebox
The axle box valve is a locking mechanism located inside the valve body. When closed, it blocks the passage of water. It is enough to unscrew the valve; the ceramic rings with slots move relative to each other. The holes on them are opposite, and water flows freely into the spout of the tap.
In classic worm axle boxes, the water is shut off by pressing the rubber seal against the hole. As a result, the gasket ring quickly wears out and fails. The price of the locking unit is less, but you have to change it or the gasket more often.
The strength of ceramics is much higher. High precision and cleanliness of processing of metal-ceramic parts allows them to grind closely and connect at the molecular level. As a result, without any gaskets, ceramics reliably block the path of water and last a long time.
The axle box in a single-valve faucet consists of brass and ceramic parts:
- frame;
- rotary rod;
- fixing washer;
- sealing ring;
- spring washer;
- ceramic rings.
On the outside of the body there is a thread for screwing the shut-off unit into the tap. An O-ring protrudes above it to prevent water from leaking between the axle box and the valve body. The rod ends at the top with a square or toothed shank. This is the seat for the valve wing. When replacing the axle box, pay attention to the shape of the shank, the mounting thread, and the size of the body itself.
Advantages of ceramic axlebox:
- works completely silently;
- To fully supply water, it is enough to turn the flywheel a quarter turn;
- service life is several times longer.
Flaws:
- clogs quickly if the water contains a lot of impurities;
- high price.
The cost of a ceramic axlebox during operation justifies itself. It does not have quickly wearing parts in its mechanism, which cause faucet leaks and require frequent repairs or replacement of the entire assembly.
You need to buy ceramic axle boxes in specialized stores. They cost a little more, but the quality is much higher.
Best answers
Angry:
Either break the “lamb”, or take hold of it with an adjustable wrench and unscrew (counterclockwise) the entire knob, buy another one along with the “lamb”. Well, if I understood you correctly.
Nikolay Mogilko:
drill out the bolt or at least its head
K-GOLEM:
only experienced managers or merchandisers can cope with this problem... :)))
dZen:
You can use a household drill to cut a new slot. Or just drill it out.
Alexey from Russia:
If the valve is no longer needed, cut it off with a grinder. There is an option to unscrew the valve itself from the mixer. but first turn off the water completely - both cold and hot.
Grandfather Au:
I would post a photo, otherwise how do we know. Spray white onto the bolt for half an hour. If it’s copper-plated, they should turn away
researcher:
It’s easier to find a man than to master repair technology. Just don’t say that it was the husband who wrote this, because this is not a husband, but a boy!!!!
Alexander:
You can’t even imagine what kind of nightmare faucet your imagination conjures up regarding your question. The valve from the faucet is unscrewed with an adjustable wrench and is not attached to it with any bolts. The head of the bolt is a wrench and does not have a slot for a screwdriver. If you can’t remove the valve from behind the flywheel, break it, drill out a screw, etc., whatever you like best. If anything, a set of new flywheels for the mixer is not that expensive.
uncle Ivan:
Send me a photo in a personal message, then we can suggest something. Valves and mixers are now different, and it’s so easy to tell. As I understand it, you need to first remove the wing and then unscrew the axle box.
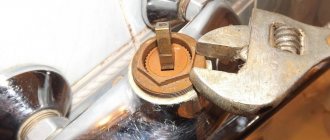
How to unscrew the faucet nut if it is stuck
The easiest way to get a stuck nut to unscrew is to knock it off with a chisel or hammer. You can use a grinder. But in most cases this option is not suitable. You just need to unscrew it so that you can screw it back later. It would seem that the situation is hopeless, but this is somewhat untrue. There are several ways to help “re-stirring” a rusted nut.
Dissolving rust
Many people know this liquid as WD-40. In common people they call it “Vedashka”. The essence of this product is that it dissolves rusty deposits and, as a result, reduces friction. As a result, the fastening gradually begins to give in.
If this product is not at hand, then you can find a replacement. Kerosene, carburetor cleaner, gasoline, and brake fluid work well for this. In addition, vinegar, iodine or alcohol are suitable for the same purposes.
Guide to action:
- Thoroughly pour the liquid over the nut and wait about thirty minutes. As soon as time has passed, you can take the key and try to turn it off. If the fastening does not yield or yields but is very tight, then the liquid has not penetrated the rust sufficiently. We wet it again, only this time with a piece of rag, and wrap it around the nut. This will give the liquid a better chance of eating away the rust.
- After such a lotion, the fastening element should begin to move. To make the movement easier, you can tap it a little with a hammer. And only then, using the key, you can try to rip it off. To make the jerk stronger, you can lengthen the handle of the key. Any piece of pipe will do.
Heating the nut
Exposure to high temperatures causes metals to expand, which means the rust will break down. After such an execution, any compound, even a completely sour one, will cease to be so strong. For heating, you can use any heat source. You can use a hair dryer, a torch, a blowtorch or a regular lighter.
Guide to action:
Thoroughly warm up the nut and screw itself. After that we try to turn it with the key. Sometimes the edges of the fastener are damaged, preventing the key from being used. In this case, we put the socket head on the nut and warm it up together. Then unscrew it with a knob.
Attention! When heating, be extremely careful - you can easily get burned.
Sink VOD-OK Joy 45 size W45xD39 cm
4290 RUR
Countertop washbasin Cersanit CREA 38 P-UM-CRE38/1-ic
5890 RUR
Artificial stone sink NSBath NSS-6048G glossy
18500 rub.
BelBagno artificial marble sink DUB-850-LVB
12920 rub.
Basin mixer Cezares PRIZMA-BLI-03/24
RUB 51,420
Artificial marble sink Cezares 50177
35210 rub.
Destroying the nut
You can destroy the connection with an ordinary chisel, it can be cut with a hacksaw or grinder, or you can use a drill.
Guide to action:
- By hitting a chisel with a hammer, we make grooves on the edges of the nut. The blows must be strong so that the chisel goes deep. This increases the internal diameter. Gradually we will destroy the fastening element. The same effect can be achieved if you drill holes on the edges with a drill. Once the nut is broken, it can be easily removed.
- Things will move much faster if you cut off the nut with a hacksaw or electric grinder. The main thing is to make a cut along the axis.
As you can see, even the most rusty nut can be unscrewed (if you really want to). However, it is much better not to bring the situation to such a result. It is better to initially use a fastener that is not subject to corrosion. Then you certainly won’t have to rack your brains about how to unscrew the “stubborn” without breaking it.
other methods
There are other methods if the above did not help:
- Destroy the connection by cutting it off with a grinder.
- Drill out the bolt using a drill.
But you need to assess the consequences in advance.
This video will help you learn more about loosening stuck bolts:
There are many ways to loosen boiled bolts. Try using each one in turn, one of them will definitely work.
Necessary tool
To carry out the work you will need the appropriate tool. It is preferable to prepare it in advance in order to reduce the time interval of restoration work during which the house will remain without water. Preparing the proper tools ahead of time will allow the repair to be completed calmly and without fuss.
Set of tools
First of all, you must have a spare part available. This is necessary if it turns out that the old element cannot be repaired. But in this way it will be possible to quickly install a new one in its place.
To immediately resolve any malfunctions, you will need the following tools:
- pliers;
- adjustable or pipe wrench;
- open-end or ring wrenches for edges of different sizes;
- flat, shaped screwdrivers;
- electric drill with cutter and drills for metal.
Please pay attention! The wide selection of spare parts from China on the market often leads to the discovery of a discrepancy between keys and materials from China at the most inopportune moment. For this reason, it is better to play it safe by having a set of keys of different sizes on hand.
Preparatory work
Before starting the dismantling process, you need to turn off the water supply to the riser, and then find out the reason why the water drips spontaneously. This can often be due to wear on the valve seal.
Leaking faucet
If it turns out that the valve box is still leaking, then you need to proceed directly to the procedure for disassembling the valve. On the side of the lever, remove the cap by carefully prying it off with a knife, trying not to damage its coating. If the handle is solid, without a plug, then simply unscrew it. Then you need to remove the plastic rings and the valves themselves. To do this, you need to unscrew the bolt fastenings with a flat screwdriver.
However, sometimes the question arises: what to do if the tap lever does not rotate? With this option, it is recommended to fill the inside of the fitting with vinegar or lubricate it with a WD-40 solution, which can be purchased at any auto store. This simple procedure will soften hardened deposits within a few hours. After which the valve should be easily dismantled, and then you can proceed to the next step.
Advice from professionals and expected difficulties
Plumbing equipment requires constant inspection. If the valve head is firmly stuck, and the problem needs to be solved immediately, then you will need to intervene with your own hands. This is especially true in cases where the services of a specialist are unaffordable or late.
Below are tips that, if followed, will help make the job easier when doing it yourself:
- If it is possible to shut off the water in the house for a long time, then it is better to go purchase a new part only after dismantling the old one, taking the latter as a sample. Consultants in the store will help you choose a similar spare part or its suitable analogue.
- The modern plumbing market offers repair kits for grand axle boxes made of rubber and ceramics. Plumbers note that with prolonged use of a water tap, the entire shut-off mechanism becomes unusable. This makes it more convenient to buy a new device entirely.
Water tap disassembled
- Some valves are equipped with latches. They must be removed.
- A large selection of Chinese parts requires keys of various sizes.
- Using an open flame can not only make repairs faster, but can also put the plastic parts of the faucet at risk of melting. Please note that the shiny surface of the case can also warm you up.
- Before removing a stuck-on grand axle box, you should completely dismantle the water tap and boil it in a solution with the addition of 2 tablespoons of soda for about 20 minutes. Then you need to dry the fastening connection in the form of a thread and try to unscrew the part.
- Before carrying out work with your own hands, you need to get acquainted with the model design of the grand axle box.
Demolition of a grand axle box is a complex task that can be difficult to do. However, studying the design mechanism, methods of performing work, and following the recommendations of experts will help solve even the most difficult problem.
Rectangular bathtub Riho Lusso 180×90 BA7700500000000 RUB 53,636
Rectangular bathtub Riho Miami 150×70 BB5800500000000 RUB 26,956
Rectangular bathtub Riho Still Square 170×75 BR0200500000000 RUB 55,200
Rectangular bathtub Riho Taurus 170×80 BC0700500000000 RUB 44,068
Rectangular bathtub Riho Virgo 170×75 BZ0700500000000 RUR 42,320
Tightening method
In some cases, in order for the threads to be disconnected, it is enough to tighten the upper part of the rusted faucet slightly tighter. For this purpose, it is recommended to use an adjustable or regular plumbing wrench that has an adjustable jaw width. Particular attention is paid to the location of the “cheeks” in a parallel direction to the hexagon on the upper part. When tightening, it is important to wrap the disconnectable faucet assembly with cloth, which will help protect the chrome coating from scratches and damage.
Vinegar and soda - a folk remedy
These food products may well defeat rust, making it possible to unscrew the old nut. To implement this method, you will need to clean the connection with an iron brush, removing rust and dirt. Then you need to draw acetic acid into a medical syringe and moisten the connection on all sides. In this situation, you need to use safety glasses to prevent the acid from getting into your eyes while working.
Then you need to leave the connection alone for 2 hours. During this time, the acid should eat away the rust. After the waiting period has expired, you can unscrew the rusted part. In this case, it is enough to simply move the nut along the thread at least a little. If the process stops here, you can repeat the treatment with acetic acid again.
After the connection is untwisted, the parts must be washed in a soda solution. The solution is prepared at the rate of a tablespoon of soda per 1 glass of water. If parts with vinegar residues get into this solution, hissing will occur. This soaking procedure should be repeated several times until the reaction stops occurring. After this, the parts can be safely considered free of rust. They can be coated with lubricant and reused later.
Tightening method
In some cases, in order for the threads to be disconnected, it is enough to tighten the upper part of the rusted faucet slightly tighter. For this purpose, it is recommended to use an adjustable or regular plumbing wrench that has an adjustable jaw width. Particular attention is paid to the location of the “cheeks” in a parallel direction to the hexagon on the upper part. When tightening, it is important to wrap the disconnectable faucet assembly with cloth, which will help protect the chrome coating from scratches and damage.
How to extend product life
The main enemy of all parts in the tap is hard and contaminated water. To extend the service life of the axle box and all kitchen equipment that has heating elements, you need to install a filter. Even rough cleaning will get rid of mechanical and metal impurities and significantly purify the water. The stem will remain clean and the tap will be easy to unscrew.
Careful handling of taps, regular cleaning and lubrication of components and locking mechanisms will significantly extend the service life of mixers with ceramic axle boxes.
Sources:
- https://stroy-podskazka.ru/vannaya/smesiteli/otkrutit-gajku/
- https://sovet-ingenera.com/santeh/kran/kak-otkrutit-gajku-na-smesitele.html
- https://jurnalstroy.ru/kak-otkrutit-kran-buksu-esli-ona-prikipela-chetyre-proverennyx-metoda.html
- https://melt-spb.ru/dlya-otopleniya/kak-otkrutit-staryj-kran.html
- https://santatrade.ru/kak-otvernut-prikipevshiy-kran-s-truby/
- https://arhitec-spb.ru/vannaya/kak-otkrutit-prikipevshuyu-gajku-na-smesitele.html
- https://stroyvolga.ru/%D0%BA%D0%B0%D0%BA-%D0%BE%D1%82%D0%BA%D1%80%D1%83%D1%82%D0%B8% D1%82%D1%8C-%D0%BF%D1%80%D0%B8%D0%BA%D0%B8%D0%BF%D0%B5%D0%B2%D1%88%D1%83%D1 %8E-%D0%B3%D0%B0%D0%B9%D0%BA%D1%83-%D0%BD%D0%B0/
- https://OchumelyieRuchki.ru/remont/kak-otkryt-prikipevshij-kran-na-trube.html
- 1
Pressure tap replacement process
Since it was not possible to turn off the water, it is barely contained under pressure by the old tap, which at any moment can give an even bigger leak. It is necessary to act very quickly and it is highly advisable to act together.
You should, as quickly as possible, use an adjustable wrench to unscrew the used tap and insert, overcoming the water pressure, the sealing device into the outlet to the required depth.
I turned on the tap and the pressure came out.
Then, holding it in the pipe, use a wrench to tighten the nut on the rod of the fixture until water stops flowing from the gap between the steel extension and the fixture.
Now you can, without fear of leaks, cut off part of the outlet using a grinder. Moreover, the location of the cut must be marked, not reaching the section where the valve of the device seals the outlet of the riser. After complete separation, the piece of pipe should be carefully removed without forcing the device too much.
To imagine how the new faucet will be located on the pipe, you can try it on in place, placing the wing on top, side or bottom, to determine the most convenient position during operation.
The next stage is very important: using electric welding, it is necessary to weld a squeegee to the outlet, onto which we will later screw a new tap. Before starting welding work, to ensure a reliable connection, you can make a small chamfer at the end of the cut pipe using a metal file. It is usually already available at the stages. This will allow the weld to fit well into the formed recess and ensure the quality, tightness and reliability of the connection.
After the squeegee has cooled, several layers of FUM tape should be wound onto its threads in the screwing direction, i.e. clockwise. This will increase the tightness of the fit of the new valve on the runoff and the tightness of the connection point. You need to screw on the tap with one hand, slowly and carefully, especially at the beginning, so as to get into the thread and not accidentally break it. At the very end, you can tighten it with a key, but at a small angle.
After the final installation of the new faucet, it is time to unscrew the sealing device. It is necessary to loosen the nut using a wrench and slightly move the rod towards the riser in order to release the elastic element in the longitudinal direction, which will allow it to lengthen and at the same time decrease in cross section. Now, without hesitation, we pull out the device, rocking it from side to side, and quickly close the new valve. The job has been successfully completed.
Do you open an iron tin can with a can opener clockwise or counterclockwise?)
Don't laugh!) I'm looking for confirmation of one hypothesis)
As answers come in, the hypothesis is confirmed))
Even from 20 replies it is clear that only a man (right-handed) can open clockwise - for me, for example, it is convenient and logical) Elik_555#2018.05.09 16:410 User replies:
during its repair Dagestanec#2018.05.10 04:050
User replies:
I don’t think they would have treated me to anything decent - good wine or Baileys.
I think no…. You might be able to work as a nurse in a hospital... ...unless they are very big... (but why do you need them?) OTCHAEHYY #2018.05.11 03:490 User replies:
in order not to become a turtle on yourself, that is, clockwise - this is if with an old opener, and if with a new one, then from yourself Mara#2018.05.11 14:310
User replies:
Isn't the weather nice today?
:)... of course, but you can download ready-made saves... There is still gunpowder in the flasks, don’t worry, we’ll kill the reptiles! Counterclock-wise. Do you need something for statistics?) VETERAN#2018.05.11 19:580 User replies:
background and meaning Luna#2018.05.11 23:050
User replies:
Romashkova Proletaria Avenue...... It depends on what kind of love we are talking about.
Recommendations
Sometimes, due to various reasons, it becomes necessary to replace radiators, pipes, fittings, and shut-off valves of the heating system. After all the work done (installation, wiring, crimping, etc.). As a rule, in centralized heating systems, high water pressure is supplied during the initial check. Which will lead to leaks if assembled poorly. If possible, you need to be at home and check for leaks in all connections, including valves and thermal heads. These are the most vulnerable places due to poor quality assembly.
In the event of sudden leaks in individual heating systems, it is always possible to turn off the boiler and shut off the coolant supply. With centralized heating, everything is much more complicated. You'll have to call a locksmith from the housing office. Shut off the heat supply to the entrance. The classic wiring option provides for the supply of coolants with the possibility of shutoff to each entrance separately.
It is necessary to purchase shut-off valves and components from trusted suppliers. Replacing a thermal valve is considered an expensive option for plumbing services. The main thing before installing any type of shut-off valves is to consult with a specialist which type of valves may specifically suit your heating scheme.
I can't remove the rusty valve
Forum / Water supply / I can’t remove a rusty valve
Ask a question you are interested in on our forum without registration
and you will quickly receive an answer and advice from our specialists and forum visitors! Why are we so sure of this? Because we pay them for it!
OLEG
July 30, 2015 at 10:38 am I want to replace the inch valve on the water tank. But the old one is so rusty that I can’t even unscrew it with a pipe wrench. I don’t want to use too much force, I’m afraid that the container pipe will break off. How can you unscrew it? alex78sol
July 30, 2015 at 01:59 pm Try heating the threaded connection with a gas torch or blowtorch. homohilaris
30 July 2015 at 14:05 In our mine, where an electric pump is installed above the well, this often happens. It seems to be tightly rusted and there is no way to unscrew it. But the problem can be solved without extra effort by either heating it or pouring a small amount of kerosene onto the rusted threads. Then you need to wait a few minutes - and you can unscrew it. VLAD
July 30, 2015 at 8:09 pm If you apply too much force, you will break the pipe if the valve is very rusty. The place of the threaded connection needs to be treated with kerosene, wait a little and only then remove the valve, it will be easier. Leonid_32
July 30, 2015 at 8:58 pm You can also use brake fluid, turpentine, and, as already mentioned, kerosene. But the most reliable method, which I often use myself, is penetrating lubricants, an example would be WD. Penetrates rust perfectly and corrodes it. homohilaris
July 31, 2015 at 7:31 am Thank you, I definitely need to try penetrating lubricant. Otherwise, kerosene in the twenty-first century is no longer respectable. The old master taught me this trick and many of his other secrets. He was already 80, and he ran up stairs faster than young people. Then - a sudden heart attack, our Ivan Petrovich has been gone for two years now.
Unscrew the broken bolt
In order to remove the broken bolt with an extractor, you will need to use a drill. You also need to take drills, dies for taps, and a strong core. In the broken “culprit” it is necessary to make a hole, the diameter of which should not exceed the diameter of the thread of the broken bolt.
The extractor has a reverse thread.
An extractor is screwed into the hole. When you screw the extractor, or rather its reverse thread, into the broken bolt, you remove it along with the latter.
If the bolt breaks off and it is possible to reach it, then you need to restore the geometry of what is left of it. Use a file or coarse sandpaper. Then you need to carefully paint the surface. Otherwise, the drill will always walk along the rest of the bolt and it will not be possible to make a hole strictly in the center. It is also necessary to maintain alignment. The hole should be drilled as close to the center of the bolt as possible.
It is necessary to start drilling with a small diameter drill and clearly position the hole in the center. The centered hole can be expanded very easily. The diameter of the extractor must be taken 1 mm larger than the diameter of the hole. It is important not to drill through the hole so that the extractor has something to grab onto.
The extractor must be screwed into the recess of the bolt surface. Then the extractor must be installed in the recess and struck with a hammer, trying to hammer into the hole like a nail. After this, it should remain in the recess.
It is necessary to clamp its head with a die and rotate it in the direction of unscrewing the bolt itself. You need to rotate the die slowly and as carefully as possible. By crashing into the bolt, the extractor tightens it as much as possible and transfers its torque to the broken “culprit”. In turn, the torque will unscrew the broken bolt.
Preparing for work
It is not always possible to find the necessary equipment for such work on hand, especially at home. You can use improvised tools that almost every owner has.
Before you begin to unscrew the bolt, cover the bolt with a rag soaked in kerosene.
The longer the rag lies on it, the easier it will be to unscrew.
If you don’t have time, you can treat the bolt with pure kerosene or WD-40 lubricant. It is necessary to tap the bolt with a hammer, then spray with WD-40 or kerosene.
After 1-2 minutes, you need to tap the bolt again and start unscrewing it. If there is no grease and kerosene, you can use brake fluid or ordinary vinegar.
How to loosen a stuck cold water valve/faucet?
Hello. There was a need to change the cold water tap, but unfortunately I discovered that the valve (or ball valve?) shutting off the cold water to the apartment was jammed. It hasn't been played for several years. See photo.
Is this a valve or a ball valve?
- Tell me how to try to stir it up? I found this for a ball, but I don’t know if it’s suitable for my case?
antd2000, this valve at the entrance to the apartment is the responsibility of the DEZ. Write them an application with a visa on a copy of the application about the impossibility of shutting off the water. They will try to change the valve box and leave it at that. It is in your best interest to keep a ball valve ready, which the mechanic who comes will install in place of the valve for money or with a lot of grumbling. I really don't recommend putting any effort into this valve. Its destruction and subsequent consequences will be blamed on you.
cineman wrote: It is in your interests to keep a ball valve ready, which the mechanic who comes will install in place of the valve for money or with a lot of grumbling.
If the first faucet is not working properly, then repair the old one or install a new one for FREE, regardless of grumbling.
The photo shows the valve. Often they change the entire valve part (this is easier than changing the whole thing) or replace the entire valve with a ball valve (if there is no valve part or the main part is required). In both cases, the replacement is FREE OF CHARGE, because this valve/taucet is in the area of responsibility of the management company.
antd2000 wrote: the cold water shutoff to the apartment is jammed
It's hard to turn without a handle, maybe you can install a handle and then it will turn. In the half-open position, it may leak along the stem.
In general, call the management company, let them fix it or replace it for FREE.
For free. Does this not depend on whether the apartment is privatized or not?
And also, is shutting off the cold water riser free of charge?
antd2000, does not depend. You pay them money every month for maintenance; everything, including risers and inlet taps, is included in the price. The replacement technology shouldn’t worry you either - maybe they’ll have to drain the whole house - it’s still 0 rubles.
antd2000 wrote: Free. Does this not depend on whether the apartment is privatized or not? And also, is shutting off the cold water riser free of charge?
FOR FREE. More precisely, you have already paid for this in the REPAIR AND MAINTENANCE line, including paid for a new faucet if a replacement is required.
You don’t even have to purchase a faucet at your own expense, but in order to solve your problem faster and possibly have a better-quality faucet, it’s probably still worth buying a high-quality faucet for replacement (at least, what would happen if the plumber stated that the faucet is in the Criminal Code no and won’t be in the near future, and if you don’t need it, return it back to the store).
antd2000 wrote: Does this not depend on whether the apartment is privatized or not?
If it is not privatized, you can also install meters at the expense of the municipality.
strider1978 wrote: If it is not privatized, you can also install meters at the expense of the municipality.
You can try, but it is unlikely, because formally the municipality does not use water and can turn it off completely. And because It is the resident who needs the resource, then there is a contract for the supply of resources with this same resident (tenant), and therefore the meter is the responsibility of the resident.
Another question is if the apartment is not for rent, but under the so-called commercial state lease - renting an apartment from the state. But I don’t know the intricacies of such relationships, because... I have only superficially heard about such experiments in the provision of housing on the principle of renting not from a private owner, but from the state, with payment for utilities and rent (according to the experiment, the price is lower than that of a private owner renting out an apartment, but more expensive than the owners pay for their housing).
ser000 wrote: If the first faucet is not working properly, then repair the old one or install a new one for FREE, regardless of the grumbling.
Repair of old or replacement with new VALVE.
cineman wrote: Repairing the old one or replacing it with a new VALVE.
If they find it, they may install a valve, but it is more likely that they will install a ball valve, because... the latter is usually cheaper (for some manufacturers the difference is almost double). In some management companies, they spend weeks or months looking for this replacement so that the complainant can’t bear it and at least buys a faucet or pays for a replacement for this FREE service.
ser000 wrote: You can try, but it is unlikely, because formally the municipality does not use water and can turn it off completely.
In ECB, it is enough to sign a paper with the district administration agreeing to transmit meter readings in the prescribed manner.
ser000 wrote: If they find it, they might install a valve
In my practice, they keep an on-duty, scary, used one. The goal of the terrible thing is to force the owner to pay for the crane and its installation.
Yes, no one will install a new faucet for him for free, the ball valve and the valve have different sizes and the rusty fitting will have to be cut out. They will loosen the gland nut and unscrew it with pliers by the stem, if anyone has one. Well, maybe they will check the rubber on the seat if the riser is blocked. New valve head, where do they buy such rarities?
The mechanic who came in on another issue immediately said that their area of responsibility was up to the valve, not turning on the valve. It's been like this for a long time. Therefore, when replacing it, you will have to pay for shutting off the water and labor. It's in Moscow.
What document is this stated in? Can anyone explain clearly?
antd2000 wrote: their area of responsibility is up to the valve, not turning on the valve
You will check with someone more competent in matters of responsibility, with his superiors, for example, a valve is part of a system that common property must be replaced or repaired for free
antd2000 wrote: A mechanic who came in regarding another issue immediately said that their area of responsibility was up to the valve, without turning on the valve.
Make a request in writing in two copies against signature regarding the malfunction of the shut-off valves on the riser. The chief engineer of the management company or the foreman of the housing office (DEZ) will come and make a decision.
antd2000 wrote: A mechanic who came in regarding another issue immediately said that their area of responsibility was up to the valve, without turning on the valve. It's been like this for a long time.
Not like that for a long time. Probably the locksmith wanted to get some money past the cash register for free services. Decree 491:
The common property includes in-house engineering cold and hot water supply systems, consisting of risers, branches from the risers to the first shut-off device located on the branches from the risers, the specified shut-off devices, collective (common house) cold and hot water metering devices, first shut-off and control devices taps on taps of intra-apartment wiring from risers
antd2000 wrote: Therefore, when replacing it, you will have to pay for shutting off the water and labor. It's in Moscow.
It's your business, but you don't have to pay for it. More precisely, you have already paid for this monthly under the REPAIRS AND MAINTENANCE item in the invoice.
antd2000 wrote: Which document is this written in? Can anyone explain clearly?
Resolution 491, see above.
You've already asked about this. Are you going for the second round?
strider1978 wrote: If it is not privatized, you can also install meters at the expense of the municipality.
You can try, but it is unlikely, because formally the municipality does not use water and can turn it off completely. And because It is the resident who needs the resource, then there is a contract for the supply of resources with this same resident (tenant), and therefore the meter is the responsibility of the resident.
Another question is if the apartment is not for rent, but under the so-called commercial state lease - renting an apartment from the state. But I don’t know the intricacies of such relationships, because... I have only superficially heard about such experiments in the provision of housing on the principle of renting not from a private owner, but from the state, with payment for utilities and rent (according to the experiment, the price is lower than that of a private owner renting out an apartment, but more expensive than the owners pay for their housing).
ser000, you can argue for a long time about who benefits from what, but the installation of meters in non-privatized apartments was paid for by the Moscow municipality. Another thing is that contractor companies were doing this and the apartment could be missed, and the management company may not carry out this work. Replacing the inlet valve on the Bugatti ball was in the estimate and the shutdown was carried out free of charge if the local plumber could be caught sober. But the vehicle seems to be changing the cranbook once again for 2 months, and will pay for the paid service at the rates of the extortionists.
Main causes of malfunctions
The kitchen faucet, as well as in the bathroom, is actively used by households many times a day. Not everyone treats it properly. For example, the flywheel is often spun in sudden movements with excessive use of force. This leads to the rubber gasket being pressed through, and then to failure of the device.
It is also susceptible to the penetration of abrasive materials (sand or other hard small particles), which settle on the surfaces and make it difficult to rotate, and in the worst case, lead to the destruction of the ceramic ring.
Sticky crane axle box
Most often, single-lever kitchen faucets break. This is due to the fact that they are under pressure with redoubled force. Such actions lead to the fact that the brass part is crushed, and it will not be easy to repair such a crane axle box.
There are three options to solve the problem:
- Replace the mixer with a new one;
- Replace the broken element;
- Repair the failed part.
The least expensive is the third of the listed ways to fix a breakdown, but one of them should be used based on the specific situation.
I can't remove the rusty valve
Let's consider the order in which repairs should be carried out.
Almost every home craftsman with minimal plumbing experience knows how to change faucet gaskets. There is nothing difficult in performing this work; just unscrew a couple of nuts, remove the old gasket and install a new one in its place.
If there is a ball valve installed in the kitchen sink or bathroom, then you will have to work hard when repairing this device yourself. But if the master is well prepared and understands the design of the mechanism in advance, then performing the work will not require significant effort.
About safety precautions
Before unscrewing a rusty nut, read these important safety points:
- Do not use a tool that is damaged in any way.
- The nut is always unscrewed counterclockwise.
- The tool must be securely fixed to the part.
- Use special household gloves to avoid injury.
So, if a nut is rusty, how do you unscrew it? We offer you several effective methods.
Use of solvent
After unscrewing the top nut and removing the handle, it is recommended to pour in any rust solvent, which can be WD-40, kerosene or diesel fuel. Then one of the hammers should be installed on one side of the nut, and with the other, apply several blows to the opposite part of the fastener, and then change the position of the tool.
Tapping should be replaced by refilling the solvent, and then unscrew the nut with a suitable size spanner. If necessary, all of the above activities will need to be repeated.
Working with rusted parts, including taps, is very difficult, so replacing or repairing them will require some tricks and simple but effective methods to make unscrewing easier.
Repair
Disassembling the mixer
How to reach the cartridge from the faucet and install a replacement?
- We remove the decorative plug from the handle. In most cases, it is simply pressed in with a small reinforcement, and it is easy to pry it off with a narrow screwdriver.
- We unscrew the screw hidden behind it, having previously illuminated it with a flashlight and found out the shape of its head. It can be used for a Phillips, flat-head or hex screwdriver.
- We remove the lever.
- Unscrew the decorative casing. In most cases, it is equipped with a regular, right-hand thread. It is better not to use the tool: the casing is made of narrow bronze, silumin, or even plastic, and it is easy to damage.
- We unscrew the brass nut of the mixer securing the cartridge - using an adjustable or open-end wrench.
- We remove the cartridge towards ourselves.
Reassembly with a new cartridge is performed in the reverse order.
How to remove the cartridge from the mixer if you cannot remove the lever stuck to the rod?