Choosing the optimal location
To select, it is important to take into account the individual characteristics of the country house:
- materials of walls and floor slabs;
- type of heating device depending on the design, size, fuel and materials from which the stoves are made;
- room size and heater power;
- number of rooms that need to be heated.
Let's look at the basic requirements in more detail.
How to choose a place to heat several rooms at the same time?
For a dacha, the design of panels is suitable, leading to another room, through which heated air passes and heats the room. But this option is more expensive. The problem can be easily solved. At the construction stage, you will need to decide on the location of the heater and make niches in the walls. Now, having reliably treated the walls with a layer of thermal insulation, we install the stove in the opening of the partition.
This is how we achieve heating of several rooms with 1 stove. This method is effective when arranging rooms with a small area. To heat large rooms, you will need to call an experienced stove maker who will assemble a fireplace with a heating panel.
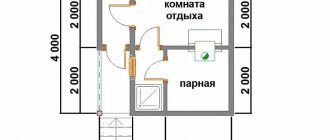
Examples of stove placement for several rooms:
How to choose a place for the stove if only one room will be heated?
It is recommended to install the stove closer to the corner of the room, here it does not take up much space, and by making a protective layer of thermal insulation with a mirrored front side, you can install the unit at a short distance from the walls and heat the house faster.
DIY installation
When making vertical/horizontal grooves and screens, the sauna stove manufacturer's instructions must be followed. This document indicates specific values of safe distances from the body of the heating device to combustible materials, screens, protected and unprotected wooden floors, doorways, depending on the actual thermal power of the stove, the nuances of its design.
For example, for some modifications of Termofor, the minimum permissible size of a vertical brick cut is 61 cm. Therefore, the stove cannot be pushed tightly into a corner.
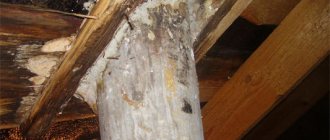
Brick cutting vertical
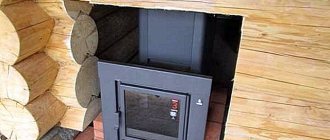
Regardless of the layout and configuration of the bathhouse, installation of a factory stove-heater with an external fuel channel is carried out in only two ways:
- inside the wall - under the load-bearing structures there is always a foundation or grillage, a window for the fuel channel is made in brick walls, part of the crowns and racks are dismantled in wooden walls, masonry is made in half a brick 1.5 x 1.5 m;
Laying on the foundation.
- inside the partition - since the facing materials of these structures are attached to the racks of the frame, which partially rests on the floor, there are often no foundations under them; for a brick portal that serves as a cutout for the remote fuel receiver, a shallow or non-buried foundation strip will have to be cast.
If the brick cutting is small, you can rest it on a wooden floor without a foundation, but in the place where the joists pass.
The thickness of the cutting portal is ¼ - ½ brick to save the construction budget. However, stove manufacturers take into account that the remote firebox can be built inside walls of greater thickness, so they provide the necessary size margin.
The main difficulties when laying cuttings traditionally arise in the interface nodes:
- brick/wall - the masonry is prohibited from being rigidly connected with reinforcing pins to the crowns of an unsettled frame; a damper tape is glued to the end of the wooden wall; the bricks do not adjoin closely, but leave a gap of 0.5 - 1 cm, decorated with platband or fillets;
Platband around the portal.
- brick/partition - a timber stand is installed close to the brickwork through a damper tape; after covering the wall planes, the junction is decorated with an overlay or platband;
- brick/fuel channel - the gap between the portal and the metal firebox is sealed with asbestos cord or heat-resistant sealant, and decorated on the outside with fire-resistant putty.
Advice! Due to the small volumes of masonry, facing ceramics can be used to get rid of plaster and putty.
Screens
Several types of screens are used for metal sauna stoves:
- fireproof - protects wood from ignition or charring, mounted directly on the wall (in some cases through thermal insulation inserts);
Fire protection screen.
- protective - protects users from contact and remote burns, in this case the stove itself is lined with an air gap between its body and the finishing material;
Protective screen.
- floor - protects the tongue-and-groove board near the firebox, created from sheet iron, basalt, asbestos cardboard or in the form of a pedestal.
Floor screen.
In addition to fire protection, screens additionally decorate furnace equipment and give interiors a complete look.
Important! Fire barriers are often constructed from asbestos-containing panels/sheets or steel structures. In 90% of cases, protective screens are made of brick, which is not acceptable for a wooden floor due to its heavy weight. Therefore, you will either have to dismantle the tongue-and-groove board and pour a foundation/floor on the ground along the outer perimeter of the screen, or use other materials and technologies.
The only option for covering with tongue and groove boards without changing the design of the wooden floor and casting a separate foundation is a metal sheet. However, this material has high thermal conductivity, so thermal insulation should be laid underneath it:
- MKRP-340 is a heat-resistant silicon-based ceramic plate measuring 0.4 x 0.6 m and 3 cm thick;
Plate MKRP-340.
- TISK-250 is a fireproof calcium silicate plate with dimensions of 0.5 x 1 m, thickness 3 cm, density 250 kg/m3;
- PKVT 1260 is a ceramic-fiber heat-resistant plate made by vacuum molding with dimensions of 0.5 x 0.6 m and a thickness of 2 cm.
Attaching the fire retardant layer.
The galvanized steel sheet is attached to the wooden floor with self-tapping screws through a layer of thermal insulation. Instead of these materials, you can use budget asbestos cardboard (2 layers of KAON 1 cm thick, 0.8 x 1 m in size), PNAKH-1S asbestos fabric or AT-1 - AT-9 fabric, basalt wool.
Fire screen options are:
- steel sheet - mounted in the same way as a floor screen on top of a fire-resistant material, has reflective properties, retains some of the thermal energy inside the steam room, but does not have a sufficiently attractive front layer;
Steel fire protection screen.
- tiles, natural stone - a GVLO gypsum fiber sheet is attached to the wall on top of heat-resistant slabs, onto which mosaics, tiles or natural stone are glued; this option is usually used when finishing a floor screen with similar materials;
Fire protection screen made of porcelain stoneware.
- steel structure - some stove manufacturers (for example, Teplodar) produce side, front and floor screens for their products to protect the wooden structures of the bathhouse.
Factory steel screens.
There are two types of protective screens:
- metal - Sami manufacturers care about the safety of users, producing screens made of cast iron and steel, installed through special spacers at a distance of 2 - 5 cm from the body;
- brick - more comfortable to use, since it is impossible to get burned on the outer surfaces; large cracks can be made in the masonry for convection heat exchange.
Metal screens reduce the temperature on external surfaces to 80 - 100 degrees, which eliminates the risk of fire in the walls, but does not protect against burns.
Despite the conflict between two construction materials - resilient wooden flooring and heavy brickwork, some individual developers use the technology:
- under the stove, a sheet of gypsum fiber board is laid on a tongue-and-groove board, and a platform of large-format paving slabs 40 x 40 cm or 50 x 50 cm is laid on it;
Option for a floor screen made of paving slabs.
- Screens with large slits for convection are made from ceramic bricks.
Important! The height of the vertical protective screens is much lower than that of fire-fighting modifications - 5 cm higher than the stove body (1 row of bricks, respectively).
Fire safety requirements
The rules require maintaining certain distances to the stove from the surfaces of the house:
- if a steel stove operating on solid fuel is installed on a floor covering made of flammable materials, the minimum distance to the bottom of the heater is 140 mm;
- a separate foundation is made for an iron or brick stove or a slab of durable, non-combustible materials is laid. Its size must exceed the dimensions of the heater by 500 mm on each side;
- the minimum distance from the floor slab made of combustible materials to the top of the device is 1000 mm;
- the size of the indentation to a wooden wall from a steel stove that is not protected by a layer of thermal insulation or not lined with brick is 1000 mm;
- with installed industrial panels made of a layer of thermal insulation and a mirror metal coating, the size is reduced to 380 mm;
- the stove equipped with a protective screen must be 130 mm away from the wall lined with brick or ceramic tiles.
Bathroom floor design
After the logs are installed, you can begin constructing the floor of the frame bath. If you decide to build a sauna with your own hands, keep in mind that the constructive floor cake must include the following layers:
- subfloor made of 0.6 cm thick oriented strand boards;
- waterproofing and wind protection coating (we will use Izospan “A”, but you can choose other materials);
- a layer of thermal insulation (for floor insulation we use ecowool, you can use mineral wool);
- a protective layer of oriented strand board 1.8 cm thick;
- to effectively insulate the floor of a frame bath, the cake contains two layers of insulation (now for this purpose we will use extruded polystyrene foam 50 mm thick);
- then follows a layer of vapor barrier (Izospan “D”);
- after this, a reinforcing fiberglass mesh is laid;
- then a floor heating system is installed;
- cement-sand screed with reinforcement;
- ceramic tiles laid with special glue.
If you are building a frame bathhouse on stilts or a columnar foundation with your own hands, you should take a closer look at the features of each layer of the structural floor pie.
Advice: keep in mind that it is necessary to properly insulate not only the floor of the frame bath, but also its walls, as well as the ceilings.
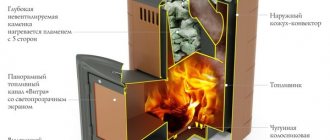
Features of installing a metal furnace
Such ovens are made small in size. In addition, they can be equipped with hobs and water heating tanks. The principle of operation is based on the radiation of thermal energy by surfaces distributed throughout the room.
To top it off, some models are equipped with an air convection device. This addition allows you to use the heat from the combustion of wood to heat cold air passing either through pipes or an air cavity between the walls and screens of the stove.
Based on these qualities, the installation location of metal heaters is determined:
- If the unit is equipped with a hob, its place is in the kitchen.
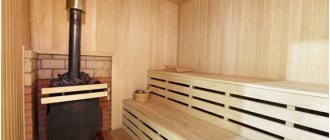
- If you plan to buy a fireplace or a metal stove with a glass door, such a device can be installed in the living room. The main thing is to maintain safe distances from wooden surfaces and protect them with screens or thermal insulation boards.
- Installation of heaters with steel surfaces is not recommended in narrow corridors or small rooms. In this case, purchasing a stove with a remote firebox can help. Such a unit can be installed in a small room, and the firebox can be brought into the kitchen.
- For safe use and minimal distance from the wall, you can simply make protective screens from fireclay bricks. This design will allow you to install the stove almost close to the wall and will allow the screens to accumulate heat and gradually release it into the room after the wood is burned.
Chimney for sauna stove
To remove combustion products from metal sauna stoves, the chimney can be made of brick, metal or ceramics, and there are three types depending on location:
- Mounted chimneys are built on top of the heating device and are its continuation. It is this type of construction that is most often chosen for installation above a metal furnace, and sandwich pipes have recently been most often used for it.
Root chimney - there are no restrictions, but still it is rare in bathhouses.
chimney pipes
- Main chimneys are a free-standing brick structure to which a sauna stove can also be connected. To build this type of chimney, it is necessary to build a separate foundation for it. If the bathhouse is planned to be located in the area of the house where the stove or fireplace will be built, or in an adjacent extension, then sometimes one common main chimney can be installed for them. But this case is clearly atypical.
- Wall chimneys are a type of flue duct installed in the brick wall of a house. If the bathhouse is built of brick, then you can use this design. However, it has one significant drawback, since the pipe actually runs completely along the street, there is a risk of condensation occurring in it, which can negatively affect the performance of the stove. Therefore, wall chimneys require high-quality insulation. It is also rarely considered as an option.
Chimneys for a sauna stove can be made of different materials - it can be brick, ceramics, metal or insulated sandwich pipes.
- Brick chimneys can be used to remove combustion products from metal sauna stoves only in rare cases. Main chimneys are quite labor-intensive to construct; it makes sense to build them if you need to remove smoke from two or more stoves.
- Ceramic chimneys are not popular among owners of bathhouses with metal stoves, as they are quite heavy, which complicates installation, as well as their high cost. However, ceramics have excellent characteristics and will last a long time. The material is resistant to corrosion processes and high temperatures, has low thermal conductivity, which means it will not overheat. In addition, the internal surfaces of ceramic pipes are perfectly smooth, so the smoke will flow out unhindered, so there will be no thick soot deposits on the walls.
- Metal chimneys are affordable and easy to install, but they quickly heat up to high temperatures, which can lead to fires in wooden structures. In addition, hot air entering the cold part of the pipe located on the street will provoke the process of abundant condensation. Therefore, the metal pipe must be covered with thermal insulation both outside and inside the building.
- An excellent alternative to the metal version of the chimney are sandwich pipes, which have a three-layer structure - a metal inner and outer layer, and between them a mineral wool lining, which serves as a good heat insulator. Sandwich pipes are easy to install; manufacturers of these products have provided a wide range of parts necessary for high-quality installation. Thanks to this, they are easily assembled into a single structure. Therefore, this option is most often chosen for the chimney of metal sauna stoves.
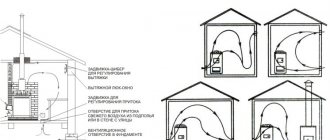
The sandwich chimney can be located indoors and pass through the ceilings and roof, or it can be directly discharged through the wall to the outside.
As shown in the illustration above, the chimney can be installed indoors or almost immediately connected to an external wall
- The first option, with a passage through the attic floor and roof, is good because the heat emanating from the pipe remains in the bathhouse. In addition, a strictly vertically installed pipe provides good draft for the stove.
The obvious disadvantages of the internal arrangement of the pipe include the complexity of installation work, since careful insulation of penetrations through the ceiling and roof is required. If the joining seams of individual parts of the sandwich pipe are damaged, combustion products will enter the steam room, which is not immediately noticeable, and this is dangerous for the lives of people in the room.
- External chimneys are led out into the street through the wall, and then rise to a set height along its outer surface. Therefore, they are easier to install both in a bathhouse under construction and in an already built one. Higher level of operational safety, more accessible maintenance.
The disadvantages of this arrangement include the need for additional insulation and careful sealing of the pipe passage through the wall. However, if correctly selected sandwich pipes are used to construct the chimney, then their additional insulation will not be required.
sandwich pipes
* * * * * * *
So, the installation of a sauna stove with an external firebox must be carefully calculated, and the parameters prescribed in SNiP must be observed without any simplification. It must be remembered that the safe operation of not only the stove, but also the entire structure of the bathhouse, especially if it is built of wood, depends on the correct installation and insulation of metal structural elements from flammable surfaces.
At the end of the publication, there is a video in which I show an example of installing a sauna stove with the firebox leading into the dressing room.
Tags: wooden, metal, base, oven
« Previous entry
Requirements for installing a brick kiln
The best option for installation is the kitchen. This design can be made small in size or a Russian stove with a stove bench can be laid out. The choice depends on the size of the room and financial capabilities. When pouring the slab, it is important to take into account the increase in size by 150 mm on each side of the furnace walls. But you will need to take into account the dimensions of the brick chimney and make a foundation for it.
A brick stove for a summer residence is the best option if the dimensions of the kitchen and its constant use allow. During long breaks and the heater being in a damp, unheated room, cracks may form in the solution. The stove will need to be heated, after finding the place where the smoke passes, cover it with a solution of fireclay clay.
Types of floor coverings in the washing room
In private households, wooden (leaky or non-leaky) and concrete floor structures are usually laid in the washing sections of bathhouses.
As practice shows, the easiest option in terms of implementation is the leaking floor shown in the photo. On a pre-prepared base, which can be a concrete screed, a lower crown, support pillars, etc., logs are attached - they will become the basis for installing flooring from boards.
Floor elements are laid at intervals of 3-5 millimeters. It is through these gaps that water will be drained. Typically, leaking floor coverings are made dismountable. This design allows, if necessary, to remove the flooring and efficiently dry the boards outdoors.
When creating a non-leaking floor from wood materials, its elements are laid without gaps. This design does not provide for the disassembly of boards. It is equipped with a slope in the direction of the drain hole. Next, the water enters the reservoir and is discharged outside the building through a pipeline.
Non-leakage flooring in the bathhouse in the washing department requires the presence of a rough base and laying a layer of thermal insulation
Particular attention should be paid to solving the problem of ventilation of the underground space. One or more holes are made in the floor for ventilation - their number depends on the area of the room
Plastic pipes with a cross section of 50 or 100 millimeters are inserted into them.
By the way, when a bathhouse is built, heated floors in the washing room are designed to be leak-free.
Concrete floors in the garbage room are made quite often, because they have many advantages:
- simple device;
- durability, strength and reliability;
- ease of care.
There are several ways to solve this problem:
- move in special shoes;
- insulate the floor;
- install a floor heating system, which will require considerable financial expenses.
Rules for installing a stove on a wooden floor
If the stove is installed on a floor made of flammable materials, you will need to install a layer of thermal insulation and lay a protective board on the floor.
Metal furnace
If you plan to install a large cast-iron stove, then the foundation, which must be equipped for a heavy structure, will serve as protection against deformation and fires.
You can not install a foundation under a steel stove or make it out of 2-3 rows of bricks:
- The wooden floor is disassembled taking into account the protrusions beyond the dimensions of the stove. This must be done carefully so as not to damage the entire floor structure.
- The first row of bricks is laid out on edge. In our work we use cement mortar with the addition of clay.
- The second row is laid out with the recesses downwards and a cavity can be left in the middle to separate the collection of ash and additional ventilation when igniting the stove.
If you need to build a foundation for a cast iron stove on finished floors, in this case it is better to use a base design with 4 pipes and a concrete slab:
- The floor is disassembled similarly along the contour of the slab.
- In the corners, 4 holes are drilled or drilled according to the diameter of the support pipes.
- The supports are lowered into the holes and cemented.
- Along the top, we fasten the individual pipes with an angle into a single structure and weld steel rods along the diagonals to reinforce the slab.
- We install the formwork and pour the foundation slab under a heavy cast iron or steel stove.
You can make protection from 3 layers. To do this, a CSP board (cement-bonded particleboard) is fixed to wooden floors with self-tapping screws. A layer of brick is laid on it. It will serve as a heat accumulator and a stainless steel or galvanized sheet with a glossy surface is placed on top. This layer will reflect thermal energy and the heat will quickly spread throughout the room.
Brick kiln
For a brick kiln, no additional protective measures are required. It is laid out on a prepared foundation, which is initially made taking into account fire safety requirements and SNiP standards. Laying an additional layer of thermal insulation is not required; the brick itself will cope with this work.
How to determine the required thermal power of a sauna stove?
The power of heating devices is measured in kilowatts. However, manufacturers of sauna stoves take a different approach - they indicate how much steam room volume this model will be guaranteed to be able to heat to a level corresponding to the required microclimate in the steam room. Naturally, subject to high-quality thermal insulation of the latter.
This is usually indicated in passports - for rooms, for example, from 10 to 16 m³.
It would seem that everything is very simple. It is not difficult to determine the volume of the steam room, and it will be just as easy to choose a model. However, the features of the arrangement of the bathhouse can make their own adjustments.
Below is a calculator that will calculate, so to speak, the conditional or reduced “volume” of your steam room, that is, taking into account all the necessary amendments. Based on this value, it will be possible to more accurately select the optimal oven.
For example, if the result is that a stove of 11 m³ is needed, then they try to choose so that this value is approximately in the middle of the range of capabilities of the purchased model. That is, say, a stove designed to heat from 8 to 14 m³.
Go to calculations
About the outlet of the chimney and chimney pipes
If possible, it is better to make a brick chimney for steel stoves. In this case, by covering the steel pipe with brick, an additional heating surface for the room is obtained. The brick will heat up from the temperature of the exhaust gases and gradually release heat to the room. This design will protect owners from burns when touching the pipe. The inner surface of the steel pipe is smooth, therefore reducing the risk of rapid deposition of a thick layer of soot and frequent cleaning of the channels.
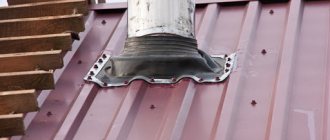
All parts are fixed to the wall at a certain distance using clamps with self-tapping screws. To exit through the roof, you will need to make a hole in it and install a special coupling or wrap it with a layer of thermal insulation. From the inside, the hole is sealed with polyurethane foam or heat-resistant sealants. On the outside, a layer of sealant and the main roof covering is used.
The chimney pipe is installed above the roof ridge at a distance of 1000 mm and is covered with a protective canopy. If the chimney exits close to the wall, the upper cut of the pipe should be on the horizontal deviation line from the ridge by 10 0.
Installation of a chimney in a wooden house
The floor and ceiling of the attic are covered with metal plates.
The chimney for an iron stove is chosen from special steel that can withstand high heat and the action of chemically aggressive substances. The chimney can go either horizontally or vertically, and even with turns, but it is more profitable to place it vertically: better draft and less hassle with cleaning.
- Holes for the pipe in the ceiling are made right before installation.
- Adapters - glasses - are inserted into the hole in the ceiling.
- The ceiling and floor in the attic, if the chimney goes through the attic space, are sealed with a metal plate at the transition point.
- Pass the chimney pipe through the sleeve and in the same way lead it to the roof - through a glass. The space around the channel on the roof is also sealed with metal.
You can also bring the chimney outside through the wall. The technology is the same.
Features of metal stoves
Metal stoves are designed specifically to equip a house, cottage or cottage with a constant source of heat without spending a lot of time and effort. However, you can fully enjoy the benefits that such a stove provides only if it is installed correctly.
- A large selection of models: from stoves of traditional design to technologically complex options with two- and three-turn fireboxes.
- Characterized by moderate cost.
- They heat up quickly, which allows you to make the room temperature comfortable in a short time.
- Long service life. If handled properly, a metal stove will last at least fifteen years.
- Compact dimensions and the presence of a hob in many models.
- Installing a stove in a wooden house does not require much time and effort.
It is worth saying that metal stoves can be additionally equipped with large panoramic glass and also perform a decorative function, such as the stoves of the Matrix, Meteor, and Vertical series. In this case, when choosing a place to install them, you need to take into account that the door should be in the viewing area.
Treatment of wood against fire
Additional means of protecting wooden structures located in the immediate vicinity of an iron stove are fire-retardant impregnations and mastics. Beams, load-bearing structures, floors and walls adjacent to the furnace are subjected to this treatment. Mastic has a higher level of fire protection, and the impregnation is almost colorless.
Fire retardant treatment can be carried out by both representatives of the Ministry of Emergency Situations and the owners of a wooden house. In the latter case, before starting to operate the stove, it will be necessary to obtain a certificate from the inspector of the Ministry of Emergency Situations about the compliance of its installation with the requirements of the safety regulations.
All leading European and Russian manufacturers of solid fuel stoves describe in detail the rules for installing equipment and fire safety requirements in their technical documentation.
Do I need to make a foundation for the stove?
Installing a stove in a wooden house may require the presence of a foundation. However, a permanent foundation is required for a metal stove only if its weight exceeds 750 kg. Typically, steel stoves weigh much less (up to 300-400 kg). But if the equipment is covered with brick, then the weight of the entire structure will be very impressive.
When the stove weighs up to 80 kg, a foundation is not needed; the device must be installed on a solid, non-combustible base.
Another way to determine whether a foundation is needed is to consult a professional stove builder. This must be done at the stage of designing a wooden house, since the foundation for the stove is built during the creation of the foundation for the house. If the building has already been built, then the flooring at the installation site will have to be dismantled. After this, you will need to remove the soil and make a foundation for the stove.
Pie wall frame bath
Baths built using frame technology are not inferior in their characteristics to those built by other methods, but require the investment of smaller amounts. Stages of work:
- The first is timber or edged board.
- Min. cotton wool, placed in the spaces between the wooden parts.
- OSB board with a thickness of 15 millimeters.
- Horizontal sheathing.
- Insulation.
- Vapor barrier.
- Vertical lathing.
- External finishing material.
- Vapor barrier.
- Interior finishing material.
Baths built using frame technology are not inferior in their characteristics to those built by other methods, but require the investment of smaller amounts. You can make the wall pie of a frame house with your own hands, but you need to choose the right materials, and then work step by step, observing all the nuances. As a result, they get a reliable, beautiful home that will delight the owners for a long time.
Where to put a metal stove?
Ideally, you should choose a location for a steel stove after windows have been installed and doorways have been erected. Then it becomes clear how the air flows inside the room will be directed. To achieve the most efficient operation of the furnace, it should be placed where there is not too much air movement.
- Narrow rooms are not a suitable place to install a stove. According to fire safety rules, there must be at least 130 cm to the wall opposite the firebox.
- In addition, the stove itself should be 110-125 cm from the walls, and when using insulation made from non-combustible materials - 40 cm.
- It is also not possible to install a stove in a room that is too small: heating equipment that runs on wood is allowed to be installed in rooms with an area of at least 16 m2.
If the device is equipped with a hob, then you can safely install it in the kitchen. For example, among the Teplodar stoves, the Matrix, Vertical, Meteor and other models have this design. These stoves can operate for up to 8 hours on one load of wood thanks to an effective two-channel afterburner system.
Owners of two-story buildings should take into account that to heat the second floor they will need another metal stove.
TOP 3 popular models of wood-burning steel stoves
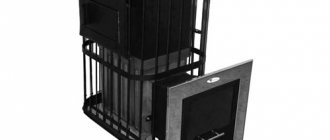
Varvara Terma-kamenka
Finnish steel wood-burning stove with a closed heater and a panoramic combustion door. Suitable for Russian baths, as well as saunas. You will have to add firewood from the dressing room, a unit with an external firebox. Water tank included.
The heated volume of the steam room is from 6 to 13 m³. The dimensions of the device are 39 x 71 x 65 cm. The stove itself weighs only 50 kg, plus stones - up to 30 kg.
Teplodar Rus 18 L
Another stove that is heated from the adjacent room. Among the advantages are an effective heat exchange scheme and ergonomic design. Open type heater, remote firebox.
“Teplodar Rus 18 L”
A distinctive feature is that the stove can be converted from wood to gas (the burner is purchased separately and installed without welding).
Suitable for a spacious steam room with a volume of up to 18 m³. The stove itself weighs 41 kg, and up to 90 kg of stones can be placed in the mesh. Unit dimensions 81 x 79 x 33.5 cm.
Harvia M3 SL
One of the heaviest steel stoves. Outside there is a mesh casing for laying stones, and there is also a closed heater. The firebox is remote, the door is panoramic with the “clean glass” system. There are also modifications of the oven with a blank door (without glass).
A powerful stove for a spacious steam room with a volume of up to 24 m³. The unit itself weighs as much as 170 kg, stones up to 250 kg.
Preparing for installation of a metal furnace
Installation of a metal stove in a house made of combustible materials provides for the following:
- A fireproof cutting, which is also called a fireproof sheet, must be installed on the floor under the stove. It consists of a layer of asbestos cardboard on which a sheet of steel with a thickness of at least 1 mm is laid. A rim made of non-combustible material should be made around the protective layer. This is necessary so that the coals that fall out of the stove cannot roll onto the wooden surface.
- The flush sheet on the side of the combustion door and on other sides should protrude at least 600 mm and 300 mm, respectively.
- Protective screens that are mounted on walls must be 30% larger than the corresponding sides of the stove and at least 300 mm.
- An uninsulated chimney should be located at least 1000mm from unprotected walls and ceilings.
Also, before installing a wood-burning stove in a wooden house, you need to take care to protect the surfaces of the walls and ceiling.
- The section of the ceiling that is located above the heating device is best made of gypsum fiber, which should be covered with gypsum putty.
- Lightweight steel-lined wall screens are only suitable for ovens that are used occasionally. As a rule, a stove for permanent use requires a wall-mounted brick screen.
- To create a lightweight screen, a basalt sheet is first mounted on the wall, and on top is a ready-made stainless steel protective screen, which not only performs a fire-fighting function, but also looks very stylish.
Wooden walls located near the installation site must be treated with fire retardants: special impregnations and mastics. This procedure is mandatory for beams and load-bearing structures. Also, the walls and floor where the equipment is installed should be coated with fire retardants.
Common mistakes when shielding furnaces
- Sometimes a wooden fence is erected around a metal stove to prevent accidental burns. Under no circumstances should this be done!
- Ceramic tiles to create a flood sheet are laid directly on the floor. The mistake is that there should be a layer of insulation and a steel sheet under the tiles. The absence of such a substrate is fraught with the appearance of cracks in the seams of the tiles and subsequent penetration of coal into these gaps.
- It happens that first they build a brick portal for the furnace, and lay a blind area close to it. This is incorrect, the fireproof groove must go under the brick, otherwise a gap may form between them.
Column and pile foundation
The need for a columnar foundation first arose in those regions where there is a high probability of flooding or where there is no dense layer of soil close to the surface. Piles are in demand in the construction of multi-storey buildings.
There are three options for arranging a pile foundation:
- Screw pile foundation
. This is a rather expensive option, which, however, is characterized by high installation speed. In this case, steel screws are used that are screwed into the ground. They will be the basis of the foundation. At the top, steel piles are tied together and then a concrete pad is poured. The whole process takes 1-2 days.
Screw piles can withstand even heavy cast iron stoves with brick lining. True, after 50-60 years, the steel rods rot.
- Bored pile foundation
. First, using a drill, a hole of a given cross-section and depth is drilled in the ground. Its walls are reinforced with mesh, a reinforcing structure is installed and concrete mixture is poured. - Columnar pile foundation
. The preliminary stage of work is similar to the drilled base. However, in this case, ready-made wooden or concrete pillars are driven into the hole. This type of foundation is used for the construction of multi-story buildings and placement of structures with a large mass.
To install a stove in a wooden house with your own hands, it will be easiest to equip a pile foundation. It will not require significant financial costs and is quite feasible for the owner of a country cottage, even if he does not have the skills of a builder.
Please note that the foundation for the stove in the house needs to be insulated to prevent the formation of condensation on its walls for cladding. Uninsulated piles are “cold bridges” and shorten the service life of the furnace.
What and how to insulate bathhouse floors
Insulating a floor surface is a rather complex process that has many nuances. It all depends on what the floor will be made of. If it is wooden, then the same materials are used, but if it is concrete, then it is preferable to use completely different ones. Although, for example, expanded clay can be used to insulate all types of floors. It is necessary not to forget about carrying out waterproofing work. This is due to the fact that insulation usually does not tolerate contact with water well. For example, mineral wool loses its quality characteristics.
Choosing thermal insulation materials
Choosing the right insulation is not at all easy. Many experts, not without reason, believe that this process is an art. After all, the market for thermal insulation materials is quite diverse. Therefore, many beginners, as they say, “get their eyes wide open.” They usually purchase the most expensive material. But this does not at all guarantee its quality. Experienced bath attendants are not at all dissatisfied with the insulation materials sold in stores. Therefore, they are experimenting, trying to insulate the bathhouse with completely unexpected objects, for example, bottles.
You can also use ceramic tiles. It is used only where there is a concrete floor. This method has already been tested by many bath attendants who are simply delighted with it. The advantage of tiles is that it eliminates the use of expensive systems and materials. It must be of high quality. It is better to purchase one that can withstand the maximum load.
Insulation of a bathhouse on screw piles
Today, saunas on screw piles are becoming increasingly popular. This is due to the fact that many bath attendants do not want to bother with foundation work. The insulation of such a bath has its own specifics. Insulation work must be carried out after the house has settled on stilts. This will be quite enough. That’s why saunas on stilts are so popular.
To finish the floor surface, you can use wood or tiles; they have good thermal conductivity. You can also walk barefoot indoors. But it is better not to lay a concrete floor in a bathhouse on stilts.
Insulation of a wooden floor
For better stability of the floor structure, floor beams should be used that are in direct contact with the brick foundation. The cranial beam should also be placed on top of the beams. After that, a subfloor is constructed on which the thermal insulation material will be attached. You can use expanded clay, polystyrene foam, slag, and mineral wool.
After thermal insulation work has been completed, you can begin vapor barrier work. Typically glassine is used to protect insulation from steam and moisture.
It is important to take care of the drainage system. However, some wood floor lovers use the removable type. This means that it is not attached with nails, it can be removed
This means that it is not secured with nails and can be removed.
Insulation of concrete floor
It is best to insulate this floor with expanded clay. But you can use perlite and mineral wool. Typically, thermal insulation materials are laid between two layers of concrete. A different technology for insulating a steam room with expanded clay. It can be mixed directly into concrete. You may encounter difficulties when insulating with perlite. The thing is that it can easily fly apart in different directions. Therefore, doors should be tightly closed when carrying out thermal insulation work. Another disadvantage is that it can cause lung diseases. You should always wear a respirator.
Conclusion
Insulation of bathhouse floors is simply necessary. After all, after its implementation, its effectiveness increases significantly. The choice of insulating materials depends on the type of floor. However, insulation will be ineffective if a drainage system is not built and appropriate waterproofing work is carried out.
Leaky floor installation
When building on sandy soils that absorb water well, it is enough to fill in 20 cm of gravel - you will get a kind of filter through which moisture will go into the ground. On clay soils, you must first dig a gutter and take it outside the bathhouse into a septic tank or drainage pit.
Beams are installed strictly horizontally on the foundation with roofing felt laid on it, which can be made in two versions:
- Beam 100x150 mm made of softwood, treated with antiseptic. Its length should provide a ventilation gap of 2-3 cm between the beam and the wall. In the middle of the span, you can install concrete or brick pillars.
- A metal channel with a height of 160 mm, onto which a wooden beam is secured with self-tapping screws. The structure is mounted to the foundation by welding or using anchors.
Advice! To ventilate floors from below, a ventilation gap of at least 300 mm must be provided between the lower edges of the beams and the ground.
Further installation of the covering is made from planed edged boards 30 mm, 2-3 cm short of the walls. They are treated with moisture-proofing compounds and laid on beams, leaving 5 mm gaps between them. The boards are fastened in several places with self-tapping screws.
Installation base
Installing a stove in a bathhouse begins with the design of the base for it. It is worth considering that this is hot metal, which means you will need to shield the floors. To do this, you can use a simple concrete screed or a special base that is fire resistant.
It is important to consider that the boiler must be installed in a bathhouse on a durable surface. A structure loaded with firewood or other fuel, along with stones for steam, is quite heavy. When installed on wood, it will gradually be pressed and deformed.
Preparing the wooden base
If there is a wooden floor, the arrangement must begin from the base. These can be different options:
- Installation takes place on a brickwork pad.
- We are thinking about how to install a boiler in a bathhouse on a pile-grillage foundation.
- A shallow, integral base is used.
Additionally, it would be a good idea to use fireproof protection. Its role is played by a steel sheet or porcelain stoneware slab. With such a foundation, it’s easy to figure out how to install an iron stove in a bathhouse and maintain safety.