How to increase the efficiency of a solid fuel boiler, including one made by yourself
The disadvantage of all solid fuel boilers is that some of the heat is carried away into the chimney, reducing their efficiency - especially with a straight and high chimney. To reduce heat loss and increase the efficiency of solid fuel boilers, you can use the methods that I used in my home.
The first method is to use the energy of flue gases to additionally heat the room
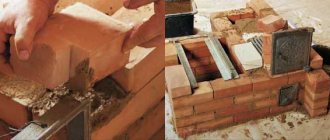
To do this, it is necessary that the solid fuel boiler is located in the basement or on the ground floor of the house and that the height difference between the bottom of the boiler firebox and the upper cut of the chimney is large enough - at least 7 m.
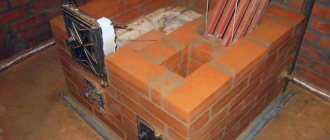
To use the heat that is carried away into the chimney, a heating stove or heating panel is erected in the room or between rooms. The solid fuel boiler is positioned so that it is under the stove or shield. The design of the heating furnace is carried out in such a way that flue gases from the boiler pass through its smoke circuits. At the exit from the firebox of the stove, a valve is installed, which closes when the boiler is fired and opens when it is necessary to heat the stove, for example in the off-season, when the boiler is not yet heated or in another case.
Rice. 7
Option for the location of a solid fuel boiler (horizontal) in the house: 1 - heat exchanger; 2 - boiler body; 3 - slab or 14 - brick vault (optional); 4 - return; 5 - circulation pump; 6 - shut-off valves; 7 - pipe with heated water (supply); 8 - stove firebox; 9 - oven; 10 - valves; 11 - floors; 12 — expansion tank of the heating system; 13- smoke channels of the furnace; 15 - combustion door; 16 — blower chamber.
If you build a heating panel instead of a stove, then there are no problems at all, since it consists only of smoke channels. The length of the smoke channels is calculated as when laying the stove.
With this option, the smoke channels of the stove or panel accumulate part of the heat of the flue gases from the boiler, and subsequently release them into the premises. Even when the heating radiators have already cooled down, the walls of the stove radiate heat for a long time, which would simply go outside.
The second method is to use gas energy to heat water.
In addition, you can install a homemade water heater on a solid fuel boiler, the water in which will be heated by hot gases coming out of the boiler through a metal chimney. The easiest way to make such a water heater is from two pieces of metal pipes with a diameter of 300-400 mm and 100-110 mm. The inner pipe serves both as a chimney pipe for a solid fuel boiler and as a heating element, transferring the energy of flue gases to water.
Air type register
The main purpose of the heat exchanger is to transfer energy from the combustion products in the chimney to the coolant, which is water or air. Heat exchangers installed in chimneys (this applies to water modifications) are often called economizers.
These devices collect and transmit heat into the room, which simply goes into the atmosphere, so that the thermal energy generated by the furnace is used to the maximum. In addition to ordinary tap water, other liquids are sometimes used - oil or anti-freeze.
In this regard, all devices are divided into two large categories:
- air;
- liquid (water).
The choice of one type or another depends on several factors. The most important of them are the configuration and material of the chimney, as well as the characteristics of the device itself.
Air heat exchanger diagram. It is considered less efficient than its liquid counterpart, but has a simple design, making it suitable for DIY
Some partitions (dampers) are not soldered, but made movable. By sliding the metal plates in/out, you can adjust the traction force, thereby reducing or increasing the performance of the heating device.
Air heat exchangers are called convectors, since their operation is based on the principle of convection. Cold air from the room enters the device, where its temperature rises due to the influence of hot flue gases. When heated, it moves further through another hole - back into the room or into the heating system.
Choosing the design of the device
When choosing a suitable heat exchanger for a furnace, you should strive to ensure that the total surface area of the finished product is as large as possible. This will ensure the most efficient heating of the room.
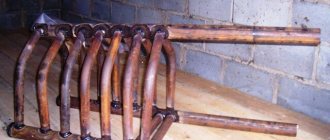
Coil
The most widespread are registers (coils). Such heat exchangers are made from smooth-walled pipes with a diameter of 40 - 50 mm. Outwardly, they resemble a characteristic L-shaped grille. For their manufacture, you can use not only round, but also profile pipes with a similar cross-sectional area.
The return and hot water outlet can be located either on one side of the register or on different sides.
The output option is determined by the design features of the furnace itself and the piping layout of the heating system.
The next most popular are rectangular or cylindrical tanks, inside of which there is a pipe or coil. The length of such a heat exchanger depends on the parameters of the furnace firebox. The heat exchanger installed on the chimney usually has a cylindrical shape. There is a pipe running inside it, the diameter of which is equal to the diameter of the chimney. The pipes are welded from below. Can be used both for heating a room and for heating water.
This design requires special attention. Due to the rapid cooling of combustion products, the draft in the chimney itself is significantly reduced. This helps slow down fuel combustion.
Installing the product on a heating and cooking stove requires special attention. Care must be taken to ensure that hot gases pass over the top shelf and enter the chimney at the front of the firebox.
In this case, the cooking plate can be located directly above the heat exchanger. It is also possible to manufacture a register without a top shelf. The so-called shelf consists of lower and side parts connected to each other by pipes.
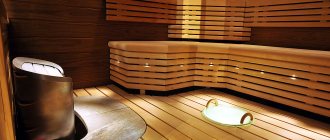
What it is
A heat exchanger for a bath is a device that transfers heat coming from hot water up the pipe. The operation of the structure is based on the properties of the liquid. When heated, the hot water in the bath moves through a heat exchanger through a pipe into a tank located in the steam room. Cool liquid enters for heating, replacing the vacated space below. The heat exchanger in a furnace is often small. This allows the liquid to heat up at high speed. Two sections of pipeline are located at the bottom and top of the device.
The heat exchanger for the stove is located in the steam room; there are ways to place the washing compartment. Water flows independently along the lower pipe and provides operating temperature for washing when leaving. A heat exchanger for a sauna stove can be purchased inexpensively by installing the structure into the stove. The absence of adjacent devices will not disrupt the overall style of the room. A heat exchanger installed on the chimney pipe into the bathhouse significantly saves space. Methods for heating water in a bath from a stove
The heat exchanger for a bathhouse stove can be installed anywhere, at the owner’s discretion, if the model is chosen correctly. The device provides different methods of heating water:
- The “samovar” type model is located on the chimney. Warm smoke passes through the pipe, heating the water. The tap is attached to a reservoir containing warm liquid. The heating option is suitable for the compartment in the bathhouse where the shower is located.
- The stove with a heat exchanger for a samovar-type bath is small and allows the location of the tank in the washing compartment. The device heats the water.
- The heat exchanger for the bathhouse is located on the chimney.
- A reservoir plus a chimney involves heat transfer, in which internal energy is moved by water flows. Heat exchangers for stoves without controlled heat exchange are installed in the steam room. Heating is carried out in contact with the wall of the chimney pipe. The model is not protected from heat, which can lead to boiling of the liquid in the tank.
Chimney - a convector with a built-in heater is mounted in the stove and is also located near the chimney. The tank is connected by pipes with a register for the sauna stove inside the pipeline.
It is necessary to buy a heat exchanger for a heating furnace based on the choice of a specific model with special technical characteristics. Choose a design that is located inside the stove for engineering reasons. It has only one drawback - scale accumulation. Near the chimney, the water heats up slowly, but the high efficiency and the existing possibility of quick repairs can be arguments for deciding to purchase the device.
Varieties by design
Depending on their location, heat exchangers can be internal or external.
External
Placed near the chimney. This is the container that “surrounds” the chimney. Heating of the coolant occurs due to the heat that the products release during combustion.
A part of the pipe is placed inside the container, which removes combustion products. Such heat exchangers are easier to maintain. They can be easily dismantled to remove scale and eliminate defects.
Domestic
This is a container located inside the stove, directly above the firebox. The device is easy to install, but if it becomes necessary to descale the device or eliminate defects, problems will arise.
Pipeline installation
We have already mentioned that for pipelines it is better to use pipes with a diameter of 3/4″; this diameter is most often used in all heating systems and is suitable in all respects for a bathhouse heat exchanger.
Pipes can be metal or plastic. You can also use flexible corrugated hoses, but you need to keep in mind that they have a significantly smaller nominal diameter, and this negatively affects the speed of water flow.
Let's give some tips on installing pipelines.
- Try to reduce the length of the pipelines as much as possible; do not make many turns or bends in the pipe. Your task is to create the most favorable conditions for water circulation.
- When using plastic pipes, do not allow them to overheat at the junction with the heat exchangers. The presence of water inside will prevent their complete breakthrough due to loss of strength caused by heating, but deformation is possible.
- Don't forget to place the drain valve in the lowest place. If the bathhouse is not used for a long time, then in winter you need to drain all the water from the system.
- When connecting pipelines, provide for the possibility of dismantling them to perform repair or routine maintenance work.
- Try to keep the length of horizontal sections of the pipeline to a minimum. Install all such sections at an angle of at least 10°. Such measures have a positive effect on the speed of water flow.
Prices for flexible corrugated stainless steel tube
flexible corrugated stainless steel tube
When using heat exchangers, some problems arise that can “spoil your mood.” What are these problems and how can they be solved?
You need to “catch” the moment when it will be acceptable, but such a “moment” is almost impossible to catch. The fact is that while taking a shower, the stove continues to burn, and accordingly, the water temperature constantly rises. What to do? Putting out the fire in the stove? This, of course, is not an option.
We suggest solving the problem using a mixer. If there is a water pipe in the bathhouse, great; it will help not only create a comfortable temperature, but also, using simple automation, make filling the water container automatic. It will be possible to wash without saving water, and the risk of it boiling in the heat exchanger will be somewhat reduced. If there is no water supply, we recommend installing an additional container for cold water next to the warm water tank. It must be connected to the shower through a mixer.
This happens especially often during installation of the heat exchanger directly in the furnace firebox. We guarantee that you will never be able to calculate the parameters of the heat exchanger in such a way as to completely eliminate such a phenomenon. The calculations are too complex and there are too many unknown and unregulated indicators. Calculations based on the speed of water flow can only be performed by a qualified design engineer who has an excellent knowledge of the laws of heat engineering, hydraulic engineering and installation. But the most important unknown quantity is the flame in the furnace.
No one will ever be able to say exactly how much heat a stove produces in each individual unit of time. It is impossible to quickly increase or decrease the flame intensity depending on the water temperature. We propose to solve the problem of boiling water using ordinary single-phase water pumps for heating systems. They are built directly into the pipeline, the power of the devices is 100÷300 W. Installing a circulation pump not only eliminates the risk of boiling, but also significantly speeds up the water heating time.
We hope that our information will be useful for bathhouse owners and will make it possible not to solve problems with heat exchangers, but to prevent their occurrence at the stage of manufacturing and installation.
Video - How a universal heat exchanger works in a sauna stove
Traditionally, stoves are used to heat private homes. However, due to design features or an increase in the area of the room, their power is not enough to effectively heat the entire building. In this case, we have to look for ways to increase heat transfer at the same cost. If you wish, you can make a heat exchanger for the furnace with your own hands. This will significantly increase the level of heat transfer.
Step by step guide
Manufacturing of a ductless heat exchanger
- Prepare a container, preferably metal, plastic will take longer to heat up.
- Place the tank at the beginning of the heating system.
- Make 2 holes in the container for exits. One is at the top, through which hot water will be discharged. The second is at the bottom, cold liquid will flow from the system pipes.
- Place the outlets correctly; the rate of heat transfer will depend on this.
- Seal the holes hermetically so that the air temperature is not wasted on the battery, and the room is evenly heated.
- Use copper for the tube; it should bend well and transfer maximum heat into the room.
- Bend the tube into a spiral shape to create a coil.
- Place the spiral in the tank, the ends of the tube need to be brought out, and secure them well.
- Connect a threaded fitting to the ends of the parts.
- Connect a power regulator to the pipe; you can buy it in a store, it’s inexpensive, so you shouldn’t get hung up on making it yourself.
- The system will work properly without a regulator, but it is needed to regulate power and save energy. The power can be set at your discretion.
- Connect the terminals to the thermostat, and then the power wires.
- To prevent the tank from wearing out due to temperature changes, install an anode.
- Close all elements hermetically.
- Fill the tank with water, the heat exchanger is ready.
Water
The device has two sectors that heat each other. Water circulation at high power occurs in a closed circuit in the heating system tank, where it heats up to 180 degrees. After flowing around the installed tubes, the water is directed to the main system, where the heating temperature increases.
To make a water heat exchanger, prepare:
- Container in the form of a steel tank. Install it to the beginning of the system. For water circulation, 2 pipe branches are needed, the lower one for cold water inlet, the upper one for hot water inlet.
- Check the tank for leaks.
- Place copper tubular spirals inside the tank; 4 meters of pipe per 100 liters of tank is enough.
- Connect the power regulator to the copper tube.
- To prevent pressure and temperature changes from destroying the container, install the anode closer to the heating element.
- Seal the tank hermetically.
- Fill with water.
- Check the system in operation.
Lamellar
The one-piece design block consists of alternately placed plates with hot and cold media. There is no mixing of media, since the seal is rubber and multi-layered. Plate types are difficult to make by hand; the tightness of the internal plates is important, and this requires special equipment.
Pipe in pipe
The exchanger consists of a large pipe and a smaller one inserted inside. The media moves through a smaller pipe and is supplied to the outer pipe for cooling. Design:
- easy to manufacture;
- easy to clean;
- durable;
- applicable to any coolant;
- unlike a plate pipe, it can operate under pressure;
- By changing the size of the pipes, you can select the optimal speed for the movement of the liquid.
To prevent pipes from costing you a pretty penny, carefully calculate the material consumption.
To make the structure, select two copper tubes in diameter, one larger than the other by 4 mm for a gap:
- Side weld the tee to both sides of the outer pipe.
- Insert a smaller diameter tube, weld the ends of the large tube, fix the position of the smaller pipe.
- weld short tubes to the tees at the outlet, liquid will move through them.
- When using steel material, increase the surface area, assemble the battery from exchangers separately.
- Connect the tubes in segments, weld them alternately to both tees to form a snake.
Materials for heat exchangers
Most often, the heat exchanger is made as a pipe structure. This is understandable, because the pipe already in its finished form has a cavity through which water or other liquid can move. And accordingly, pipes made of different materials can be used in the process of manufacturing a heat exchanger.
- Plastic pipes, this also includes metal-plastic. If we compare them with steel pipes, it can be noted that their thermal conductivity is two hundred times lower than that of steel.
- But a copper pipe has a higher thermal conductivity than a steel pipe. And this difference is 7.5 times.
Now imagine how many meters of each pipe are needed so that they equally provide heat to the coolant passing through the pipes. Offhand it looks like this:
- The metal-plastic pipe will need 4000 m.
- Steel – 25 m.
- And the copper one is only 3.5 m.
Now it becomes clear which material is better and which should not be used at all. Let us immediately make a reservation that these compared indicators are taken for pipes of the same diameter. The only thing that confuses me about this ratio is the cost of the pipes. For example, 3.5 m of copper pipe costs almost the same as 25 m of steel pipe. In addition, steel is stronger and can withstand thermal loads better. But copper is more ductile, which allows you to avoid complex installation and assembly processes and give the heat exchanger a different shape, moreover, without much difficulty. That is, these small deviations still have to be taken into account when choosing a material for making a heat exchanger with your own hands.
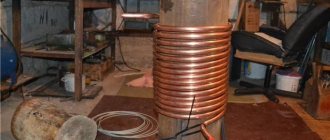
Copper heat exchangers
A furnace with a copper heat exchanger, of course, works several times more efficiently. The plasticity indicator of a material makes it possible to minimize its size, for example, by twisting it into a spiral. By the way, the size of the heat exchanger itself does not in any way affect the performance of the device, because in this design the most important indicator is the heat extraction area. This means that the more turns of the spiral there are in the device, the larger the contact area.
Made from copper
Currently, a homemade copper heat exchanger can work in different ways. There are two ways to heat the coolant:
- Pass it through the internal cavities, transferring thermal energy from an external source. This is basically how all traditional heating boilers and furnaces work.
- Pass the coolant through the inter-tube space, and pass the energy carrier, for example, saturated steam, through the internal cavities of the heat exchanger.
That is, the technology for heating the coolant will depend on what heat source you will use. By the way, such systems can work not only for heating, but also for cooling.
Steel version
It is not easy to make steel heat exchangers for a furnace with your own hands. To do this, the home master must have the skills to work with a welding machine and other plumbing tools (especially a grinder). Such a device requires a thorough approach. Eg:
- To make a heat exchanger with your own hands, you need a heat-resistant steel pipe with a wall thickness of at least 5 mm.
- A qualified welder can weld such a thickness without leaving shells or other defects.
- It is necessary to select the design of the unit so that it exactly matches the design of the boiler combustion chamber. And not only in terms of size, but also in shape, and in the precise and uniform arrangement of parts and components. This requires engineering knowledge.
- It is necessary to understand the issues of heating engineering. A small mistake can lead to the fact that the heat exchanger seems to be in the heat energy extraction zone, but it turns out to be insufficient to provide the heating system of the house.
Seals.
If the fitting has a threaded part with a nut, thanks to which it can be secured in the casing body through rubber seals, then the tube of the stainless coil must somehow be passed through the plastic of the casing, and in such a way that water does not leak. For these purposes, I had to make a cunning homemade rubber seal (2 pieces) (see picture) with a groove for plastic.
Using a sharpened large-diameter tube, I cut out two cylindrical seals from thick sheet rubber (thickness about 14mm). Then, using a smaller tube (d < 10mm), central holes were made in each seal (a dashed line passes through them in the figure). Then the seals were mounted on a suitable bolt, the bolt was clamped into a drill and, using a piece of a square needle file, grooves for the plastic were machined (turned, loudly said, rather rubbed) on the rubber seals:
Important! The hole in the plastic of the plumbing pipe covers was drilled in such a way that the rubber seal was inserted into the plastic very tightly. Thus, after insertion, the central hole (which was already made with a diameter of slightly less than 10 mm) was additionally crimped. When inserting the coil tube, the rubber is sandwiched between the coil tube and the plastic hole, thereby sealing the joint. No additional sealants (silicone, etc.) were used.
How to select or calculate the dimensions of a furnace boiler
After you have chosen the type of heat exchanger, you need to decide on its dimensions. On the one hand, its dimensions must correspond to the size of the place where it will be installed.
Most often, heat exchangers are placed in the firebox of a stove, but sometimes in the smoke ducts or chamber of a ductless stove. It is necessary to take into account that there should be a gap of 0.5-1 cm between the brickwork and the register, taking into account the thermal expansion of the metal.
In addition, you need to know the required power of the furnace heat exchanger. How to determine it?
It depends on the thermal power of the water heating system required to heat the house, which in turn depends on the thermal insulation properties of its external structures and the maximum negative outdoor temperature in winter. In a simplified way, you can focus on the average: 10-12 kW per 100 m 2 of house area.
How to calculate the required area of a furnace boiler to provide such thermal power? On average, it is generally accepted that to provide a thermal power of 5-10 kW, about 1 m 2 of the heat exchange surface of the boiler is needed. The value of this indicator depends on the temperature of the hot gases in contact with the heat exchanger and the temperatures of water (coolant) at its outlet and inlet, which in turn largely depends on the combustion mode and type of fuel.
The total power of the heat exchanger can be calculated using the formula:
Q=SQsp,
where: Qsp – its specific power, kcal/hour; S – its useful area (contact with the heating medium), m2.
Specific power can be calculated using the formula:
Qsp = k(Tt)S,
where: k=12 kcal/hour per 1°C – gas-water heat transfer coefficient through a steel surface; T = (Tmax+Tmin)/2 – average temperature of the heating medium (flame, gases), °C; t = (tmax+tmin)/2 – average coolant temperature (input+output/2), °C.
If the stove operates periodically (about 2 hours) on wood, then the average temperatures of the medium and coolant will be a maximum of 500 and 70 ° C, respectively, and from 1 m 2 of heat exchanger in this case it will be possible to obtain a maximum of 6 kW of thermal power.
If the furnace operates on coal and continuously, then the average maximum average values of the medium and coolant can be: 800 and 70 °C, respectively. In this case, about 10 kW can be removed from 1 m2 of furnace boiler area.
If the total required thermal power of the boiler and the combustion mode (and therefore its specific power) are known, then it is quite possible to determine what useful surface area it should have:
S =Q/Qsp, m2.
Depending on what material the heat exchanger will be made of, you can calculate how many pipes or sheet metal will be required to provide such a contact area with the heating medium. In this case, only the surface that will be in direct contact with hot gases or flames is taken into account.
For example, if the furnace boiler will be made solid (only from sheet metal), then only its inner surface should be taken into account. If it is made of pipes, then almost their entire surface will participate in heat exchange (their length x diameter x 3.14). When combining different materials, it will be necessary to calculate the area of contact with the heating medium of each element separately, and then sum it up.
If it is necessary to increase the thermal power of the boiler with the same overall dimensions, additional elements (for example, pipes) can be added to its design. If its power is too great, then its length can be reduced. In other words: in each specific case, it is necessary to calculate and adjust the register dimensions, linking them to the size and design of the stove itself, as well as the power of the house’s water heating system, which will have to be provided with thermal energy.
DIY making
After you have selected the type of furnace boiler, the material and calculated the dimensions, you can begin making it yourself
In this case, it is necessary to pay attention to the quality of welding work. It must be at a high level, since this unit will be operated in a fairly aggressive environment, and in order to repair it, most likely, you will have to disassemble the stove or part of it
Therefore, if you are not confident in your welding abilities, then it is better to entrust this work to an experienced specialist, having previously prepared all the necessary structural elements.
After completing the welding work, it is necessary to fill the register with water, check for leaks and perform pressure testing at a pressure that is at least 2 times higher than the working pressure in the heating system.
Liquid devices
During the manufacture of liquid heat exchangers, in order to make them safer, the core is placed in a metal casing. At the same time, insulation is placed in it. Often, when creating the described devices, basalt wool is used.
Such products are fixed to the chimney, which helps to heat the coolant. If a coil is used, its ends are connected to the heating system. If you create the product yourself, you should make a coil from copper. This is due to the fact that this material has high thermal conductivity.
Some homeowners use metal products, but to increase efficiency they have to significantly increase the size of the structure.
Coolant circulation is carried out as follows:
- first, the liquid heats up, resulting in an increase in its volume;
- after that it rises along the coil;
- after this, the liquid is sent to the radiator;
- the cooled coolant is displaced and directed to the heating element.
In order for the system to work efficiently, it is necessary to calculate in advance such parameters as the length of the heating element and the diameter of the pipes used to create the system. If these parameters are not taken into account, the system will not work effectively. In some cases, due to errors made during the creation of the system, water hammer occurs.
When installing a heat exchanger on a chimney pipe, you should remember that the design must be safe. Its heated parts must not come into contact with materials that could catch fire.
Choosing material
The coil is traditionally made from a pipe, the length and diameter of which are determined by the desired level of heat transfer. The efficiency of the structure will depend on the thermal conductivity of the material used. The most commonly used pipes are:
- copper with a thermal conductivity coefficient of 380;
- steel with a thermal conductivity coefficient of 50;
- metal-plastic with a thermal conductivity coefficient of 0.3.
Copper or metal-plastic?
With the same level of heat transfer and equal transverse dimensions, the length of metal-plastic pipes will be 11, and steel pipes will be 7 times longer than copper ones.
That is why it is best to use annealed to make a coil.
We are looking for improvised means
Considering the high cost of materials, it would be appropriate to consider the possibility of using products that have already served their purpose, but have not yet fully exhausted their service life. This will not only reduce the cost of manufacturing the heat exchanger, but will reduce the time for installation work. As a rule, preference is given to:
- any heating radiators that do not leak;
- heated towel rails;
- radiators from cars and other products of similar design;
- instantaneous water heaters.
Most often, a metal tank with a capacity of up to 5 liters with built-in pipes acts as a heat exchanger. There is no direct contact with fire. The device allows you to heat cold water, which then flows into radiators or a removable tank of larger capacity located in the same or an adjacent room.
As a result, by heating the stove in one room, it will be possible to heat another. According to its design, the heat exchanger for a furnace can be external or internal.
External
This type is very similar to a tank filled with coolant. Inside the container there is a part of the pipe used to remove combustion products. In terms of its design, the external heat exchanger is more complex than the internal one, as it places increased demands on welding work.
However, its maintenance is much easier. If necessary, the tank can be dismantled to remove scale or eliminate leaks.
Interior
Mounted above the firebox directly inside the stove. It is easy to install, but if maintenance is necessary, certain difficulties may arise. Especially if the stove is made of brick.
To avoid this, at the time of design development it is worth taking care of the maintainability of the future heat exchanger.
Comments: (9)
| Good to know 11/17/2016 | |
| What if it's made from copper? Will you have to clean it often? | |
| admin 20-11-2016 | |
| Made of copper? It is possible, but is it necessary? Clean the coil from the inside only chemically (citric acid?). I can’t tell you how often. | |
| sergey 29-11-2016 | |
| Stainless steel tubes for the coil need to be seamless or can be suture | |
| admin 29-11-2016 | |
| I had a seamless one. It seems to me that it is more important that it be made of food grade stainless steel, and whether it is seam or seamless does not matter. You're not going to shoot from it. | |
| Vladimir 01/17/2017 | |
| Were there any problems with sand spilling out of the tube? | |
| admin 01/19/2017 | |
| Absolutely no problem, take out the wooden plugs, lightly tap on the coil and the sand pours out. When everything is poured out, you can blow out the pipe and rinse it with tap water. | |
| Vladimir 03/12/2017 | |
| how can I order one from you? | |
| admin 15-03-2017 | |
| I'm sorry, but I can't help with this. The coil was made for a good friend and therefore the investment of time and effort was not critical. | |
| Alexander 23-12-2019 | |
| Very intelligible and quite realistic for repetition, thank you! I want to use it for pasteurization of wine. Is it (dry wine) also classified as “low concentration alcohol solutions”? | |
Features of brick kilns
All types of structures of this type have been known for several hundred years and have long proven their reliability. But when giving preference to such heating, you need to weigh the pros and cons.
What's good about this option?
- If you try to heat a house using a conventional solid fuel stove, then on average 1 m² of construction can heat 30 m² of a standard house with ceilings up to 3 m. Accordingly, it turns out that the larger the house, the larger the stove needs to be built. A system with built-in water registers generates 2.5 times more heat and can have a fairly modest size.
- If the instructions for laying the structures were carried out in accordance with all requirements, then the stove will serve faithfully for decades. Preventive inspection and cosmetic repairs are within the power of any owner, unlike the option with a solid fuel boiler.
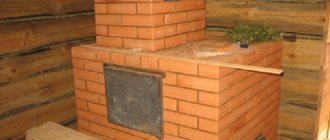
The principle of register heating.
- At the moment, there are several common projects; if a Russian stove is not suitable for every room, plus its installation requires high qualifications, then Swedish or Dutch brick stoves with water heating can be built with your own hands, if you really want to.
- Another positive aspect of such heating is that in this case it is not at all necessary to build complex multi-channel structures; if there is no question of the presence of a frying surface, then such a system can be mounted on the basis of a conventional fireplace.
Important: if the maximum efficiency of a traditional brick structure does not exceed 50%, then using good registers, proper piping and a heating circulation pump embedded in the system. Efficiency can reach up to 85%, which is quite comparable with modern solid fuel boilers
Scheme of a stove with a heating boiler.
- The price of building materials and fuel plays an important role. The structure itself can be made from material left over after the construction of the house. As for fuel, firewood, coal or briquettes are not exorbitantly expensive types and are quite affordable for almost everyone.
- Most designs are equipped with a frying surface and an oven, which allows you to cook food at the same time.
System flaws
It will take time to run the system at its designed capacity; unlike electrical units, it will take at least half an hour to heat up the brick walls of the structure and the coolant in the pipework.
Heating diagram from a fireplace.
- When compared with solid fuel boilers of comparable power, the dimensions of such structures will be much larger. Plus, they usually need to be installed in the center of the home, which takes up quite a lot of usable space.
- Any solid fuel heating system provokes the formation of quite a large amount of dust. No matter how hard you try, you will need to clean the room where the brick oven is installed much more often.
- All structures of this type are classified as objects of increased fire danger. They cannot work offline. In addition to the possibility of a fire, there is also the danger of carbon monoxide spreading due to improper operation or boiling of the coolant in the system, which is also fraught with unpleasant consequences.
Date: September 25, 2022
Tips and tricks
As you can see, making a heat exchanger yourself is not difficult. For a simple design, a tank, two copper tubes of different diameters, a coil and a fan are enough. Thanks to the device, you can not only heat the room, but also cool it.
A thing like an exchanger in one form or another is found in almost every home. Approach the work constructively and thoroughly, prepare drawings, decide on the choice of material, follow the instructions described above for the manufacture, assembly and connection of the device.
If you wish and follow consistent steps, you will assemble a design no worse than a store-bought one, the house will be warm and cozy, and the device will work flawlessly for a long time.