The bathhouse is the favorite place to relax for the vast majority of people. By visiting the steam room, you can relax your soul and body, gaining strength for further work achievements. There is a room with a steam room on every second plot of land, so the question of how to properly repair a bathhouse will sooner or later interest everyone.
Repairing a bathhouse with your own hands or with the help of specialists has to be carried out in a number of cases:
- the building has been in use for a long time and problems have already appeared that cannot be ignored or solved with simple cosmetic repairs;
- There is a bathhouse on the site that has not been used for its intended purpose for a long time. In such a situation, what is needed is not a simple repair, but a complete reconstruction of the bathhouse;
- When purchasing a log house that has been in use for a long time, it is necessary to carry out repairs and partial modernization.
Most often, repairs are required in an old bathhouse that is operated in unfavorable climatic conditions, for example, with a significant difference in temperatures in summer and winter. In such conditions, the wooden components of the bathhouse are the first to suffer, that is, almost the entire structure, from log walls to shelves.
Preparation for restoration
Before starting work on restoring the premises, you should carefully inspect it and check the condition of all systems and parts. The most important part of preparation is the foundation inspection. If cracks or other serious damage are found on its surface, reconstruction of the bathhouse does not make sense. In this case, it is easier to build a new building; you can also consider the option of moving it to another base.
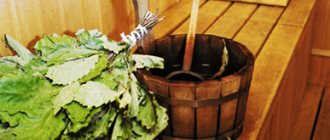
Interior of the bathhouse Source arma.ks.ua
Inspection of the structure
The purpose of the event is to identify faults, determine a method for correcting them and compile a list of necessary materials and work.
The audit is performed as follows:
- inspection of external walls - the condition of the insulating material, the presence or absence of cracks, crevices, gaps, rot, the integrity of corners and other wall structures is checked;
- inspection of the base - checking for the presence or absence of flaws;
- inspection of the roof and ceiling - the general condition of heat, water and thermal insulation materials is checked, as well as the presence or absence of defects;
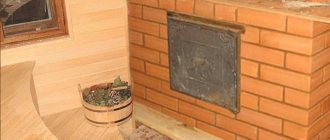
- inspection of the stove and chimney - the presence or absence of certain damage or burnout is checked, as well as the condition of the lining, if any;
- inspection of doors and windows - checking the presence or absence of distortions, cracks, chips, gaps, cracks, as well as tightness;
- inspection of the floor - the general condition of the insulating materials is checked, the presence or absence of fungus, termites, cracks, crevices and other defects, as well as the “health” of the finish, if any;
- inspection of internal walls - the presence or absence of cracks, cracks, chips, gaps and other defects is checked, as well as the condition of the facing material, if any;
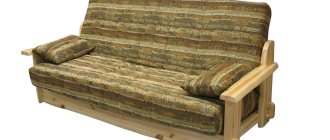
- inspection of interior items;
- inspection of water supply and drainage systems;
- inspection of electrical wiring.
After assessing the condition of all elements of the structure, an estimate is drawn up, materials are purchased, and repairs are made.
Dear friends, just a moment! To ensure that the purchase of raw materials does not “eat up” all the money available in the bins, it is advisable to inspect the bathhouse annually and carry out light cosmetic repairs regularly.
Floor reconstruction
The flooring in the steam room is usually made of boards, the thickness of which ranges from 35 to 50 mm. Before laying, they are treated with protective agents to prevent damage from humidity and temperature changes. Water procedures and exposure to steam quickly render the material unusable, so care should be taken to extend its operation. Before starting to finish the walls and ceiling, work always begins with replacing the floor.
Repair of the floor covering can be complete or partial, depending on its condition and planned changes in the structure of the building. If several boards have become unusable, but the overall appearance of the floor is relatively normal, then there is no need to completely replace all the material. It is enough to carefully inspect the premises to assess the scope of the proposed intervention. Replacing rotten boards with new ones in most cases allows you to refresh the appearance of the steam room and prevent its further destruction.
If during the reconstruction of the bathhouse it is planned to change the sewerage system, the entire floor will have to be completely replaced. This is necessary when you plan to add another type of wastewater drainage. In such a situation, all boards are removed from the floor, damaged ones are thrown away, and intact ones are thoroughly dried and treated with antiseptic agents. The surviving material can then be re-laid onto the floor along with new wood.
Reconstruction of flooring Source par-torg.com
Mandatory elements of a wooden village house
Houses in the suburbs are often built of wood, and if not, then it is sure to be present in the interior of any rustic style. It is worth highlighting three main features characteristic of a house in a village:
- a real fireplace, stove or decorative versions thereof;
- the presence of an attic or second floor;
- a lot of light, mostly natural.
All rustic styles are characterized by the use of only natural materials, so at the design stage it is necessary to eliminate plastic, synthetics and artificial materials.
Country style kitchen
If the house in the village is small, you need to properly plan it. Each residential building must have the following premises:
- kitchen;
- living room;
- bedroom;
- veranda, terrace or at least porch;
- basement.
Wall insulation
Reconstructing a bathhouse is a difficult task, as a result of which you can get a completely new room, warmer and more convenient for use. In order for the result of the work performed to be satisfactory, it is necessary to take care of eliminating all damage that occurred during the operation of the building. These include cracks and crevices in the walls, which inevitably arise from high humidity in the steam room. They need to be sealed so that the heat remains inside the room longer and the rate of its warming up increases.
Most often, the main damage appears on the outer surface of the walls. This is due to their location at the transition between different temperature conditions. You can eliminate cracks using various methods - for example, tow or regular polyurethane foam work well. The choice of material is not so important, the main thing is careful treatment of the damaged areas.
To make the bathhouse even more comfortable, special insulation is used. For wooden buildings, mineral wool or polystyrene foam, which are placed under the finishing materials, is well suited.
Thermal insulation of walls Source banya-expert.com
Selection of materials and finishing tools
Before you start repairing an old bathhouse with your own hands, you need to prepare the tools. It is separately recommended to draw up a list of works in order to calculate the required amount of consumables. 10–15% should be added to the resulting amount.
Materials
The required materials can be divided into two groups:
- for cladding;
- for heat and waterproofing.
To carry out major repairs, you will need bricks, metal profiles, beams, boards, foam and gas blocks.
Advantages of using aerated concrete
For cladding
Building materials for cladding:
- tiles, decorative and natural stone;
- lining, plinths;
- platbands;
- paint, putty, plaster;
- linoleum, laminate.
For heat and moisture insulation
Materials:
- mineral wool;
- mineral wool with a foil layer;
- mastic for coating surfaces;
- foil;
- vapor barrier film;
- roofing felt;
- penotherm
Tools
List of required tools:
- Miter saw;
- hand saw for wood;
- grinder with discs for metal and stone;
- set of chisels;
- hammer, nails;
- screwdriver, self-tapping screws;
- chainsaw, jigsaw;
- spatulas, trowel, pry bar;
- set of keys, screwdrivers;
- building level, tape measure.
After preparing the consumables and tools, you can start working.
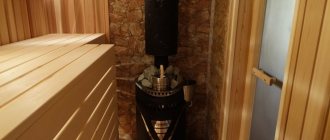
Heating system update
The heart of any type of steam room is its stove, which performs the most important function during bath procedures. This element must be in good working order, so it is checked in the bathhouse first. If an old building is being modernized, its furnace may need to be thoroughly cleaned, worn parts will also need to be replaced and the functionality of the entire system will need to be checked.
It makes sense to replace a traditional brick stove with a modern boiler. This device can be purchased at a store or made independently. The boiler has the following advantages:
- Small sizes;
- Greater heat transfer compared to a stove;
- Easy to use and upgradable.
If desired, the stove can be left in place, putting it in order and removing minor damage. To do this, you need to carefully inspect it, check its functionality and safety. The last stage of repair involves painting the device with chalk or lime.
Installing a stove Source stroy-podskazka.ru
I'm getting down to business
The proposal to seriously insulate the bathhouse was rejected. “Will we heat it a lot in winter? It’s good if we get together two or three times.” And in general, I didn’t see the need for serious insulation either, since everything was done quite well. Our plan also did not provide for any global work.
I decided to start with interior work. Everything unnecessary was removed from the bathhouse. The shelves, backrests, and bench were carefully dismantled and taken out. The interior doors were also removed and the windows from the dressing room and washroom were exposed. I de-energized the wiring and cut it off. The ceiling boards and wall beams were treated with an antiseptic, according to the principle: “you can’t spoil porridge with oil.” During processing, ventilation holes were discovered. One is between the dressing room and the steam room, in fireproof brickwork, next to the stove, the other is in the steam room, on the wall opposite the heater, in the corner under the ceiling (they were covered with rusty and dirty iron bars and almost merged with the wall).
Next, I switched to the floor, since I had to “dust” it, and I didn’t want to dirty the lining. Carefully dismantled the finished floor, mercilessly tore out and threw away the rotten subfloor. I carefully examined the joists and lower crowns. Everything was in order, no replacement was required. The drain pipe from the pan went beyond the foundation and ended in a small drainage hole, which, of course, needed to be updated, since the drainage there had long ago mixed with the ground, and it was noticeably overgrown. I carefully treated the crowns and joists with an antiseptic.
Then he removed a little soil, covered the bottom with a thick black film (200 microns), with a decent overlap (both among themselves and on the foundation bricks, however, without blocking the air ducts), and taped the seams with moisture-resistant tape. I covered it with different fractions of expanded clay, a little short of reaching the top of the joists, the thickness of the expanded clay layer was about 20 cm. I sanded the finished floor boards in the yard, they needed to be sanded properly, but I don’t have a sanding machine, I made do with a powerful belt sander. I treated them with an antiseptic and secured them back. The drain pipe was brought out in the same place.
Water source
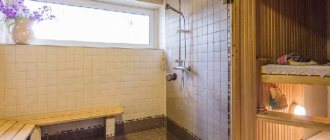
Reconstruction of old baths necessarily includes the addition of a water supply system, which is often missing in steam rooms built long ago. It is difficult to imagine complete comfort if it is impossible to steam and rinse properly. Therefore, it is imperative to correct this situation.
Water for a bath can be supplied from almost any source. Both a well and a centralized supply from a water supply system are suitable. The most important thing here is to install the pipes correctly so that they are not damaged in winter. To do this, they are placed below the freezing level of the soil, and under the floor covering they are carefully insulated. In unheated bathhouses, it is imperative to organize the possibility of draining water so that the pipes do not freeze in winter.
This problem is easier to solve if the bathhouse is connected to a well or well located nearby. In this case, the pipes are laid in such a way that the slope is towards the source. Also, the restoration of the bathhouse includes the installation of taps, with the help of which water will drain from the heating and heat exchange systems.
Shower in the washroom Source banya-expert.com
Doors, windows and shelves
The windows had old, peeling paint, and the interior doors were homemade panels. It was possible, of course, to take it all apart into parts, clean it and put it back together, but the game isn’t worth the candle: there is a faster and much simpler way.
Glass was removed from the windows, after which both the window frames and door panels were long and carefully annealed with a blowtorch, and then sanded. Then the door panels were covered three times entirely with aqualac, and the window frames also three times, only on the inside. After everything was dry, everything was put in place.
Door and window openings were decorated using trims and corners, then the decoration was removed, painted, dried and put back in place. The shelves, bench and backrests were disassembled into planks, carefully sanded with a sander, first with coarse, then fine sandpaper, treated with oil and installed in their rightful place in the steam room.
Reconstruction of the upper part of the building
To remodel a dry-air bath or any other, you need to pay attention to all the details, including the condition of the ceiling and roof. These structural elements are susceptible to leaks, especially often in the area where the chimney is located. The first step is to check the condition of the roof near the pipe. It is also important to assess the general condition of the ceiling in order to decide on the extent of reconstruction.
To preserve heat, it is advisable to take care of roof insulation. For this purpose, mineral wool and other materials are used. Special attention should be paid to the chimney - there are high temperatures near it, so flammable insulation cannot be used.
Installation of a roof for a bathhouse Source legkovmeste.ru
Flaws
There cannot be ideal designs; the disadvantages of the design under consideration include the following points:
- sufficient complexity of execution without experience in carrying out similar work;
- difficulty in installing exterior decoration due to protruding corners;
- the presence of corner protrusions leads to a decrease in the useful length of the crowns and, accordingly, to an increase in the cost of the log house by up to 10%. This argument is cited as the main one in the debate on the topic of chopping into the paw or into the bowl, which is better. But a felled log house needs enhanced thermal insulation of the corners, which practically reduces real savings to zero. And insufficient rigidity leads to the fragility of the building due to the change in geometric dimensions with the appearance of cracks.
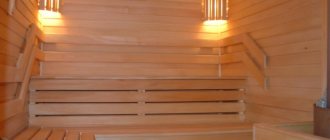
Bathhouse interior renovation
Reconstruction of an old bathhouse also involves replacing the interior finishing, which tends to quickly wear out due to temperature changes. In wooden buildings, window and door openings are especially affected; over time, they crack and become unusable. As a result of frame deformation, their repair becomes impractical; it is much easier to completely replace these elements with new ones. The same goes for doors.
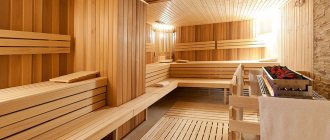
The last thing to be replaced is the interior finishing of the bathhouse. Here you can show your imagination and arrange the room to your liking. Different materials are suitable, the main condition is their safety for health and non-flammability. Wood will look best in a building; this is the traditional choice for Russian and other European baths.
When modernizing a bathhouse, you can add additional elements to it, for example, a veranda for relaxation. This is an interesting and practical solution, but it should be done last, after more important work has been carried out. The thing is that the presence of extensions does not affect the operation of the steam room itself, but a damaged floor or roof can seriously harm it.
Installing a window for a bath Source fleurlili.ru
Reasons for the need for repair work
How to understand that the steam room is “sick”? How do you know when she needs “therapy”? The bath urgently needs to be “treated” if:
- the room heats up extremely slowly;
- the room cools down very quickly due to heat leakage;
- there is a draft in the steam room;
- there is a musty smell in the health resort;
- in the “house of purity” the aroma of burning is felt;
- the room is “decorated” with rot, mold, furrows;
- Condensation often accumulates on the walls;
- the roof is leaking.
The presence of problems from the list is a bell that loudly notifies about the need for repair work.
Cleaning the room
Not only global violations in a bathhouse require the close attention of the owners, but also basic compliance with hygienic standards for the maintenance of a bathhouse.
Cleaning the bathhouse from soot, fungus, resin and other damage will make bathing procedures as beneficial as possible.
Getting rid of mold
Mold that appears in a bathhouse can cause some human health problems: allergies, asthma, disturbances in the normal functioning of the cardiovascular system, headaches, diathesis in children. In addition, mold formations deprive the bathhouse of its aesthetic appeal and create favorable conditions for the destruction of the entire bathhouse structure.
Such negative aspects are unacceptable during constant use of the bathhouse.
How to deal with such negativity as mold in order to get rid of it forever?
First, you need to understand the cause of mold. Impaired air exchange can become a source of mold, so you need to pay close attention to ventilation. Cleaning the ventilation shafts and redesigning the entire air exchange system is what needs to be done to prevent mold from appearing in the bathhouse.
If the bathhouse is not always clean and tidy, then the likelihood of mold formation increases many times over. After bathing procedures, the room should be thoroughly washed and well ventilated.
Moldy areas can be easily removed with regular alcohol. This effective method helps remove moldy deposits both outside and inside wood components.
Iron sulfate solution is also a good helper in the fight against mold. The recipe for the product is simple: 1 liter of water, 22 grams of iron sulfate, 44 g of potassium alum and 18 grams of table salt.
This product is used not only in the garden, but also in the fight against mold in the bathhouse.
Folk remedies for combating mold in the bathhouse include:
- "Whiteness";
- formalin solution (25 ml of forty percent formalin per liter of water).
The modern chemical industry produces quite effective products against mold formations; they can be purchased at construction and hardware stores. Preventive agents are not suitable for getting rid of mold; for this you need chemicals marked - for REMOVAL of mold. After treating surfaces in a bathhouse with chemicals, be sure to thoroughly rinse everything with clean water afterwards to remove any remaining harmful chemicals.
Ventilation is the final stage of treating moldy areas. To avoid the recurrence of mold, the internal surfaces of the bathhouse should be coated with special preventative agents.
Access to fresh air and drainage of the bathhouse are useful measures for preserving the bathhouse
Removing the fungus
The fungus appears in places where there is a particular accumulation of dampness in the bathhouse.
Such damage to wooden structures must be repaired.
This can be walls and ceiling, floor, water drainage area, etc.
When the fungus is already visible to the naked eye, you can use the following means to combat it:
- Mechanical method. You can get rid of visible fungal manifestations using a spatula or iron brush. A drill with a brush attachment and a grinding machine will help speed up the mechanical cleaning process. Removing the entire affected layer and burning it is a feasible task for those who fight the fungus in the bathhouse and do not want it to reappear. Helpful advice: for best results, before starting work, you need to moisten the surface with fungus with water.
- Folk remedies. These drugs are used by those who do not accept chemical treatment in the bath. Copper sulfate, bleach, sulfur, hydrogen peroxide, bleach - these are the means that people use to eliminate fungus.
- Chemical special preparations. Chemical manufacturers produce a wide range of products for combating fungus indoors. You should not save money and buy dubious products; it is better to choose well-known and proven brands.
Antifungal drugs are produced by both domestic and foreign manufacturers
Cleaning from soot
Soot on the walls and ceiling of the bathhouse occurs if the flame is too high during operation of the stove. Another reason for an unpleasant raid is a fire.
It is strictly not recommended to wash in such a bath
Soot is a product that arises from the combustion of firewood, fire briquettes, and any other materials that are thrown into the stove. Most often, this formation does not have a dry, but a fatty substance that should not be rubbed or washed off with cold water.
Under no circumstances should you use toxic materials in the bathhouse to clean soot from surfaces!
When carrying out work, it is best to protect yourself from possible fumes (especially if the soot is the result of a fire) by first ventilating the room, wearing a respirator or a bandage soaked in water.
Using a sander and protecting your respiratory tract while working
It is advisable to wear a hat on your head, and use old clothes, which you don’t mind throwing away later.
In a wooden bath, do not wet the smoked surface with water. Soot is very well absorbed by wood, so additional moisture will promote deeper penetration of soot into the pores of the wood and, accordingly, complicate the process of getting rid of soot.
Step-by-step removal of soot from the surface in a bath:
- Using a vacuum cleaner. The outer dry layer can be easily removed using a vacuum cleaner with a convenient attachment. You can use different nozzles to reach hard-to-reach bath areas covered with soot.
- Using a special sponge with “anti-soot” impregnation. It is better to purchase such a sponge in more than one copy, since soot quickly renders the sponge unusable. You can also use one sponge, constantly cutting off the contaminated layer with a sharp knife.
- Carrying out work on degreasing surfaces. For this purpose, grease-fighting detergents, a brush or a mop with a long handle will be useful. The water for this process should be very hot to make it easier to deal with the fat.
- Remove the soap solution with a clean cloth and dry the room. Change the water often to keep the sauna clean.
The modern chemical industry also offers special products for removing soot. For example, MAZBIT+ is a highly concentrated detergent designed to combat the consequences of fire. Its use will greatly speed up the process of getting rid of soot and make it easier.
Opponents of the introduction of “chemistry” into the bathhouse prefer to make do with folk remedies: river sand with laundry soap, mechanical removal of the soot layer using a grinding machine.
Removing the resin
Wooden rooms with strong heating can intensify the process of resin release. Some people like the smell of this substance, but most bathhouse attendants fight this problem mercilessly. Resin can negatively affect human health and the quality of sauna construction. Of course, to avoid this problem, you need to build a bathhouse from dried material, without using building materials of dubious quality.
How to remove resin that has come to the surface of a wooden surface in a bathhouse?
The problem of resin protrusion is completely solvable
The simplest and most effective way is to simply mechanically remove resin stains using a spatula, chisel or any other suitable device.
Some craftsmen advise making patches in places where resin is actively leaking, using the same wood that led to this problem. You can use a soldering iron and a chisel. To remove resin, use a soldering iron to burn the area near the resin exit, melting the build-up, and then use a chisel to remove all the resin. The resulting hole is filled with shellac and sanded to hide these “patches” and maintain the aesthetic appeal of the bath surface.
Recommendations
In order for the operation of the bathhouse to be a long-term, safe and useful procedure, try not to ignore cleaning the bathhouse after each use. This is not difficult to do:
- sweep away the leaves left from the broom;
- ventilate the room;
- try to remove excess moisture from the walls, floor, and drainage areas.
Regularly (at least once a month) during the period of active bath procedures, organize general cleaning. Thoroughly washing away the dirt between the tiles, removing soot, removing resin stains and splashes from the broom on the walls and ceiling are the most minimal actions that can really extend the service life of the bathhouse.
To clean the bathhouse, use a vacuum cleaner, rags, hot water and detergents.
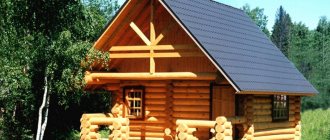
Making a log house from logs using the “bowl” method
There are three types of making such a log house - Russian, Norwegian and Canadian. A peculiarity of the Russian method of cutting a log house is that the groove, which is located in the top of the crown of the log frame, exactly repeats the contour of the previous crown. The Norwegian and Canadian method involves cutting out a cone, and the bowl that goes in the crown above is also shaped like a cone. The Russian method of making a log frame is the most aesthetically pleasing, and Canadian and Norwegian technology guarantees a higher strength of joints.
Using the Russian construction method is the best option when constructing a bathhouse from rounded timber, where a milling cutter is used to select grooves, and the diameter of the log is always the same. In such conditions, there is no need for additional clamping of the corner using a cone.
However, if the timber is cut manually, and it is not possible to ensure the same diameter of the logs, it is better to use Canadian or Norwegian construction technology. In this case, it is not possible to ensure a perfectly even frame, but the bathhouse will be strong, reliable and durable.
The cost of construction using the “bowl” method is higher than the “paw” method. This is due to the fact that this method will require a larger number of logs.
Roof construction
For small buildings, a gable roof is installed. Flat and single-pitched types of coating are easier to manufacture, but can be destroyed by precipitation in winter. The gable type is made using a rafter system. This will require 15×5 boards.
Step-by-step instructions on how to properly make a roof:
- The first pair of rafter legs is tried on and connected. The boards are fastened together with nails or screws and secured with a crossbar - a cross beam.
- The rest of the rafter legs are made according to the blank.
- Begin installing the legs on the roof. They are attached to the mauerlat from below, and to the girder from above. Metal corners and screws are used for fixation. The average step between the legs is 1.2 m, but it changes if necessary.
- For the ceiling, materials used for wall insulation are used. The space between the floor boards is filled with mineral wool. From the inside of the room, the insulation is insulated with foil or thermal insulation and covered with a facing layer.
- Lathing is placed on the rafter legs to install the roof.
- The roofing is laid on the roof and fixed.
Important! During the installation process, it is important to consider the location of the chimney. It is placed at the same distance from wooden parts to prevent sudden fire.
Building coloring
After all the activities have been completed, you should begin painting the house. There are several nuances to be observed here. This procedure involves applying several different products - tinting, varnish, azure. All of them will retain the interesting texture of natural wood
Please note: the ends of the logs cannot be subjected to either protective or decorative treatments. It is in this place that the tree’s capillaries are concentrated, with the help of which it “breathes”
If this condition is not met, normal air circulation will be disrupted. Since the processing process will seal them, the timber or log will soon undergo a rotting process.
You can learn how to cover a house with facade panels from the video presented.
Repairing damage
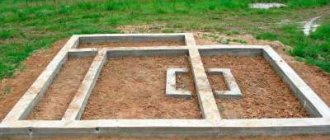
Repair of strip foundations after subsidence
The degree of damage to the base is determined by the beacons. If they do not crack, the subsidence has stopped. In this case, it is enough to drill holes with a diameter of 250 mm and a depth of 2.5 m in problem areas in 1 m increments. Then, if possible, remove a small volume of soil from under the foundation in these places. The holes and resulting voids are filled with concrete.
When the settling process continues, one of two methods can be applied:
- Conventionally divide the entire foundation lengthwise into sections and build a completely new base step by step, going under the old structures;
- Drill holes around the perimeter of the building to the depth of stable soils and fill them with concrete - this will compact the weak soil and stop subsidence.
Advice! Filling voids in dense soil with a solution is possible immediately. If the soil is loose and wet, a pipe with a diameter of 450 mm is placed under the foundation, through which liquid concrete is pumped until it stops flowing. Then half a meter is retreated from this place and the operation is repeated.
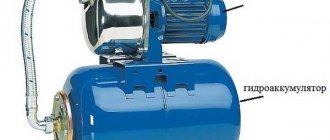
Subsidence of a columnar foundation
To strengthen the supports, a pipe is inserted into the ground to their lowest level at an angle of 35°, into which cement mortar is poured. When it stops being absorbed into the soil, the operation is interrupted for 1-2 days, after which everything is repeated twice with the same interval.
If, despite the measures taken, the bathhouse continues to settle, which is determined by the beacons:
- A circular ditch of 200x350 mm is dug around the support, in which formwork from boards is installed;
- Inside the pit, pins are placed between bricks and stones, to which a reinforcement mesh made from metal scraps is attached;
- The formwork is filled with concrete mortar filled with crushed stone or gravel;
- When strengthening adjacent or opposite foundation supports, it is necessary to place an additional beam between them, under the new “rings,” to increase the load-bearing capacity of the entire structure.
Roll of foundation pillars
On heaving soils, the foundation supports may eventually take on a non-vertical position, which can be corrected as follows:
- The bathhouse is raised and fixed in a new position without dismantling windows and doors;
- The leaning pillars of the base are dismantled;
What to do if the log house starts to look askew: step-by-step repair instructions
If your bathhouse, made from a clean, unlined log house, visually begins to look crooked, or if, with seemingly straight walls, their cladding inside or outside is sagging (and it may swell), this means that there has been subsidence of the soil at one of the corners of the foundation or deformation of the log house itself . Jacks must be used for leveling.
The jacks under the lower rim of the frame must be securely fastened
The process consists of several steps:
- The sheathing is completely removed, the thermal insulation can be left untouched, but you can only re-caulk the frame.
- Doors, windows, frames are taken out, all the furniture is taken out.
- The roof around the chimney and the floor near the stove are dismantled.
- Jacks are placed, first under the sagging part. Raising each of them little by little, the bathhouse is leveled to a plumb line or hydraulic level. You can then tie it with a metal channel to create additional rigidity.
- Then the bathhouse is sheathed again, all disassembled components are restored.
We repair the roof
The main load on the roof of the bathhouse is created from inside the room. Constant evaporation of steam penetrating into the attic leads to the deposition of moisture on the supporting structure of the roof. Repairing a bathhouse roof involves strengthening or replacing damaged areas in the rafter system and roofing material.
When the slate roof of a bathhouse cracks, the cracks are sealed with a special solution consisting of parts: 1/3 cement, 1/3 asbestos, 1 PVA glue, 1 water. Before applying the mixture, which is applied in several layers 2 mm thick, the slate must be cleaned and covered with primer.
To repair rusted areas of a metal roof, tow is used, previously immersed in hot bitumen. It is inserted into the hole, which is then filled with mastic. For serious defects, patches are used: roofing material is placed on the damaged area, previously treated with bitumen, and coated with mastic. If the soft roof of a bathhouse is damaged, the rotten fragment is removed, a new one is installed, and sealant is applied to the joints.
Simple ways to determine the nature of damage
Determining the exact cause of the emergency condition of the foundation requires a serious examination of structures using special devices and tools, which is extremely difficult to do on your own. But you can use simplified methods for this purpose.
Analysis of the condition of the base of the bathhouse based on cracks in the walls consists of installing beacons. To do this, across the damage, at its beginning and end, it is necessary to apply a strip of gypsum mixture with a maximum thickness of 3 mm and a length of approximately 50 mm. Observing the crack allows you to determine whether it is growing and at what rate. If the gap grows in its lower part, the foundation swells; at the top or in the middle, the central part sags; at the side, the corner of the base subsides.
An effective, but physically difficult method is digging a trench in a problem area. In this way, it is possible to examine the depth of the foundation, the condition of underground structures, their materials, the presence of groundwater, and determine the cause of damage.
Attention! If one of the corners of the building rises, this indicates the absence of a drainage system or its poor quality. In such a situation, it is necessary to ensure complete drainage of water from the walls.
When installing a reliable blind area is impossible, a temporary option is made. To do this, soil is poured around the building on a slope, covered with polyethylene and a layer of earth.