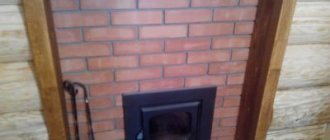
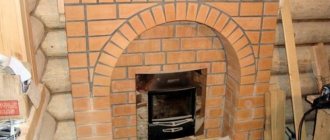
Every bathhouse needs a stove to heat it. And the furnace requires a portal. This is a structure for placing cast iron, a kind of frame.
It must be made of durable and heat-resistant materials that can withstand the temperature of a hot oven for a long time.
Each person who starts building his own bathhouse decides for himself how to approach the arrangement of the frame. It can be made in the form of an ordinary wall, or you can approach its arrangement with a design concept.
Every bathhouse should have such a structure. We'll tell you how to make it yourself.
Materials for the construction of a sauna stove
To build a rubble concrete foundation you will need:
- cement and sand for preparing mortar, filler (coarse gravel, crushed stone, broken bricks and other construction waste) lumber for formwork, waterproofing products (bitumen, special mastic)
Materials for stove masonry:
- red (fireproof) brick for laying the stove and chimney; natural stone as a heat accumulator; fireclay (refractory) brick for lining the firebox; clay and sand for preparing the solution; stove casting (doors, stove valves, grate); asbestos cord for sealing the junction of casting and masonry; wire for fastening castings; waterproofing material (roofing felt), for insulating the first row of masonry; cast iron plate 18 mm thick; water container.
The stove requires two different types of bricks: for laying the outer part of the stove and for the firebox. You should also decide on the size of the oven.
They come in both quite large and mini ovens. The amount of bricks and other materials and the costs of these materials depend on the size of the oven. A small oven will require much less materials.
Fireplace or stove: what to choose?
Fireplaces (decorative stoves) are divided into types according to three main characteristics:
- Location - islands do not have points of contact with walls and partitions, therefore they do not require additional framing (portal), they are located, for the most part, in the center of the room; attached to the wall - in the center (front) or in the corner (corner fireplace) - they are most often created with your own hands; built into the wall (designed at the stage of construction or large-scale redevelopment of the premises).
- The type of fuel hole is open (the flame can be observed “without obstacles”) and closed (doors made of heat-resistant glass are used).
- Type of fuel - wood, gas or electricity are used. In the first two cases, the owner of the stove gets access to “live fire”, and a gas stove or fireplace is easier to install and easier to use; the third type is ideal for a city apartment in terms of fire safety, as well as occupied space and design.
Advantages of mineralite
- Having made the insulation with mineralite, you will forget about replacing them for a long time. They serve well and properly.
- The panels do not burn or ignite. This fiber cement board meets the most stringent fire safety requirements.
- Minerite is considered a universal material. It can be used not only for insulation, but also for decorative finishing.
- Installation of the plates is extremely simple.
- You can do everything yourself without resorting to outside help.
A mineralite slab for a bath, like any other material, in addition to its undeniable advantages, also has disadvantages. And most buyers note only one thing - the unpresentable appearance of some types of such panels. If you choose more decorative specimens, they will cost a little more.
Strengthening the base and performing masonry
The stove is a fairly heavy structure, weighing about 100 kilograms. If it is placed on the floor of the bathhouse (sometimes it is even placed on the ground - for this, a hole is made in the floor and a foundation is poured for the stove), then the floorboards require strengthening. For this purpose, metal concrete slabs or at least sheets of iron are used.
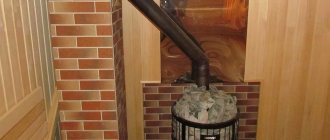
Structurally it consists of the following elements:
- chamber for firebox and ash;
- heater (place where stones lie);
- iron water tank;
- chimney base.
The laying is carried out as follows:
- lay the first row of bricks along the perimeter of the future structure;
- in the second row there is room for a door;
- at this stage, install the frame for the door and secure it with wire;
- the third row is erected under a place for the door;
- in the fourth row they place a grate - this is a grate through which air will penetrate;
- in the fifth - they make a chamber for the firebox;
- in the sixth, the door for the combustion chamber is strengthened;
- the seventh and eighth rows are placed taking into account the door;
- ninth - closes the doorway;
- in the tenth they provide space for water tanks;
- the eleventh–nineteenth rows increase the height of the stove;
- From rows 20 to 25 we lay bricks to form a smoke path and block the stove.
Main characteristics of a brick sauna stove
The most important characteristic of a brick kiln is power. This characteristic is directly related not only to its size, but also to the quality of the brick and mortar used for masonry
The sauna stove is built from red heat-resistant brick of the M150 brand, and the firebox is lined with refractory fireclay bricks.
Important: it is not recommended to use fireclay bricks for laying stove walls, as they are not able to retain heat for a long time
The thicker the walls of the oven, the longer it will retain heat, but the longer it will take to heat it up. Masonry mortar is prepared by mixing sand and clay, without adding cement, since the seams will collapse when exposed to high temperatures.
The design of a brick sauna stove provides for a closed heater and space for installing a water tank. The stones placed in the space of the heater warm up well, and after watering them with water, the steam room is filled with steam having a comfortable temperature and humidity.
A well-built brick stove remains hot for at least 8 hours, and the heat in the room remains for more than a day. The brick sauna stove warms up for 4-5 hours.
Since the walls of a brick kiln have a lot of weight, and the heater included in the design increases it even more, the first stage of construction is always the foundation.
Preparation of the solution
Before finishing the stove in the steam room of the bath, it is necessary to prepare a masonry mortar.
To do this, you need to choose the optimal ratio between clay and sand. This can be done by mixing a small portion and rolling it out into a thin cylinder. Then they fold it into a ring and look at the walls. If no cracks have formed, then the solution is of the highest quality. Modern craftsmen use a different composition to finish a sauna stove. It includes Portland cement, sand and tile adhesive. All ingredients are mixed and work begins. With this composition, the brick holds quite tightly, which guarantees the durability of the masonry. But cement in the solution can have a negative effect when heated. So the choice will remain with the owner of the bathhouse.
Tags: bathhouse, framing, oven
« Previous entry
Making the project safe: basic principles
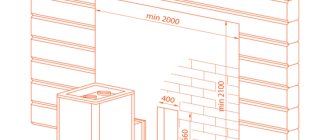
Traditionally, the oven is built near the wall opposite to the shelves in the steam room. The stove design must be created in such a way that a minimum distance of 30-40 centimeters is maintained between the heating parts of the finished unit and everything that supports combustion. If special protection is installed, for example, made of asbestos cardboard, this figure can be reduced to 15-20 cm.
Prices for asbestos cardboard
asbestos cardboard
A gap must be maintained between the smoke exhaust pipe and the floor/roof elements that come into contact with it, which is subsequently filled with fireproof material. Asbestos is most often used for protection. From above, the mentioned gap with insulation is closed with a steel shaped plate.
For additional protection, the area of the floor in front of the stove firebox is covered with a metal sheet about 10 mm thick. It will protect the flooring material from fire if coals fall out of the firebox.
The standard option for placing a stove in the bath space is shown in the following image. Here you can also see the order of organizing the water circuit, which can be taken as a basis if the supply of warm water will be provided by the stove unit, as well as the features of connecting and removing the chimney.
Standard option for placing a stove in a sauna space
Brick bathhouse photo. Brick bathhouse projects. Beautiful brick baths photo
Baths 2x3Baths 3x3Baths 3x4Baths 3x5Baths 3x6Baths 4x5Baths 4x6Baths 6x6Other sizeSummer bathsWinter bathsWith atticCustomer projects
Relevance of brick baths photo
Everyone has long been accustomed to the idea that a real Russian bathhouse should be made of wood. And people’s opinions are unlikely to change in the near future, the reason for this is the traditions of the Russian people. But this does not mean at all that alternative building materials have no right to exist. Each of them has its own disadvantages in relation to wood, but also advantages. Along with wooden ones, a brick bathhouse (photo) is quite common.
Brick bathhouse projects photo
Brick is one of the materials that cannot be demolished. If you use the bathhouse correctly, it can last 150 years in good condition. Another advantage is the freedom of imagination, which lies in the ability to make bold, both architectural and design decisions. For many, this factor is important in choosing the material for building a bathhouse. Owners of brick buildings already know that they can go without repairs for a long time. This is very important when it is not possible to carry out the necessary repair work in a timely manner; the only thing required is to operate the bathhouse correctly.
The construction of any building requires preliminary drawing up of a project. Such a document is a guide to action for builders, making it possible to build a reliable building with minimal financial costs. Many companies offer clients to consider brick bathhouse projects (photo).
To build the walls of a brick bathhouse, it is better to use solid red clay brick; it absorbs heat well and releases it for a long time; it is not for nothing that it is used when installing a stove.
The package of drawings and plans contains:
- computer visualization of each facade with separately indicated overall dimensions, individual parts, elements;
- plans for each floor, which detail the placement of load-bearing walls, window and door openings, partitions, placement of risers, and engineering equipment;
- roof plan with all structural elements, their configuration, dimensions;
- drawings of the room and its individual parts in transverse and longitudinal sections.
Beautiful brick baths photo
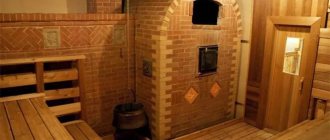
Continuing the conversation about the advantages of brick baths, we can note the low fire hazard, which is very important for rooms prone to fire due to working with fire and heating elements. The formation of walls can be very diverse
Everyone can choose a bathhouse with a semicircular design or a rectangular design. Using the described material, you can make decorations by laying it vertically or horizontally, as well as at a certain angle, you can look at beautiful brick baths in photos and come up with a unique design for the structure. At the same time, it is very important that this is done by professional workers who know how to build so that the bathhouse is not only beautiful, but also strong, and, therefore, durable.
Advantages of cooperation
Our construction company has been building brick baths for a long time. Many years of experience have allowed us to study many of the nuances of using this material, construction technology and methods of original finishing. Each project created by our engineers has its own flavor. We offer to additionally build an attic, a swimming pool and much more, everything to make your bathhouse look elite, expensive and impressive. Our advantage is the average cost for high quality and good results. The company is happy to provide any customer with a designer or architect with whom they can individually agree on the necessary details for the project. If you decide to get a brick bathhouse, don’t be afraid of difficulties. We are able to protect you from them and, on our own, fully make your dream come true.
Have fun!
Kinds
Portals for furnace equipment in a bathhouse are classified depending on various factors. By form:
- arched structures;
- rectangular or square portals.
According to the material:
Brick, natural or artificial stone. Most often, these materials are used for decorative framing. They are suitable for lovers of the classics. They look impressive in baths made of wood. The best option is red brick or clinker. Often the metal elements of stoves are decorated using artificial or natural stone. Tree. Since this material is flammable, it cannot be used as a base for a portal. Wood is suitable only for decorative purposes. At the same time, it must be impregnated with a protective composition against fire. Ceramic tile. A finishing material, the appearance of which is chosen depending on the wishes of the owner. Experienced builders do not recommend using large tiles. Drywall, metal. Sometimes the decorative design of furnace equipment is made from these materials
It is important to choose drywall that is resistant to high temperatures. The frame is made of metal.
Features of the portal for the stove in the bathhouse
When fired, the stove heats up to very high temperatures, emitting infrared rays. The resulting heat spreads throughout the room, heating it. The wooden walls of the bathhouse, which are adjacent to the stove, can become charred at this temperature and lead to fire. It is known that wood ignites at a temperature of 300 degrees, and at 100 degrees with prolonged exposure it begins to smolder.
To prevent this from happening, protective screens are placed around the stove. They can be frontal or lateral. Installing a stove in which the combustion channel opens into another room or even outside is becoming increasingly popular among steam room owners.
If the firebox channel opens into the rest room, then a transparent door will be an excellent design solution. You will get a steam room stove on one side and a beautiful fireplace on the other. Thus, the portal performs two functions.
- Protection of wooden elements of the bathhouse from high temperatures.
- Decorating the room.
The portal completely covers fire hazardous areas of the stove, effectively protecting wooden structures in the bathhouse. It can be purchased ready-made to suit the size of the sauna stove. Or you can make it yourself, without resorting to the services of specialists.
Wall decoration
The composition of such cladding includes metal sheets, as well as a thermal insulation layer of non-combustible insulation. First of all, a layer of thermal insulation is installed, then metal sheets are attached to it, the surface of which is carefully polished.
In this case, it is the heat-insulating layer that allows the cladding to reflect thermal energy, thereby significantly reducing the heating level of the bath floors. Also worth noting is the reflector, which softens the heat coming from the stove, making it more suitable for the human body.
The following can be used as insulation:
- Cardboard tiles for a bathhouse on the wall with a stove, which contain basalt fiber. Excellent material that insulates the bath room both from heat loss and from the penetration of extraneous sounds. Unaffected by excessively high temperatures, does not rot;
- Minerite panels. This material is currently gaining popularity quite quickly due to its non-flammability and resistance to high temperatures;
- Basalt wool. Representative of environmentally friendly materials that are safe for the human body. Non-flammable, resistant to elevated temperatures, but too hygroscopic;
- Cardboard boards containing asbestos. This material has excellent heat-insulating properties and is not susceptible to mechanical stress or the influence of elevated temperatures. Due to asbestos in its composition, it cannot be classified as highly environmentally friendly.
The insulation is attached using ceramic bushings. If the minimum distance from the surface of the casing to the stove is maintained, we recommend installing a double layer of insulation.
Facing cladding
In order to protect the sauna stove without disturbing the overall stylistic component, cladding is often used.
The following materials are considered the most popular for these works:
- Terracotta tiles. It is made from clay, which is subsequently fired in a special oven. This material has proven itself to be incredibly wear-resistant, durable, and also resistant to various mechanical influences, including the influence of high temperatures. Terracotta manufacturers produce both matte and glazed options;
- Tile clinker. It is also made on a clay basis and is distinguished by its wear resistance. It should be noted that in terms of external characteristics it is quite similar to decorative brick;
- Tile tiles. A highly decorative material, since the surface of the tile is covered with various patterns, designs, and prints;
- Soapstone chlorite. Environmentally friendly rock. It has a natural shade of gray or green, and is characterized by increased resistance to impacts and other mechanical influences. Soapstone chlorite perfectly tolerates constant exposure to elevated temperatures, while being completely non-hygroscopic, which is so important for a steam room;
- Porcelain stoneware slabs in the bathhouse near the stove. This material is not susceptible to elevated temperatures, non-flammable, wear-resistant. The undeniable advantage of porcelain stoneware is its textured surface, which exactly imitates the appearance of various precious stones, as well as other finishing materials - brick, wood, masonry.
Important! This cladding is mounted on top of a pre-arranged heat-insulating base. For fastening, solutions that are resistant to elevated temperatures are used.
How to cover a stove in a bathhouse with tiles and other materials listed above? The finished cladding will look like this:
- Wooden walls;
- Technical gap measuring 3 centimeters;
- Thermal insulating base made of non-combustible materials;
- Material for cladding.
Manufacturing
To make a brick sauna stove with your own hands, you need to prepare tools, consumables, a place for construction, draw up a project, make a foundation, build a structure.
Material and tool
Before you begin assembling the stove, you need to prepare:
- required number of bricks;
- trowel, trowel;
- building level;
- container for mixing the solution;
- grout for seams;
- pipes for chimney assembly;
- asbestos, roofing felt;
- drill with mixer attachment;
- doors for the combustion chamber, ash pan;
- metal wire for tying rows.
Additionally, you may need hand tools - a hammer, a pry bar, a set of keys, screwdrivers.
Preparation
After preparing the consumables and tools, you can begin developing the project and preparing the mortar for laying bricks.
Design
Regardless of the masonry method, a brick kiln project must have several basic elements:
- water tank;
- chimney with its individual elements;
- combustion chamber;
- ash box;
- doors (at least two).
Additionally, the diagram can indicate the location of the heater and grate.
Preparation of mortar for masonry
To build a brick oven, you cannot use classic cement mortar. It cannot withstand high temperatures and begins to crumble with constant changes in temperature. To prepare the solution you will need:
- sand sifted through a sieve;
- fireclay clay.
The components are mixed in a separate container and filled with a small amount of water. The liquid should not have an unpleasant odor.
Construction of the foundation
Foundation assembly process:
- First you need to apply markings for the future foundation. To do this, wooden pegs are driven into its corners, and threads are stretched between them.
- The depth of the pit is 60 cm. The bottom layer, 15 cm thick, needs to be expanded 10 cm to the sides.
- Cover a space 15 cm high with sand. Place a layer of crushed stone (10 cm) on top of the sandstone. Compact the crushed stone.
- Lay a layer of waterproofing over the crushed stone. For this it is better to use roofing material.
- Make formwork from boards. Place it inside the pit.
- Mix the cement mortar.
- Tie a reinforcing frame from individual reinforcement rods. Place it inside the formwork.
- The size of the formwork should be 5 cm smaller than the pit on each side.
- Concrete must be poured into the formwork so that 15 cm remains before the beginning of the masonry level.
After a week you can remove the formwork. The vacated space is filled with gravel.
Laying the “body” of the structure
Furnace laying:
Make a base for the furnace equipment, which consists of two rows of fireclay bricks. Cover the surface of the walls around the stove with asbestos sheets. Fix metal sheets on top of them, which will reflect thermal energy. The walls of the stove structure must be laid out in order. Seams on adjacent rows should not match. After laying each row, it must be checked with a building level. Simultaneously with the manufacture of the outer walls, it is necessary to lay the combustion chamber. Fireclay bricks are used for this.
It is important to leave free space for the ash hole door. You need to secure the grate on top of it, leaving space for the firebox door.
When laying, you need to check the verticality of the walls and the thickness of the seams.
Installation of a water heating tank
The location of the water tank is selected depending on the dimensions of the furnace equipment. It should be in a place to receive more heat. To calculate the volume of the tank, you need to take into account that approximately 25 liters of water are required per adult.
Chimney laying
For a brick stove, it is recommended to assemble a chimney from the same material. An asbestos pipe is installed inside the brick frame. The space between the brick walls and the pipe is filled with non-combustible material to increase the tightness.
General description of the design
You can purchase a sauna stove in a specialized store, or order production from an experienced craftsman, or you can build it yourself. In the latter case, you may encounter a lot of problems, but all of them can be solved. In addition, the process of making a stove is quite exciting, and also allows you to save on at least one of the design components - the portal. How to make a portal in a sauna for a stove? First, let's look at what this design is.
The portal is a kind of rim for a stove or fireplace, which has a recess. This is where the stove is installed.
Important! If you decide to make this decorative element with your own hands, we recommend using a hearth insert for it, since it does not have its own frame and you won’t have to think about how best to insert it.
In order to recreate this element, the first step is to calculate the heating ratio
device and portal.
The most optimal values, which are traditionally used quite often, are considered to be the height of the fireplace, which occupies approximately 75 percent of the portal you designed, and the width - 50 percent.
It is best to first buy a hearth insert, then adjust the frame to it.
This is much easier than trying to fit an unsuitable fireplace into an already erected frame.
The materials used can be chosen:
- Drywall;
- Natural wood;
- laminated chipboard;
- Wooden beam;
- Galvanized metallized profile;
- Laminated parquet board;
- MDF;
- Plywood.
In order to decide on the most optimal option, you should take into account the modification of the stove, as well as the skills of the person who will be involved in the construction of the portal for the stove to the bathhouse. Of course, a fireplace for an office and a sauna stove are significantly different. Therefore, in the second case, it is best to focus on non-combustible materials and refuse to use natural wood to decorate the stove. In our article you will learn how to finish a bathhouse near the stove and thereby protect the structure.
For electric stoves in the bathhouse, portals finished with:
- Stone;
- Self-adhesive film;
- Polyurethane stucco;
- Heat-resistant paint;
- Tapestry;
- Plaster stucco.
When in need of protection
The walls of a bathhouse do not always need additional protection by installing a screen for the stove or by lining it with fireproof materials.
Information. There are standards according to which a certain distance must be maintained between the sauna stove and the wall. This is justified by the fact that this distance should be enough for the infrared rays to dissipate and not have such a strong effect on the bath walls, increasing the risk of fire.
The specific distance is regulated by fire safety standards and SNiP:
- The distance between the stove and the wall must be at least 13 centimeters if the adjacent wall is laid out in one brick, covered with lime-based plaster (layer - at least 25 millimeters) or asbestos, clay, brick cladding (layer - at least 40 millimeters);
- There must be at least 32 centimeters between the stove and the half-brick wall, which is covered with lime-gypsum (layer - at least 25 millimeters) or asbestos-vermiculite slabs (thickness - at least 40 millimeters);
- A minimum distance of 70 cm must be present between a metal stove with a refractory coating and a wall covered with a lime-gypsum mixture (layer - at least 25 millimeters);
- If the metal stove does not have a coating of refractory materials, the distance to the wall covered with lime-gypsum mortar must be at least one meter.
There are also similar rules for the ceiling surface, since the distance between it and the top of the stove must be maintained:
- At least 25 centimeters must be retreated from the ceiling protected by a metal sheet (which should be laid on asbestos cardboard or plaster) and a stove with a fire-resistant ceiling in three rows of bricks;
- A distance of 80 centimeters must be maintained if the stove has a thermally insulated ceiling on the surface and the ceiling is protected with fireproof materials;
- There should be a gap of 1 meter between the ceiling with missing protection and the stove, the ceiling of which consists of two rows of bricks;
- If the stove has no overlap at all, the distance should be at least 120 centimeters.
Attention! Of course, maintaining a meter distance is possible only in spacious baths, which is very rare. Usually compact buildings are erected, where every millimeter is worth its weight in gold.
That is why permissible distances are neglected, installing protective screens instead.
Preparatory work
The main task of preparing a sauna stove for cladding is building a foundation. Many metal structures are installed directly on the floor of the bathhouse. This is due to the fact that they are relatively light in weight, which leads to savings on foundation construction costs. But when using bricks when facing a stove in a bathhouse, the weight of the future structure will increase significantly, which can lead to damage to the floor.
Therefore, it is necessary to dismantle the plank flooring and raise the foundation to a certain level. For this you can use concrete or ordinary brick. When choosing the latter, it is not necessary to plaster the structure, since it will not be visible due to the laid floor in the bathhouse.
It is important to remember that the foundation for the future furnace must be buried in the ground. To do this, the soil is removed to a depth of 70 cm, after which a sand and gravel cushion is made, which is properly compacted
And only after this work is completed do they begin to build the foundation.
Next, you need to purchase refractory bricks, clay and sand. The material chosen for lining the furnace is not the same. To finish the pipe itself and the combustion chamber, solid clay bricks are used. But to decorate the sauna stove they use shaped material. But the choice remains with the owner, who, if necessary, can plaster the resulting structure and paint it with lime paint.
Step-by-step instruction
Forming the base
In order for a brick-lined sauna stove to be strong and reliable, it is important to lay the foundation correctly. The strip foundation is considered the easiest to assemble and install. To equip it, the wooden floor elements in the house are first dismantled, after which a trench is dug, the bottom of which is covered with a sand-crushed stone mixture
Everything is compacted well and watered. The next stage is concreting the foundation. For the strength and reliability of the structure, it is recommended to additionally lay a reinforcing mesh into the foundation before pouring it. The solution is then left to dry. Until the base is completely dry, further work is not recommended.
To equip it, the wooden floor elements in the house are first dismantled, after which a trench is dug, the bottom of which is covered with a sand-crushed stone mixture. Everything is compacted well and watered. The next stage is concreting the foundation. For the strength and reliability of the structure, it is recommended to additionally lay a reinforcing mesh into the foundation before pouring it. The solution is then left to dry. Until the base is completely dry, further work is not recommended.
Preparation
Before constructing the protective apron, it is recommended to soak the lining brick for 12 hours. To do this, the required amount of material is separated, cleaned if necessary and placed in cold water. This event is necessary to ensure that the blocks do not absorb moisture from the solution during the formation of the order.
How to prepare brick mortar?
The installation of a metal furnace will be reliable if a cement-clay mixture is used as a masonry mortar. Both components are taken in equal proportions and diluted with water to obtain a creamy consistency. To mix the solution well and obtain a homogeneous mass, it is recommended to use a construction mixer. After mixing, you need to let the masonry mixture thicken, and then proceed directly to the masonry.
Bricklaying
In order for the apron to be reliable, it is important to correctly calculate the permissible distance between the brick wall and the iron body, because if the gap is small, the masonry will quickly crack and you will have to redo everything all over again. On average, it will take up to 15 orders to form a screen. It is recommended to divide the work into 2 stages: on the first day, form half of the rows, then leave the structure to dry until the morning
Then the rest of the masonry is done, the optimal row thickness is half a brick. The ordering scheme is presented in the table:
It is recommended to divide the work into 2 stages: on the first day, form half of the rows, then leave the structure to dry until the morning. Then the rest of the masonry is done, the optimal row thickness is half a brick. The ordering scheme is presented in the table:
| Row | Description of work |
| 1 | The perimeter is completely laid with bricks, the row is started from the corner, with strict observance of evenness of laying |
| 2 | The wall is built up, reinforcement is carried out, air gaps are formed |
| 3 | Posted as 1st |
| 4—5 | A portal is formed for the firebox door and ash pan, |
| 6—8 | A metal corner is placed above the base of the portal |
| 9 | Can be stacked randomly |
Depending on personal preferences, you can arrange the arrangement with an arch at the level of the stove where the coals are located. This way the smoldering embers will be visible and you can admire them for a long time. You can also complete the arrangement by installing a round pipe in the bathhouse through which the smoke will come out. In none of the selected options, the step-by-step instructions for forming the order do not change.
11e848e1d3edc9508581e7ba9670a865.jpe
b93bf8b1cfe8d748c9f00f0289d65ea6.jpe ca0a0831eef5a22c9c2b40b8d044df0d.jpe 4ee5b7901e5b4f12fd8d62f5442bdc66.jpe
First heating
When the brick finish dries, and this lasts on average up to 2 weeks, it is important to put the device into operation correctly. To do this, 2-3 test fires are performed, during which a minimum of firewood is used. This will prevent excessive heating and cracking of the structure.
In this way it will be possible to safely dry wet areas, thanks to which the stove will serve reliably and for a long time.
This will prevent excessive heating and cracking of the structure. In this way, it will be possible to safely dry wet areas, thanks to which the stove will serve reliably and for a long time.
Chimney outlet through the roof
A more complex option requires increased care and the purchase of additional elements. Consider the option of a metal roof.
Step 1. Make precise markings in the ceiling where the pipe exits, make a hole
Make sure that the hole does not hit the roof beam! The dimensions of the hole in the ceiling should be 10 cm larger around the perimeter than the diameter of the pipe. The ceiling is made of boards - making a hole in it is not a problem
Scheme for arranging a hole in the ceiling
Pipe passage through the ceiling
Pipe passage through the attic
Step 2. Mark the place where the pipe exits on the roof, watch the verticality and location of the rafters and sheathing. The hole in the roof should not damage the elements of the rafter system.
Step 3. Use a cylindrical grinder to cut a hole in the roof; its size should correspond as much as possible to the diameter of the pipe.
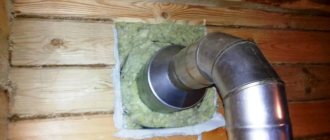
Step 4. Fix the vertical position of the chimney in the ceiling with pads, insulate the opening with mineral wool and nail galvanized steel sheets on both sides.
Insulating the opening with mineral wool
Step 5. To seal the pipe outlet on the roof, you need to buy special additional products: a metal skirt and a glass. The diameter of the glass must correspond to the diameter of the pipe. It is quite difficult to make such products yourself; it is better to buy them ready-made.
To close the pipe on the roof, roof penetrations, for example, of circular cross-section, are used
Step 6. Use a metal clamp to attach the chimney pipe to the rafter system structures. There is no need to insulate anything; at this distance from the boiler, the metal chimney has time to cool down.
Step 7. Place the glass skirt over the chimney. The glass has the ability to rotate and tilt in the skirt, which greatly simplifies the installation process.
Chimney passage through the roof
Step 8. You need to cut off the roofing sheet. The width should be 10÷15 centimeters greater than the width of the skirt, the length should correspond to the distance from the top edge of the skirt to the nearest formwork strip. When marking, carefully ensure that the waves in the cut piece of roofing coincide with the waves on the roof.