Choosing natural materials for buildings located on suburban areas is the right decision. Surrounded by nature, everything should be natural and environmentally friendly. Traditionally, our compatriots build houses from logs or timber, but there is an opinion that using half-timber for construction is a better alternative to the usual options. It has been tested in the cold Norwegian winters, confirming its full energy efficiency. The neat appearance of the log house walls only adds another plus to the list of advantages of this material.
Building a bathhouse with your own hands step by step
Let's look at where to start building a bathhouse. Before you make a bathhouse with your own hands, you need to find a place on the territory. It is necessary to comply with established norms and rules. For example, you need to maintain a certain distance from other buildings - a house, a barn, a garage. You cannot install the sauna close to a fence. The location for construction is calculated separately if there are bodies of water nearby, so that wastewater does not get into it. When the site has been selected, it must be thoroughly cleared of debris and the ground leveled to install the foundation.
Base, floor and drain
When the area for building a bathhouse in the country is ready, proceed to laying the foundation. Its type depends on the design of the bath: strip, pile, screw. As an option, build a bathhouse with your own hands without a foundation for small steam rooms.
It is better to start installing a bathhouse from the floor and drainage communications. They are built simultaneously and are the most difficult stage of the work. The drainage can be pointwise if the pit is located under a building. Builders recommend draining and diverting pipes further so as not to expose the wooden building to premature destruction.
Before you build a bathhouse with your own hands, you need to prepare a separate drainage hole to which the drain will lead. For a home version of a small steam room, it should be narrow, since feces do not drain there, as in bathrooms, or greasy waste, as in kitchen drains.
It is easier to build a bathhouse with your own hands if there is a sewerage system on the site. Communications are diverted from the drains to the central pipe. They must be insulated, wrapped in mineral wool and laid at a depth of at least 50 cm. This way you can avoid freezing in severe frosts.
To ensure water drainage through the floor and at the same time prevent rotting, it is recommended to make a floating floor. That is, this is a wooden covering that is loosely fixed to the internal walls of the building. The floor is laid on wooden joists, which creates a small gap between the foundation and the floor covering. Because of this, natural ventilation is formed. The pitch of the logs is on average 50 cm, the height is no more than 12 cm, taking into account a span of up to 4 m. If the span is larger, then the height of the logs should be greater.
Tar pine is used to lay the finished floor. This is a dense, eco-friendly material, often used for the construction of bathhouses. To protect it, it is recommended to use a primer and paint products.
You can use tiles as a floor covering, but this will require strengthening the floor and complete insulation of communications. Without certain construction skills, it is difficult to make such a coating.
Walls, ceiling, roof
Regardless of the type of base, it is necessary to lay waterproofing from bitumen and roofing felt
It is important to use several layers of materials so that moisture does not seep anywhere. If you are planning a building made of wood, you need to lay lathing on the strip foundation to prevent rotting of the lower chords of the wood
Walls are built depending on the project and the type of materials used.
If the walls are installed from a log house, calibrated logs are selected and grooves are cut into them to strengthen and assemble the structure.
Arrangement inside
Before you build a bathhouse with your own hands, cheaply and beautifully, you need to take into account all the nuances. If you are planning a stationary shower, you need to think about the water supply in advance. And also think about how the water will warm up. In a steam room with a stone stove, it is convenient to install a metal tank, the water in which will warm up as it is heated.
The first thing that is done inside is to install the stove. It can be stone or metal. It is necessary to consider the chimney and ventilation system. It is best to decorate the inside of a sauna with wood or clapboard. Design and color solutions are everyone’s personal business.
To summarize, it should be noted that a bathhouse at the dacha with your own hands can be done cheaply, quickly and very simply in a few weeks. Even a beginner who has not previously been involved in construction can install a frame building made of wood on a strip foundation. The main thing is to take into account all the nuances, think through the drainage and supply of water, electricity, and ventilation in advance. There are a huge number of building materials and projects on which the technology will depend. If you are planning a two-story building with a steam room and a swimming pool, showers and relaxation rooms, a reinforced foundation and full strengthening of the walls with pre-sheathing are required. When installing a small family steam room with dimensions of no more than 16 square meters, you can get by with a light strip foundation and a frame made of timber.
More useful information on the website banya-guru.ru.
Bath walls
To build a Russian bathhouse, it is best to use a solid log. If you have chosen this particular material, then the technology for constructing a wooden frame will come in handy (photo).
Sometimes profiled timber is also used (photo).
In this case, the building turns out to be lighter in weight, and it is assembled much faster. You will have to tinker a little more with logs. This building material should be as uniform as possible, so carefully select logs of the same diameter and quality. The walls of a wooden frame are called “crowns”. For the lower crowns, logs of maximum diameter are traditionally used. The higher the walls rise, the more the diameter of the logs decreases. This indicator must be reduced smoothly, gradually.
Whatever construction material you choose, make sure that the wood is properly dried. Otherwise, after some time, the walls of the bathhouse will begin to dry out and become deformed. Both the hydro- and thermal insulation of the structure suffers from this. Whatever material you decide to build your future bathhouse from, the 5 lowest crowns must be thoroughly treated with an antiseptic.
Walls made of timber themselves are quite airtight, since each beam fits perfectly to the other. The log structure is more capricious. The joints between adjacent logs must be made airtight, i.e. caulk and seal with special sealant. You can learn how this is done from the video.
For caulking, felt is most often used, less often well-dried moss. From above, these materials are thickly coated with sealant (photo).
If there are large cracks in the log, they should definitely be sealed with the same sealant, since any such defects in the material will affect the thermal insulation of the bathhouse building. A strand of extruded polyethylene should be placed inside the crack.
Choosing a foundation
Since a timber bathhouse is a lightweight structure, it does not require a reinforced foundation. The only exception is the space under the stove. It is imperative to strengthen both the base and the floor in this place, otherwise the floor plane will sag and deform, which will negatively affect not only the stability of the stove structure, but also the appearance of the dressing room.
Among other things, you will need to choose a foundation based on the condition of the soil. Thus, for heaving soils, those foundations that are preferable for soil in normal condition may not be suitable.
You also need to pay attention to the depth of groundwater. If they are located higher than 2 m from the ground surface, then it is not worth making a monolithic foundation
In principle, the process of pouring the foundation does not require special knowledge, since the baths generally have a simple layout.
Tape
This type is one of the most common, since it is easier than others to do it yourself. The strip foundation is a strip of reinforced concrete, which has a slightly larger perimeter than the future bathhouse. The width of the tape can vary, but most often the indicator chosen is 10 cm wider than the wall. So, when using a beam with a width of 20 cm (typical), the foundation will be 20 + 10 = 30 cm. The positive point is that the construction of a strip foundation does not require a lot of materials. All you need is concrete, reinforcement and a wooden frame.
In the future, it is important to waterproof the base well, for which they use various raw materials such as tar. It is extremely important to make high-quality markings before starting to dig a trench and subsequent work
The location of the walls plays a decisive role here, so you can’t go wrong. And also, in addition, a kind of cabinet for the stove is made - this is a wider place that is completely filled with concrete. The cabinet is pre-reinforced, increasing its strength.
Pile
Pile foundation is a universal option. It is perfect regardless of the type of soil and groundwater level. All you need to do is pre-make or purchase piles and deepen them to the desired level. If you have no experience in construction work, then it is best to abandon this option. Beginners find it very difficult to strengthen the foundation of this type under the stove, since each specific case requires an individual approach.
The unspoken rule is the location of piles at the junctions of walls - corners. And also the piles should lie under the walls themselves. The distance between the piles depends on the number of storeys of the bathhouse and the estimated weight of the entire structure. It is best to choose a pile foundation in cases where the bathhouse is planned to be combined with a residential building. Thus, the entire structure will look cozier and more attractive, while the cost of constructing such a foundation will be low.
Monolithic
A monolithic foundation is the least versatile, but the easiest to implement. All that is needed is to dig a pit, install a frame and pour concrete. On the one hand, monolithic slabs are recommended to be installed on heaving soils to stabilize the structure. It is believed that the slab will gradually move along with the house, and the house itself will not move or deform. On the other hand, this solution cannot be called economical, since a lot of concrete mortar and reinforcement will be required.
To pour a monolithic foundation, you will need concrete that does not set immediately. Since Portland cement is mainly used for concrete mixtures, you will have to try to find the right one. The shortcomings don't end there. In addition, it will be necessary to take care of the presence of ventilation slots in the concrete base, otherwise it will crack and lose strength.
Step-by-step instruction
When carrying out such work, it is necessary to act step by step in order to avoid mistakes and not to translate the existing material in vain. Let's take a closer look at how to properly make high-quality timber with your own hands.
Using a hand router
It is quite possible to obtain a homemade beam using a conventional hand router. This is a very useful and practical tool that many craftsmen have in stock. The considered method of manufacturing timber is considered one of the simplest and most accessible. To carry out all work, you must use only a powerful device (at least 1.5 kW). To make timber, the master must also stock up on cutters with a radius of 40 to 50 mm. If you plan to build not a simple, but a more complicated type of beam, then it is advisable to additionally prepare different attachments.
Using a router you can even make parts that have a D-shaped side. For such procedures, you will need to additionally purchase a belt or disk sander, as well as a high-quality electric plane.
Using a router to make a log frame has its positive aspects.
- If the workpiece from which the beam is made is properly prepared and has excellent quality, then with the help of a router it will be possible to achieve 100% accuracy in preparing the groove.
- If the nozzle on the router is well sharpened, then the craftsman will not have to additionally grind the part after it has been properly processed.
Let's analyze the process of preparing timber using a router in stages.
- First you need to build a stable and reliable foundation. It is made in the form of a slipway or workbench, which stretches the entire length of the workpieces being processed. The support should be strong, not wobbly, and there should be no play in it. The workpieces must be fixed as efficiently as possible.
- As mentioned above, in addition to the router, the master will need special milling attachments. Their sizes and shapes will directly depend on the degree of complexity of the profile that the master will choose. If you have extensive experience and appropriate skills, you will be able to obtain high-quality products that are as close as possible to industrial designs.
- When working with a router, the master must maintain perfect precision in guiding the machine through a pre-marked area. It is advisable to act so that the tool moves carefully and smoothly along consistently aligned guides. Jerks or lateral play should be avoided.
The level of quality of pairing of all elements will directly depend on how accurately the master will act. This will also be reflected in the quality of buildings that people will subsequently erect from homemade material.
Source
Heavy adobe
These are real brick blocks made of dried clay, straw and sand. In order to make a brick, you need to independently build a mold from planed boards without a bottom. For small blocks it may contain several sections.
The inside of the mold can be lined with polyethylene for easy removal of adobe bricks. For the same purposes, you need to fill the ends of the molding box with handles.
There are no exact proportions for heavy adobe mixture; it is prepared experimentally.
The mixture should be homogeneous, thick and mushy; it is collected in a heap and allowed to stand for a day.
Then the mixture is filled into the mold and the already formed brick is taken out of it.
The blocks need to be dried in a place well protected from moisture; good ventilation is required. When the blocks have dried, you can check their quality.
You should not form all the blocks at once; to check the quality, it is enough to prepare one brick.
- If the adobe brick is broken by hand, there is not enough straw.
- If the brick crumbles, there is a lot of straw and little clay.
- The brick block is covered with cracks - a lot of clay and little sand.
Preparing heavy adobe is a longer and more labor-intensive process. The blocks take a long time to form; in addition, they must dry out.
It is better to start building buildings from heavy adobe in the spring, when weather conditions allow it to dry well.
Heavy adobe makes interesting, sometimes intricate buildings, since the blocks can be shaped into very different shapes.
A bathhouse can be fashioned as if from plasticine and even without corners, but this type of masonry requires experience and skills in construction. If you don’t have the skills, you can practice on a small structure, such as a doghouse.
Selection of materials
The first question a builder faces is what is better to take, stone, brick or wood? In this case, we are considering the option of a wooden bathhouse, which can be built in two ways - frame or log house.
Wood has been used as a material for bath buildings since ancient times. Advantages:
- environmental Safety;
- cheapness;
- simple processing;
- the presence of useful essential resins that have a good effect on human health;
- durability with proper care.
Wood cannot be called an ideal material, as there are many difficulties. For example, it is not easy to ensure that the walls are even; only high-quality timber or logs with precise cutting are suitable for this.
There is also a shrinkage factor - the wood dries out and becomes deformed, so it is important to dry the wood in order to reduce the percentage of shrinkage before the finished log “goes” to the wrong place.
Most often, hardwood is used for construction; a linden bathhouse is especially good. Linden weighs little, allowing you to save on the foundation. There are options from poplar, birch, and pine.
Which type of wood is better
The service life of the finished structure depends on the quality of the purchased raw materials.
The surface of the timber should be smooth, without cracks. The presence of spots of a black, bluish tint indicates the beginning of rotting of the wood. Such material cannot be used for construction. Timber with obvious signs of damage by insects and bark beetles will not be suitable either.
Larch is considered the best species for a bath because of its resistance to humidity. The material only gains strength over the years.
But due to the high price of raw materials, it is not always possible to build a complete bathhouse from this rock. Therefore, the optimal solution is to lay out the bottom 2-3 crowns of larch, and for subsequent rows take cheaper timber from other coniferous species (pine, spruce).
You might be interested in:
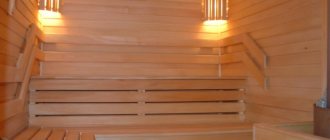
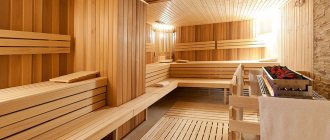
Construction of a steam room in a Russian bath
A wooden canopy and a stove are installed in the steam room.
The steam room is located farthest from all the rooms, although the process begins there. It comes in different sizes, depending on the number of people steaming at the same time. 5 m² is preferable so that the room can be heated faster. In the steam room there are shelves and benches on which people sit or lie. The part of the heater that is responsible for supplying wet steam goes into the steam room. This is a special door that hides a space with hot stones. The door is opened to add water, adjust the temperature and humidity of the steam room. Sometimes the stones are placed openly and water is poured on them. The stones cool down faster than with the closed version.
The walls of the steam room are refined if the log house is not made of linden or aspen. Wood releases resin when heated - this is unpleasant and can cause burns.
Often, to save space, the functions of a steam room and a washroom are combined into one room. This is less comfortable, but acceptable if the sauna is used correctly. Follow the sequence of bath procedures and temperature conditions in order to experience the pleasure of a combined steam room with a wash room.
We choose a place, we make a project
The construction of a Russian bathhouse requires careful planning. Before starting work, you need to determine its place on the site. This should be done not based on your desires or convenience, but in accordance with current legislative building, sanitary, and fire safety standards.
The choice of bathhouse size depends on the purpose, number of guests, and free space on the site.
Even with the modest dimensions of the steam room, there should be at least 1 square meter per vacationer. meter.
The standard rooms in it are:
To increase the comfort of relaxation, a bathhouse can be built with a swimming pool, veranda, or attic.
If you plan to install a wood stove, then it is important to think in advance about its location, foundation, chimney pipe outlet, and indicate the placement in the project on a separate drawing.
Diagrams for supplying communications must be provided.
Those who love barbecue and cooking over a fire will love the sauna with a gazebo.
Advantages and disadvantages
Block building materials have their pros and cons. You definitely need to know them if you plan to use blocks in the construction of a bathhouse. To begin with, it is worth considering in more detail what advantages such elements have.
There are several advantages of such material as blocks.
- A structure built from blocks will not shrink, like, for example, buildings made of wood.
- A steam room made of blocks can be built almost immediately after the main finishing.
- The construction of such a bathhouse will take a minimum amount of time.
- All repair work can be carried out without the involvement of outside help, but experts recommend inviting at least one assistant. This way construction will go much faster.
- The final cost of a block bath will be 2-3 times lower than in the case of building a wooden steam room of exactly the same dimensions.
- Block materials are absolutely safe for human health. They do not contain hazardous chemical compounds, so even at elevated temperatures they do not emit harmful substances.
- The blocks are relatively light in weight. Thanks to this characteristic, you can significantly save effort and money on preparing a high-quality foundation.
- Many consumers choose block materials for construction because they do not support combustion.
- A bathhouse made of blocks is not subject to rotting.
- The blocks are easy to maintain. They do not need to be regularly coated with antiseptic compounds, as is the case with wooden buildings. Block materials are not susceptible to mold and mildew.
- Walls built from such raw materials are “breathable” due to their diffuse properties.
- Many types of blocks, for example, gas silicate ones, boast good heat and sound insulation properties.
- The service life of quality blocks is very long.
Currently, many owners choose block materials for the construction of baths (and not only).
However, these products also have their disadvantages.
- The blocks absorb moisture, so the bathhouse must be provided with high-quality waterproofing, otherwise the material may simply collapse.
- A bathhouse made of blocks requires a vapor barrier. This is explained by the fact that condensation almost always accumulates inside walls made of such materials, so it is impossible to do without vapor barrier materials.
- Blocks are durable materials, but in this regard they are inferior to brick.
- Popular gas silicate blocks contain aluminum powder and lime. These components reduce the positive characteristics of the material.
Many problems associated with block baths can be completely avoided if they are constructed in a high-quality manner and also take care of hydro- and vapor barrier in advance.
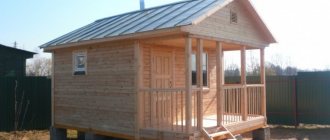
Do-it-yourself frame bathhouse - option 2
The previous version of the bathhouse (chopped) is good for everyone - this bathhouse is environmentally friendly, inexpensive to manufacture, and attractive in appearance - but its main disadvantage is that not everyone can build a log house with their own hands, and heating takes a lot of time.
What's the alternative? It can serve as a frame bathhouse. By following the assembly using frame technology, such a bathhouse can be easily built with your own strength and hands.
Rigid frame in the design of the bathhouse.
The role of the most important structure in the construction of a bathhouse using frame technology is played by the frame, as you might guess.
It is made from wooden beams. The lower harness is made, the racks are installed on it in increments of 60 centimeters and then, in turn, they are fastened together with the upper harness.
If you plan to use OSB when installing the outer cladding, then the number of additional stiffeners can be reduced.
Select the cross-section of the beam for the bathhouse, taking into account such a characteristic as the thickness of the thermal insulation - for corner posts and trim, 10 by 10 centimeters is suitable, for racks that will be installed in the gap, a less thick one is suitable - 5 by 10 centimeters.
When building a frame bathhouse with your own hands, remember:
To insulate frame buildings, materials are used whose thermal conductivity coefficient rarely exceeds 0.04, which means that such walls retain heat even better than wood itself.
Frame bathhouse - what's outside?
The outside of such a bathhouse can be sheathed with DSP - the material is modern and therefore practically non-flammable, with excellent water resistance characteristics, with remarkable strength; OSB sheets are convenient for the construction and installation of anything.
If, as stated above, you install the racks in increments of 0.6 meters, then ordinary standard DSP sheets (1.25 meters) or OSB sheets (1.22) will fit between the frame racks without additional trimming - you will save a lot of time and material.
In addition, by using OSB you will save time on finishing the walls - since their surface is prepared in advance and is very smooth.
The difference between OSB and DSP is that when working with DSP, unlike OSB, you will need a grinder, and you have to fasten them by drilling holes in advance. When installing OSB (orientated strand boards), there is no hassle - you work as with ordinary wood.
The smooth surface of both slabs is ideal for subsequent wall finishing. The difference between them shows up in the work. To cut the DSP sheets to size, you will need a grinder; for fastening, you will have to pre-drill holes. In this regard, oriented strand boards OSB are much more convenient. Working with them is no different from working with wood.
Ondulin or even ordinary sheet “galvanization” (galvanized sheet profile) is perfect for covering a frame bath.
Pros and benefits of a panel-frame bath
- Economy both during construction and during use
- Speed and ease of construction and installation with your own hands
- A frame bath will not require shrinkage
- Unlike a chopped bathhouse, you can build it at any time of the year
- You can finish such a bathhouse with any finishing building materials
What is good about a timber frame for builders?
When building a house from a turnkey carriage, all processes differ little from the construction of a conventional log house. The only caveat is the fact that the wood for a house made from a carriage must be pre-processed at a sawmill, cutting off two sides of each log. After this operation, the laying of the actual frame from the carriage is somewhat simplified compared to the work of erecting a frame from a round log.
The width of the carriage and, as a result, the walls of the house depends not only on the wishes of the customer or builder, but also on the diameter of the original log - the thicker the log, the wider the carriage can be made.
Exterior finishing
The main finishing of the walls of a timber bathhouse consists of sanding the surface, and then treating its walls with special compounds that resist the proliferation of parasites inside the wood, protect the wood from fire and emphasize its natural beauty. This is a very important stage that should not be ignored.
However, decorative finishing is carried out with siding, brick or facade panels. This will give the bath a modern look and provide additional protection.
The roof of the bathhouse can become a decoration. It can be made gable or single-pitch if the building adjoins the residential part.
It can be painted in any color or you can choose a decorative roof: tiles, natural slate, ceramic tiles, wood.
How to prepare and process timber yourself?
But how to build a bathhouse from timber if it is not possible to order the material itself? In this case, you can prepare it yourself. It is better to do this in the cold season.
As soon as the tree is cut down, it is advisable to let it rest for at least a month, after which all the logs need to be carefully examined and sorted: only the highest quality ones can be left for the construction of a bathhouse, and it is better to discard damaged and bad ones.
Now you can begin processing the future building material. So, to begin with, the log needs to be cleared of bark, and so that it does not crack, it must be left on both sides - about 15 cm wide. After such procedures, you can put the logs in storage: at least 20 cm from the ground, carefully folding them in packs or stacks, making sure to maintain a distance of 5 to 10 cm between them.
By the way, it is advisable to make the two or three lower crowns of the bathhouse from deciduous timber, and all subsequent ones from pine, spruce or cedar. This is due to the fact that larch always retains its properties well, even in an intensely humid environment, and is much less susceptible to rotting, becoming harder and harder over time. But building an entire bathhouse from this material is a very expensive pleasure, but everyone can afford the first three such crowns. And the pine and spruce walls of the bathhouse are still slightly better in terms of hydro- and thermal insulation properties.
History of appearance
The poor people of Scandinavia first began to build their homes from half-beams, or carriages. The logs were cut from two opposite sides, resulting in a slab suitable for constructing a floor, attic floor and roof. Over time, half-beam houses became a kind of hallmark of the Scandinavian style, and residents of the northern regions of neighboring countries became interested in the unique thermal insulation properties of the buildings.
Today they no longer remember that the bowls for a Norwegian castle were once cut by hand, and the half-timber had to be adjusted to the spot. Modern manufacturers supply the market with ready-to-assemble material made from softwood.
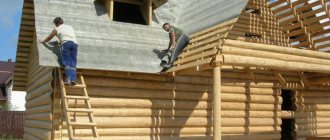
Construction of a bathhouse, preparatory stage
The construction of a bathhouse, like any structure, consists of several stages: preparation, installation of the foundation, walls and roof. In any case, the step-by-step construction of a bathhouse from timber begins with the choice of location and quality material. Typically, such buildings are located in a remote part of a suburban area. It is much easier to decide when the main residential building is already ready and the entire territory is planned out.
If the site is not built up, you need to think through everything taking into account the dimensions of the future building
It is necessary to pay attention to the fact that the building should be located at a distance of about 6 m from other objects. Its dimensions will depend on the number of rooms and their area
You can’t do without a shower, steam room, locker room and rest room
But you can always add a few more rooms, a swimming pool, a kitchen to them. The complexity of the planned work will depend on this, as well as the step-by-step construction of a bathhouse made of timber
You can’t do without a shower, steam room, locker room and rest room. But you can always add a few more rooms, a swimming pool, a kitchen to them. The complexity of the planned work, as well as the step-by-step construction of a bathhouse from timber, will depend on this.
In order for everything to be planned correctly, accurate calculations are made, an estimate is drawn up, a project is needed. There are standard and individual projects. The latter are created taking into account all the wishes of the customer. But at the same time, standard ones are much preferable. Based on them, it is easy to create a unique project, supplementing it with the necessary elements. At the same time, the reliability and safety of the structure is guaranteed.
Choosing a foundation for building a bathhouse
Design also involves checking the quality of soils. The choice of foundation will depend on this. The most preferred are tape and columnar. For independent work, the columnar one is more suitable, since it requires less cost, effort and financial resources. In this case, the phased construction of the bathhouse begins with marking the selected location according to the plan.
Piles should be located in the corners of the building, as well as at the intersection points of walls and partitions. In order to accurately determine the step and location, special marks are placed. In these places, earth will be excavated and piles installed. For this, concrete mixture and reinforcement are used. When laying permanent formwork, sheets of roofing felt and asbestos-cement pipe are used. This option is preferable for light buildings, such as a bathhouse made of timber.
But a strip foundation is much more reliable and stable. When choosing it, the stage-by-stage construction of a bathhouse begins with digging a trench about 30 cm wide. A larger width is not required because wood is a fairly light material. The first layer of such a foundation is river sand, poured no more than 15 cm thick. Next comes gravel
This will allow water to be drained from under the foundation in a timely manner, which is especially important in the spring.
When such a pillow is ready, a frame of reinforcement is constructed to ensure strength and stability. Then the concrete mixture is poured in two stages along the height of the formwork. When installing a strip base, you must also take care of waterproofing. After it has dried, you can continue building the bathhouse in stages and begin choosing material for the walls.
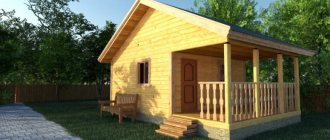
Construction of a bathhouse from profiled and laminated timber
Timber is most suitable for constructing walls. Installing it requires significantly less effort, especially if you choose a profiled one. The quality of the material used is the basis and guarantee of the durability of the building. Therefore, it is worth giving preference to timber prepared by specialists.
Using a log house will slow down the whole process. Since it needs time to shrink after installation. Construction of walls also requires sufficient skills and experience. Therefore, if you plan to independently build a bathhouse in stages, it is better to opt for profiled and laminated timber.
This material is manufactured directly at the factory. Therefore, when delivered to the construction site, it already contains special grooves and tenons for connection. Accordingly, the structure will be assembled quite quickly, like a construction set. It should be noted that the wood is supplied already dry. As a result, there is no need for shrinkage of the material, which means that the construction process will move much faster.
Walls made of laminated veneer lumber are practically not subject to deformation, since the influence of surrounding factors is minimized. In some cases, as when using profiled timber, caulking is required, but extremely rarely. One of the most important stages of wall construction is the installation of the first crown. But before that, waterproofing is performed.
Features of half timber
For the carriage, select trunks with a diameter of at least 40 cm. After processing and sawing, they acquire a height of at least 35 cm and a thickness of:
- 20-24cm – for external walls;
- 15cm – for internal partitions.
The energy efficiency of a half-beam log house is influenced by the height of the lumber, because there are significantly fewer crown joints in the wall. At the same time, the thickness of the walls allows you to expand the interior space of the house.
The half-beam is distinguished not only by its unique cross-sectional shape, but also by its unusual self-jamming lock.
A specific locking connection, called a Norwegian bowl, a Norwegian chopping block and a Norwegian cross, helps the half-bars fit tightly to each other. After shrinkage of the log house, the inter-crown gaps are minimal, and the connections are reliable and durable. The trapezoidal shape of the Norwegian bowl is complicated by the presence of a wedge-shaped seat, a system of grooves and protrusions.
Types, optimal timber size
Materials available for sale:
- planed (solid);
- profiled;
- glued.
Planed will be cheap, but it will have to be thoroughly impregnated with antiseptics. Many people do not like the appearance of the finished structure, so the outside facade is often sheathed with a block house or siding.
The profiled timber has tenons and grooves along its entire length. It is convenient to put the elements together using the tenon-groove principle. The connection is tight, which allows moisture to penetrate inside. The material requires protective treatment with antiseptics and fire retardants.
Glued laminated timber is the most expensive, but it is from it that reliable frame bathhouses and houses can be assembled. It is carefully polished and impregnated with antiseptics at the factory.
For the construction of a Russian bath, the following sizes of raw materials are used.
100*100 mm
For a year-round bath, this material is too thin. The walls will quickly freeze, condensation will begin to form, and the wall decoration will gradually deteriorate. The steam generated from a constantly loaded stove will not last long in severe frosts.
In addition, the 100*100 mm section imposes restrictions on the height of the building. A large load is unacceptable.
To use it in winter you will have to make insulation.
Laying methods
To work correctly with a carriage you need to know exactly how to lay it correctly
When laying the carriage, it is very important to ensure the structure maximum stability and reliability. If everything is done correctly, a house built with a similar design can last for many years without losing its visual appeal.
Some buildings can last more than 200 years.
Many people resort to laying the carriage flat. This is an ideal method when a low-height house or bathhouse is being built (only 1 floor). This method is not suitable for higher constructions. With this installation method, corner joints are always made in different places on each of the crowns. This means that the carriage of one wall of the building in the lower crown will have one size, and in the upper one - another. And this is done along the entire height of the log house.
There is also a slightly different way. If standard size logs (6 m) are used, they are often laid out one on one in a clearly horizontal position. This makes it easy to form the crowns of the structure. To make the joining as reliable as possible, grooves are formed located in the upper part of the elements. This is where the inter-crown seal is laid. Special cuts are made in the corners of the logs. These are locks with a wedge-shaped profile.