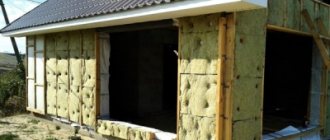
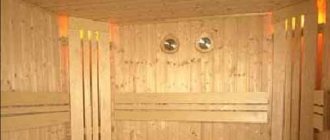
You can protect the bathhouse from moisture and heat loss if you build such an object on a plinth: that is, on a special base located on the foundation.
Thanks to the high-quality arrangement of this element, it will be possible to ensure that the bathhouse or sauna will also be completely protected from the occurrence of condensation, which inevitably leads to the formation and growth of fungal lesions. Insulating the basement becomes one of the main tasks.
Insulation of the base from the outside and inside: analysis of the most popular and practical options
As it is closest to the eternally damp and cold soil, the foundation is most susceptible to various negative factors, and therefore always collapses faster.
Therefore, its base, the above-ground part, is always carefully insulated and waterproofed so that neither dampness nor low temperatures penetrate into the bathhouse and cause discomfort. Especially if the basement of the bath house is also used as a living space. That is why insulation of the steam room basement is so necessary - thorough and reliable. What exactly is considered a base in a bathhouse? The word “basement” comes from “zoccolo” (Italian) - this is the foot of a building that stands on a foundation. Those. a kind of continuation of the foundation - a transition from it to the walls of the bathhouse. The main task of the plinth is to prevent moisture and cold from entering the premises and play an important aesthetic role in the exterior. Any steam room on a good, high-quality base always looks solid. And the second, and no less important task of the plinth is to protect the walls from the formation of condensation, which always leads to the development of fungus. This is the question we will study right now.
Alternative ways to build a plinth
Sometimes craftsmen use non-standard designs for the installation of a bathhouse plinth, for example, from sand-lime brick, ordinary ordinary brick, wall stones, slate, etc. It is worth noting that any wall materials as plinths are undesirable, since they are not designed for direct contact with the ground . Still, it is better to construct structures in a single mass with a base. If the foundation base is made in the form of piles, then it is preferable to make the above-ground part in the form of a monolithic reinforced concrete belt.
The first and last row of the red brick plinth must be placed in a poke, and all the inner ones in a spoon. This will ensure a good bond and give the necessary rigidity. If there are more than 10 bricks nearby, then on the 5th row it is also necessary to “plug” the base.
If the foundation ends at a level equal to the ground level, additional brickwork can be made as a plinth for the construction of wooden walls of the bathhouse. It is better to use silicate type bricks, as they interact well with a humid environment. It is necessary to raise the level by 500-600 mm from the ground surface (but not less than 250 mm). The thickness of such a wall will be 400 mm for a large bathhouse and 250 mm for a small one-room building.
Ventilation outlets must be made. To do this, vents are left approximately in the middle part of the masonry in height. It is advisable to make a reinforcing belt of reinforcement and concrete on top of the masonry. Waterproofing is laid under the brick and under the wall, since in this case we use three types of materials for the foundation, plinth and walls.
Plinth cladding
The external cladding will additionally protect the base and wall structures from moisture and temperature changes. The materials used for cladding are extremely durable - moisture-resistant and frost-resistant. These include decorative facing bricks, tiles, and hanging plastic systems. The base, decorated with natural stone - limestone, sandstone, as well as artificial stones, looks very beautiful.
The basement part of the foundation of a small bathhouse in a summer cottage can also be lined with various available materials, for example, fragments of ceramic tiles or glass, laying them out in the form of a mosaic.
PS Here the base is ready, now we choose a log house for the bathhouse and EASY STEAM FOR YOU!
Have fun!
Insulation with spray polyurethane foam - no gaps
Waterproofing is not necessary for this method. Polyurethane foam is sprayed from a construction gun - directly onto the concrete base. The normal layer is 5-7 cm. Polyurethane foam dries instantly, and a dense and heat-insulated water-repellent surface is formed on the base. For more warmth, you can even spray it twice, with the second layer directly on top of the previous one, without any preparation.
Next, the mounting mesh is attached and a layer of plaster or some other decorative finish is placed on it.
Insulation made from extruded polystyrene foam
Here's how to insulate the base with extruded polystyrene foam:
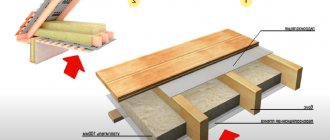
1. We lay a waterproofing membrane on top of the foundation. 2. On top of the membrane - heat-insulating boards up to 120 mm thick. They can be secured with glue using the spot application method.
Advice: you can also lay thin slabs in two layers - it will be even warmer. And in this case they need to be laid in a checkerboard pattern, overlapping the seams of the previous layers.
3. On top of the slabs there is an additional profiled membrane as drainage for draining groundwater. 4. Now – geotextile as a filter layer. 5. And finally, we insulate the horizontal foundation slab and make a concrete blind area around the entire perimeter of the bathhouse.
Yes, this option for insulating the base with your own hands is more difficult to do, but, as practice shows, a well-thought-out technology that is personally implemented is always more effective than what a hired team does. After all, any worker just wants it to be “faster, easier, and so that you can take something for yourself.”
Do you need a brick base?
Do you need a brick plinth? This is a question that plagues every developer. You will find part of the answer in the previous section.
But the base has another function - protective. As you know, the foundation located in the ground absorbs moisture. Especially if the concrete was prepared manually, then its hygroscopicity leaves much to be desired. Therefore, it is always necessary to lay roofing material between the concrete and the brickwork of the base as a waterproofing layer, which will protect the brick from absorbing ground moisture.
So, it is necessary that the brickwork of the base protrudes 20-50mm above the foundation. This is done to protect the foundation and the penetration of precipitation (rain, snow) onto the waterproofing layer.
For example, the width of the foundation is 300m. This means that the brickwork of the base needs to be made 1.5 bricks wide (380 mm). This results in 40 mm of overhang on each side of the foundation.
If the width of the foundation is 400 m, then it is not at all economical to make a base 500 mm wide (2 bricks). You can make it 1.5 bricks (380 mm) and shift it 20 mm to the outside.
You can also make a sinking version of the base, when the brickwork is done in the middle of the foundation strip. It turns out that the foundation will protrude by 20mm. In this case, the ingress of rain moisture onto the waterproofing layer is inevitable. Accumulation of water and subsequent absorption by the brick is possible. This can be avoided by protecting the brickwork and foundation with eaves overhangs made of galvanized or painted steel.
A log house installed on a plinth will be protected from ground moisture by waterproofing layers in two places (1 - between the foundation and the plinth, 2 - between the plinth and the log house), which will increase the service life of the log house: as a rule, the lower crowns of the log house rot in 90% of cases from constant entry of moisture from below.
Foam insulation - quickly and economically
With polystyrene foam, the base of the bath will be protruding - and well protected from moisture and cold. For this purpose, it is better to take material with a density of at least 25 kg/cubic meter, and any thickness, unless the base protrudes more than 40 cm.
Stage I. Marking the new base
The polystyrene foam will slightly increase the volume of the base, and therefore it needs to be marked in advance. To do this, pull the string just above the waterproofing and draw a horizontal line on the wall.
Stage II. Preparing the surface
We clean the surface of the dirt and prime it with a deep penetration compound.
Stage III. Styrofoam fastening
We start gluing the foam plastic from the corner - to do this, we make markings with a marker and cut off a couple of pieces with a knife. Now we apply glue to the wall with a notched trowel, apply foam boards and lubricate the ends. So, having glued several plates, we make holes with a drill, fix the sheets and hammer in nails.
Stage IV. Reinforcement
Now the foam needs to be treated with primer. Next, use cement glue to glue the metal slope corner around the perimeter and corners. We also attach the reinforcing mesh to the foam with glue, having previously cut it into the same pieces as the foam.
Here's how to attach it: apply glue to the foam, spread it with a wide spatula, apply the mesh and go over it with the spatula again.
Stage V. Finishing the base
After the glue has dried, we move on to finishing the base. Apply the putty solution with a wide spatula on top of the glue-cement. The dried putty is already primed and can be painted. And you need to paint the base with special acrylic facade paint.
Natural and artificial stones are also excellent for cladding the base of a bathhouse - they can be attached with ordinary glue for installation work. And this finish looks simply gorgeous!
How to lay a brick plinth
You need to lay a brick plinth over a waterproofing layer of roofing felt.
Several recommendations on how to lay a brick plinth:
- Before the brickwork, a horizontal waterproofing layer of roofing felt must be placed on the surface of the foundation to prevent moisture from penetrating from below. According to regulatory documents in construction, it must be made of 2 layers of roofing felt, with each layer sealed with mastic.
- If the base structure is massive (in width and height), then a leveling screed must be made of a 20mm thick cement-sand mortar over the waterproofing layer, on which a masonry mesh with 50x50mm cells made of 4mm wire is laid. This reinforcing layer will give additional rigidity and strength to the base of the overlying brick plinth.
- For a log bathhouse, the above condition is not so important, because the log house is much lighter than the brick walls of the house and the bathhouse does not require a high base.
- The first row of brickwork must be bonded
- It is necessary to carefully fill horizontal and vertical joints with mortar, because if moisture penetrates, the mortar in the joints will begin to collapse over time.
- if the base is high, then you need to reinforce the masonry every 3 or 5 rows, or at least in the corners.
- Horizontal waterproofing from roofing felt is again performed on top of the top row of brickwork of the plinth.
Since the brickwork of the plinth is that part of the walls that is especially susceptible to the influence of atmospheric influences (rain, snow, ground moisture) and works almost all the time in a humidity regime, then for permanent buildings it must be additionally protected. The best protection is natural stone cladding. Other options are possible: ceramic tiles, artificial stone, plaster).
A few final tips
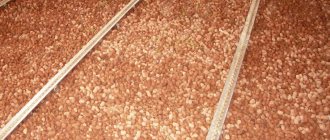
When insulating the base from the inside and outside, the most important thing that needs to be taken care of first and foremost is protecting the thermal insulation material from rodents. And to do this, the trench for the insulation needs to be deepened a little - along the entire perimeter of the bathhouse. We fill its bottom with a screed of 5-10 cm and install the insulation itself with the obligatory subsequent covering of it with expanded clay concrete.
Also, if the building does not have a basement (like a typical bathhouse, for example), ventilation and inspection openings must be left. Even better is to install hatches.
That's all! Take care of insulating the basement during the construction phase of the bathhouse - and it will always be warm and cozy.
Source
Choosing a foundation for a log bath
- Weight of the building;
- Features of soil structure.
- digging holes for each pillar;
- filling the hole with a sand-gravel mixture;
- installation of waterproofing;
- installation of formwork on each pillar;
- fastening reinforcing rods;
- pouring concrete;
- bundle with a grillage around the perimeter;
- waterproofing pillars with bitumen.
Important! If you choose the wrong type of foundation and violate the technology of its installation, there is a risk of distortion of the bathhouse structure, even to its destruction.
The most dangerous natural factor for the integrity of the foundation of a building is soil freezing. If there is uneven thawing on one side of the building, the soil may “float”. In this case, even reinforcement will not save a brick foundation. Monolithic foundations made of concrete and metal are much stronger, but they can also crack. For greater stability, anchor platforms are created on such soil.
To determine the nature of the soil, dig a hole up to one and a half meters deep and evaluate the composition of the soil. It is important to investigate the groundwater level. For clay, gravel and sandy soil, a columnar or strip bathhouse foundation structure is more suitable. For soft marsh and garden soil, a pile foundation will be required. The most universal option is fine sand or rocky rocks - any option is suitable for them.
The foundation of a log bath can be buried or shallow. In classical construction technology, it is believed that the depth of the base of the structure should be greater than the depth of soil freezing. But it should be borne in mind that a wooden structure has a relatively small weight and size, so it is possible to reduce the cost of arranging the foundation of a bathhouse by reducing its depth. That is why shallow foundations are increasingly being used.
The columnar option is excellent for wooden buildings and frame structures. Such baths are light in weight and do not place significant load on the foundation. The columnar base is distinguished by its simplicity of design, but at the same time it is famous for its exceptional reliability. Each element of such a base is located in structural units that have an increased load.
Arranging a columnar foundation for a log bathhouse does not require significant expenses. In addition, you can do this simple work yourself, as it does not require professional skills.
Algorithm for constructing a columnar foundation:
The disadvantages of the columnar version include the impossibility of arranging a cellar, but is a basement needed in a bathhouse? A columnar foundation should not be placed on moving or heaving soil. Such a base structure requires additional insulation of floors and work to drain rain and wastewater.
The tape base is considered a classic and economical option. The constructed foundation can have a prefabricated or monolithic structure.
A monolithic base is made using formwork, filler and reinforcing material. The prefabricated foundation is made of reinforced concrete blocks. This design is easy to install, but allows moisture to pass through at the joints.
The shallow strip foundation has a depth of up to seventy centimeters. The base, located below the soil freezing level, usually has a depth of 120-160 centimeters.
Algorithm for arranging a strip foundation:
- cleaning and leveling the site;
- marking the foundation using a cord;
- digging a trench;
- backfilling a sand and gravel cushion twenty centimeters thick;
- foundation waterproofing device;
- installation of formwork;
- installation of reinforcing material;
- layer-by-layer pouring of concrete;
- installation of vertical studs for fastening the base of the log house;
- waterproofing the foundation surface with bitumen and removing formwork.
The metal-reinforced strip base is suitable for complex, heaving soils.
A screw pile foundation makes it possible to build a log bathhouse on difficult soil. This technology was developed for military purposes and is now successfully used in residential construction.
The foundation on piles can be installed on any soil, including areas with difficult terrain.
The pile is a pipe with a screw blade that is screwed into the soil. There are several types of piles:
- metal;
- concrete;
- wooden.
Such piles are relatively inexpensive and can be installed even on marshy soil.
The disadvantage of the pile option is its service life - up to half a century.
Slab foundation
It is a monolithic slab under the entire building. The foundation made of slabs has excellent load-bearing characteristics and is suitable for complex soil prone to subsidence. A slab is an excellent base option when groundwater is close to the soil surface.
Such a foundation is used infrequently, mainly when other types of foundations are not suitable for one reason or another.
You can build bathhouses in dacha and suburban areas from any materials, but traditionally preference is given to wood: rounded logs, timber, etc. Saunas made from logs are most common due to, first of all, their environmental friendliness, excellent thermal conductivity qualities, and the unique aroma coming from the heated walls, which not only allow you to relax, but also improve your health.
Alternatively, if the plot is small, the log house can be attached to the house, but most often a separate building is erected. Before starting construction, it is necessary to make a project and decide how the bathhouse frame will be installed on the foundation, decide on the location for construction, examine the soil, etc.
Log bathhouse.
Photo of a bathhouse on a slope by the river.
There are no special requirements or restrictions for placing a bathhouse on the site, but a natural slope to the south, or, in extreme cases, to the west or east, would be preferable. A site near a river would be ideal: in this case, there is a slope, a natural reservoir is within easy reach, and there is no need to build a swimming pool.
But if there is no natural reservoir, the question of building a pool may arise - in this case, a study of the level of groundwater will definitely be required, since if they turn out to be surface water, this idea will have to be abandoned.
When building a bathhouse on a country plot or in a private property, the question of how to make a foundation for a bathhouse becomes one of the most important in terms of ensuring the durability and reliability of the entire structure.
Naturally, the question arises of how much it costs to make a foundation for a bathhouse, and it should be noted that this is a rather expensive and labor-intensive undertaking. You can significantly reduce costs if you make the foundation for the bathhouse yourself.
If you decide to build a building on your own, then, first of all, you should choose what kind of foundation to make for the bathhouse.
The foundation of a bathhouse differs little from the foundation of any other small building. In practice, several types of foundations are provided for different conditions.
The following types of foundations for a bathhouse are possible:
- Strip foundation. This structure is a concrete strip with a reinforcing belt, laid under load-bearing walls along the entire perimeter of the structure. It is very well suited for large baths, but for its construction you need fairly hard soil. Such a foundation can be of two options: a recessed and a shallow variety. In the first case, the pouring depth drops below the maximum seasonal freezing of the soil. The shallow-depth version is installed on hard soils with small building dimensions.
- Columnar type foundation. Such a foundation provides for the support of load-bearing structures only at the most loaded points: at the corners of the building and in the space between them in increments of about 3-3.5 m. The supports are made in the form of reinforced concrete pillars of rectangular cross-section. In order for the load on the supports to be uniform, a grillage in the form of a wooden or metal beam is laid in the upper part, connecting the pillars to each other and covering the entire bathhouse perimeter. Such a foundation can be erected with relatively small building sizes and fairly hard soil.
Pile or screw type. Essentially, this is a variation of the columnar option in which the concrete pillar is replaced by a metal pipe (pile) or a metal screw pile. This type of foundation is indispensable for loose and moving soil, in swampy, peat areas. The pile is driven through a loose layer until the soil reaches sufficient hardness.- Tiled or monolithic foundation. Such a foundation is made in the form of a monolithic reinforced concrete slab covering the entire area of the building. Taking into account the large area of support on the ground, the depth of such a foundation can be significantly reduced, and it can be erected even on loose soils. In terms of material consumption, this type of support is superior to other options, but in terms of ease of construction and reliability it has clear advantages.
The question of how to make a foundation for a bathhouse yourself is, first of all, related to the correct consideration of influencing factors.
The depth of the foundation and the choice of its type depend on the basic characteristics of the soil. These parameters include:
- groundwater level taking into account seasonal changes;
- depth of soil freezing in winter;
- the structure and composition of the soil, determining its hardness, heaving, and mobility.
One of the most important parameters is the groundwater level. The lowest point of the foundation should be 22-27 cm above this level. This parameter for a specific area is determined experimentally: by digging a test hole 1.4-1.9 m deep. In the case where groundwater comes close to the surface of the earth, a strip foundation can only be shallow, but a pile or tile option can be used.
Another important parameter is the depth of winter soil freezing. The foundation should go below the maximum frost mark. This requirement is due to the fact that when the soil freezes, it creates such a force that it can lift the concrete. This rise is not the same in length, which causes different deformations, and, as a result, cracking of the material and its gradual destruction.
Technology for finishing the base of a bathhouse with siding
Siding is easy to install. Anyone can cope with the work, even without special construction skills. Depending on the surface area, finishing the bathhouse base with your own hands will take several days. For cladding, you can use wood, metal or vinyl siding. The latter is made of polypropylene, to which special frost-resistant substances are added, as well as components to increase the strength and elasticity of the panels. In addition, it will not cost much.
Preparing for finishing the bathhouse base
You need to start finishing only after high-quality insulation and waterproofing of the structure. It is also important to make inspection and ventilation holes. The best option is to install hatches for this at a height of 15 cm from the blind area. It is advisable to cover them with a metal mesh to prevent pests and ice from entering in winter.
All wooden elements must be impregnated with antiseptics and fire retardants. If the base is brick or concrete, then level it with adhesive and cover it with a primer solution. It is advisable to treat the surface with protective impregnations in several layers. We start lining when they are completely dry.
Installation of siding frame
When choosing material for lathing, give preference to galvanized metal profiles. They are more durable and do not corrode. A wooden frame will last much less.
We carry out the work in this order:
Features of fastening siding to the base of a bathhouse
Having chosen a material that imitates stone, wood or brick, you need to ensure that the overall pattern, if any, is observed.
We perform finishing in the following sequence:
Material for the base of the house
Now there are two opinions about the design of the plinth, when the question arises of what material to choose for the plinth of the house:
- the basement part is made of concrete, as a continuation of the monolithic foundation
- the base is made of brick
Laying a brick plinth was not even discussed in the past. The plinth must be brick, period. Just 10 years ago it was not fashionable to raise the foundation higher than 150mm above the ground.
If we compare concrete and brickwork, then in terms of thermal properties, without a doubt, the brick plinth wins. Because, for a residential building, a brick plinth with a masonry thickness of 510-640 mm is laid out. This thickness of a brick wall does not require additional insulation in snowy regions of Russia.
But recently, the technology of insulating concrete walls has come into fashion. And this plinth technology is now preferable when constructing a permanent residential building, because, simultaneously with the insulation of the plinth, horizontal insulation of the blind area is done, which provides an advantage as a protective measure for foundations from freezing.
If you are not going to insulate the basement part of the wall and the blind area of the house from the outside of the house, then without any options, laying a brick base is suitable for you:
- easier
- warmer
- cheaper
- does not require additional finishing
But this is a subjective opinion.
If it is easier for you to monolith the base, then, of course, choose this option. Because in both options, the bathhouse is a structure that does not require a high underground. The maximum height of the base for a bath is 300-400mm.
And if you choose a brick base for a bathhouse, all the same, its thickness will be no more than 250 mm (in brick), due to the fact that it is not necessary to make a wide foundation for a log house from 200-240 mm logs. And this thickness of brickwork is not much warmer than a concrete wall. And during seasonal use (in summer), warm material for the base is not of great importance at positive outside temperatures.
Rules for plastering the base of a bathhouse
You can plaster the base of a bathhouse using different mixtures. There is a special mosaic plaster on sale, which contains small grains (0.8-3 mm in diameter). After application, it looks like a multi-colored mosaic. This plaster is a good option for finishing the base of a bathhouse, as it is steam and waterproof. However, before you apply it, you will need a base. The latter is always made of cement or lime-sand plaster.
Preparation for plastering the bathhouse base
Before you begin plastering the base, its surfaces should be prepared. If plaster is applied to the surface of a long-constructed building, it is necessary to thoroughly clean the base of paint and dirt. After the walls are leveled, they need to be coated with a primer.
If there are deep cracks or potholes on the base, they should be repaired using a special repair compound. Remember, if you are going to plaster a base insulated with expanded polystyrene or polystyrene foam, you need to take care to improve adhesion - apply notches and treat with a primer.
Technology of applying plaster to the base of a bathhouse
You can begin work on applying a layer of plaster a couple of days after the surfaces have been coated with primer.
We carry out the procedure as follows:
How to sheathe the base of a bathhouse - watch the video:
Source
Beauty inside! Bath decoration
Your bathhouse is almost ready, and it’s time to start decorating the interior. This task is not as simple as it might seem at first glance. When can I start finishing the bath? What materials should be used to decorate walls and ceilings? Do I need to use impregnation or is it better to leave the wood untreated? These are the questions asked by those who are building a bathhouse for the first time. Forumhouse.ru participants will help you understand the intricacies of bath decoration.
The choice of finishing materials depends, first of all, on the nature of the building - whether you want to take a steam bath in a Russian bathhouse, bask in a Finnish sauna or visit a Turkish hammam. It is also important to consider what materials were used for the construction of load-bearing walls, partitions, floors and shelves. And, of course, you need to choose materials based on your ideas about the design of the future premises and financial capabilities.
Wooden paradise
The most common option for finishing a bath is lining made of natural wood. It should be well dried, as fungus forms more easily in damp wood. It not only spoils the appearance of the finish, but can also cause great harm to the health of steamers.
Linden feels best in a hot bath or sauna - at high temperatures it does not release resins, unlike cheaper pine. An exception from conifers is noble cedar, which does not leave sticky marks and can be safely used in a bathhouse.
A member of the Wiktar noticed streaks of resin on the paneling four years after finishing the bathhouse. Moreover, it was not the lining itself that was “crying” - it was fake, but the ceiling block to which it was nailed.
Wiktar:
– It was necessary to cover the ceiling bar with foil.
Aspen lining does not emit resins and is more resistant to moisture and rotting. They also like to use it in finishing steam rooms, since aspen does not heat up too much, does not bend or crack from high temperatures. Its only drawback is that aspen darkens over time, which can change the interior of the bathhouse not for the better.
Finishing with rare types of wood is in fashion today. For example, noble red, ebony or rosewood, which has a dense structure and a very beautiful pattern. African abashi oak is also good in a bathhouse - even if the temperature in the steam room approaches 120 degrees, this wood with an even structure heats up only to the temperature of the human body. Therefore, expensive abashi is most often used to create shelves.
– On light abashi, when it dries, not very beautiful stains appear. So I soaked the wood in linseed oil and solved the problem.
You can find other opinions of forumhouse.ru participants on the use of abasha in the bathhouse in this topic of our forum.
Bark trimmed
Croaker is gaining more and more popularity in the decoration of baths. But not simple, but fake. Half-logs with a rounded shape accumulate heat well. And thanks to its roughness, bast does not burn and massages the skin. In addition, this decoration allows you to create the atmosphere of ancient Rus' in the room. So the expression “not a bad idea” - as they used to say about those who had greater wealth and stood out from the general background, is completely unfair in our time. If you want to stand out, wash the bathhouse with bast!
Robe for the King
Does the wood used to decorate the bath need processing? Some of our forum members believe that a tree without a coating, like a king without a robe, does not look so bright and noble. Others, on the contrary, are sure that in a steam room it is better to leave the wood’s natural beauty and open pores, without clogging them with “all sorts of chemicals.”
However, if you decide to take the first path, choose varnishes and oils designed specifically for baths and saunas - they are adapted to high temperatures and humidity. Ordinary varnish begins to stick unpleasantly even at just over thirty degrees Celsius. And this cannot be allowed in the steam room - such a coating will then have to be scraped off the walls for a long time.
Member of forumhouse.ru Alewprof77 :
– We use special wax for baths and saunas. It can be tinted in various shades, it has no odor and repels water, dirt, dust, etc. well. In case of severe contamination, you can always wash it with a soapy solution - and the bathhouse is as good as new.
But the use of fire protection, which is based on ammonium salts and its organic derivatives, in a steam room is extremely dangerous. Such compounds emit carcinogenic fumes when heated. So if you want the bathhouse to remain a health resort and not ruin your body, read the labels carefully before applying the composition to the boards.
Solid as a rock
If you are a connoisseur of the subtle beauty of the East and are building a hammam, you cannot do without beautiful natural stone for decoration. The Turks decorate walls, floors, and shelves with natural marble - white, pink, greenish. This stone retains heat well, but does not get so hot that you cannot touch it.
Another “bath” stone is semi-precious jadeite. It has a large margin of strength and a beautiful green color - such a finish will not only look good, but will also calm your nerves.
If natural stone is too difficult to obtain and prices are high, use ceramic tiles to decorate your bath. Moreover, there can be many variations here - both in style and in the size of the tiles.
In the salt cave
You can enhance the healing effect of a bath with the help of...salt panels. Yes, yes, this finishing material is made from natural salt and comes in several natural shades - white, pink and gray.
The effects of microelements contained in salt are further enhanced under conditions of high temperatures and humidity. Thus, iodine is responsible for the proper functioning of the thyroid gland. Calcium maintains bone integrity and is involved in the functioning of the circulatory system. Magnesium is an indispensable aid to the heart. And potassium, sodium and selenium slow down the aging process, having a beneficial effect on the skin. In addition, salt is your best friend for frequent runny noses and diseases of the respiratory system. It’s not for nothing that doctors often prescribe patients to visit salt rooms as an inexpensive alternative to a seaside resort.
A matter of technology
More than one article or even a book could be devoted to discussing the technical details of the interior decoration of baths.
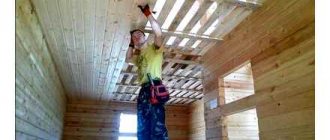
When, for example, can you start decorating a bathhouse? According to our forum members, the finishing of a bathhouse made of timber or logs begins no earlier than six months after the assembly of the log house - the structure should shrink.
In what sequence should I cover a room with wood? Forumhouse.ru member Valera69 advises starting with the floor, then sheathing the partitions, the ceiling, and lastly, the load-bearing walls.
Is it necessary to additionally insulate the bathhouse, and what filling should a proper pie have? You will find detailed answers to these questions in our material and in the video about remodeling the bathhouse.
Create beauty in the bathhouse and steam in pleasure, with health benefits! And the advice of our forum members will help you with this.
Source
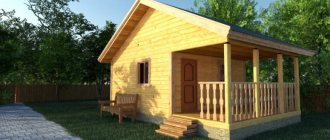
Wooden log bathhouse: pros and cons
A log bathhouse is a classic Russian version; such buildings are being built in all regions of our vast country. The popularity of wooden baths partly depends on the fairly economical material, which is not in short supply throughout Russia.
The advantages of wooden baths include environmental safety, quick heating of the washing and steam compartments; efficiency and speed of construction (a log bathhouse is easy to build with your own hands).
There are also plenty of disadvantages to wooden baths: the log house has significant weight, there is a high risk of fire and the occurrence of foci of biological damage (rot, mold and fungus can render a wooden building (log bathhouse) unusable in a very short time).
In order for a bathhouse built from logs with your own hands to serve for many years, it is necessary to carefully construct a support base that can withstand the loads from the weight of the bathhouse, the water boiler, the weight of human bodies, snow loads in winter and other factors affecting the foundation.
Waterproofing methods
Waterproofing is carried out in three main ways: painting, pasting and mixed. Let's take a closer look at each of them.
Painting. The foundation is pre-treated with an antiseptic, after which the following materials are used:
- bitumen mastic, emulsion, penetrating solutions, protective or water-repellent impregnation.
Pasting. In this case, construction waterproofing fabrics are used, for example, roofing felt, membranes or geotextiles. Any of the listed materials must be arranged in one continuous sheet. This is necessary to prevent water or condensation from entering.
Mixed. This technology combines both presented methods.
Vertical waterproofing
When vertically waterproofing the foundation for masonry, distribution occurs over the entire height of the foundation. The upper boundary will be the area in which precipitation falls on the wall, and the lower boundary will be the “sole” of the foundation. The materials chosen must have high moisture resistance so that the floor does not deteriorate from water, mildew or mold.
The gluing technology is also suitable for vertical waterproofing. Then the foundation is covered with rolled material, for example, roofing felt or technoelast.
Let us consider in detail the method of waterproofing with bitumen:
Remember that the container must be constantly heated to avoid the mixture from hardening! With proper work process, bitumen penetrates into all small concrete pores and becomes an excellent barrier to penetrating moisture. After 5-6 years, the service life will come to an end, and cracks will appear on the surface.
As for vertical waterproofing of strip foundations, in some cases it is not necessary. Let's look at cases when you don't have to do it, and when you have to do it.
When not to do it
In addition to concrete, the installation of a blind area near the building also cuts off a significant part of the moisture. The concrete can handle the rest on its own.
When to do it is necessary
If the bathhouse has a basement, waterproofing work is necessary, regardless of the quality of the concrete. Using insulating materials, you need to make a so-called “trough” so that water or its evaporation cannot penetrate through it.
A combined method of waterproofing is best suited: first we put a layer of mastic or impregnation, and on top - a sticker of a spike-shaped polymer membrane.
You can start insulating the foundation if you need a heated basement. A suitable material would be polystyrene foam for slabs. It has excellent heat-protective properties, does not rot, and does not deteriorate due to insects or rodents.
Only on top of the thermal insulation layer can a layer of waterproofing be applied. If polystyrene foam is laid correctly (i.e. in 2 layers, and all seams are taped), then it is no longer necessary. However, it wouldn't hurt to be on the safe side. Remember that the rolled material will need to be glued onto the mastic again, since it will not be possible to fuse it onto polystyrene foam.
Regardless of whether there is insulation or not, membranes are perfect for soils. They will compensate for the forces of soil heaving thanks to their rounded spikes. And the existing air between the foundation wall and the membrane itself will become an additional heat-insulating layer.
Horizontal waterproofing
Horizontal waterproofing of a bathhouse can only be done at the construction stage. This method will protect the foundation from the harmful effects of water and condensation. If the structure does not include a basement, then the upper level will be the boundary between the foundation and the wall. Otherwise, the level is the line that runs under the basement floor.
It is also possible to use water-repellent compounds for waterproofing. If your budget allows, waterproofing membranes are perfect. Before installation, they must be preheated over a fire, and then pressed to the surface of the foundation and made even with a roller.
As a rule, roofing felt is often used as a waterproofing material. Take a closer look at the rubyroid laying technology:
Brand of brick for the plinth
The grade of brick for the basement should be no lower than M200 for a brick house with several floors and no lower than M150 for other lighter wall structures of 1 floor. Why? Because the base is the most loaded structure after the foundation itself. The base will carry everything above it:
- walls
- overlap
- roof
- snow on the roof
- furniture and people in the house
In accordance with SNiP II-22-81 “Stone and reinforced masonry structures”:
1.3. Application of silicate bricks, stones and blocks; stones and blocks made of cellular concrete; hollow bricks and ceramic stones; semi-dry pressed clay bricks are allowed for external walls of rooms with wet conditions, provided that a vapor barrier coating is applied to their internal surfaces. The use of these materials for the walls of rooms with wet conditions, as well as for the external walls of basements and plinths, is not allowed.
It is recommended to use fired clay brick of plastic formation in accordance with GOST 530-2007 “Ceramic brick and stone” M-150 and more, F-50, where:
- M – strength and resistance to bending, compression
- F – frost-resistant (resistance against sudden temperature changes)
Other waterproofing methods
There are lesser known waterproofing methods that are also worth mentioning.
The second method is protective screens. Bentonite mats, which are made from clay, are used here. They are recommended to be combined with other protective materials. Similar to the previous method, you must first prepare the foundation, and then fix the clay mats on it using dowels. Near the base, you can install a concrete pressure wall to prevent the mats from swelling from moisture. During the first few days of operation, the paper part will collapse, and the clay will cover the entire surface of the foundation, thereby protecting it from water.
What materials are best to use
When building a bathhouse, many cannot decide how best to treat the foundation from moisture. Today, waterproofing additives, rolled materials and coating mixtures are very popular.
- Liquid – reduce the degree of porosity of the foundation; Elastic additives – increase the viscosity of the solution and improve water resistance; Dry - penetrate into the deep cracks of the foundation, ensuring its safety.
All of the listed materials are complete components for waterproofing. To ensure the most effective protection of the bathhouse foundation, it is better to combine several waterproofing materials.