For some reason, the average citizen has always associated the dugout as an indispensable attribute of two things: either with the arrangement of the location of the partisan detachment during the Great Patriotic War, or with the hopeless life of the proletariat before the revolution. That's right. However, there is such a thing as a dugout bathhouse. This is what our story will be about today.
Bathhouse underground
An underground bathhouse, whose design resembles a dugout, is considered an unusual but economical structure. The walls are lined with stone for reliability. There is often dampness in the dugout. High concentrations of moisture are observed in spring and autumn. The stone walls of the dugout easily resist moisture.
Bathhouse walls made of wood have a shorter service life. Dampness does not spare the material. The advantage of wooden dugouts is that they warm up quickly compared to stone buildings.
It will only be possible to install a dugout bathhouse in an area with deep underground layers of water. It is important to choose a hill. In the lowlands, the dugout will be flooded with melt and rain water. The height of the bathhouse is 25 cm greater than a person’s height. The dugout cannot be completely immersed in the ground. The pit is dug to such a depth that part of the bathhouse extends above ground level. Windows are installed in the protruding parts of the walls of the dugout for natural lighting and ventilation.
Advice! Dugouts that partially protrude from the ground are made if they use a bathhouse project without electricity.
The design of a wooden dugout involves the installation of log supports at the corners of the pit and in the center. Moreover, the pit can have not only a rectangular shape. If desired, the dugout bathhouse can be built with a tent of 6 or 8 corners. If the roof is supposed to be covered with earth, it should be made flat. The soil will not slide off such a bathhouse roof during rain or melting snow. The roofing material of the dugout is several layers of waterproofing. The material is laid on a continuous sheathing of boards. The rafters of the dugout are round timber cleared of bark. All wooden elements are impregnated with protective compounds against bark beetle and fungus.
Forest dugouts are not covered with waterproofing. The roof is covered with dense layers of clay, leaves, moss, and pine needles. The walls of the dugout need special waterproofing. On the soil side they are covered with roofing felt, film or membrane. To prevent the soil from falling into the dugout, the walls of the pit are strengthened with a board nailed to the supports.
Advice! It is better to build stone dugouts in a round shape. The design is more resistant to heaving and lateral shift of the soil in winter.
Do-it-yourself dugout bathhouse: photo
Some historical facts
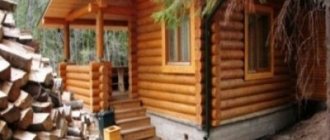
In the Russian Federation, when building a bathhouse, a log house was built, and then a couple of zones were arranged in it - a steam room and a dressing room. A stove was always made in the bathhouse, and if the fireplace made of stones did not have a pipe, and there was a hole in the roof to remove the smoke, then this combustion method is called “black”. Soot began to settle on everything in the room - on the shelves, on the walls, and even on people. In order to make steam, you need to splash a little water on the hot stones. But the bathhouses, with an excellent stove, equipped with a chimney and pipe, were heated “white,” and everyone came out clean. The photo below shows a real dugout bathhouse.
Do-it-yourself bathhouse from a barn
You can get by without building a dugout if there is an old barn in the yard. After a little modernization, the building will turn out to be a good bathhouse. The shed is suitable from any material: wood, stone, foam block, brick.
The construction of a bathhouse begins with the layout. Most of the barn is used for the steam room. It is optimal to calculate 2 m2 of steam room area for 1 person.
Under the stove, choose a place where there will be a partition separating the steam room from the locker room. When planning a bathhouse, think through a convenient arrangement of shelves. It is optimal to make the floor pourable. The underground is filled with concrete screed or laid out with slabs and waterproofed with bitumen. Logs are laid on the base, a board 50 mm thick is laid with a gap of about 5 mm.
Ventilation windows - vents - are cut out in the foundation of the barn. Through them, they organize the drainage of water from the underground of the pouring floor.
Important! The concrete screed of the underground is made with a slope towards one of the walls for better water drainage.
It is optimal to cover the walls of the bathhouse with aspen boards. First, a timber frame is attached. The walls are covered with waterproofing, insulation is placed in the cells of the frame, covered with a vapor barrier, and the board is nailed down.
To cover the walls of a bathhouse, it is optimal to take a board with connecting grooves. The locking connection reduces the likelihood of steam penetration into the insulation. The nails are driven in with the heads going deep into the body of the board, otherwise you can get burned on them in the steam room.
Covering and insulating the ceiling of a bathhouse is no different from finishing the walls. You can use a thin board for cladding. The shelves for lying are made of boards 50 mm thick. The wood is sanded well. The optimal shelf width is 700 mm.
The video shows an example of remodeling a bathhouse:
Furnace and ventilation installation
A platform made of refractory bricks is laid under the stove in the bathhouse. The chimney exits through the roof. The stove itself is laid out in brick or a metal potbelly stove is installed. In any design there is a place for heating stones and water.
The furnace firebox is located in the dressing room of the bathhouse, and the rest is located inside the steam room. For ventilation, vents are cut out in opposite walls. The lower air intake window rises 500 mm from the floor, the upper exhaust window rises 2 m from the floor.
What reduces the cost
A dugout bathhouse costs the owner much less than building a standard above-ground bathhouse. The dugout does not require expensive insulation materials. The entire globe is around the bathhouse, and heat loss is minimal. And in winter, snow is an insulator. You don’t have to spend money on expensive building material, but use dead wood. As a rule, there are no windows in such a bathhouse. And this is also a significant expense item. And its architecture is primitive.
Do-it-yourself kung sauna
A decommissioned car shed can be used for more than just a shed. The body will make an excellent bathhouse, after a simple conversion. The kung is installed on reliable supports. It is optimal to get 6 concrete blocks. The outside of the body is sheathed with a frame made of timber, increasing its length by 2 m. The added compartment is allocated to the veranda of the bathhouse. The multifunctional room will serve as a locker room and is suitable for relaxation. The roof of the entire frame is covered with corrugated sheets or metal tiles. Kung is completely hidden under the new roof.
The interior of the body is separated by a partition. The larger section of the bathhouse is reserved for the steam room. If there are not enough original windows, additional openings are cut out with a grinder and frames with glass are attached. Before finishing work begins, electrical wiring is laid in a metal sleeve along the walls.
Furnace installation
A combustion room is installed in a smaller compartment, separated by a body partition. The chimney is exhausted through the roof or a ready-made hole in the wall, if the kung was previously equipped with a stove. The entire furnace exits from the combustion chamber into the steam room. A place is prepared on the stove for stones and water heating.
Interior decoration
From the inside, sheathing is attached to the walls and ceiling of the bathhouse. Insulation is laid between the bars, covered with foil, and sheathed with boards. A pourable floor in a kung bathhouse does not work. The body metal will quickly rot. It is optimal to fill the screed, lay the tiles, and organize the drainage. The top tile floor is equipped with wooden gratings.
Exterior decoration of the bath
Exterior finishing of the bathhouse begins with laying insulation boards into the frame. The thermal insulation is covered with a vapor barrier. The frame is sheathed with any finishing material. Under the outer cladding, it is not even noticeable that the bathhouse was converted from an old car body.
General principles of planning and operation
When designing a dugout bathhouse, you can, as a basic option, use the concept of old country-style bathhouses. If there is insufficient internal space, the steam room and washing compartment can be combined. An open boiler for hot water can be directly built into a stove-stove, while the natural evaporation of water from its surface will create a soft, moderate atmosphere, similar to that of Roman baths or oriental baths, such as hammams.
The biggest disadvantage of dugout baths should be considered the insufficiently effective supply and exhaust ventilation, and the use of methods for activating it leads to a directly proportional increase in heat loss. The second point that you should pay special attention to is the collection, disposal and disposal of wastewater, and the simplest method - the use of pouring floors - may be unacceptable due to insufficient permeability of the soil at the construction site. The way out, in this case, should be the organization of a drainage system and drainage grooves. A significant factor in the success of work in this direction should be the use of the natural slope of the area.
Insufficient ventilation and dampness can, to some extent, be compensated by periodic firing of the sauna stove without steam generation, solely for the purpose of reducing high air humidity in the interior of the sauna. In this case, you will have to reckon with the loss of time and put up with increased fuel consumption for the sauna stove.
Bathhouse from a gun carriage
In villages, in simple language, truck trailers are called carriages. For bathhouse builders, a carriage is a round timber hewn on both sides. The material is also called “two-roll timber”. The carriage was invented by the Norwegians. They came up with the idea of a strong locking connection. The docked carriage does not allow heat to pass through and ensures reliable stability of the walls of the bathhouse.
Advantages and disadvantages
Laft baths have a number of advantages, but there are also several disadvantages.
Positive features:
- The carriage is environmentally friendly. Wood does not emit chemical impurities in the bath, creates an aroma, and maintains a special microclimate.
- The locking connection of the carriage is considered one of the most durable. The walls of the bathhouse are not deformed in dampness or after drying. There are no gaps between the carriage.
- The appearance of the carriage has natural beauty. There is no need to additionally line the outside of the bathhouse.
- For the carriage, logs with a thickness of about 400 mm are used. Such a bath wall reliably retains heat without additional thermal insulation.
- The carriage inside the bathhouse is beautiful. The walls do not need to be sheathed with anything additional.
- The price of the carriage will seem high to many, but the construction of a bathhouse will be cheaper due to the absence of the need for additional interior and exterior decoration.
- If we compare two identical bathhouses made of a carriage and a rounded log, then the first building turns out to be more spacious.
- The walls made from gun carriages are lightweight. There is no need to pour a powerful foundation under the bathhouse.
Among the shortcomings of construction from a gun carriage, 3 important points are identified:
- The carriage is susceptible to rotting faster than a log. The problem is the hewn sides. The core of the tree is exposed, which is less resistant to moisture. To increase service life, the carriage is often and carefully treated with protective impregnations.
- The cost of a bathhouse built from a gun carriage will be cheaper when compared with stone buildings that require interior and exterior finishing. In other cases, the costs will be higher. Construction from logs or beams will cost less than a similar option from a gun carriage.
- An important drawback is the appearance of cracks on the carriage. However, not a single tree is immune from this problem. The cracks in the carriage are not through.
In terms of speed and ease of construction, timber construction wins. In the carriage there is a difficulty in making the locking connection.
Advice! It is better to buy a bathhouse carriage with ready-made locks.
Construction Features
A bathhouse is assembled from a gun carriage in the same way as a construction made from timber or logs. First, the foundation is poured, the walls and roof are installed, and the interior space is arranged. The difference in construction is the assembly of walls from gun carriages. Logs are used from coniferous trees. To make a carriage yourself, the round timber is dried. Pre-made longitudinal cuts will eliminate the appearance of cracks. The shrinkage of logs for carriages after drying reaches from 5 to 15 cm.
The corner connection of the carriage has a similar pattern to the Russian bathhouse. The edges are made with protruding ends. However, according to the Russian system, the lock of the bathhouse logs has a semicircular shape, and a secret wedge is made on the gun carriage. It goes inside the groove of the lower crown of the bathhouse.
The semicircular connecting lock of the Russian bath is connected to the insulation lining. The carriage wedge fits tightly into the groove. Without insulation, a castle according to the Norwegian system does not allow cold to pass through. The lower crown of the bath is laid on a 60 mm thick embedded board. The initial assembly of the log house is carried out without dowels. Major assembly is performed after errors are eliminated.
Important! If ventilation slots can be arranged between the logs, then the number will not work with a gun carriage. The air is left under the roof of the bathhouse.
The construction of the carriage is difficult only in construction. In all other matters, the bathhouse wins.
Building options
Each builder does what he is capable of. As a result, bathhouses differ in location, depth, construction material, appearance and interior. But any bathhouse is a pleasure.
In a bathhouse you definitely need a stove - either a homemade one made of stone or a purchased metal one.
PHOTO: s.zapodlico.ru Stove-heater in a dugout bathhouse
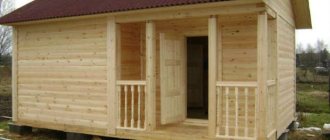
Bathhouse made of tongue-and-groove boards
A special feature of the tongue and groove board is its strong locking connection, which does not let cold into the bathhouse. Assembly of the structure consists of the following steps:
- The frame of the bathhouse base is assembled from timber with a cross-section of 150 mm. A board 50 mm thick is suitable, but it is laid on edge in the amount of 3 pieces. The frame elements are connected at the corners. Additionally, grooves are cut for the vertical posts of the frame.
- The finished frame is installed on a columnar base. A support must be placed at each angle. Two layers of roofing material are laid between the base and the wooden part of the bathhouse. The horizontalness of the frame is measured using a level.
- The racks of the bath frame are installed in the grooves of the frame and secured with mounting angles. The optimal pitch of vertical elements is 600 mm. Additional racks are placed at the locations of windows and doors.
- Each rack is set vertically in level. Stability is ensured by temporary jibs.
- The racks are connected at the top by strapping made of boards 50 mm thick. In the finished bath frame, check the evenness of the corners and all vertical elements.
- On the outside, the tongue and groove board is nailed horizontally, tightly connecting the locks. The horizontal position of the board ensures the stability of the structure. Do not forget to attach waterproofing under the outer cladding to the bath frame.
- On the inside, mineral wool is laid between the frame posts. The thermal insulation is covered with a vapor barrier.
- Covering the walls of the bathhouse from the inside occurs in the reverse order. The boards are nailed vertically. A ventilation gap is provided between the sheathing and the vapor barrier.
The cladding of the bathhouse ceiling is carried out according to a similar scheme. Thermal insulation is used 2 times thicker than on the walls.
Choosing a wood species
The outside of the bathhouse is covered with any board. Pine and larch will do. Inside the bath, wood should have low thermal conductivity. Linden and aspen are ideal.
Materials
To facilitate the construction process, everything you need must be prepared in advance. Traditionally, you will need wood for finishing, nails, and an anti-fungal coating. In addition, the room will need to be installed:
- double-glazed windows (if there are windows);
- door;
- stove with a container for water;
- water drainage hoses;
- container for cold water.
Don't forget about electrical wiring. You need to buy a cable with special reinforced insulation, as well as light bulbs to illuminate the room.
Bathhouse made of polystyrene concrete
Polystyrene concrete blocks have poor thermal conductivity. For a bath this is an ideal option. However, the material absorbs moisture. The walls of the bathhouse are protected to the maximum with reinforced waterproofing from the inside and outside.
Bathhouse construction technology
A reliable strip foundation is poured under a bathhouse made of polystyrene concrete blocks. From above, the base is covered with two layers of roofing material. Laying out the walls starts from the corners. The first row of bath blocks is placed on cement mortar. The subsequent rows are laid using glue. The thickness of the seam is kept to a maximum of 5 mm. Every third row is reinforced. Grooves are cut in the blocks for the rods. The laid reinforcement is filled with mortar. Further laying is again done using glue.
The roof of the bathhouse is made gable. Mauerlat is laid along the perimeter of the walls. Rafter legs and floor beams are attached to it. The rafters are filled with sheathing, waterproofing is rolled out, and a roofing covering, most often corrugated sheeting, is laid.
A ventilated façade is installed on the walls of the bathhouse outside. Mineral wool is used as insulation, and the cladding is chosen as desired. The inside walls of the bathhouse are similarly insulated and vapor barriered. Wooden lining is used for cladding. The ceiling of the bathhouse is hemmed in the same way as the walls. The floor is concreted. The rest room is tiled and heated with electric mats. Boards are laid inside the steam room.
The video gives tips on how to properly lay out the blocks:
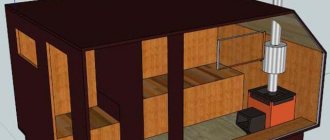
Work progress
When a place has been chosen, the future premises are marked, the turf is removed and after that you can start digging a pit. This may take several hours or several days - the volume is about 30 cubic meters.
Next, drainage is performed, where the water will flow, and roll waterproofing is installed.
Then we begin to build a “shed” inside the pit. You can use dead wood and dead wood for it. First, corner pillars and load-bearing pillars are installed under the roof, then logs are laid around the perimeter. The waterproofing is fixed, and the void between the logs is filled with earth. External walls can be treated with clay.
Next, the rafter structure is assembled, the ceiling and roof are installed.
Source
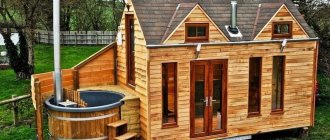
Polycarbonate bath
A summer version of a bathhouse can be built from polycarbonate without much expense. Under the sun, energy is accumulated through transparent sheets, it will be warm inside, and the water will warm up faster. The bathhouse is not used in winter due to the lack of a stove. Additional heating is carried out by electricity.
Step-by-step instruction
To build a bathhouse, you need to install a frame and cover it with polycarbonate. The process consists of the following steps:
- On the site, the dimensions of the bathhouse are marked with stakes and a cord. Concrete foundation pillars are dug in at each angle at the location of the piers.
- The base is covered with roofing felt. The frame of the bathhouse is assembled from timber - a rectangular frame. It is fixed to the foundation pillars with anchor pins. The polycarbonate bathhouse is light, with a large windage. Fixation with anchors will prevent the structure from overturning by the wind.
- Vertical posts made of 50 mm thick boards are fixed to the frame. They are tied on top with a similar board. The rafters are attached to the frame at a distance of 600 mm. To prevent the structure from playing, the racks are reinforced with jumpers and jibs. The rafters are connected with lathing.
- The roof of the bathhouse is covered with one layer of polycarbonate. On the walls, the internal and external cladding is made of two sheets, which eliminates translucency. The partitions inside the bathhouse are similarly made of polycarbonate.
- The floor is made in the simplest way - poured from wooden gratings. For a summer bath, a complex drain with sewerage and concrete screed is not needed.
- You can even supply water to the bathhouse from a boiler or install a heated tank similar to a summer shower.
Construction methods
There are several options for building a sauna without a foundation: DIY construction, turnkey ordering, and a mobile version of the sauna.
DIY installation
A preliminary analysis of the soil is carried out, establishing its characteristics and density. Then they draw up a project for the future bathhouse - determine the size and shape of the premises, taking into account the number of people in the family. You need to prepare in advance for construction:
purchase all the necessary materials - they must be resistant to elevated temperatures (non-flammable insulation) and high humidity;- prepare tools for work;
- electrical goods for wiring must be reliable and of high quality;
- You should take care of thermal insulation so as not to “heat” the street.
Note! Experts recommend giving preference to installing a stove without removing the firebox - this option is cheaper and requires less fuel. The roof of the steam room should not be too high.
Turnkey option
The “easiest” way for the owner of a summer cottage is not to waste his time on construction work, but to invite specialists who will carry out the planned project. Professionals will assemble the structure, then install it (using specialized crane equipment) on the base at the desired point on the site.
Mobile trailer
The advantage of a compact and mobile bathhouse in a summer cottage is obvious to everyone. Its cost is several times less than a stationary one, and its installation takes minimal time.
An ordered mobile project can be “brought to life” in the shortest possible time (2-10 days). The design kit already includes electric or wood-burning stoves; different options for connecting communications are acceptable. The external design of a reliable and safe bathhouse is modern and impressive.
Steam room installation
The most common material for equipping Finnish saunas is a sandwich panel; you can also make a frame from wooden elements - this option is easier to implement, the main thing is to choose the right dimensions and join the corners.
The main type of work when assembling the steam room will be fitting the elements one by one. Installation is carried out at the construction site, the load-bearing ones will be risers located vertically, and the sheathing and insulating layers are attached to the crossbars horizontally.
The outer part of the steam room is finished with clapboard, plywood or other materials, the lower part of which has mineral insulation. If you compare finishing with such materials with buying a ready-made sauna from panels made in production, you will notice obvious savings, up to 30%.
Thermal insulation of garage
The garage should be insulated both outside and inside. One way to insulate a garage quickly, with the least amount of effort and minimal financial losses, is to use polystyrene foam.
Insulation from outside
There are several rules for insulating a building with foam sheets:
- The thickness of the foam must be greater than or equal to 50 mm;
- Sheets of foam plastic must be installed in a checkerboard pattern (with a shift along the seam in each subsequent row);
- Polystyrene foam is a soft and crumbly material, so a reinforced mesh should be glued on top of it;
- The installed mesh must be puttied with a cement-sand mixture; it is better to choose a ratio of components of about 1:3 (one part cement to three parts sand);
- The facade should be painted with water-based paint to protect it from external humidity.
Insulation from the inside
The inside of the future bathhouse can be insulated, as well as the outside, with polystyrene foam or use mineral wool, which is used for thermal insulation of conventional baths. It is better to insulate metal garages from the inside in two layers: this will significantly reduce heat transfer in the cold season.
Features of the device and advantages of a bathhouse in the basement
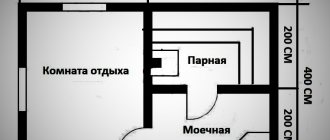
So, before you start drawing a diagram for installing equipment, you should carefully understand the features of the device and the advantages of installing a bathhouse in the basement of a private house. In a traditional layout, a Russian bathhouse is a complex consisting of three main rooms:
- Steam room;
- Washing;
- Dressing rooms and waiting rooms.
The first room is the steam room, the most important complex room; it must maintain a high temperature, have excellent ventilation and thermal insulation.
In the washing room, a small family bathhouse, there is a shower and, if possible, a font or a small pool for cold water. Although, many avid sauna fans prefer a bucket-waterfall with ice water rather than a container with relatively cold water.
The dressing room is used both as a dressing room and as a rest room; there should be enough space for both a table for a feast and a bench for rest.
Until recently, a bathhouse in the basement of a private house was a curiosity. First of all, this is due to the fact that in private houses it is not customary to have a basement with an area equal to the area of the first floor. The second point is that the basement floor usually houses a cellar or a garage - a workshop, that is, there is simply not enough space for three full-fledged rooms. And of course, one should not discount such an argument as safety; many believe that a bathhouse made in the basement of a private house will be a source of dampness in the house, which will invariably lead to the formation of fungus and mold.
On the other hand, placing a bathhouse in the basement of a house will require much less money than building a separate house. Be that as it may, the basement already has a ceiling, walls and floor. Electricity, as in the house itself, functions properly, there is running water, and the sewage system runs through the basement, so all conditions are created for a small bathhouse. Well, as for the size, for a family of 3-4 people the space and a small basement are enough to accommodate a steam room, a shower cabin and a massage table.
An additional argument in favor of the project is usually the fact that the maintenance of such a home sauna is cheaper than a separate building. Even in the most severe frosts, the basement is cooled differently than a log house or brickwork. After all, there is a living space above the ceiling, and the fact that the basement, buried at least 2-2.5 meters into the ground, allows you to ensure a comfortable temperature in the intervals between bath days, and this already saves up to 30% on the maintenance of the bathhouse.
In addition, in modern projects, the entrance to the basement is located inside the house, and not outside, so that immediately after visiting the steam room you can go up to the living room and continue a pleasant evening in front of the fireplace.
Sauna equipment
An electric stove, preferably factory-made, is used as heating equipment, the power of which is calculated based on the volume of the sauna. For example, with a steam room volume of 20 cubic meters, the power of the heating stove must be at least 10 kW.
The equipment must be equipped with an automatic shutdown. It must be installed at a short distance from the floor surface - approximately 20 centimeters. For the stove, a fence is arranged around the entire perimeter so that the boards rise slightly above the stove, and the distance between them and the equipment is at least 5 centimeters.
https://youtube.com/watch?v=ppsl6He7PmM
Special stones for the sauna, which differ from each other in their characteristics and healing properties, will subsequently be placed in this space. The stones should heat up very quickly and retain heat for quite a long time, having a positive effect on the human body.
Natural stone heats up, reaching a maximum temperature, then, under the influence of water, local cooling of the rock occurs. Therefore, stones must be selected with high heat resistance, which will not crack or split.
In addition to the stove, lighting fixtures, thermometers for measuring the air temperature inside, an hourglass and ventilation valves, which are fastened with screws to the internal wooden lining, are installed in the sauna room.
For those who do not want to deal with the installation of a chimney, the construction of a heating stove with the laying of stones, we offer the installation of a ready-made infrared cabin.
Of course, it does not have a high steam temperature, and the depth of heating of the skin is also small. Infrared waves do not penetrate inside, and the skin dries out, which is not very favorable for its healthy condition.
Don't forget to prepare material for the sauna
Mobile structures
First, let us highlight the desire of all manufacturers to introduce a variety of cheaper bath options. Keeping abreast of the problem, the consumer is offered to purchase mobile structures. The set of such a bathhouse consists of a tent, a stove and a bag. There are lighter options. They do not have ovens, and the temperature is increased by a portable steam generator.
You can install such a structure on any site, and two adults can do it. Depending on the type of mobile sauna, from 3 to 7 people can steam in it. Again, it all depends on your budget. The temperature created inside is acceptable for carrying out procedures – 90°C.
Wood stoves
Many enthusiasts do not accept modern solutions. They claim that the heat from a wood stove is more “mild” and “friendly.” Both of these adjectives may seem strange. But since they are in the realm of the senses, it is most likely that proponents of wood-burning stoves are simply appreciating the natural ambiance of a sauna made of wood.
The only real difference is that a traditional wood stove creates a distinctive smell around it. However, this is not a scent that would be associated with aromatherapy. In addition, it should be remembered that a wood-burning stove, like all others, needs gas removal, in this case - in the chimney. It must be constructed in accordance with applicable building codes. Of course, manufacturers have already solved this problem, and you can order ready-made chimney elements for almost any type of stove.
How to choose heater power
It can be assumed that for every 1–1.1 m3 of bath area, 1 kW of furnace power is required. For example, a bathhouse with the following dimensions: 200 cm (width) by 200 cm (depth) by 200 cm (height). Let's calculate the volume: 2 m x 2 m x 2 m = 8 m3. We calculate the furnace power: 8 m3 divided by 1.1 m3 = 7.27 kW. Choose a more powerful stove if your sauna has a window or other additional heat outlet.
It is important not only what the sauna is made of, but also how it is equipped in the basement of the house.
The starting point is the stove, the cost of which depends on its type. If you want to save money, choose a dry sauna. You can also adjust the price of furnishing the premises using different materials. In this case, the amount depends on the type of wood, so you can choose it using the same common sense as when building the cabin itself. A sauna in the basement of a house should also be equipped with light sources - closed lamps. Look for cost-effective lighting, but don't forget about quality and safety.