The Russian people love to steam and can come up with everything in such a way that they save money, and the building does not take up much space on the site, and so that you can transport it with you. We are talking about a barrel sauna, which is gaining more and more popularity due to its characteristics and design. According to many owners, this design is convenient, economical, beautiful and mobile. There is only one caveat - a ready-made bathhouse on the market can be bought for 200–250 thousand rubles. The price is decent, but all costs can be reduced, because such a structure is built easier and faster than buildings of a similar purpose made of cinder block or brick . You only need to spend money on the material and the stove. If you are a non-specialist, this article will help you learn how to build such an unusual structure.
How does a barrel sauna work?
Bath structure
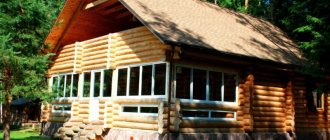
What is such a bath? Most likely, you imagined an ordinary wooden barrel. And you'd be right, because the design looks like a barrel lying on its side. Its height, and therefore its diameter, ranges from 2 to 3 m, depending on the wishes of the developer. The length is also selected according to your needs. If you have a large family, or you want to steam with your friends, the length can reach 6 m. And when 2-4 people need to steam, 3 or 4 m will be enough.
Such a bathhouse can consist of more than just a steam room. It is often equipped with a washroom, shower, rest room, veranda or locker room. These sections will not be visible from the outside; the division of the structure occurs inside, due to additional partitions. If there is a washing department, it is necessary to provide water supply and sewerage.
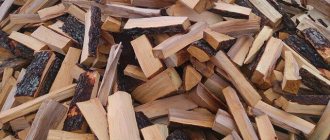
The material from which such baths are made is wood. But not every type of wood is suitable for such work. To ensure comfort, it is important to decide right away which wood to choose and how to build with it. After all, if an ordinary bathhouse can be made from anything, and the inside can be lined with wood or other environmentally friendly material, then such a design will have the same material both inside and outside. For example, coniferous trees cannot be used. The resin that is inside the tree will actively release when heated. Heated resin can even burn your skin.
The only type of conifer that is suitable for construction is cedar. Its healing and aromatherapy properties have a beneficial effect on human health. In addition, cedar is resistant to moisture and various microorganisms, does not deform, does not shrink or crack under the influence of temperatures. And the variety of textured patterns and shades is important for the aesthetic design of the structure.
Often when choosing a tree, they choose oak, which is known for its strength and hardness of structure. Such a bath will serve you for many years. Linden is another species that is often used. Linden vapor has a beneficial effect on the skin, rejuvenating it, and the building itself will quickly warm up and keep warm.
A budget option can be called building from aspen. Its properties are very similar to those of linden, only aspen produces a bitter odor and is less durable.
How to make a barrel with your own hands? Procedure
It is not difficult to find a company from which you can buy a barrel sauna. The price is quite affordable, so many people use this option. But others prefer to do everything themselves: build a bathhouse for themselves and their needs. Is it possible to make a barrel with your own hands and install it yourself? Certainly! Next we will tell you what needs to be done and in what order.
We recommend reading:
Sandunovskie Baths - an architectural monument of Moscow
Stage 1. Selecting a location
The bathhouse does not need to prepare a foundation, but it needs to find a flat area where the wood will not interact with the ground.
The following areas are suitable for this:
- lined with paving slabs;
- filled with concrete;
- covered with gravel;
- covered with road slabs, etc.
Stage 2. Selection of materials
In order for the barrel sauna to be comfortable and last for many years, you need to choose the right wood.
Coniferous trees are not suitable for building a barrel with your own hands, since when heated they release resins that can burn the skin. But here there is an exception - cedar. This material has aromatherapy and healing properties. It does not deform, easily tolerates strong temperature changes, is moisture resistant, fungi and mold do not develop on it, and cedar does not shrink. In addition, it has an attractive appearance and pleasant texture that will decorate the bathhouse.
Another good option is oak - it is a durable material that will last for many years. Under the influence of moisture it only becomes stronger. Oak has healing properties and has a rich dark color. The disadvantage of this breed is the price.
Linden is a popular and widespread material that is actively used for the construction of baths. It gives the room a pleasant and light aroma, creates a healing microclimate, does not shrink and has good thermal conductivity. But linden is susceptible to fungus, which reduces its service life.
Aspen is similar in its characteristics to linden; it also heats up quickly, holds heat well, and emits a pleasant aroma. In terms of moisture resistance, it is considered better than linden; another important advantage of this type of wood is its low price.
Stage 3. Preparing the base
The barrel sauna is round, its stability is ensured by the base, so this stage plays an important role in the process of building a sauna with your own hands.
Boards 30-35 cm wide and 35-40 mm thick are suitable for it. A recess is cut out on all beams, repeating the shape of the outline arc. The notches are cut using special patterns, and it is important that the minimum height of the board is at least 10 cm. To fix and fasten them, formwork and screws are used, and they are screwed into the corners with metal corners.
There will be about 2-4 bases in total, depending on the length of the barrel bath. The first stand is installed under the front door, and the last one is installed under the back wall.
Stage 4. Preparation of partitions
The walls of the barrel bath are attached to the partitions. Their size is determined by the capacity of the bath. But even if you are planning to make a miniature version for several people, it is not recommended to build too small rooms, as you will feel uncomfortable in them.
You need to immediately decide on the places where the windows and doors will be and cut holes for them. The number of partitions depends on the layout of the bathhouse; there will be at least two of them.
Stage 5. Preparing the walls
On the base of the walls, boards are laid out, which are connected to each other using the tongue-and-groove method. From time to time they need to be further strengthened. Continue until you get a circle.
We recommend reading:
Do-it-yourself black bath: construction features
Stage 6. Screed
To give the structure strength and reliability, you need to take metal clamps and use them to tighten the barrel bath around the circumference. They will protect the boards from spreading and also prevent cracks from appearing.
Stage 7. Installation of windows and doors
At this stage you need to install the necessary windows and doors. The room must be sealed, so all elements will fit exactly, without gaps.
Stage 8. Insulation
If you plan to take a steam bath only in the summer, then you can skip this step. If it will be used in winter, then additional insulation is necessary.
Stage 9. Preparing the roof
You can use different materials for the roof: bitumen shingles, roofing felt, corrugated sheets or metal tiles.
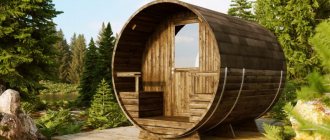
Why a barrel sauna?
Sauna on wheels
This question may arise immediately. After all, you can make an ordinary bathhouse out of wood or brick, like everyone else does. But this design has a number of advantages, thanks to which it is very popular.
Advantages of this option:
- Compactness. Thanks to its design, such an engineering creation can be placed in almost any area. After all, often the average bathhouse occupies only 8–10 m2, which is useful for owners of small plots. But with all this, the internal space is used to the maximum, and six people can fit in such a steam room.
- Mobility. If you need to move, or are selling your summer cottage or house, just take it with you. It can be easily transported to another location in a truck, and if it is small, a car trailer can be adapted to transport it. And all due to the fact that it does not have a rigid connection with the foundation, but is simply installed on its surface. You can also make such a bathhouse on wheels.
- Room heating rate. Since the design has no corners, it warms up quickly. Many experts agree that 20% of the total time is spent on warming up the corners. With a barrel there will be no such loss of time. In summer, you can heat up to 100ºC in 30–40 minutes, in winter in 1 hour.
- Economical. To build a regular bathhouse, you need much more money, while this one will cost you much less, but you should keep in mind that its capacity is from 3 to 6 people.
- There is no need to construct a capital foundation, since due to its low weight, it is simply not needed.
- Unusual and modern design. The shape and appearance of the structure attract attention. In addition, psychologists have proven that rounded shapes promote relaxation.
- Easy maintenance. Dirt does not accumulate in the corners, simply because there are none, and the area is small, so you will have to clean less.
- Thermos effect. It is ensured by thoughtful thermal insulation and shape. Thanks to this, you can save on fuel and electricity. According to experts, the round shape helps to consume 23% less resources than a simple bathhouse.
As you can see, there are enough advantages. Therefore, analyzing them and their capabilities, most developers choose this option. If you are reading this article, then you are also convinced of the practicality of this form.
No. 2. Barrel sauna: advantages and disadvantages
We have already indirectly touched on the main advantages of sauna barrels, but now we will dwell on all the advantages in more detail:
- compactness . Barrel baths are small in size, so they can be installed on a small summer cottage, even when it seems that it is impossible to allocate a piece of free land between numerous beds and greenhouses;
- mobility . The design weighs no more than 1.5 tons, so transportation is extremely simple. Moreover, such a bathhouse can be repeatedly moved from place to place and even transported. Some even manage to take the structure with them on a trip;
- a foundation is not needed due to the light weight of the structure. It is, of course, better to first level the selected location and provide a slight slope for water outflow;
- speed of construction. A team of specialists will install a ready-made barrel sauna in a matter of hours - you won’t have to wait months for that cherished moment when you can finally take a steam bath in your own sauna. You only need to take care of the availability of electricity, water and drainage. If suddenly necessary, the bathhouse can be disassembled with your own hands and reassembled in a new place;
- fast heating . In just 20-30 minutes, the interior of the steam room warms up to a temperature of 900C. In winter, heat is retained better than in traditional baths, and all thanks to the absence of corners. The high heat capacity of the structure allows you to light a sauna using fewer logs than when lighting a regular sauna;
- ergonomics . Despite the small footprint, the barrel can accommodate all the areas necessary for comfortable bathing procedures for 3-8 people;
- original appearance. There is probably no need to explain the fact that a large barrel on the site will look impressive; it will become a real decoration of the territory;
- year-round operation;
- ease of care. The absence of corners and a small area simplify the cleaning process;
- environmental friendliness . Barrel saunas are made from pure wood, so the steam will be healthy and beneficial. The structures are equipped with wood-burning stoves, so you can save on electricity;
- low price. A barrel sauna is much cheaper than building a regular sauna.
The disadvantages include the fact that it is unlikely that you will be able to relax with a large group in a barrel sauna. In addition, the walls of the bathhouse are single-layer, so strong chemicals cannot be used to treat them. However, the market offers a lot of special protective products for treating bath walls: they combine maximum safety and effectiveness. The thermal insulation of the bathhouse and the possibility of using it in winter causes a lot of controversy . Many people argue that a barrel sauna is an exclusively summer option. Manufacturers say that due to the high heat capacity of wood, powerful stoves and gapless technology for installing boards, the bathhouse does not need insulation and perfectly maintains high temperatures even in frosty conditions. If the structure is made of high-quality material and assembled correctly, then even in severe frost with the heating turned off, the temperature will drop by 1 degree every 4 minutes.
Owners of barrel saunas share their experience that in winter, at temperatures of -13...-150C, they continue to use a steam room, but clarify that it takes more time to kindle. Some manufacturers produce baths with an additional layer of thermal insulation, which are suitable for year-round use in areas with harsh climates.
Materials and components
Preparations for building a bathhouse
The first step is to decide on the material from which to make the bathhouse, as well as its design. To have an idea of the future construction, you can look at various drawings and plans to choose the one you like. It must indicate all the data: length, width, diameter, etc. Then, based on the dimensions, you need to prepare the following material:
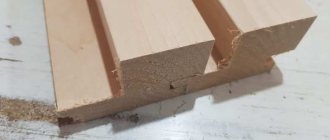
- Tongue and groove boards 90 mm wide and 45 mm thick. The length is selected depending on the size of the structure. Do not take boards with a larger width, as in the future when laying them it will be difficult to join on a round surface.
- Edged boards 200 mm wide and 50 mm thick.
- Window and wooden blocks.
- Canopy.
- Tightening metal hoops.
- Wood-burning, electric or heater stove.
Before carrying out work, all wooden elements must be coated with an antiseptic so that the wood does not rot and microorganisms, mold and mildew do not grow in it.
Due to the round shape of the bathhouse, the wood needs to be prepared and cut. And the boards will be connected to each other using a tongue and groove method. If you do not have the appropriate equipment to do this, it is better to order such processing from specialists. Just show them the drawings with the dimensions so they can cut everything just right. And to save material, time and effort, you can purchase a ready-made set of materials, which you only have to assemble and install, but it will cost much more. When you have prepared everything, you can proceed to construction.
Main types of round baths
Depending on the size, design features and purpose, barrel-shaped baths are divided into three main types. A brief overview of each of them:
- Russian steam room. Wet hot steam and a traditional attribute - a birch or oak broom. This structure consists of two functional areas - a steam room and a washing compartment.
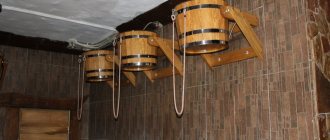
- Finnish sauna. High temperature and dry steam. It is advisable to have a hanging bucket or font at your disposal for contrasting water procedures.
- Japanese ofuro. A spacious wooden vat equipped with a heater.
Russian steam room
The most popular type of bathhouse, which can be organized on your own site. Bath procedures include a set of activities taking place in the steam room and washing room.
The steam room has a sauna stove, which provides quick heating of the building and promotes the formation of thick and moist steam. The washing room is used for contrasting water procedures after warming up the body in the steam room.
Since bath procedures require a large amount of water, the design of the bath must provide for a special drainage system.
The heating stove is mounted between two functional zones so that the chamber with the heater is located in the steam room, and the expansion tank and firebox are located in the washing room.
Since the Russian round bath is small in size, the heating equipment must be compact and safe. The inner surface of the walls should be covered with fire-resistant panels.
Dry sauna
A Finnish sauna made from a barrel of dry steam can be located in one room. A distinctive feature of the structure is the presence of a font for contrast procedures. Setting up a round dry sauna is much easier than building a full-length stationary sauna.
Such a structure must be airtight, practical, safe and durable. In a dry steam room, unlike a Russian one, there is no drainage system. The main requirement is to provide ventilation openings with valves in the wall and floor base. The sauna is also equipped with comfortable benches and a compact heating stove.
The round barrel sauna can be mounted in a horizontal or vertical position
It is important to remember that the horizontal position provides a significant increase in the total area of the building
Ofuro
This is a Japanese barrel bath, which has a number of advantages for installation and operation. Ofuro does not have a roof, installation is carried out on a wooden base, and the inside is equipped with the necessary furniture and equipment.
The most common ofuro shape is round or ellipsoidal, which allows you to install seating benches and a heating device inside with additional protection in the form of a wooden partition. Another option involves supplying heating pipes from a stove taken outside. This design requires more resources, time to heat up and maintain optimal temperature conditions.
Stage 1 - preparing the base
Creating the base of a barrel bath
As already mentioned, there is no need to dig a pit and pour a foundation. It is enough to install it on a flat surface so as to prevent contact of the tree with the soil. Preparing such a site is quite simple if you compact and level the area and fill it with gravel or crushed stone.
The base for such a bath can be made from floor slabs.
If there is no such level area, you can make a base of concrete. To do this, remove the top layer of soil, 15–20 cm deep. Install the formwork, pour sand into the base, making a cushion of 5–10 cm, and compact it. Then lay the reinforcement and fill everything with concrete. After 3 weeks you can assemble the bath, that’s when the solution will completely strengthen.
Now you need to make a wooden base. Transverse parts will be made from edged boards 200 mm wide. If you decide to cut them yourself, then cut a rounded notch in them that follows the contours of the barrel. To ensure everything is even, use the pattern as a reference. The workpiece should be cut no more than half the width, that is, 100 mm. The number of such boards is determined by the length of the bath. As professionals advise, they need to be installed in increments of 1–1.5 m.
For reliability, the transverse parts can be connected with boards, which are screwed along the embedded boards using screws.
Types (table)
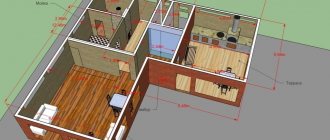
Barrel sauna layout option
| Name | Description |
| Ordinary Russian bath | Features hot and humid steam. You can steam in it with brooms. Usually consists of 2 rooms: a steam room and a washing room. After sitting in the steam room for a while and sweating, you can go wash in the shower. In this design option, it is imperative to consider a water drainage system. To prevent it from stagnating, the barrel sauna is placed at a slight slope. The stove in it is installed between two rooms. It is equipped with a tank for heating water. This tank should go into the shower. In the steam room there is a net with stones on which water is poured. They are heated by the firebox. The combustion part of the furnace is located in the washing room. It is better to fence it off so as not to get burned during bath procedures. There is not much space in such a ben, so the stove should be as small as possible. The walls near the stove are insulated with fireproof material. |
| Sauna | It differs in that the air in it is dry. It may consist of one room. Often this design is equipped with a font into which cold water is poured. If there is little space, sometimes a bucket is used for dousing with water. It is considered a tradition to plunge into cold water after a sauna. It's easier to set up than the previous one. The room must be airtight: the doors close tightly, there are no gaps in the floor or walls. The sauna has only a small hole in the roof or wall with a special valve that can be closed partially or completely. Water is not used in the sauna, so there is no need for a drain. It has comfortable benches and a stove with a heating stove. You cannot pour water on the stones in the sauna. You can add a few drops of essential oil or tincture of medicinal herbs. Thus, therapeutic and preventive aromatherapy is created. The sauna can be installed both vertically and horizontally. |
| Ofuro | Similar to Japanese sento. Visually it resembles a font. Heated by a built-in stove. It has no roof, but it is used all year round. They place it on a wooden floor. The inside is equipped with a wooden bench and a stove, which is fenced with a wooden partition so that no one gets burned during bath procedures. According to Japanese wisdom, the ofura bath unites all four elements: earth, fire, water and air. The earth is the wood from which it is made, the fire is the stove. And the creation of complete harmony occurs thanks to the water and air surrounding a person in this bath. In it he relaxes and becomes healthier. Visually it may resemble a simple barrel or be elongated. The stove does not have to be installed inside the structure. Sometimes they place it next to it and run pipes from it that heat the water inside. This is a safer option. True, heating requires much more time, and, consequently, fuel consumption increases. Usually they spend 10–20 minutes in it, and then the steamed body must be wiped with a hard mitten. |
Stage 2 – assembly of end partitions
Assembling the end partitions
Now you need to assemble the end partitions. Their height and circumference depend on your plan. Connect the prepared boards by pressing them close to each other on a flat surface. To hold them together, use cross beams. Secure each board with screws to the cross beam. Also don't forget about openings. After all, partitions must have doors and windows in the right places. Therefore, when securing the cross beams, make sure that they do not interfere with the installation of window and door units. Once the required number of partitions have been assembled, you can proceed to the next step.
Stage 3 - frame assembly
Assembling the frame
Next, you should lay the embedded boards on the prepared base. All elements are connected using the tongue and groove method.
Boards pre-cut to the required size are laid on the bottom. Fasten them along the required circumference until it is sufficient to install the end partitions. The boards must be nailed to the base or screwed.
Once this height has been reached, install the end partitions in the desired places and continue assembling the structure, securing the boards around the partitions. Each board must be nailed or screwed to the end of the partition.
To simplify the task of installing partitions on the inside of the embedded boards where the partitions will be installed, you need to cut grooves whose width is equal to the width of the partition. Then installing it will be much easier and faster.
The barrel is tightened with clamps.
After you have laid the last board, you need to ensure the rigidity of the structure. To do this, the barrel is tightly tied with iron hoops. To connect the ends of the hoop, use iron clamps. After a long period of use, when the wood dries out a little, the clamps need to be tightened so that the gaps are minimal.
Stage 4 - interior work
Interior decoration of the bathhouse
It's time to start decorating the interior of your bathhouse. There is no less work here, since we still need to make the floor, shelves, install a drain, prepare a place for the stove, etc. But now everything is in order.
- The first step is to knock down the shelves and install them inside. It is recommended to assemble them from aspen or linden.
- After that, start installing the floor, which will also be made of wood. The floor should be laid at a slight angle towards the drain, then the water will not linger. To ensure air circulation, the floor can be made in the form of a wooden grid, so that the distance between the boards is at least 1 cm. Then your feet will not freeze and will be dry, since all the water will drain freely.
- Take care of the water drainage system. Where to take it is up to you. If the site already has a sewerage system, you need to organize the flow of water through pipes into the sewer system and install a siphon so that during bathing procedures you do not inhale an unpleasant odor. Another option is to dig a drainage hole where the water will flow.
- If you want to equip the bathhouse with electrical wiring, this must be done at the assembly stage. In this case, ordinary wires will not work. You need to purchase a special wire in non-flammable insulation and lamps that are designed for saunas.
- When you plan to steam only in the summer, you don’t need to insulate it. But if you have a great desire to steam all year round, the bathhouse needs to be insulated with rolled material. Additionally, it is necessary to lay a vapor barrier layer and finish the room.
- Don't forget to install doors and windows in the right places.
- The most important element of the interior is the stove - the key element. You need to choose which stove to buy - an electric stone stove or a small wood-burning stove. Here you can choose from your own preferences. The stove must be installed in the last section where there will be a steam room. It is important to protect the place where it will stand. The walls, floor and ceiling near the stove should be lined with fire-resistant material such as tiles or a metal screen. If your stove is wood-burning, you need to make a place in the ceiling for a chimney.
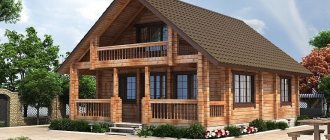
Step-by-step instructions for building a free-standing bathhouse
When you decide to create a cozy bathhouse in your summer cottage, you don’t have to turn to specialists for help. Even with little experience in construction, such a construction can be organized independently. First, they draw up a project and select materials
At this stage, it is important to take into account the geographical location of the building and the conditions of its operation. The following construction procedures are performed step by step
Preparing the site for construction
When a suitable location has been selected and the material has been delivered, you can begin to prepare the site for construction. Depending on the specifics of the soil, the type of foundation is determined. The construction site should be level with a slight slope for water drainage.
First, they draw the outline of the future foundation and remove all vegetation from the soil. Then pegs are driven in around the perimeter, based on the area of the building. From the posts with nailed boards, cast-offs are made and the axial dimensions of the foundation contour are marked.
At the next stage, they begin to dig a pit, holes for posts or a trench. When the required depth is reached, special shields are installed to prevent the soil from collapsing. At the end of the excavation work they are removed.
Pouring the foundation
For a free-standing bathhouse made of timber, a columnar foundation is suitable. The budget base will easily support a relatively light wooden structure. Then they dig the required number of holes with a certain step. It is necessary to have supports in the corners, at the intersection of walls.
Crushed stone and sand are poured into the bottom of the pit. Then the asbestos-cement pipe is installed strictly vertically and secured. Reinforcement is placed inside and concrete solution is poured. A few days later, after waiting for complete hardening, a small half-brick wall is laid between the pipes around the perimeter.
Construction of walls and roofing
More often, 15 x 15 cm timber is used to build a free-standing bathhouse. They begin installing the first crown after laying the waterproofing and carefully processing the materials in contact with the base. The beams can be joined in several ways: on rectangular dowels, in a root tenon, or using the dovetail method. When building walls, the crowns are connected using special wooden and metal pins - dowels.
At the next stage, the roofing is installed. First, choose a suitable roof shape and install the rafters according to the plan. Then the supports are erected and securely fastened. Sheathing boards are attached to them, covered with waterproofing material, insulation, and the selected roofing material is installed.
Heat and vapor insulation
Regardless of the type of oven chosen, any steam room will always have high temperature and humidity. The thermal insulation layer helps retain heat for a long time. The following types of materials are suitable for use in the construction of a bathhouse:
- Film. Dense fabrics can be smooth, rough with reinforcement. This insulation option will be cheap.
- Membrane. Non-woven material is laid on top of the insulation. It perfectly protects against condensation and moisture.
- Foil sheets. A special coating made of foil and metal lavsan effectively retains heat in a steam room of any size.
Interior finishing work - what materials are best to use
Internal finishing work must begin with the installation of communications. The sewerage point, the passage of water pipes and electricity must be laid out at the design stage.
After installation work on laying communications, they proceed to the manufacture of the finished floor. It can be concrete or wood. The cement filling will be durable; after hardening, it is additionally tiled. The wooden flooring is made to leak; a small gap is left between the joists and floor boards.
After the windows and doorway are installed, you can begin decorating the interior walls of the bathhouse. The use of synthetic materials is excluded, since when heated they release harmful substances. The best type of finish is natural wood. This can be a polished edged board, a blockhouse, or lining. When choosing the appropriate option, you need to take into account the characteristics of each breed and the characteristics of the varieties.
Installation of oven and shelves
Shelves for relaxation in the bathhouse should fit the size of the room and be made of wood materials. First, a stable frame is made from timber, then polished boards are attached to it.
Each owner chooses the stove himself depending on personal preferences. If it is a heavy unit, it is installed on a special foundation. The installation is carried out in accordance with all fire safety requirements. All wooden structures near an open fire must be well insulated.
Stage 5 - roof installation
Installation of the roof
The final stage that should be completed is to make the roof. There are several options:
- simple rafter system with a gable roof;
- soft roof (bitumen shingles or roofing felt).
The soft roof is attached directly from above. But before installation, the barrel must be covered with waterproofing material so that water does not penetrate the boards. After this, you can lay the roofing material. To make a rafter system, you need to prepare a wooden beam with a cross-section of 50x50 mm and make a frame, and the roofing material will be metal tiles or corrugated sheets.
The last thing to do is treat the inside and outside with linseed oil or a special bath composition. This is where all the work ends.
Barrel sauna on site
All the work will take you several days, but the barrel sauna will delight you, your family and friends for a long time. Staying in the steam room is beneficial for blood vessels, the nervous system and the respiratory tract. In addition, such treatment is not only useful, but also pleasant!
Also read:
- How to make a broom for a bath.
Drafting
Such a bathhouse is a cylindrical structure assembled from boards and fastened with metal hoops. Its sizes can be very different.
There are quite a lot of drawings on the Internet based on which you can use to make a barrel sauna with your own hands. Take a ready-made one or make your own.
What elements the barrel sauna consists of can be found out from the table below.
| Structural element of the bath | Material | Assembly Features |
| Foundation beams. | Beam 50*150. | Be sure to be impregnated with anti-rot compounds. |
| Prefabricated elements | Boards 45*90mm. The length depends on the size of the bath | They have a tongue/groove or rounded/convex connection |
| End elements | Boards 45*90mm, timber 50*50mm | |
| Iron clamps | Metal tape and tension elements | Installed on both sides |
| Roofing material | Soft tiles or roofing felt | |
| Caulk | Tow | Only used if the boards do not have a tongue/groove design |
Preparatory work
A barrel sauna on your own is not difficult, if only because you don’t need to build a foundation for it. Just carefully level the soil at the site chosen for the construction. You can place the structure directly on the grass, however, I advise you to remove it along with the turf and fill the free space with gravel. Otherwise, the foundation beams may begin to rot over time.
Important: Cut out and prepare all elements of the barrel sauna structure in advance. In this case, the assembly will be completed faster, since you will not have to be distracted by rework and correcting random errors
Installation of support beams:
In the base beams, make landing slots for a semicircular barrel. The length of the remaining straight edges must be at least 20cm. The step between supports is no more than 1.5 m. To fasten the beams into a single structure, use two boards. Secure them at the ends of the cut timber with galvanized corners.
- The lower part of the barrel is assembled (the floor is sufficient for the installation of end elements of width). The connection is made according to the tenon/groove principle;
- The end elements are installed. They are knocked down from boards and fastened with three transverse bars;
- The barrel body is assembled to the end.
Tip: After assembling the floor of the barrel, make grooves 45mm wide and 15mm deep in the places where the end elements are installed. This will allow the circles knocked down from wood to be secured more securely and will prevent them from moving during the operation of the bathhouse.
The final stage:
If you are assembling a barrel sauna exclusively with your own hands, that is, from scratch, then you will need to cut out windows and doors in selected places with an electric saw. Then the barrel is covered with metal bands. In this case, it is worth using tightening elements. Over time, the barrel board will dry out a little, causing cracks to appear. The situation can be corrected by tightening the hoops tighter.
Roof for a barrel bath:
To protect the barrel bath from rain, cover it with a roof on top. It can be made gable by knocking down a frame from several pairs of beams connected at an angle and covering it with a board. Glue roofing felt or soft tiles on top. Place the roof on the barrel.
OK it's all over Now. The sauna barrel is assembled. Doing it yourself, as you can see, is not difficult. Especially if the structure is assembled from ready-made purchased elements. Assembling a barrel from scratch will be more problematic. For example, to make tenons and grooves on boards, special tools are used that you simply may not have at hand.
Video on the topic “assembling a barrel sauna”:
Photo
This bath can be installed anywhere
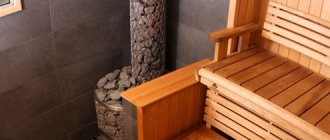
Stove in the bathhouse
Mini sauna on site
Bathhouse near the pool
Bath between trees in the garden
The barrel sauna fits into the design
Two baths on one site
Bathhouse barrel on the pier
Schemes and drawings
Construction of a barrel bath with shower
Drawing of a bathhouse 2.5-5 m
Drawing of a barrel bath 5-2.4 m
Drawing 5679-2040
Drawing 3529-2040
Drawing 3000-2500
Bathhouse 5-2.5 m
Did the article help you?
Equipment
Package Included:
- wood-burning stove with a chimney and a samovar-type tank for heating water;
- double-glazed windows;
- interior and entrance doors;
- pre-installed electrical wiring with lights;
- shelves, ladders, hanger.
As additional options, we offer exclusive stoves in facing stone with external fireboxes, an electric water heater, various fittings, cabinets, cedar piles, buckets, ladles and other products.
Calculate a barrel bath