When setting up a bathhouse, it is important not only to install a heater in the steam room, but also to carefully think through the arrangement of all communications in order to create the most comfortable conditions for staying in this building. This cannot be done without electricity, water, sewerage and ventilation. You can use a boiler as a heat source for organizing water supply, but it is more logical to use a stove and not take up free space with unnecessary equipment. A water tank for the bathhouse is necessary to ensure the availability of hot water and the ability to wash after visiting the steam room or performing wet cleaning.
Bath water tank
TOP 5 best water tanks for baths
| Photo | Name | Rating | Price | |
| #1 | Teplodar Parus | ⭐ 4.95 / 5 3 - votes | Find out the price | |
| #2 | Ferrum | ⭐ 4.9 / 5 | Find out the price | |
| #3 | MetalStroy | ⭐ 4.85 / 5 5 — votes | Find out the price | |
| #4 | Volcano | ⭐ 4.8 / 5 2 - votes | Find out the price | |
| #5 | Horizontal | ⭐ 4.75 / 5 4 - votes | Find out the price |
Which water tank would you choose or recommend?
Take the survey
Bronze model
Bronze bath taps are controlled using valves, spindles, disks and plugs. Hence their classification. They also differ in the type of mixer head. The housings are made of metal with double-sided threads and a supply pipe. In addition to the replaceable fittings with a head, the faucet has a nose that determines the direction of the water jet. Valve taps have a head with an external thread and an internal thread. Thanks to the external thread, you can mount the valve head, and with the help of the internal thread, you can ensure the movement of the rod fixed in the regulated section in a spiral. As a result of such manipulations, the valve, having fixed the stem at the bottom, can control the position of the seat, that is, the hole for the flow of liquid.
From the outside, the rod can be controlled using a conventional handle. For strength, the saddle is equipped with a gasket, a structure that ensures that the mixer adheres to the saddle. To stop the flow of water, the head body is sealed using a special packing and tightly compressed by a sleeve on the side where the device handle is located.
Types of tanks
Water tanks of different configurations are installed. The method of heating water may also differ. When choosing a container, you should take into account all the nuances.
The purpose of the hot water tank in the bathhouse
Capacity
The volume of the installed tank depends on the number of people who can simultaneously be in the bathhouse and use hot water. On average, 10...20 liters of boiling water should be provided for each person (with a small reserve). Today, tanks with a volume of 50...100 liters are produced. As a rule, it is not advisable to install a tank with a capacity exceeding 100 liters.
The shape of the container can be any: square, rectangular, oval and even round products are produced. But first of all you need to pay attention not to this, but to the build quality of the tank and the manufacturer’s warranty.
The shape of the container can be any
Material
When choosing a container, you need to consider that it must be able to withstand high temperatures (up to 250 degrees) for a long time.
Metal tank for water in the bath
You should not try to save money and install tanks made of ferrous metals. This approach cannot be justified not from an aesthetic point of view, but mainly from practical reasons. Due to constant exposure to high temperatures, the metal will deform over time , and traces of corrosion will appear on it . This significantly reduces the service life of the tanks and the quality of the water in them.
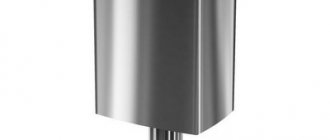
- The most common tank option is stainless steel construction. The demand for such tanks is explained by their attractive appearance, durability, resistance to various types of external influences, high heating rate, ability to retain heat for a long time, relatively low weight, hygiene, high durability and ease of maintenance. The tank configuration may vary. But high-quality stainless steel costs a lot. And you need to take into account that today there are many counterfeit products on offer, which will soon rust.
Stainless steel tank for bath - Not so common, but there are tanks made of cast iron. They are not afraid of rust. However, it must be borne in mind that, despite the fact that the water in such structures will not cool quickly, it takes more time to heat it up. Due to the bulkiness of the tanks, you need to carefully consider their location. Today, not many companies produce cast iron tanks, and they are not very cheap.
Cast iron water tank for bathhouse - Enameled containers can be used, but they are not the best option.. Of course, such material does not corrode and is very hygienic. But low resistance to mechanical damage over time will inevitably lead to the fact that the metal with a fairly thin coating will become chipped (as a result of not very careful handling) and these areas will rust. It will no longer be possible to fix the problem.
Enameled container for water in the bath
Stainless steel tanks can be considered the optimal design option for installation in a bathhouse. If we talk about the type of steel, it is recommended to choose products made from AISI 304. It contains not only chromium, but also nickel, which increases the durability and reliability of the material.
Prices for a water tank in a bathhouse
water tank for bath
Location and design
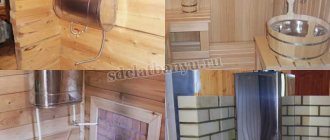
Three methods are used to place the tank: traditional (directly near the firebox), on the chimney and remote . What is the difference?
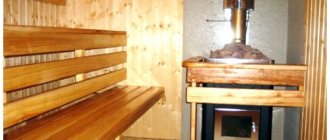
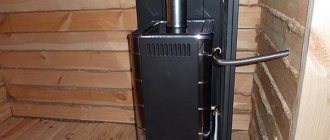
Bath stove with tank
Tank built into the oven
The reservoir can be located on the side or above the firebox. The water in it heats up quite quickly (exposed to open fire). To drain it, a ball valve is installed. Of course, this design does not involve pipeline laying work, which saves labor and material resources. However, using such a container is not very convenient; usually a tank of not very large capacity is installed, and its installation takes up useful space in the steam room, which usually is not very much. The best solution in small-sized baths is the top location of the tank. Since the metal will be in direct contact with the fire, the thickness of the tank walls must be at least 8 mm.
Water tank next to metal firebox
Reservoir on a pipe
If the ceiling height allows, you can install the tank on the chimney. Water is heated by hot gases passing through it. To simplify the installation process, it is possible to purchase a container with built-in chimney elbows. This tank can be fixed without much effort. By laying a pipeline from the tank, you can carry water to any point in the bathhouse, for which a pipe is connected to the bottom of the tank, ensuring the flow of liquid, for example, into the shower. Filling a tank installed in this way is not very easy due to the high location of the filler hole. It is best to use a hose lowered into a container for these purposes.
Reservoir on a pipe
Remote design
Thanks to the installation of a heat exchanger on the heater (on the chimney or directly on the stove) and natural convection, it is possible to place the tank in the washing compartment.
Water tank over brick firebox
The heat exchanger can be integrated into the oven (removable or non-removable), but you can easily install it yourself. It is a coil or container with a volume of several liters with pipes to create a circuit.
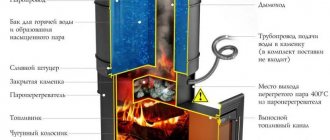
The principle of operation of a tank on a pipe
The first Russian baths were heated “black”; smoke filled the room, leaving traces of soot and soot on the walls. This technology has long been a thing of the past; modern stoves are equipped with chimneys.
Vapors and gases leaving the stove through the chimney heat it up greatly. And this temperature can be used to heat water.
To do this, a tank is installed on the pipe. It encircles the pipe and the water in it is heated by hot gases. This solves two problems at once - heating water and thermal insulation of pipes.
This is interesting: This system works on the principle of a samovar, which is why the tank on the pipe is called a samovar.
How does the system work?
Heat from the stove is transferred to the register or water jacket of the heat exchanger, which leads to an increase in the temperature of the coolant. Since the water in the tank has a lower temperature, pressure is created that promotes gravity flow of the liquid. Thus, hot water enters the tank, and cold water enters the heat exchanger through a pipeline, where it is heated (from the bottom point of the tank, water should be supplied to the bottom point of the heat exchanger, and from the top point of the heat exchanger, water should accordingly go to the top point of the tank). The minimum pipe diameter is 3/4 inch. The process continues until the temperature in the oven drops.
How to connect the water tank
Important! The tank must be higher than the heat exchanger, otherwise water circulation will not be ensured.
Without installing a pump, the total length of the pipes between the heat exchanger and the remote tank should not be more than 3 m. There is also a nuance in the principle of the pipeline design. It is necessary to create a slope to ensure natural circulation of the coolant: the pipes connecting the heat exchanger to the tank must have a slope of at least 25...30 degrees, and those delivering water from the heat exchanger to the tank must have a slope of at least 250 degrees.
Installing a heat exchanger allows you not only to do without a water heater in the tank, but also to transfer heat to all rooms.
DIY sauna tank
The heat exchanger must be chosen wisely. It should not reduce the performance of the heater by taking away a significant amount of heat from it. The maximum that it can take is 10% of the generated thermal energy.
If it is not possible to organize the movement of water by gravity, you can supplement the system with a circulation pump. This will increase its effectiveness. It will be possible to increase the length of the pipeline and reduce the slope. But the operation of this equipment is only possible from a 220 V electrical network.
Circulation pump pressure calculator
Go to calculations
Important! When operating water supply systems, remember that it is forbidden to heat the heater if the tank is empty. Otherwise, the welds may come apart. We also must not forget that in winter, water must be removed from the system (if the bathhouse is not heated), since when it freezes it can break the structure.
You cannot heat a stove with an empty tank.
Since when installing a water supply in a bathhouse, you often cannot do without a circulation pump, which ensures the movement of liquid in a closed circuit, the 5 best models are offered.
FAQ
How to paint the tank to prevent corrosion?
Give preference to paints that are designed for use in rooms with high humidity. They will protect the outer walls of the equipment from rust formation.
Can the heat exchanger built into a sauna stove defrost in severe frost if the remote tank has not yet frozen? I filled the water tank and didn’t heat the bathhouse for a month. Where will the water start to freeze in the heat exchanger or in the tank located under the ceiling?
Most likely, the water will freeze at about the same time. The heat exchanger will rupture, since there is nowhere for the water to expand. The expansion tank will most likely burst very soon too.
Which pump to use when organizing hot water from a remote tank to a shower?
Use a pressure boosting pump. Please note that it must work with hot water. Good reviews about the WILO pump. It has a flow sensor, that is, it turns on itself when the tap is opened.
What method of sealing threaded connections is best to use to connect the tank to the heat exchanger?
Tangit Unilok in the form of a thread showed itself very well.
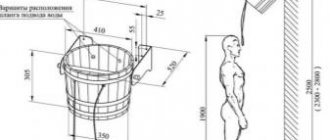
Recommendations for installation and connection of a remote tank to a heat exchanger
The task is to conduct hot water from a heat exchanger installed on the chimney to a hanging tank in the washing compartment located behind the wall. It is more comfortable to steam and wash in different rooms.
The liquid heated in the heat exchanger should flow by gravity into the tank. From there it can be spent on hygiene procedures, after which cold water is refilled into the tank, which goes through the pipeline to the heat exchanger for heating.
Connecting the water tank
The heat exchanger is equipped with pipes for connecting the circuit. The threads at their ends facilitate installation work.
Table. What will you need to connect?
| Name of tools and materials | Illustration |
| Bulgarian | |
| Hammer | |
| Screwdriver | |
| adjustable wrench | |
| Level | |
| Corrugated pipe | |
| Couplings | |
| Self-tapping screws | |
| Linen | |
| Plumbing paste | |
| Ball Valves | |
| Tee |
Prices for sanitary paste
plumbing paste
Step 1 . Pipeline exit points are measured, after which holes are drilled for hot and cold water pipes.
Holes are drilled
This is not always easy to do, given the thickness of the walls.
Hole for pipe
Step 2. Hanging a stainless steel remote tank. To do this, you need to tighten two self-tapping screws.
Self-tapping screws are screwed in
All measurements must be made using a level.
A building level is used
The tank is fixed using a wall mount.
Fixing the water tank
Step 3 . Connections between pipes and pipes must be sealed. You can use Tangit Uni-Lock thread or sealant for this. If these materials are not available, it is recommended to use plumbing paste and flax, which are not a problem to buy. The paste is applied to the thread, after which the fiber is wound (it must be carefully straightened).
The fiber is being wound
This connection is reliable. After this, you can tighten the nuts using an adjustable wrench.
The nuts are tightened
It should be noted that poorly performed sealing will lead to water leaks. The same must be done on the heat exchanger.
It is important to perform proper sealing
Step 4 . Pipeline connection. The heat exchanger is connected via a flexible stainless corrugated pipe. You can adjust it to size using a grinder.
A flexible corrugated pipe is used for connection
The second end of the hot line is connected to the (upper) pipe of the heat exchanger.
The second end of the hot line
It is necessary to provide an elbow at the bottom of the circuit and install a ball valve to drain water before the onset of winter (no liquid should remain in the pipes, heat exchanger, or tank in a cold room). This tap should be located at the lowest point.
Ball valve
A hot water outlet is also installed (supplied to the tap).
Draining hot water from the tank
The result is this design.
This is the final design
The heat exchanger looks like this: a pipe is connected to the upper pipe for discharging hot liquid, and to the lower pipe for supplying cold water from the tank.
Connecting hot and cold water
Step 6. All that remains is to fill the tank and test run the system.
It must be remembered that water should be poured into the tank before the stove starts heating. Otherwise, the entire system will simply break apart.
Video - Connecting a remote water tank in a bathhouse
What materials are used to create sauna stoves
Each owner has his own requirements for a bathhouse. Some people need solidity and the opportunity to organize a long vacation for themselves, their family, or a group of friends. Others want to build a sauna in the shortest possible time and provide it with an easy-to-install heat source. A huge number of people want to quickly heat the room and start steaming. The material from which the sauna stove is made can, with its properties, satisfy a number of needs of its owner.
Brick
Brick sauna stoves are solid, durable, powerful solutions. Unfortunately, they are quickly going out of fashion. The reason for this phenomenon is clear: the design of a brick sauna stove is complex, and construction requires the work of a highly qualified craftsman. The fact of the lack of real masters cannot but cause regret. A brick stove for a bath is very attractive and has many advantages.
- Excellent thermal inertia. Carefully heated brick wood stoves can retain heat for many hours. This is good not only for the steam room: thermal inertia allows you to dry the room.
- The amount of heat generated is enormous. A wood-burning brick stove heats a large volume of the room.
- High level of fire safety. The temperature of the brickwork surfaces is not sufficient to ignite surrounding objects.
Finally, not a single iron stove can replace a brick one. The latter is completely organic: it looks like a natural part of a Russian bathhouse. Therefore, connoisseurs of the genre and impressions definitely try to build a brick oven, without even looking at its shortcomings:
- the structure is heavy and must be installed on a foundation;
- the cost of materials and work performed is high;
- the oven takes up a lot of space.
Metal
Stoves made from steel or cast iron are very popular among consumers. The relatively low weight of structures, ease of installation and placement are highly appreciated. Metal sauna stoves quickly melt, warm up, and give off an intense flow of heat. Units of this type are made from different materials.
Metal stoves are produced from cast iron, stainless steel, and steel of a wide range of thicknesses and grades. The units use a variety of fuel types. There are gas, wood and combined solutions. An electric furnace will allow you to completely untie yourself from the source of resources, rid yourself of combustion control, and automate the process of maintaining temperature.
All metal furnaces have a number of undoubted advantages:
- easy to install;
- they weigh little and do not require a separate foundation;
- warm up relatively quickly (depending on the design);
- give off a lot of heat.
But those who like a compact gas metal or electric furnace should remember the disadvantages of such units.
- The main thing is a very small thermal inertia. The metal cools quickly. Only stones will help keep you warm.
- In addition, the steel solution must be chosen very carefully. Power is calculated according to the characteristics of the room.
- A metal stove will force you to constantly monitor the combustion process, add firewood or supply other fuel.
Cast iron stoves look much better than simple steel ones. Such structures are massive, have good thermal inertia, do not require maintenance and last up to 40 years. They are completely safe, but only a few can afford a unit of this class. The reasons are simple:
- a cast iron stove is comparable in weight to a brick stove and requires a foundation for installation;
- cast iron stoves are quite fragile, the metal from which they are made can crack from impact or sudden temperature changes;
- the cost of construction is very impressive.
It was the combination of fragility, the difficulty of transporting large masses, and the price tag on the product that made cast iron stoves the lot of rich people who value style and uniqueness.
The last type of heating installations for a bath are simple and affordable metal stoves. This can be quite a complex device. Made from ordinary steel, the compact potbelly stove can be easily equipped with a unit with a heat exchanger, and you can install a block with a water tank on it. Such a small stove heats up very quickly, but does not retain heat at all. Its only advantage lies in its simplicity and ease of movement from place to place. A potbelly stove is an ideal solution for a mobile sauna.
Specifics of spindle heads
This is an improved version of the previous type, only its stem is stationary. And the “rail” thread along which the device with the attached valve moves is cut not inside the head body, but inside the stationary rod. There is no fundamental difference with the previous type; an increase in comfort can also be argued. It’s just that the flywheel does not “move” up and down along the thread, but is stably in its place, because the rotation occurs inside a stationary rod.
In addition to the breakdowns typical of valve devices, spindle heads are not prone to breakage of spindle threads. It is believed that it is impossible to install cutting at home. This is true. However, there is a measure that allows you to temporarily postpone going to the store for a new head:
- disassemble the tap and unscrew the spindle from the stem;
- disconnect the valve from the spindle;
- We put a ring made of copper wire with a diameter of 2 mm on the upper valve stem. By installing a ring between the spindle and the valve, an additional rigid part will appear, replacing part of the worn thread. If one ring is not enough, you can make two or use thicker wire.
The work is almost like jewelry. If you don’t want to bother with repairs, it’s better to buy a new head. No thread at all, for example.
Specifications
Modern models of metal stoves have a built-in water tank. The technical characteristics of the container are indicated on the packaging or in the assembly instructions. Options:
- volume;
- steel thickness;
- the presence of holes for filling and draining liquid;
- form;
- number of fastenings.
Technical requirements:
- metal surfaces should be easy to clean from dirt;
- the material must withstand constant temperature changes and not be destroyed by prolonged exposure to moisture;
- the container must have sufficient volume;
- the material must heat up quickly.
The optimal amount of liquid per person is 15 liters.
Other fittings
There are several types of fittings, the main ones:
These models have one similarity - they are used to supply water. Due to the many differences, it is recommended that you carefully study the technical characteristics of each type of fittings before making a purchase.
Shut-off valves
Using a shut-off valve, you can shut off the water and remove the pipeline or plumbing fixture during installation and repair work. In other cases, the valve is closed.
The shut-off valve may be located:
- at the beginning of the pipeline;
- on a section of pipe leading to a bathhouse or sauna;
- on all pipeline branches;
- on a vertical riser;
- in front of the plumbing.
The design of the shut-off valve resembles a spindle tap for a bathhouse. In this case, the shut-off valves can be movable or fixed, and the valves themselves can be straight-through, angular, or direct-flow.
Drain taps for water supply
In order to be able to completely empty the pipeline, a drain valve is installed in the water supply system. As a rule, in the summer, water is drained only after the end of the summer season; in winter, this procedure must be carried out every time the system is not fully used.
The drain mechanism is installed:
- before the water pipe enters the building;
- in front of each plumbing fixture;
- at the very beginning of an autonomous water supply system.
Often, solenoid valves are used as an alternative solution to the drain valve. Such options are much more convenient, since they can be controlled remotely.
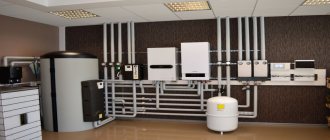
And a little about scale in boilers
If a summer house or cottage with a bathhouse is located in a region with hard tap water, scale will form in the boilers. It is deposited in the place of extreme temperature heating, reduces the rate of heating of water, and significantly reduces the conductivity of heat in the pipes. Scale from hard water constantly builds up in an uneven layer and has a high coefficient of heat resistance.
The appearance of scale inside the pipes reduces the strength of the samovar sections of the chimney, reduces the service life of the entire structure, and deteriorates the samovar-type heat exchanger. If pipes and boilers are not cleaned of scale in a timely manner, water floods the fuel compartment of the stove.
Recipes for folk remedies against scale
- Baking soda. In the tank, bring the water to a boil, pour a pack of soda into it. Then let the water cool and bring it to a boil again. Drain the water and soda, fill the tank with clean water, pour half a glass of vinegar essence into it. Bring to a boil, leave to cool. Bring to a boil again and pour out after half an hour. The influence of soda and acid loosens the scale; it is removed with a hard sponge or brush.
- Lemon acid. Not sparing the bags of lemon, pour it into a tank of cold water, then bring to a boil. Let it sit for a while, drain the water with citric acid, fill the tank with clean water, and bring to a boil. The acid breaks down all the scale deposits, the tank is rinsed with clean water. The method is cheap, fast-acting, but has a significant drawback: the acid, acting on scale, affects the metal material, its surface will be rough, and fresh scale will quickly appear again. It will become more and more difficult to clean the boilers with lemon each time.
- Vinegar. Pour a glass of vinegar into the filled tank and boil for 20 minutes. The acid acts effectively, its disadvantage is the residual odor. You need to clean the boiler with the windows open, then rinse the system thoroughly and ventilate the room for a long time.
Today, all methods of heating water in home baths are widely used. The designs of the various systems are well thought out, easy to use and safe.
It is important to fulfill all installation conditions efficiently.
Valve taps and their features
Valve taps (another name is taps with a retractable spindle) are designed quite simply - the head, which has external and internal threads, can be twisted and unscrewed. The external thread allows the head to be mounted in the faucet, and the internal thread ensures that the rod on which the valve is mounted moves along a spiral path.
As a result of such manipulations, the valve, rigidly fixed to the lower edge of the stem, opens and closes the seat - the hole for the passage of water. From the outside, the rod is controlled by a familiar handle.
For reliability, the saddle is equipped with a gasket - this design ensures the tightest possible fit of the working element of the crane to the saddle. To prevent water from passing through the tap when it is in the closed position, the head body is filled with a special packing. The seal is pressed tightly by a bushing located on the side of the faucet handle.
Some of the most common problems associated with valves include the following:
- Wear of the gaskets, as a result of which water begins to actively leak through a loosely closed hole, and the water supply itself becomes very rattling;
- Wear of the stuffing box, which is determined by the flow of water in the gap between the bushing and the spindle;
- Deformation of the seats, due to which water constantly flows out of the tap, regardless of the position of the handle.
Such problems are quite unpleasant, but their prevalence has allowed us to develop several simple solutions to eliminate the problems that arise. In addition, valve taps are quite simple and reliable - it is almost impossible to break them irrevocably even with self-repair.
The repair process boils down to the following actions, which directly depend on the previously diagnosed problem:
- Replacing the gasket. First, the stem is removed from the tap, from which the worn gasket must be removed. A new one is installed in its place, which is slightly larger in size than the hole in the socket. To achieve maximum tightness, it is worth chamfering the outside of the new gasket before installation. It is also worth considering that rubber gaskets are used for cold water, and leather gaskets for hot water.
- Replacing the stuffing box. Before work, you need to remove the flywheel and bushing. When these operations are completed, the worn seal is removed, after which the new oil seal is filled with foam or fluoroplastic. The material must be laid in accordance with the direction of the thread. The spindle is wrapped with twine or thin twine for maximum density. To make the job a little easier, you can do without removing the old packing. In any case, fresh material should be treated with oil - this will increase its resistance to moisture.
- Repair of deformed saddles. The first step is to disassemble the faucet and dry it thoroughly. Circles cut from sandpaper are inserted into the dried nest. Next, you need to use a rod to scroll the paper in all directions until the surface becomes ground in.
The simplicity of valve taps is an important advantage that is highly appreciated by amateurs, because it is very easy to install and repair such a system. The only difficulty that can be encountered when using such mechanisms is damage to the threads.
If the thread breaks, it would be better to replace the faucet with a new one in order to avoid the rather delicate work of creating a new thread.
Valve taps
This design has stood the test of time and is considered one of the most reliable. The valve model (otherwise known as a faucet with a retractable spindle) is very simple and convenient. Its head, equipped with an internal thread, ensures smooth movement of the rod that controls the valve. The latter, as it is unscrewed, moves away from the saddle and lets water through. The tightness of the tap is ensured by rubber gaskets and special packing in the head.
At the same time, opening it requires some effort. Among other disadvantages of valve taps, we mention the following:
- rapid wear of the gaskets, due to which water begins to flow even after closing;
- abrasion of the stuffing box sealing the head;
- deformation of the seats, preventing a tight fit of the valve.
On the other hand, all such breakdowns can be eliminated quite easily, and it is almost impossible to permanently damage such a crane.