/Repair/Floor/
Tiles and laminate are combined for greater practicality of the room and its zoning. For example, in kitchens, kitchen-living rooms, hallways, and also under doors. Here are the 5 main ways to design a joint (list by popularity):
- Using a threshold or connecting profile;
- Using sealant (silicone, acrylic, polyurethane);
- Using a cork compensator;
- Using tile grout between joints;
- Using a liquid plug.
In this material, we examined each of these solutions in detail and presented 40 photo examples.
The junction of tiles and laminate without a threshold in the interior of a kitchen in Khrushchev
Joint WITHOUT a threshold - how to do it and why sometimes it’s better not to take risks
Let's start with a more preferable, but also more complex solution - the junction of tiles and laminate without a threshold.
How to make a joint between tiles and laminate WITHOUT a threshold?
You can join tiles and laminate flooring without a threshold only if ALL of these 5 conditions are met:
- Lay both coatings not in a floating manner, but with glue. If the laminate is laid in a floating manner (when the lamellas are laid on a substrate and are not glued to the base), then a threshold cannot be avoided.
- Achieve the same height of tiles and laminate by adjusting the thickness of the adhesive and screed. The maximum error is 1-2mm. This is the second reason why you need to plan the junction of tiles and laminate without a threshold in advance.
- Make an expansion joint of sufficient width. In order for the laminate to expand and contract naturally, there must be a gap of at least 5 mm between the tiles and the laminate (on average, 1 mm of compensation gap is required for every meter of laminate length). Otherwise, the laminate will swell, begin to creak, and the plug may even fly out of the joint.
- The joint should be no more than 3 m long, and the room should be no more than 25 sq. m. m. After all, the larger the area of the laminate, the larger the compensation gap it needs.
- Cut the laminate very carefully. This requires special equipment and a qualified craftsman, especially if the joint shape is complex.
If at least one of these requirements is not met, then the threshold will still have to be set. Do you doubt whether it’s worth bothering with a joint without a threshold or is it better to take the easy route? The advantages of the first solution are obvious: a neat appearance, no cracks that complicate cleaning, nothing interferes with walking.
The junction of tiles and laminate without threshold in the interior of a kitchen in Khrushchev
And the absence of a threshold is indicated if the joint has a complex configuration. For example, if it is too long, radius, wavy or curly (zigzag, with hex or octagonal tiles). Here are a couple of photo examples of complex joints.
On the other hand, when making a decision, keep in mind that no matter how perfectly the joint is made and no matter how high-quality the laminate is, there is still a risk of it swelling. In this sense, the threshold is a more reliable solution.
So, where to start planning a joint:
- If you want to connect tiles and laminate flooring without a threshold, then you need to choose specific materials and the method of designing the joint in advance - before the screed stage. Next, a little math: sum up the thickness of the tiles and tile adhesive, and then the thickness of the laminate and its backing/adhesive. Finally, we calculate the difference between the heights of the two coverings. The task of builders is to level out this difference due to the thickness of the substrate, screed and/or glue.
- However, if you have already laid tiles, but have not yet laid laminate, then there is still the opportunity to make a single-level floor. Since the tiles have a standard thickness, they are laid first, then the laminate can be adjusted under them.
Finally, we talk about 4 ways to design the joint between laminate and tile without a threshold.
Attention! Whichever of the following methods you choose, when laying the laminate for its thermal expansion, you should leave a 5-10 mm gap from the opposite wall (later it will be covered with a plinth).
No. 2. Joint shape
The shape of the joint depends on where the joint will be located, what tile is used, and what preferences the apartment owner has. The joint line can be:
- straight. The most popular option is usually used when the joint is located on the border of two rooms under the door, and then it is decorated with a decorative threshold. A straight joint can be quite long when used to zone a room;
- curved. It is usually used when laying two coverings in one room when it is necessary to distinguish different zones. Making such a joint with your own hands is quite difficult, since you need to make a very precise cut of the tiles and laminate. If you managed to make a neat cut, then the joint can be made without a threshold. Otherwise, it is better to use a decorative overlay.
- broken. Used when installing triangular, hexagonal or diamond-shaped tiles. The laminate is cut to fit exactly around the tiles; the latter is not cut or adjusted. It is not easy to perform such installation; the joint must be perfect, since the threshold is not used - it will ruin the whole look. Such a joint looks good on a long section.
Method 1. Sealing the joint with tile grout
Pros: Simple, inexpensive and working method. Suitable for complex joints.
Cons: The grout may crack as the building shrinks. Since the joint between the tiles and the laminate turns out to be rigid, the compensation gap for the laminate must be left under the baseboard.
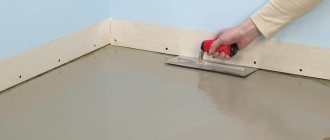
Installation: You can fill the seam with grout both during the floor laying process and after its completion. The algorithm of actions is as follows:
- On the screed we draw the markings of the line of the future joint;
- We lay the tiles to the line, trim the unnecessary part and trim it with a grinder;
- We cut the laminate, lay it taking into account the compensation gap, and treat the edge with silicone;
- Fill the resulting seam halfway or a little more with sealant and let it dry;
- Place grout into the seam on top of the sealant and level it;
- To make the seam more durable, coat it with clear varnish.
Advice:
- Epoxy grout or polymer grout is especially suitable for porcelain stoneware;
- You can use the same grout that was used to grout the tile joints.
Installation methods
Let's take a closer look at the installation features of each option.
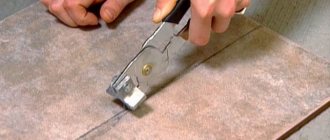
Cutting tiles and laminate
When the seams between two materials are straight, there are no problems with their fitting, but it is difficult to trim the curved areas. To do this, you will need to make a template from available material (cardboard, polystyrene foam, etc.), using which to mark the future joint.
- A curved cut on laminate is made using a manual or electric jigsaw.
- The tiles can be cut to fit the curves of any shape using a grinder with a diamond tile disc, or manually with a jigsaw/hacksaw with a diamond string. You can also drill as many holes as possible along the cut line and break off the excess with wire cutters.
Installation of flexible PVC profile
Installation instructions for flexible PVC profile
- After laying the tiles and laminate, there should be a gap, the thickness of which will allow you to install the fastening profile and leave a temperature gap of 5 mm next to the laminate.
- Using a hammer drill, we drill holes for dowels in the expansion joint. If you have a heated floor running through the seam, then liquid nails can be used for installation, but it is better to exclude such cases at the design stage.
- We cut off the required length of the profile using a knife/hacksaw/jigsaw.
- We screw the fastening profile to the base with self-tapping screws.
- Before laying the decorative flexible profile, you need to soften it. To do this, place it in warm water (50-70 degrees) for 15-20 minutes.
- The decorative nozzle is inserted into the mounting profile and snaps into place.
Installation of flexible metal profile
- Before starting work, calculate the thickness of the tiles and laminate, taking into account the adhesive and backing - they must match.
- We manually give the required bend to the profile.
- Cut the required length using a grinder or a hacksaw.
- The profile has special claws for attaching it to the floor, so it is best to install it simultaneously with laying the tiles. The foot will be pressed against the tile with glue, and on the other side the backing and laminate will simply be inserted.
- If the profile was not laid during laying of the tiles, this can be done later - but you will need to remove part of the adhesive along the outer edge.
- The laminate is laid with a gap of 5 mm. You can lay out part of the covering and then slide it under the profile. To control the size of the gap, you can temporarily apply masking tape with markings to the edge of the laminate.
The profile is held in place by pressing with the tiles
Installation of aluminum threshold
A regular threshold with holes is installed as follows:
- Cut the threshold to the width of the doorway.
- Mark the drilling points at the joint.
- Drill holes, insert dowels and secure the threshold with self-tapping screws on top.
- To screw in self-tapping screws, use a screwdriver or screwdriver with minimal torque, otherwise the threshold will bend.
An important nuance: the measurement is taken taking into account the platband, and not just between the two extreme points of the box. Then the threshold is trimmed to fit the trim to avoid gaps.
Proper pruning
If the threshold has hidden fastenings:
- The holes are marked on the base.
- A self-tapping screw with a dowel is inserted into the groove on the underside of the threshold.
- Holes are made in the floor.
- The threshold with the dowels on is inserted into the holes and hammered to the end. To avoid damaging it, strike it through a block pad.
Instructions for installing a threshold with a hidden fastening at the junction of laminate and tiles.
The standard fastening has a significant drawback: the BM 6x40 dowel has a large gap between the cap and the arch of the threshold, so it will not be installed securely. To avoid this, it is better to take 8x60 dowels and grind off the head on both sides for a tight fit.
To remove the backlash, take a larger dowel and file the head
The easiest way is to install a threshold with a self-adhesive base:
- Mark the outline of the sill on the flooring to ensure it is glued evenly in the center of the joint.
- Remove the protective film from the self-adhesive base and stick it on.
Method 2. Sealing the joint between tile and laminate with sealant (silicone, acrylic, polyurethane)
Pros: Due to their plasticity, sealants allow you to “walk” a little. For the same reason, the joint between dissimilar coatings does not deteriorate when the building shrinks.
The 1.5 mm seam is filled with silicone sealant
Cons: Silicone sealants sometimes harden over time. Only narrow seams about 5 mm wide can be sealed with sealant.
Advice:
- Acrylic sealant can be painted and varnished after drying (unlike silicone).
Installation: In this video you can see the process of bringing tiles and laminate into one plane and the process of sealing the joint with silicone sealant.
What to consider when choosing a threshold
The main characteristics of the profile are length and width. The laminate should not be adjacent to the inner wall; a gap of at least 5-10 mm should be left. Plus, a few mm are needed to overlap the joined coatings.
The second thing you need to pay attention to is the material of the threshold. If it will be installed between a wet and dry room, then it is optimal to use aluminum, plastic or rubber strips. Wood materials are sensitive to moisture and wear out quickly. In rooms with heavy foot traffic, an aluminum threshold would be the best choice.
And finally, it is advisable to select the profile in accordance with the color and design of the floor. It can be unnoticeable or act as a contrasting finish. Flexible thresholds are suitable for designing curved lines, and special stepped profiles are produced for joints with height differences.
Method 3. Joint with cork expansion joint
The cork compensator is the most popular alternative to the threshold. They can be used to create a straight joint, and sometimes a radius one.
- Many designers prefer a cork expansion joint. And there are those who consider it as much a relic of the past as aluminum profiles.
Pros: Looks good, the joints are very neat. Pressed cork is soft and elastic, so it can provide natural expansion to laminate/parquet flooring. Due to its naturalness and plasticity, cork expansion joint is especially suitable for the joint between tiles and parquet/parquet boards/engineered boards.
Cons: higher price, not suitable for shaped joints, limited choice of shades, theoretically it could begin to crumble due to shrinkage of the house or even fly out of the seam (but, as practice shows, this is unlikely). Another significant drawback is that the elasticity of cork is not enough to compensate for the expansion of the laminate in spacious rooms (more than 25 sq. m).
Adviсe:
- When laying laminate flooring, you can buy a cork expansion joint to match it and already with varnish. If you are laying parquet/parquet boards, then you can buy a cork expansion joint without any treatment (pictured) and sand and varnish it at the same time as the parquet.
View this post on Instagram
Cork expansion joint available in natural color. Easy to paint. Used to fill joints where parquet joins. Chistopolskaya 20b, “Cork Gallery”. #CORGALLERY #parquetkazan #floors made of corkkazan #cork compensator #cork compensator #wooden parquet
Posted by Eduard Nechaev (@edouard_netchaev) Sep 25, 2022 at 3:42 PDT
- Cork expansion joints with veneer are available for sale - this is an excellent choice for wooden floors.
Installation: the compensator is glued with parquet glue. The work is carried out as follows:
- First we lay the tiles. We grind the edge, level it, and clean it from dust and dirt using a vacuum cleaner.
- We apply the compensator and, if necessary, trim it.
- We treat the edge of the laid tile with glue.
- We insert the compensator into the seam and press it firmly against the edge of the tile, for example, using a building level.
- We fill the micro-gap between the tile and the expansion joint with sealant (to match the expansion joint/floor covering), for this you can slightly bend it. Next, firmly press the compensator again. Wipe off excess sealant.
- We lay the laminate close to the compensator.
How can you connect the transition?
To neatly design the gap between functional areas, four materials are most often used.
Grout
An easy way to seal winding, shallow seams. Such thresholds are difficult to find, and other fillers will not look so organic. Often in modern interiors there is an interesting way of finishing the floor: polygonal ceramic parts “incline” a little into an area with a different coating. This separates the hallway area from the rest of the house and the kitchen area from the living room. In this case, the transition is also carried out using grout. Do it in the following order:
- Carry out preparatory work.
- Treat the edges of the second material with silicone compound.
- Fill the resulting seam halfway with it.
- Wait for it to dry.
- Dilute the grout, spread it on top and level it with a spatula.
- Wipe the finished dried layer with a damp cloth and cover it with clear varnish to extend its service life.
Photo: Instagram @remont100lvl
- Decoration
Colored grout for tiles: 8 pros
Silicone and acrylic sealant
Joining two sections with elastic sealant is even easier than with grout. The advantage of the method is that there is no need to additionally treat the boards to protect them from moisture. But there is one point - you need to take into account that after drying the filler will turn light brown. The acrylic filler can be painted in a suitable shade after it has dried. Both expansion joints are suitable for renovation work in new buildings, as they are able to adapt to the shrinkage of the building.
Sequence of work:
- Place masking tape on both sides of the seam so you don’t have to waste time scrubbing it off later.
- Make a hole in the silicone paste tube so that it can be squeezed out, or insert it into a special gun.
- Fill the gap so that the sealant extends slightly above the floor surface.
- Use a spatula to remove excess mixture. If you don’t have a spatula, you can wait until the mixture dries and cut off the excess.
Keep in mind that it takes one or two days for the sealant to dry completely. Silicone expansion joints are recommended for use in rooms where the flooring is secured with glue or fasteners.
Photo: Instagram @42m2.ofhappiness
Photo: Instagram @42m2.ofhappiness
Photo: Instagram @42m2.ofhappiness
Photo: Instagram @prinesite_pechenki
Liquid plug
Liquid cork for laminate and tile joints is a moisture-resistant mixture of an adhesive base and cork chips. It has an unusual texture and looks good in seams no larger than 7 mm. On wide crossings it will look alien. This is a simple connection method for areas of any shape.
The hole that is filled with the mass is first cleaned of dust and degreased.
Rules for working with the mixture:
- The coating levels must match. If there is a slight difference, the glue is aligned along the higher edge.
- Do not let the cork get on the floor, as it is difficult to wipe off and, once dry, almost impossible. You can pre-coat the floor with oil or apply masking tape to it.
- The material must be sanded a day after pouring, until it hardens.
The layer turns out to be very durable and it is almost impossible to remove it.
Photo: Instagram @centraparketarf
Photo: Instagram @parquet_design
Cork compensator
One of the most popular ways to design boundaries between two floor coverings. The filler is a soft, pressed lath or whole sheets with the same characteristics. The compensator has several advantages:
- Possibility to choose the appropriate color.
- Ability to withstand building shrinkage and dimensional fluctuations of laminated strips.
- Suitable for wide seams.
- Looks beautiful in the interior.
For this material it is also desirable that both areas are at the same level. Otherwise, the result will not look aesthetically pleasing.
Sequence of working with the filler:
- Adjust the rail to the desired size or cut the part from the sheet.
- Apply adhesive to the entire width of the laminate or tile, and a thin layer of sealant to the bottom.
- Glue the compensator and cover it on top with an antiseptic and clear varnish.
- The rail can be tinted, but you need to take into account that it absorbs paint well and the color turns out saturated.
Photo: Instagram @centrpola.ru
Photo: Instagram @centrpola.ru
Method 4. Joint with liquid cork (cork sealant)
Cork sealant is an elastic mixture based on cork chips and glue.
Pros: Can be used at the joints of complex shapes.
Cons: Looks less neat than sealants or cork expansion joints, especially in wide joints (more than 7 mm). Despite the fact that liquid plug is difficult to insert into narrow joints.
How to design a joint beautifully
To design the joint at the best level, you will need to think through all the details carefully. First of all, there are cases when it is not worth combining tiles with laminate:
- Do not combine several types of coatings on one surface at once, otherwise the house will turn into a store of finishing materials.
- The joint between wood-look tiles and wood-look laminate will most likely look ugly, because different materials will not be able to match 100% of the same shade.
- If you don’t want to do complex mathematics, don’t combine materials of different thicknesses on the floor and don’t make a complex broken joint.
How to make the joint as aesthetically pleasing as possible? Designers advise:
- When joining materials, choose the threshold to match the tone of the laminate. Perhaps it will even be found in the same manufacturer's collection. 1
- Silver metal - steel, aluminum, stainless steel - is an almost universal option, quite discreet and beautiful. Try to choose the narrowest profile possible to ensure a harmonious transition. 2
- It is possible to join “without a seam”, but this is a jeweler’s work. If the levels are perfectly calculated, the edge is perfectly processed and varnished or painted, the joint will be almost invisible. 3
Some more tips
- The easiest way to choose a matching threshold is from the laminate manufacturer's collection.
- Sometimes, instead of racking your brains over creating a joint without a threshold, it’s easier to completely abandon the idea of combining dissimilar coatings. For example, if you visually like wood, then you can replace it with practical wood-look porcelain tiles along with a heated floor system. But it’s not worth joining imitation wood (the same porcelain stoneware) with natural wood or laminate, since it’s almost impossible to choose tone-on-tone materials that match the texture.
- It is very important to find a qualified craftsman who has already performed similar work when laying the floor and designing the joint between tiles and laminate.
- Keep in mind that if the room is small (up to 8 sq. m), then combined floors will not look very good, they will visually fragment and reduce the space.
- If you want to combine tiles and laminate in the kitchen, we recommend making a tiled area at least 1 meter wide (from the cabinets with the stove and sink). The photo below shows an unsuccessful example of combined floors - the strip of tiles is too narrow.
- It's best to lay the tiles first. Since it is easier to adjust the level of the laminate to it. In addition, working with tiles is always wet, and this is harmful for the laminate.
Photo gallery
Support the project - share the material with your friends on social networks:Options for connection nodes
There are several ways to make a technological connection between laminate and tiles:
- Flexible PVC profile - suitable for any curved bends. Consists of a base and a decorative nozzle.
- Flexible metal profile - most often used on curved sections, but it can also be used on straight seams. They are powder coated for durability.
- Aluminum threshold - best suited for installation at the joint under the door leaf. Allows you to hide not only the expansion joint, but also to level out height differences. Some models are powder coated. There are several types of thresholds:
- Thresholds with holes for self-tapping screws are a standard option;
With hidden fastening - they look more beautiful;
- Self-adhesive - the easiest installation.
Flexible PVC profile Cezar
Flexible metal connecting profile
Standard aluminum sill
Door frame with threshold
According to the “Manual for the design of autonomous engineering systems of single-apartment and semi-detached residential buildings” (section Ventilation, paragraph 4.84), a gap of at least 2 cm must remain under the interior doors for air flow.
Solid wood profiles and thresholds
Cork compensator
Transition profiles smooth out abrupt transitions between two coatings
Preparing the tile base
If new laminate is installed directly over tile flooring, it must be properly prepared.
The following points need to be taken into account:
- The flatness of the tile covering and the height displacement between tiles should not exceed 2 mm.
- Cracks in tiles or joints may indicate errors in the screed or missing extension joints. To ensure that they do not transfer to the new laminate flooring, the cracks must be sealed with resin.
- Loose or damaged tiles should be secured, replaced or repaired to avoid foot noise or unstable surfaces.
A particularly important aspect is the body height: if it is too high overall, the doors and sills may need to be leveled. This means that additional effort is required and may result in optical disturbances.
In principle, laminate is laid on tiles in the same way as on any other surface. Sound insulation is indispensable as a liner, since laminate flooring is very sensitive to humidity, in addition, a vapor barrier should be planned. This also applies to laminate flooring suitable for wet areas.
Please note the following for installation:
- Laminated panels must have at least 24 hours to acclimatize to the room and adapt to humidity.
- Before laying, a vapor barrier (polyethylene film) and sound insulation are laid on the tiled floor.
- Laminate flooring in the click system is laid from left to right. The first panel must be precisely positioned for a flawless installation image.
- An extension joint of 1 to 1.5 cm is marked on the walls. Spacers ensure that the panels do not slide along the wall.
TOP 3 best threshold manufacturers
In search of quality products, you can interview friends, surf the Internet, request information through “Okay, Google” or Alice. But it’s better to read our mini-rating of top manufacturers of profiles for laminate and ceramics.
Cezar
Since 1997, the Polish manufacturing company Cezar, under the brand of the same name, has been producing a variety of products for construction and finishing purposes. Including:
- Skirting boards made of plastic and aluminum.
- Door frames, fillets,
- Panels for walls and ceilings.
- Substrates for floor coverings.
- Profiles for ceramic tiles, plasterboard, furniture.
- Aluminum and PVC thresholds (flexible).
The last category includes flat, semicircular and corner elements with open, hidden and adhesive fixation systems. Color range – more than 50 decors and shades. Domestic consumers are well acquainted with the brand, because Caesar products are famous for their quality and durability.
Arbiton
One of the largest Polish companies, Decora SA, is a whole network of factories producing construction and finishing products produced under the brands Afirmax, EwiFoam, Vidella and Arbiton.
Arbiton TM products are often found on the domestic market:
- Vinyl tiles.
- Substrates for flooring materials.
- Thresholds made of metal and PVC.
Flexible and aluminum profiles are produced in a wide range, including joint-bridging, corner, and finishing. The color palette includes more than 50 decors, including metal and wood designs. Products are certified according to Russian and European standards.
Is it possible to leave the tile covering?
In principle, it is possible to install new flooring on an intact and level tile floor. Laminate and other floating floors are especially good for this because the flooring does not need to be screwed or glued and the tiles remain intact.
However, in order to end up with a durable and defect-free laminate floor, various points need to be taken into account. Good preparation of the tiled base is important.