Preparing the walls
If you have walls made of non-combustible material or the stove will be installed at a distance of more than 50 cm from combustible surfaces, simply skip this point.
For a stove with a remote firebox, make a niche in advance. Use a chainsaw to saw a wooden wall according to the markings, punch a brick wall with a hammer drill and level the ends with a chisel and hammer.
Finished opening
Ways to protect walls from stove heat:
- plastering over metal mesh. Layer thickness >25 mm;
- installation of a protective steel screen (stainless steel) in combination with non-flammable material more than 1 cm thick;
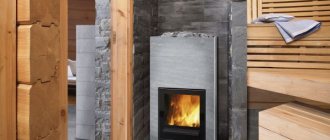
- wall decoration with porcelain stoneware or natural stone over a layer of non-combustible material more than 1 cm thick;
- installation of factory protective screens;
- brick screen.
Fire-resistant plasterboard for insulating walls in a bathhouse
SuperIzol (SUPER ISOL)
Most often, a brick screen is erected to protect walls. It can be located on two or three sides of the stove. Here the screen acts as a barrier separating the hot stove and the flammable walls of the bathhouse, and also accumulates heat and maintains the temperature in the steam room.
Brick base and screen
Brick screen for furnace
You can lay the screen from red solid brick (as well as clinker, bassoon), but it is better to use fireclay, laying it in half a brick. For masonry, cement-sand mortar or fireclay clay is used. A 120 mm thick screen will do its job perfectly.
When laying, they are guided by the following rules:
- the distance from the wall to the brickwork should be from 5 to 15 cm;
- a similar distance of 5-15 cm is taken from the walls of the oven to the masonry;
- the brick screen can be as high as the ceiling, but not lower than the height of the stove + 20 cm. It is optimal if the masonry continues 1 meter above the level of the stove;
- At the bottom of the screen, vents (holes in the masonry) are left, which are necessary for the circulation of hot air masses. It is permissible to install small firebox doors into the masonry and open them when the stove is lit.
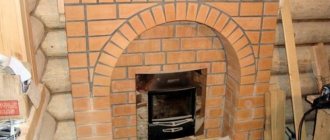
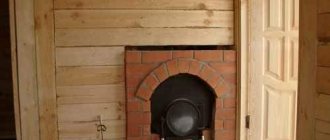
The photo shows an opening in the wall and the process of laying a brick screen
Another example of brick laying in a wall opening
Brick screen for a furnace with a remote firebox
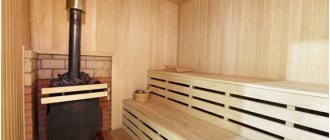
This is what the screen looks like from the waiting room
Beautiful carved platbands will hide the cracks
Installing the furnace on the foundation
Not inferior to brickwork in popularity is wall decoration with soapstone, magnesite slabs, and volcanic stone.
Kinds
People who have installed metal stove equipment in the bathhouse should think in advance about the location and material of the protective screens. There are several types of protection:
- Metal. Made from stainless steel or cast iron. Metal partitions reflect heat towards the steam room. Sheets of steel quickly heat up to high temperatures, which is why any careless touch to them can result in a burn. To make the protection safe, a 10 cm wide frame is made on top of it, which is filled with expanded clay, crushed stone or broken brick. The distance from the stove to the wall in the bathhouse should not be less than 12 cm. Under the metal layer, you need to fix a sheet of basalt, which will increase fire safety.
- Brick. Another material that is often used to make protective screens. For construction you need to use fireclay bricks. It is important to take into account that the structure should be located 20 cm above the stove equipment. Several holes must be made on the bottom of the brickwork, which will ensure air exchange between the screen and the heater.
- Tree. Decorative fences around the stove are often made from this material. Their main task is to protect bathhouse visitors from getting burns. Wooden fences are made at a distance of 50 cm from the furnace equipment. In this case, the wood must be treated with fire-resistant impregnation. If the wood turns black after several kindlings, the screen should be moved away from heating surfaces.
In addition to making a reflective screen, you can additionally sheathe the walls, floor, and ceiling with non-flammable materials:
- mineralite slabs;
- asbestos cardboard;
- basalt wool.
To obtain reliable protection against high temperatures, these materials can be combined with stainless steel sheets.
In construction stores you can find ready-made screens made of galvanized steel. It is impossible to install such structures, since galvanized steel releases harmful substances when heated strongly.
Floor screens can be purchased together with a metal stove. They are made of cast iron and stainless steel. Homemade floor screens can be made from the same materials or from fireclay bricks.
Brick screen
Protective screen made of red stove brick
Brick barriers often cover the side surfaces of the stove, making the outer skin like a casing. In this way, the separation of combustible surfaces and the hot heating device is carried out.
Protective brick screen - diagram and photo
Since ancient times, there has been a tradition of building stoves from brick or stone. This design took a long time to heat up, but at the same time radiated soft heat, and subsequently cooled down for a long time. Modern metal stoves heat up quickly, emit hard infrared radiation, and the red-hot walls of the stove burn out the oxygen in the bathhouse. In addition, a metal stove is more fire hazardous. In view of these aspects, we can conclude that it is advisable to combine stone or brickwork with steel structures.
Brick screen for a metal stove – photo
Solid fireclay bricks are well suited for constructing a protective casing. A mixture of cement or mixed with refractory clay will serve as a good binder for it. The masonry-screen made of fireclay bricks, according to the value of the safe distance, is made with a thickness of about 12 cm (0.5 bricks) or 6.5 cm (0.25, respectively). However, expensive fireclay bricks are very rarely used in private baths to protect wooden walls; most often, preference is given to red stove bricks.
Installation of a sauna stove and laying a protective brick screen (fireclay bricks)
Red brick screen
Before finishing (lining) a metal stove with red stove bricks, the base is first built.
Foundation diagram
An example of pouring a monolithic base for a brick screen and stove
It is imperative to take into account: if the stove is located not far from the load-bearing wall, then there must be a distance of at least 5 cm between the foundation of the stove and the foundation of the building. To ensure that these two foundations are not connected in any way and the heat from the steam room is not lost, thermal insulation material is laid between them .
The foundation surface should be 15-20 cm below the level of the finished floor of the bathhouse. After installing the foundation (it needs to be allowed to dry for 30 days), moisture-proofing material - roofing felt or roofing felt - is laid on it in 2 layers. Then, bricks are laid on the clay-cement mortar in 2 rows, shifting the bricks among themselves so that the seams of the masonry are covered by the brick lying on top.
Poured foundation
The brick is laid on top of two layers of roofing material secured with bitumen mastic
Laying bricks on a poured base
At this point, the work on arranging the foundation is completed.
A heat-protective base should be made on top of the foundation, consisting of:
- a sheet of metal fixed on top of a layer of heat-insulating material;
- two rows of bricks laid on a wooden floor;
- heat-resistant ceramic tiles.
Tile base for stove
Before covering an iron stove with bricks, you need to prepare the required mortar for laying. The best option for brickwork around a metal stove would be a simple clay mortar (raw materials should be mined at a depth of more than two meters) with sand. The kneading process is not complicated. The clay is first soaked, then the already soaked clay is thoroughly rubbed through a sieve. The sand is sifted and mixed with soaked clay. The viscosity and plasticity of the mortar must be such that it does not squeeze out of the seams during laying. You can add 5-10% cement to the solution for strength.
Preparation of clay solution
The foundation of the protective screen can be made in a quarter of a brick, be sure to leave small holes in its lower part and in the middle part - special windows that create air circulation between the brick screen and the installed stove (sometimes they are equipped with combustion doors). In this case, the bath will heat up very quickly.
Brick fencing for the furnace
Teklar sauna stove with brick screen and air ducts
It is best to line the stove with half a brick. If the screen is made of brick, it will take a very long time to warm up.
Types of bricklaying
The brick screen can be laid all the way to the ceiling. The main condition is that its height must be at least 20 cm greater than the height of the stove.
Metal stove with brick lining
To more reliably protect wooden walls from high temperatures, an acceptable distance has been established between the wall and the constructed brick screen. It should be less than 15 cm, but more than 5 cm, while the distance from the stove to any of the walls can be 20 - 40 cm.
Where to put the stove in the bathhouse?
The location of the stove depends on many factors, in particular, on its type, as well as on the location of the firebox (in the same or in an adjacent room). In addition, fire safety is important - there should be at least half a meter from all fuel .
Don't miss: How to insulate slopes inside a house: what is the best way to finish plastic windows with your own hands, how to plaster and prime them, rather than paste them on top?
So, those who decide to install a brick oven make a foundation for it, so the location is already determined at the sketch stage. But with a metal stove, sometimes people delay until the last minute, not knowing which model to buy. Therefore, it happens that already finished walls have to be cut and other unnecessary work done.
IMPORTANT! The location of the supply ventilation depends on the location of the stove, so it’s better to think in advance.
In addition to ventilation, it is worth thinking about fire safety, especially in a bathhouse with flammable walls. Often, in order to provide it, part of the wall is made of brick. Which again speaks to the need for planning.
The location of the stove in a bathhouse with a separate steam room
There can be two options:
- or the stove, together with the firebox, is located entirely in the steam room, which means it only heats it;
- or the firebox is moved to the adjacent room, which allows for partial heating of that room too.
The location of the stove in a bathhouse with a separate steam room: option with a firebox from the rest room. Diagram from the article about the hood
In the first case, during the cold season you will have to think about how and with what to heat the neighboring rooms , in the second - the same problem remains only partially.
Stove in a bathhouse with washing and steam room
Here you can also find several solutions. The firebox can be taken not to the rest room or dressing room, but to the washing room. But this is problematic from the point of view of storing firewood. Therefore there are other options.
Stove in a bathhouse with washing and steam room
You don’t have to remove the stove at all, just install a water tank at the top , which will be connected through the wall to the “samovar” on the chimney pipe in the steam room. “Samovar” is a heat exchanger (!stoves with a heat exchanger are reviewed here), which can be found on sale; with its help, water for the washing room is heated, and from the tank there is heat sufficient to maintain a normal temperature of 30-32 degrees in the washing room.
In some cases, the problem is solved by additional heat sources - warm floors or a second stove .
Is a foundation always needed for a furnace?
We already said above that no, it is not always needed. The need for it arises only when the weight of the sauna stove with everything associated (from the water tank to all the bricks that line the floor, stove and chimney) exceeds 700 kg. If the total weight is lower, you can simply lay the base with bricks instead of a foundation, put 12 mm asbestos on top, and on top of it - a steel sheet of any thickness (from 1 mm). The topic is discussed in detail here.
IMPORTANT! A separate foundation for a brick oven is made so that it has its own shrinkage, not related to the shrinkage of the house.
Such a foundation is made thoroughly, deepened to the load-bearing layer. If the stove weighs more than 700 kg, but not by much, then you can make a shallow foundation.
Usually the foundation for the furnace is not brought up to the height of the subfloor, because then the bricks are laid and the height is compared. The area of the stove foundation should be 15-20 cm larger than the area of the stove base on each side .
The video below clearly demonstrates the process of pouring a foundation for a bathhouse yourself. The video is a little dark, but it gives you an idea of the process.
Advantages of basalt cardboard
Thermal insulating basalt cardboard is used during the treatment of areas of thermal equipment that are extremely sensitive to elevated temperatures, such as, for example, the insulation of heating and thermal furnaces, the insulation of dampers, boilers, pipelines, and doors. Basalt sheets are used for a heat-resistant layer between the stove and the floor, pipe and roof, where other materials cannot be used. It is also used for thermal insulation of storage tanks of any type, thermal boxes, mixers and ladles. Basalt cardboard is used as part of various structures, for example, a “sandwich”, which is assembled from layers of paper and cardboard. It can also be used to insulate joints in building structures of various purposes.
Due to its environmental friendliness, this material can be used as thermal insulation for heaters, boilers, and other equipment for household purposes.
- High degree of thermal and noise insulation.
- Fire resistance.
- Environmental Safety.
- Does not affect the corrosion resistance of metals.
- Biologically stable (does not attract rodents and microorganisms).
- Retains properties at high temperatures (up to 700°C).
- It is not resistant to moisture, so additional protection is necessary.
Thermal insulation of heat pipelines, oil and gas pipelines, and other types of communications exposed to temperature changes and other aggressive factors. As an insulating and soundproofing material in the construction of structures for various purposes (industrial and residential). As a thermal insulation material for various containers, tanks, boilers, etc., provided that the surface temperature is between -180 degrees and +700 degrees. Thermal protection and insulation of refrigeration units. As fire protection for air ducts and other structures. As an insulating and soundproofing material in interfloor ceilings and wall partitions.
Basalt cardboard with foil is one of the varieties of basalt cardboard, the main feature of which is the presence of foil on one side. Like other types of similar cardboard, the material is made from basalt rock fibers, which are formed into dense sheets that can have a significant thermal insulation effect. Thanks to the foil layer, this effect is doubled, since the thermal energy is reflected into the room and is retained even better. In addition, basalt cardboard with foil can also be used as sound insulation, as it has excellent sound absorption properties.
This is a non-flammable, fireproof and fire-resistant material that practically does not absorb moisture from the air. Foil basalt cardboard fits perfectly under the screen and pre-furnace sheet to ensure maximum thermal protection of wooden surfaces in the sauna. Able to withstand temperatures up to 1000C. In terms of its characteristics, basalt cardboard is superior to the widespread asbestos cardboard; it has improved sound absorption, thermal conductivity, and service life.
Advantages of Basalt cardboard:
Environmental friendliness. Basalt cardboard is an absolutely environmentally friendly material. It does not contain or emit harmful substances even when exposed to high temperatures. It is used in industries such as microbiology, food industry, pharmaceuticals, which require stricter environmental control of production.
Heat and sound insulation. Thanks to its light fibrous structure and random arrangement of fibers, basalt cardboard has increased heat and sound insulating properties. Its use will allow you to effectively perform high-quality insulation, reducing noise levels and heat loss.
Fire safety. The use of cardboard prevents the spread of flame, which minimizes your risks. The products belong to the group of non-combustible materials (NG). The melting point of the fibers is over 1000C.
Durability. In the absence of mechanical damage, the service life of the material is unlimited.
Ease of installation. The material is easy to handle, allowing you to install it yourself.
The price is for 1 sheet of basalt cardboard.
Made of metal
Metal structures are more durable, since this material can more easily withstand temperature changes. The complexity of installation and the price of such slabs are slightly higher than their brick counterparts.
The work will require sheet metal: zinc sheets or steel, as well as additional mineral insulating materials that are not subject to combustion and melting at high temperatures. A welding machine and sheet fastening mechanisms are also required.
The thickness of the insulating material should be at least two centimeters, and the height of the shield should be 5-10% greater than the height of the furnace. Remember that the wall of the structure is double, so eight sheets of metal are required to complete the job.
Step-by-step manufacturing instructions
- Prepare all necessary materials and consumables;
- Place the insulating material in an even layer on the sheet of metal;
- A second layer of metal is applied on top;
- Special fasteners are welded using a welding machine to hold the structure together.
- The produced sheets must be installed around the furnace on all sides using fasteners.
- It is recommended to place insulation under the bottom to prevent unintentional charring of the floor and fire in the room.
Tools and materials
To work, you will need sheets of steel or stainless metal, a welding machine, an angle grinder with cutting wheels for metal, a drill, self-tapping screws, and non-flammable material.
Screen making
We choose a polished metal sheet that has better heat transfer. In most cases, such screens are installed on the back walls to prevent heat loss. You should not strengthen such protection directly on the wall - the likelihood of a fire increases several times. In order for the installation to be carried out correctly, it is necessary to place a layer of non-combustible material between the wall and the protective element so that there is free space for air behind the sheet.
Here it would be fair to note that a screen made of stainless material for a stove is much better than one with a matte surface, which serves its purpose worse.
Sources
- https://probani.guru/pechidimohod/ekran-dlya-pechi/
- https://www.teplodar.ru/help/articles/detail/zashchitnyy-ekran-dlya-pechi-v-bane/
- https://v-banyu.ru/zashhitnyj-ekran-dlya-pechi-v-parnoj.html
- https://parilochka.com/pechi-dlya-bani/ustanovka-i-zaschitnyiy-ekran.html
- https://2proraba.com/podvore/ekran-dlya-pechi-v-bane.html
- https://pechiexpert.ru/zashhitnye-ekrany-dlya-bannyh-pechej-01/
- https://mr-build.ru/newteplo/zasitnyj-ekran-dla-peci-v-bane.html
[collapse]
Advantages of locating a furnace with an external fuel channel
Sauna stoves with an external fuel channel can be made of cast iron or steel. The design of this device differs from a conventional furnace for heating a bath precisely in the presence of a remote firebox, which can be removable - in heavy cast iron versions of products, or have an integral structure - in steel models. Thanks to this configuration of the stove, the combustion chamber door is moved into the room adjacent to the steam room or even outside.
Moving the furnace firebox into the dressing room provides many advantages during operation:
- When the stove is fired, two rooms are heated at once - the steam room and the dressing room.
- It becomes possible to add firewood, constantly supporting the combustion process while the steam room is in use.
- Since there will be no need to open and close the firebox door from the steam room side, the stove can be protected with a safety barrier (brick screen), which will eliminate the risk of burn injuries during water procedures.
- Garbage, which is often brought into the room along with firewood, will not get into the steam room.
- It becomes possible to place a niche next to the firebox for drying firewood, which, of course, cannot be done in a steam room.
- It ensures that clean air is maintained in the steam room, since when the door is opened to add firewood, gaseous products of wood combustion can enter the room in small quantities.
- The absence of a firebox door in a steam room will significantly save the free space of the room, and so, as a rule, it will not be too voluminous. Therefore, it becomes possible to install the heating device in a convenient location on the wall dividing the room.
However, it must be taken into account that modern factory-made appliances are equipped with a glass cooling system installed in the combustion door. Therefore, the waiting room will not warm up properly. And in order for heat to flow more intensely into the dressing room, you will have to open the combustion chamber door slightly - this factor must also be taken into account when choosing a place to install the stove. If the device cannot be installed so that the open door does not interfere with free passage, then in winter this room will require additional heating.
Prices for a stove in a bathhouse
sauna stove As an example, the design of the Termofor Kalina Inox BSE anthracite NV PRA stove
The remote fuel channel can be rectangular, or have a narrowed shape near the firebox. Panoramic heat-resistant glass installed in the door not only allows you to control the fuel combustion process, but also gives the design an aesthetically pleasing appearance to the fireplace. If the dressing room is used as a relaxation room, then you can install chairs in front of this “fireplace” and, while relaxing after visiting the steam room, admire the play of the flames.
The system that cools the glass also performs the function of cleaning it, so soot does not accumulate on the inner surface, and it always remains transparent.
Installing a stove with the combustion channel removed to the dressing room provides a lot of operational advantages. The disadvantages are minor, and the most significant of them is more worries when installing the device.
The fuel channel of a sauna stove can even be taken outside. This is usually done in the following cases:
- When the steam room and dressing room have a very small area.
- If the stove is planned to be heated with coal, which traditionally leaves a lot of dirt behind, and its combustion products are quite toxic.
- In the case when the bathhouse is used for commercial purposes, that is, it is temporarily rented out to strangers. And its owner acts as a stoker, who does not disturb clients with his presence at all.
In some cases, this option is also used - the firebox window is generally placed outside
In other cases, a stove installed in this way will be extremely inconvenient to operate, especially in winter. Agree, there is little joy when you have to jump out into the street in order to add firewood to the firebox.
The only advantages of moving the furnace of a sauna stove outside are the absence of garbage in the premises and the fact that the fuel does not have to be brought inside the sauna.
Safety fences
A stove-heater in a steam room is an essential item, but also a source of certain danger. Even with impeccable observance of all operating rules, there is no escape from one threatening factor - the stove gets very hot, and you can get burned on it.
The Harvia company, with its vast experience in the production of sauna products, could not help but think of protective guards for sauna stoves.
One of the possible options is to enclose the oven from materials that do not heat up too much and cannot cause burns.
Protection options
Safety fences for sauna stoves are available in several versions: corner, railing, general. When purchasing, you need to take into account that in the vast majority of cases, fences are designed for stoves of specific models or at least lines.
Prices depend on the shape of the fence, its versatility and additional functions.
In addition to being practical, safety barriers for stoves in steam rooms from Harvia also have an aesthetic function. As a result, their acquisition becomes profitable many times over. The company offers
- protective railings made of wood and wood, for heaters of different lines;
- wooden general floor barriers;
- corner wooden barriers;
- multi-level options;
- Illuminated barriers provide not only safety, but also beauty.
The purchased protective equipment can be easily installed in a steam room or on a stove of the appropriate brand (convenient mounting points are provided). In addition to protecting the client from burns, they increase the level of fire safety by limiting the possibility of the stove coming closer to flammable materials.
It is also important that the protective fences for sauna stoves from Harvia have an elegant appearance. They serve as an addition to the design solution of the bathhouse, allowing you to make it perfect.
Choosing a sauna stove with a separate sink and steam room
Any bathhouse should be equipped with a sink and a steam room. To effectively use space, many owners install a special stove. It divides the bathhouse into two rooms.
How to choose?
To know how to choose a stove for a sauna with a separate steam room and sink, you should use the following tips:
- The fryer must have high thermal power, sufficient to heat the steam room and water in the washing room, as well as provide steam. For each room, this indicator is individual and depends on the size of the heated area and the material from which the bathhouse is made.
- A properly selected design is compact in size, easy to use and eliminates the possibility of fire.
- The stove must be equipped with a high-quality steam generator and heat accumulator. This is necessary in order to easily set the desired mode that determines the type of bath: from real Russian to dry Finnish.
- It is necessary that the roaster be equipped with tools to adjust the convection.
- There should be no significant areas on the furnace structure whose temperature may exceed 150 degrees.
- If you are offered a brick or metal Dutch oven, opt for the latter option. Metal stoves are capable of heating a steam room with high speed and efficiency, take up less space, do not require a foundation, and are easy to use and maintain.
This is what a sauna stove with a separate sink and steam room looks like:
Popular models
Let's look at sauna stoves with a separate sink and steam room from several manufacturers, and compare their prices and characteristics.
Mounting and installation
Sauna stoves with a separate sink and steam room from well-known brands are usually installed by employees of the manufacturer or according to the individual instructions supplied.
But you can also install it yourself using the following approximate algorithm and diagram:
Layout of the furnace and remote tank:
3 different connection diagrams for elements:
Installation tips:
- The design of the furnace does not require a special foundation, but the foundation for it must be prepared. It is performed using brickwork. The base area is 70x70 cm, the height should be more than 10 cm.
- Cover the walls adjacent to the stove using bricks and insulate them with heat-insulating materials.
- If you plan to heat the stove from the waiting room, make a hole “with a reserve” in the partition between it and the steam room.
- On the prepared base, lay a layer of heat insulation material and an iron sheet on which the furnace structure is installed. The firebox is inserted into the partition.
- Fill the stove with stones.
- Cover the floor boards with a metal apron, which is secured over a sheet of thermal insulation.
- Mount the decorative trim on the front section of the firebox, install the ash pan and the door.
- Install the pipe. If the roof is flat, the height of the pipe should be more than half a meter, if it is gable - more than one and a half meters.
- Weld a metal screen to the predetermined contact point between the ceiling and the pipe. This part reliably connects the two halves of the pipe and protects the ceiling from elevated temperatures.
- The water tank, as well as the heat exchanger, should be installed simultaneously with the main pipe.
A stove in a bathhouse with a washing room and steam room is a reasonable solution for a small area. The modern market offers a large number of stove options. The choice should be made based on the size of the room, the desired heat capacity, the dimensions of the structure, and your personal preferences. Our recommendations will help with this.
Choosing a sauna stove with a separate sink and steam room
Features of choosing and installing a stove for a bath with a separate sink and steam room. Examples of optimal furnace models from different manufacturers are given.
Wooden fence for the stove
Wooden fence for the stove
Alexander Chelnov chief editor
Author of publication December 6, 2015
Did you like the article? Save so you don't lose!
- 5
- 4
- 3
- 2
- 1
0
- Calculation of blocks and bricks for construction
- Calculation of chimney height
- Calculation of the amount of lining
- Calculation of strip foundation
Categories
- Baths of the world
- Ventilation
- Video
- All about stoves and chimneys
- Roof
- Windows and doors
- Do-it-yourself sauna construction experience
- Finishing and interior
- Reviews about the prom. ovens
- Water supply and drainage
- Useful tips
- Floors
- Bathhouse projects
- Walls
- Ceiling device
- Insulation
- Foundation
- Wiring
- What stones are best to use for a bath?
- Shelves in the bathhouse - drawings
- Bathhouse with a gazebo under one roof - projects + DIY construction
- Brick sauna stoves projects
- Economy sauna in the country
Are you building a sauna?
Join our 305,000 subscribers and receive a book in your mail about the 36 most important tips for building a bathhouse.
When is protection needed at all?
The need to install protective casings and screens does not always arise. If a fire-safe distance is maintained between the stove and the nearest flammable surface, additional protection is not needed. At this distance, the IR rays are scattered, weakened, and the amount of them that the wooden wall receives can no longer lead to damage.
It is believed that the safe distance from the wall to the brick stove (quarter-brick laying) is at least 0.32 m, from the wall to the metal stove (not lined) - at least 1 m. For a metal stove lined from the inside with brick or fireclay, the distance decreases to 0.7 m.
Thus, maintaining fire safety distances is more possible in large baths, where the issue of saving space is not relevant. In family steam rooms, where every centimeter of space counts, installing a stove 0.3-1 m from the nearest walls is impractical. In this case, the safety distances established by the standards must be reduced using screens and casings.
Common Mistakes
Incorrect shielding of metal stoves
When creating and installing a structure at home, novice craftsmen often make mistakes. Among them, the most common are:
- the lack of sufficient distance between the structure and the walls of the steam room negatively affects the strength of the masonry and fire safety;
- lack of distance between the walls of the furnace and the brick, which contributes to disruption of air exchange, overheating of the protective screen and cracking of the masonry;
- poorly mixed masonry mortar leads to crumbling of the masonry, the appearance of cracks and the formation of unnecessary gaps.
The technology for creating and installing a protective screen is quite simple. For this reason, even beginners in the construction business can handle it.
The protective fence has a beneficial effect on the efficiency of the heating device located in the middle of the steam room or in the corner of the room. Self-installation of a structure of this type does not require a large amount of time and money, and also allows you to improve the functionality of the bathhouse and its appearance.
Protective screen for the stove in the steam room
A protective screen for a stove in a steam room can be made from more modern materials if you want it to be very beautiful. Now there are a lot of facing materials for any budget that can be used for screen construction:
- fired clay terracotta tiles
- clinker tiles: also made of clay
- natural soapstone: especially attractive for steam baths for its healing properties. On sale are square tiles of various sizes (300x300m or less), 10mm thick, polished or polished, rectangular bricks 20mm thick, looking like torn stone.
But you can’t just make cladding from this material on logs; you’ll have to build a base for the tiles. That is, first sheathe a wall with a ventilation gap of 2-3 cm with fire-resistant sheet material (and only then lay stone or tiles on it), such as:
- cement fiber board Minerit
- glass-magnesium sheet (GML)
- fireproof plasterboard (GKLO)
If you do not have high aesthetic demands on the protective screen for the stove in the steam room, then the easiest way is to sheathe the walls with the above gap with fire-resistant sheet material without further expensive tiling, such as vermiculite slabs, which, however, have a quite presentable appearance and have all the necessary qualities:
- environmentally friendly
- fire resistant
- fireproof
- easy to install
We can also recommend fiber cement board, which is a non-flammable material, can withstand temperatures of 150 degrees, does not emit harmful substances, is easy to clean and wash, does not rot and is resistant to fungi.
Conclusion: if you make a protective screen for a stove in a bathhouse with your own hands, then it is better to give preference to constructing a boundary wall made of bricks or lining the wooden walls of the steam room with vermiculite slabs.
Briefly about the main thing
Screens around the sauna stove are installed to protect people from burns and flammable structures from damage and ignition.
Enclosing structures are assembled from wood with fire-retardant impregnation, stone/brick or metal on top of a frame with expanded clay inside.
For wall cladding, a pie is often constructed from a double layer of thermal insulation and polished stainless steel sheets; less often, panels are assembled for the facing material.
Only non-flammable materials with a low thermal conductivity coefficient can act as thermal insulators: stone or basalt wool, asbestos or basalt cardboard, mineralite.
Heat-resistant or clinker tiles are used to cover the walls next to the stove.
It is important at the stage of design, construction and repair to maintain the standard distance between the stove and flammable materials, depending on the type of protective design solution and composition.
The floor is protected from overheating by rigid platforms made of natural or artificial stone, brick or cast iron.
Ratings 0
Additional aspects
It is worth understanding that not all situations require a protective screen at all. For example, for brick kilns with an initially protected firebox, fences are not required. If the screen needs to be installed, then red ceramic materials are selected for it, capable of withstanding severe temperature changes and exposure to moisture.
Conclusion
A DIY sauna stove screen is an important sauna structure that can prevent accidental burns and balance the operation of the stove. By implementing one of the proposed schemes, you can achieve a combination of protection efficiency, good functionality of the stove and good visual qualities of the entire system.
Step-by-step procedure for self-construction
Wooden structures must also be protected with metal
If the weight of the equipment is no more than 0.4 tons, taking into account the stone lining and tiles, and the floor is made of boards 4 cm thick, you can do without installing a podium. Ceramic tiles are laid on asbestos sheets on the floors. Usually, stainless steel stoves weigh a little, but for cast iron fireplaces, pouring a foundation is required. The distance from the bottom of the stove to the flooring in case of installation without a base must be at least 10 cm.
Distance to wooden roof elements:
- 130 mm - from brick pipes;
- 250 mm - from ceramics;
- 130 mm - from ceramic smoke ducts with fire insulation.
The steam room is characterized by high humidity, so the floor in it is made with a slope away from the wall behind which the stove stands. The flooring under the fireplace is waterproofed on all sides so that water does not flow in at its level from the side of the shower, washing room, or steam room.
Foundation installation
A heavy brick oven needs its own foundation
The foundation is made in such a quadrature that it is twice the area of the bottom of the stove. The base material is concrete and red ceramic brick. The base for the stove should not be connected to the foundation of the walls or log house.
Step-by-step instructions for building a foundation for a firebox in a bathhouse:
- mark the construction site taking into account the standard dimensions;
- an opening is cut out in the wall, part of the floor is dismantled;
- dig a foundation pit with a depth of 50 cm plus 20 cm for the installation of a sand-concrete cushion;
- backfill with sand, crushed stone and tamper;
- lay waterproofing so that it covers the vertical walls before pouring concrete;
- install a frame frame made of reinforcement.
Concrete is poured flush with the ground, then protective layers are made. If the surface is raised to the floor level in the bathhouse, temporary formwork made of wood or chipboards is installed. The foundation will gain full strength in 28 days.
Filling the floor, insulating the walls
Two layers of waterproofing are placed on top of the concrete; roofing felt is used, which is glued to molten resin or factory-made bitumen mastic. A cement-sand screed is made on the surface, the thickness of which cannot be less than four centimeters. A layer of one or two rows of brickwork is made under the stove.
Stove installation
For an iron furnace, a protective screen is made of refractory bricks.
If the bathhouse is just being built, they install a stove, line it with bricks and then make a wall between the dressing room and the steam room. If the stove is installed in a finished building, the instructions suggest a different work plan.
Installing a stove in a bathhouse with your own hands:
- study the technical passport, which contains the recommended parameters for the distance to partitions and ceilings;
- a hole for the combustion channel is knocked out in the wall, brickwork is done inside it;
- install the unit on the prepared base, then make a brick shell around the body;
- foam the joints between wood and masonry;
- install a protective screen around the perimeter of the stove at a distance of 10 - 50 mm from the walls of the firebox.
Safety reflectors are made of steel or cast iron; front and side models are available. The screen reduces the temperature to +80 – +100°C, so the gap to the wooden partition can be reduced to 0.5 m.
Chimney installation
When the channel passes through the wall, the ceiling is lined with bricks and wrapped with a heat insulator.
Types of chimneys:
- mounted structures are placed on top of the furnace; ceramics and metal sandwich pipes are used for them;
- main chimneys are built separately in the form of a brick channel;
- wall channels are made in the thickness of vertical fences.
Why and when is a protective screen required?
Heat from the stove is transferred to people and surrounding objects in two ways:
- through air; when heated, the air transfers the generated heat;
- through infrared radiation.
Only the first option is suitable for people - it is safe and comfortable. When taking bath procedures, you can always easily and quickly increase the temperature in the steam room. It is enough to moisten the stones. But, unfortunately, we also have to deal with infrared radiation. The latter is characteristic of all heated objects.
The temperature of the sauna stove reaches 300-400 degrees and higher. At such a high temperature of the metal walls, a powerful stream of infrared radiation is formed, which can lead to burns. The problem is especially relevant for small home baths, where there is nowhere to hide from the negative flow.
Mid-price ovens are in many cases equipped with metal convection protection. Expensive models are shielded with ceramic or stone cladding, which also plays a decorative role. But inexpensive and “handicraft” models almost never have thermal insulation.
Brick (or, less preferably, metal) protection is required in such cases:
- when the body of a freestanding metal stove is not covered with anything;
- if the factory shielding is made poorly and does not protect well from thermal radiation;
- if the heat generator is equipped with casing, but is installed too close to a wall made of flammable materials; Since most often the walls in steam rooms are wooden, providing protection is necessary in most cases.
Situations where sauna stoves are made entirely of brick are rare. Such structures take up a lot of space and therefore require large premises. Much more often we deal with small-sized steam rooms, for which the described situations are true.
Installation Requirements
In 1991, SNiP requirements were approved that determine the distances from heating elements. They indicate the following distances:
- from the wall surface to the heater there must be at least 38 cm for protected surfaces and from 50 cm for unprotected surfaces;
- to protected walls – 38 cm;
- all opposite walls - from 1.25 m.
According to Finnish standards, it is allowed to protect walls made of wood material with basalt material, metal, or galvanized corrugation. Screens must ensure that there are no gap areas to prevent contact of the flame with combustible materials, and that the outer surfaces are heated to a temperature not exceeding the melting or ignition point.
Warming up and insulating the dressing room
Between the locker room/rest room on one side and the steam room on the other, ideally there is a smooth transition between temperature conditions.
There are four options to achieve this:
- The stove opens into both rooms.
- An additional partition between the steam room and the dressing room, combined with the relaxation room.
- Part of the heated air is supplied from the steam room.
- There is a washing room on the direct path from the dressing room to the steam room.
It is also necessary to take care of the insulation of the room. The floor, walls and ceiling are insulated from the cold. Often they use foil insulation, but on a thick layer the foil should be laid manually.
Mineral wool, polystyrene foam and other foam materials, as well as expanded clay, are suitable for insulating the dressing room, but mineral wool will be the best in structure, especially if it is foil-coated
Floor insulation begins by nailing smaller cranial bars to the lower parts of the joists, located in increments of 45-55 cm, longitudinally to the base. A rough covering is placed on top - oblong or wide boards. The subfloor is formed as a continuous floor.
The resulting structure is covered with a waterproofing membrane. Place it so that the layer is completely pressed against the protruding joists. Then, in the space between these slats, a proportionate piece of insulating fabric is laid: slightly larger in width, length and height. Mineral wool is also suitable as thermal insulation. They take more of it, since the material is highly compressed.
A vapor barrier is laid above with a slight overlap on the walls. In the process, pipes that will be in the thickness of the floor or below are insulated.
All that remains is to make the floor itself. The surface can be paved with tiles or boards. Usually they choose wood, this creates a warm floor and maintains the unity of the interiors. The covering must be made continuous, moving the boards as close as possible to each other.
The finishing deteriorates most under the ceiling, so use a thick layer of insulation. Thermal insulation can be collected on the ceiling, between the planks. Place a vapor barrier below, insulation above, then waterproof it. You can cover the top with cement screed and wooden boards.
You can read more about ceiling insulation in this material.
Option for thermal insulation of the ceiling above the dressing room: densely laid expanded clay, hidden in two layers of vapor barrier, and a wooden plank floor without screed
Log houses can be insulated in the finished building, but it is worth planning thermal insulation in advance. It is also worth taking care of the insulation of the front door.
Due to thermal barriers, they effectively combat excess moisture, but condensation can be avoided completely if you constantly do certain things. Keep doors closed and only open briefly. Adjust the shutters in the ventilation grilles.
Use plugs especially during warm-up. After procedures, cool the dressing room through open doors and windows. At the same time, allow short-term drafts. Ventilate each room in turn - through their windows.
Distance from stove to wall
Maintaining the recommended distances from the heater to the wall or any other flammable surface will protect the room from fires and make your vacation enjoyable and safe. Each stove model comes with instructions that contain installation recommendations, including the safe distance from the stove to the walls. In most cases, this figure is 50 cm from the surface that can catch fire.
What to do if it is impossible to follow the recommendations? In this case, the distance is reduced to 38 cm. But the surface that can ignite must be protected by a sheet of metal in combination with a layer of non-combustible material. The thickness should be at least 1 cm. Gypsum or basalt cardboard can be used as a non-flammable material.
If you need to minimize the distance to the wall even further, a brick partition is erected. The distance can be reduced to 12.5 cm. The stove is placed close to the brick screen.
Chimney for sauna stove
To remove combustion products from metal sauna stoves, the chimney can be made of brick, metal or ceramics, and there are three types depending on location:
Mounted chimneys are built on top of the heating device and are its continuation. It is this type of construction that is most often chosen for installation above a metal furnace, and sandwich pipes have recently been most often used for it.
Root chimney - there are no restrictions, but still it is rare in bathhouses.
Prices for chimney pipes
chimney pipes
- Main chimneys are a free-standing brick structure to which a sauna stove can also be connected. To build this type of chimney, it is necessary to build a separate foundation for it. If the bathhouse is planned to be located in the area of the house where the stove or fireplace will be built, or in an adjacent extension, then sometimes one common main chimney can be installed for them. But this case is clearly atypical.
- Wall chimneys are a type of flue duct installed in the brick wall of a house. If the bathhouse is built of brick, then you can use this design. However, it has one significant drawback, since the pipe actually runs completely along the street, there is a risk of condensation occurring in it, which can negatively affect the performance of the stove. Therefore, wall chimneys require high-quality insulation. It is also rarely considered as an option.
Chimneys for a sauna stove can be made of different materials - it can be brick, ceramics, metal or insulated sandwich pipes.
The sandwich chimney can be located indoors and pass through the ceilings and roof, or it can be directly discharged through the wall to the outside.
As shown in the illustration above, the chimney can be installed indoors or almost immediately connected to an external wall
The obvious disadvantages of the internal arrangement of the pipe include the complexity of installation work, since careful insulation of penetrations through the ceiling and roof is required. If the joining seams of individual parts of the sandwich pipe are damaged, combustion products will enter the steam room, which is not immediately noticeable, and this is dangerous for the lives of people in the room.
External chimneys are led out into the street through the wall, and then rise to a set height along its outer surface. Therefore, they are easier to install both in a bathhouse under construction and in an already built one. Higher level of operational safety, more accessible maintenance.
The disadvantages of this arrangement include the need for additional insulation and careful sealing of the pipe passage through the wall. However, if correctly selected sandwich pipes are used to construct the chimney, then their additional insulation will not be required.
Sandwich pipe prices
sandwich pipes
*******
So, the installation of a sauna stove with an external firebox must be carefully calculated, and the parameters prescribed in SNiP must be observed without any simplification. It must be remembered that the safe operation of not only the stove, but also the entire structure of the bathhouse, especially if it is built of wood, depends on the correct installation and insulation of metal structural elements from flammable surfaces.
At the end of the publication, there is a video in which I show an example of installing a sauna stove with the firebox leading into the dressing room.
Characteristics and composition
Before talking about the characteristics of the product, we should understand what we are dealing with, namely, talk about the composition. It may change from manufacturer to manufacturer, but the essence remains the same. The main component of mineralite is cement.
It is at least 70% here. The rest is taken up by cellulose, as well as special additives. Despite the appearance and overall strength of the product, mineralite does not contain asbestos. This means that when heated, not a single gram of harmful substances is released, and destruction is also excluded.
Asbestos is known to even explode at critical temperatures. All products must include hydrobisifiers. These are special elements that protect the structure from moisture absorption, which prevents cracking in frosts, possible rotting and other types of damage.
Now, it's time to move on to the characteristics. Let's list the most important of them:
- High strength. This applies not only to exposure to shocks and external damage, but also to the effect of moisture on the surface when it is heated to a high degree, for example, in a bathhouse, as well as resistance to temperature changes and air humidity levels. The surface and structure as a whole are resistant to humidity levels, which expands the scope of use even to outdoor use.
- Does not burn. Manufacturers of mineralite indicate the class “NG”, which indicates the complete non-flammability of the product. This makes its scope wide and not limited only to saunas and baths.
- Invariance under various influencing factors. As previously mentioned, water repellents prevent moisture from getting inside. As for low/high temperatures, in the range from -100 to + 180, the structure does not react in any way, including the properties of linear expansion remain unchanged. The product is also resistant to chemically active environments, which is why mineralite is often used in the finishing of industrial premises.
- Stronger every day. We said that 70 percent of the material is cement. Thus, the more time passes from the date of production, the stronger the product becomes. And this continues for at least 50-70 years, after which the cement will lose its properties with the same uniformity.
- Environmentally friendly. Judge for yourself: cement, sand, cellulose and other mineral additives cannot harm humans and others. Thus, it is completely safe under any conditions.
As you can see, there are many characteristics that will become important and fundamental when choosing. But we must not forget about the fragility of products
The material is very fragile, so it must be transported, stored and stored with extreme care.
The same applies to processing. It cuts softly, you can use a hand or power tool, but to achieve the best result it is best to use cutting elements with a fine tooth.
Cleaning loose tiles
If there is a supply of facing material, then use it, or buy the same ceramics; if not, the fallen off finishing is cleaned of the solution. To do this effectively, in a ceramic-friendly way, use an angle grinder with a dry cutting disc. The tiles are soaked in water for half an hour to soften the glue and reduce the amount of dust. Then the ceramics are laid face down on a flat wooden surface, pressed with a clamp through a rubber pad and the old mortar is cut off or ground off at an acute angle to the surface. The edges of the tiles are cleaned of grout with sandpaper.
We ensure the strength of the future coating
Since it is unlikely to be possible to glue tiles onto tiles in the bathroom over an old glossy coating, it should be pre-treated. How? There are three ways to solve the problem.
It is necessary to remove the gloss from the old tiles. It's long, hard, and there's a lot of dirt left behind. Then you need to make notches on it (the same disadvantages) or treat it with a special compound. The third method involves purchasing a primer, which is quite expensive. But since even the most frugal owner will not be able to glue tiles onto tiles in the bathroom without any financial outlay, it is wiser to stick with this option. But the process will not take either time or effort. This miracle remedy is called “Concrete Contact”. The primer will make the old tiles rough and provide excellent adhesive properties to the base. The composition is applied with a brush or roller. The main thing is to maintain the exposure time, that is, let the primer set well and dry. Which will take about six hours, no more.
How to make a protective screen for a sauna stove with your own hands?
Rest assured that there is nothing difficult in creating a protective screen for a bathhouse with your own hands.
It is recommended to prepare all the necessary materials and tools in advance, as otherwise this will significantly slow down the progress of work. Having everything you need will help not only not to stop construction and installation, but also will not confuse the overall “engineering idea”.
Made of brick
Brick and concrete mixture are used as the main working material. Mixtures that are designed for use at high temperatures should be used. If you do not want to spend money on purchasing it, then you should add clay to the standard mixture. This will strengthen the future structure.
When calculating, it is necessary to take into account three parameters to determine the required amount of brick, namely:
- Width;
- Height;
- Length.
Keep in mind that in the masonry it is necessary to calculate an additional few millimeters between the bricks for the concrete mixture.
- The manufacturing process is no different from laying bricks. All that needs to be done is to create a kind of brick “fence” around the stove of the required height.
- After installation, it takes at least 5-7 days for the solution to dry completely. A longer period is required due to the confined space - the solution dries worse in it.
- After completing the last stage of work, you should additionally check the strength of the masonry. If necessary, additional basalt slabs can be installed on top of the brick to provide greater security.
Covering for baths and saunas
In the life of almost every Russian person, the bathhouse plays a significant role. Where else can you combine business with pleasure? After visiting the bathhouse, people feel, along with physical, spiritual purity and unprecedented peace. And what a pleasure it can be to visit your own bathhouse, built on a summer cottage!
Building your own bathhouse is not an easy task and requires a competent approach. There are no small details here. The interior decoration of the bathhouse is also of great importance. To cover the walls of a steam room from the inside, the ABC of Wood company offers eurolining made from linden, aspen or cedar. To finish the washing compartments, larch lining is used. The wood of all these species is moisture resistant and is little susceptible to splitting and splitting. In addition to everything, products made from aspen, linden and cedar have low heat capacity and do not heat up at high temperatures.
Linden wood is moisture resistant, less susceptible to splitting and splitting, and does not heat up at high temperatures. Linden wood is used to make sauna shelves, backrests, accessories and railings, on which you can sit or lie in the sauna even at very high temperatures without getting burned. Linden lining is used to decorate the walls, ceiling and shelves of the sauna. Linden has a pleasant golden color and a pleasant honey smell. All this, in combination with the property of linden not to heat up, will bring maximum comfort in the steam room of your sauna or bathhouse. In you can purchase not only lining and floor boards from Linden, but also all the necessary additional elements to give your bathhouse/sauna a complete look.
| Name | rub. per m.p. | rub. per m 2 |
| Eurolining Linden Grade Ex 15 x 88 , length 1.0 - 1.5 m | 66 | 750 |
| Eurolining Linden Grade Ex 15 x 88 , length 1.6 - 3.0 m. | 110 | 1250 |
| Shelf Linden Sort Ex 25x90 length 2.0-2.5 m. | 180 | — |
| External corner Linden Grade Ex 25x25 length 1.6 m. | 50 | — |
| Fungus Linden Grade Ex 14x27 length 1.6-3.0 m. | 45 | — |
| Corner plinth (Galtel) Linden 14x27 length 2.0-3.0 m. | 40 | — |
| Platband Linden Sort Ex 15x70 length 2.2 m. | 67,5 | — |
Pipe grill - beautiful and functional
The stone grate is used for the rational use of heat from the exhaust gases of a chimney and is attached to the chimney itself. When water flows onto the stones of the heater from such a grate, abundant steam is produced. They are often installed one above the other, which gives the sauna interior design a stylish, exclusive look. The grid prevents stones from scattering and falling into areas not protected from heat, sparks and fire. The grates are made of heat-resistant stainless steel. Its height is 400 mm, weight – 1 kg. Diameter – 250 mm, used for any chimneys.
Fire safety requirements
The stove in the bathhouse and sauna must be installed in accordance with existing fire safety regulations. The mentioned requirements provide for fire insulation of the stove by maintaining minimum distances to walls and other objects in the room. Such requirements affect the design of the bathhouse and sauna premises, causing inconvenience in its layout.
In addition to the functions of thermal protection and fire safety, the stove screen performs another useful function. It speeds up the heating process of the heater, reducing the preparation time of the room. necessary to start the bath procedure. Since the main heat carrier in a bathhouse is steam, it can be obtained with a furnace screen much earlier than without one.
Instructions for creating different types of protection from oven heat
A fence for a stove in a steam room made of a sheet of metal will be the most effective and simple solution for a home bath. It is better to use a polished panel, since a smooth, shiny surface is much more reflective. This property also means that heat will not accumulate in the metal, but will spread throughout the room.
The metal fence for the stove in the steam room must be attached to the brickwork or directly to the floor using special fasteners or components. The process will not take much time, but you will completely protect your vacation.
The brick partition is laid in half a brick. Here it is also necessary to leave a gap between the floor and the first row. Most often it is made in the form of a door. With its help you can regulate the degree of heat accumulation in the oven.
Start laying from the bottom row, and gradually rise to the height of the stove. The level of the screen should be 15–20 cm higher than the stove. Many experts recommend making such a partition all the way to the ceiling.
Features of installing metal protection
The protective partition in the bathhouse near the stove is a universal item. Modern manufacturers of such equipment offer many options for barrier screens. New products will suit any needs and different budgets.
The partition plays an important role because it performs the following functions:
- eliminates the possibility of burns;
- used as additional room decor;
- Using a protective partition, you can control the flow of heat not only into the steam room, but throughout the entire house.
Brick baths are in great demand. This material has a fairly low thermal conductivity, so brick walls heat up much more slowly. But this property does not make the brick walls in the bathhouse completely safe - here it is also necessary to protect the bathhouse walls from the heat of the stove. Wood is used as the most popular material for building a bathhouse. High temperatures increase the risk of fire.
Installation of a metal screen is usually carried out in such a way as to create a structure like a box. The outside is stainless steel or sheet metal coated with heat-resistant paint. As a result, an air gap appears between the metal sheets, which ensures good thermal insulation.
There are holes in the lower part of the structure that provide air circulation and prevent overheating of the metal box. To implement such protection, you can use one of two schemes.
A polished metal sheet is selected, which has much better heat transfer. As a rule, such screens are used on the rear walls of the furnace, preventing heat loss. Of course, you should not attach this protection directly to the wall - the risk of fire will increase many times over.
For proper installation, it is necessary to place a non-combustible layer between the protection and the wall so that there is air space behind the sheet. There should also be a short distance from the protection to the floor - this allows air to blow across the screen, removing heat.
If necessary, a stone partition can be reinforced with a metal screen to maximize the effect. The only thing worth noting here is that a stainless steel screen for a sauna stove is much better than a screen with a matte surface, which performs its functions much worse.
To implement such a scheme, thermal insulation is first laid on the wall, and then metal protection is placed on top of it. The design will largely depend on the chosen insulation.
Depending on the selected thermal insulation, the arrangement of the protective screen will look like this:
- When using rolled material, the cladding is created in such a way that the distance between the planks is slightly less than the width of the material. The insulation is placed between the planks and fixed with special dowels with a large head.
- If mineral cardboard or asbestos sheet is used as a heat-insulating material, then it must first be attached to the wall, and the metal sheet is fixed on top.
To maximize the effectiveness of the protective barriers, it is also worth installing a floor screen that is placed under the stove.
Which insulation option is better to choose?
Among the listed options for protective structures, there are no better ones. Everyone chooses an option depending on the size of their wallet. It would be a good idea to stop at finishing the surface with tiles, after preliminary thermal insulation. But in most cases, users prefer metal screens.
When arranging a bathhouse in a private house, the last option is considered the fastest and most economical. If you follow the technology when performing protective masonry, even the most budget-friendly method will be effective.
Screens for protecting combustible (wooden) walls
It is necessary to protect not only people from the harsh radiation of a metal stove, but also the walls located near it, especially if they are wooden. For this, heat-resistant screens are most often used. Most often, screens are metal. Moreover, it is desirable that the metal be polished: in this case, heat rays are reflected back into the room. But metal screens cannot be attached directly to a wooden wall: they have a fairly high thermal conductivity and effectively transfer heat to the walls, but we do not need this. Therefore, it is necessary to lay a layer of thermal insulation under the sheet of metal. Most often, mineral or basalt wool of small thickness (1-2 cm is enough), cardboard from the same materials is used; earlier they could use asbestos sheet, but today they have come to the conclusion that it is harmful. Glass wool was also previously popular: it is an excellent heat insulator, but it is difficult to work with - protective suits and gloves are required, and a respirator is required.
Iron wall protective fencing
Another way to attach a protective metal screen is with a ventilated gap of 2-3cm. A frame made of a material that tolerates high temperatures but has poor thermal conductivity is stuffed onto the wall. You can use small pieces of plastic or metal-plastic pipes for hot water: screw the pipe sections with self-tapping screws to a wooden wall (vertically), and then put a metal sheet on them. In this case, the bottom edge of the sheet should be placed a few centimeters above the floor so that air flow moves between the metal and the wall, cooling both the sheet and the wall.
Another type of protective screen is brick. A second wall is laid in the floor or a quarter of a brick. Its height is usually recommended by stove manufacturers, but it is usually 40-50 cm higher than the top panel of the stove. Ceramic tiles can protect a wooden wall. It looks great, is durable and easy to care for.
Protecting the walls of the bathhouse from the stove can even be a decoration
Often, manufacturers of metal furnaces offer ready-made screens to protect walls. These are structures made of two sheets of metal with an air gap between them. They are covered with heat-resistant paint, often with a decorative design applied to them, so that such a screen not only serves as protection for the wall, but is also a decorative element.
Heat-resistant screen for oven
It can be mounted on a wall or in a place specially reserved for it (taken into account when planning and building a steam room). You cannot paint metal screens made by yourself: you need a special heat-resistant paint, which is applied in a factory using the hot spray method.
Source
Finishing before installing the stove
Installing a stove is the final stage, which is preceded by numerous preparatory work, especially in a bathhouse with flammable walls. There are general rules according to which you can safely place a stove in a bathhouse.
Fire requirements
The floor, walls, and ceiling must be protected from a burning stove.
Let's consider the option when the furnace firebox is located in the room adjacent to the steam room. If the wall is wooden, then an opening is made in it either immediately or after construction is completed. Its size is significantly larger than the size of the fuel channel.
Those who build a special brick wall around the fuel channel do the right thing. Its dimensions can be determined either by the requirements that are in the stove's passport (if we are talking about a metal stove purchased in a store), or, if the stove is homemade, then the minimum distance to the wood of the wall is 38 cm, but it is safer to make 50 cm. If If you use heat insulators that are resistant to high temperatures, then the distance can be reduced slightly - to 25-36 cm .
The chimney also needs thermal insulation, because the metal one heats up to high temperatures. The insulation material is the same, capable of withstanding high heat.
The ceiling above the stove often becomes the cause of fire, so it is recommended to decorate it with fireproof material ( minerite , basalt cardboard ). The area of the latter should be one third larger than the area of the top of the oven.
When using electric heaters, grounding should not be neglected.
Floor protection is usually done like this: regardless of whether there is a foundation or not, a base of bricks is made under the stove, on which a sheet of asbestos cardboard 12 mm thick is laid, and a steel sheet is placed on top of it. In some cases, the first brick layer is not done.
By the way, some people place stoves not on bricks and metal, but on porcelain stoneware or other durable tiles made of natural or artificial stone.
In front of the combustion door, which is recommended to face the entrance door to the steam room , the free space should be at least 1.5 meters .
Useful video
And here is a video on the topic: the guys cheerfully and quickly laid out a brick wall for a stove with an external firebox.
Flood sheet
You can make it yourself from a sheet of tin , or you can buy it in a store that sells good stainless steel flush sheets.
You can place such a sheet under the entire stove, or just in front of the fire door to protect the floor from sparks and embers. There are flooding sheets of different sizes on sale: from small to meter-long.
Instead of metal, it is permissible to use any other heat-resistant material. As already mentioned, this can be tiles made of stone or other material.
Tiles for the steam room in the bathhouse near the stove
Let's take a closer look at the tiles for the steam room. Despite the fact that it can be used more widely in the bathhouse, we are only interested in the stove area. There are suitable tiles with the following properties:
Since we are not talking about decorative cladding, but about a simple refractory base on which the stove will stand, you should not pay attention to glazed types of tiles. They are, of course, double fired, but this glaze will crack and crumble under the influence of temperature .
Tiles for the steam room in the bathhouse near the stove
Porcelain tile would not be suitable if you decided to put it where people will walk, but under the stove it is quite suitable.
Also suitable are: metlakh , clinker , terracotta tiles. When choosing, be guided by the characteristics mentioned above.
In addition to ceramic tiles, it is quite acceptable to place the stove on tiles made of natural stone - here the choice is yours; any not too thin stone tile suitable for a bathhouse will do. That is, not marble(!), but, say, soapstone , serpentine , gabbro , etc.
Decorating wooden walls near the stove in the steam room
If the stove was not located next to the wall, then no protection for the wooden wall would be needed at all. So it’s all a matter of distance - for a brick stove it is 32 cm , for a metal stove without lining - 1 m, with lining - 70 cm. But there is usually little space in the steam room, so the stove stands almost flush with the wall or even in a corner. Or her firebox is brought into an adjacent room, and the length of the fuel channel is 25 cm - there’s no way to keep it further away.
a brick wall is often placed where the stove will be located. The scheme has already been described above - with distances and thermal insulation.
It is permissible to put a layer of plaster more than 25 mm thick on top of the wood on a metal mesh.
You can also use sheets of one or another heat-resistant material, but this is called a “ protective screen ” and its varieties will be discussed below. In some cases, over the screens . Or metal sheets are attached to the same refractory base.
Depending on the type of finishing, it must be done either before installing the stove, or it can be done after. For example, a brick wall or screen must be made in advance.
Video
Video on the topic: a video about how to take into account the shrinkage of a log house when installing refractories.
Types of thermal protection and their manufacture
In both the bathhouse and the sauna, the microclimate is determined by temperature and steam. Moreover, both are generated by a sauna stove. The water that is splashed into the heater turns into steam, filling the bath or sauna room. It is from the ambient air in the bathhouse and sauna that the human body should warm up. But a sauna stove disrupts the distribution of heat indoors.
If you do not fireproof the sauna stove, the wooden casing may overheat, which may even become charred.
The area near the stove becomes unbearable for a person to stay in due to the heat emanating from it.
Heat-resistant screens for sauna stoves can be made of brick and sheet metal. It is best when the stove screen reflects heat well. and it is possible to maintain the surface of the screen in a state of at least a matte mirror throughout the operation of the stove. Therefore, a screen for a stove made of stainless steel will be the best thermal protection against the heat of the stove.
The walls near the stove must also be covered with such a screen. It is very convenient when the stove in the bathhouse is located very close to the walls. With this arrangement, the most space is available to comfortably accommodate people in the room. But with the mentioned placement, fire safety must be enhanced by thermal insulation of the screen covering the walls.
The design of a bathhouse or sauna should initially include the installation of a stove near the wall and the corresponding fire safety of the room. Walls near the stove should not be covered with wood. A layer of heat-resistant mineral wool must be applied to brick walls. It will be convenient to secure it to the wall with oven sealant, which is available in the store.
The most common thermal insulation is:
- insulation in the form of panels or sheets - mineralite.
- thermal insulation in the form of thin sheets of compressed fiber obtained from molten basalt
- pressed sheets of asbestos fiber insulation
- loose, hygroscopic, wool-like insulation made of basalt fiber.
If the walls are wooden, you will definitely need to insulate them from the heat of the stove with the following thermal insulation:
- apply heat-resistant mineral wool to the walls or use fireproof screens, covering the walls with them so that there is a protrusion beyond the dimensions of the stove by one meter both up and to the sides
- lay a brick wall along a wooden wall close to the thermal insulation
- attach stainless steel sheets to the brick wall, which will most effectively isolate the heat from a nearby stove.
You cannot use thermal insulation containing asbestos - it is harmful to health.
Such a screen will provide the best fire safety and reliably protect wooden walls from dangerous overheating. Sheets of metal will noticeably expand when the stove is operating. In order to avoid destructive deformation when using small stainless steel sheets, the sheets should be overlapped like tiles on a roof - first a row of stainless steel sheets below, then above, and so on to the top.
You can install a pure brick screen with your own hands for thermal protection in front of the stove on the side where people are located. In order for the brick screen to be as durable as possible and not be destroyed by an accidental collision with something, it must be folded around the stove from wall to wall with your own hands so that there is support against the wall.
If you decide to make a screen in front of the stove with your own hands, it is better to choose a stainless steel structure. Such a screen will take up less space and will look better, especially in a small room. The advantage is also that the upper bricks of the brick screen masonry, due to heavy operating conditions, can peel off from the mortar and this can cause certain troubles. A metal screen will most likely last much longer than a brick screen without breaking.
The best case for making a screen with your own hands is when the entire bathhouse or sauna is just planned to be built with your own hands. To securely fasten sheets, you need galvanized steel pipes of rectangular cross-section, embedded in the floor, to which it is most convenient to attach stainless steel sheets. But, if space allows, a stainless steel screen can be made movable, but at the same time stable.
You can also make a movable screen with your own hands based on a frame made of pipes. the design and dimensions of which will be optimized for the room. Such a movable screen can be optimally placed in the room using trial methods. This will be much better than destroying the tiles of the bathhouse floor to install the pipes of a stationary screen, especially if the tiles were laid by yourself.
Non-combustible lining
To protect walls from a hot stove, sheathing consisting of various special thermal insulation materials is often used.
Stainless reflective lining
Special non-flammable thermal insulation or protective sheathing consists of stainless steel sheets that perfectly protect the wooden surface of walls in private baths from fires. To construct such a simple screen, first a heat-insulating material is attached to the wall, and only then a stainless steel sheet is attached on top.
Stainless steel protective screen
To increase the efficiency of the cladding, it is advisable to polish the stainless metal sheet well to a mirror shine. The mirror surface of stainless steel significantly improves the reflection of heat rays emanating from the stove, preventing the wooden walls from heating up. In addition, by redirecting hard infrared rays back, the mirror stainless metal will turn them into soft and safe for people to perceive.
Metal screens for a bathhouse are easy to make with your own hands. The main thing is not to forget about using a heat insulator between the wall and the sheet of metal (minerite or asbestos cardboard will do)
Cladding with cladding
Mirror stainless steel cladding looks beautiful and perfectly protects the walls from fire, however, in some cases it may not be appropriate in a bathhouse and over time the mirror surface will become matte, will not be able to reflect the rays efficiently and will not look as beautiful as it originally did. Heat-resistant cladding will help solve the design problem in the bathhouse for many years; heat-resistant adhesive is used to lay it on the brick lining.
Non-combustible cladding
Terracotta tiles
For cladding walls located next to the stove, you can use the following heat-resistant materials:
- clinker tiles, similar to facing bricks, but denser in structure;
- embossed ceramic tiles with ornaments or designs on its upper part;
- porcelain stoneware – tiles with high strength and heat resistance;
- soapstone - a natural mountain fireproof, waterproof, durable stone;
Lining the furnace and walls with soapstone
- strong, durable terracotta tiles made from special kaolin clay, fired in ovens at temperatures above 1300 degrees.
Terracotta tiles in the sauna
As a fire-resistant material, you can also use a board made of fire-resistant plasterboard, or from fiberglass, which will not be deformed under the influence of heat, from a fireproof cement-fiber board - mineralite, or from a special tile material - glass-magnesium sheet.
Minerite protective screen
Minerite
The mineralite protective screen is mounted on the wall through bushings
Of course, the best option for cladding wooden walls is brick cladding. With such protection of the walls from high temperatures, the stove can be placed almost close to the wall. However, it is not always possible to use new, even bricks for masonry and lay beautiful masonry around the stove. Sometimes a previously used brick is chosen for a protective screen in order to further refine it with a beautiful material.
Masonry
We do the laying by tying the rows. The height of the wall is 02 meters higher than the upper surface of the firebox.
The screen must cover the metal oven, both from the sides and from the back.
We mark the lines for laying out the screen, leaving at least 50-150 mm between it and the walls of the oven.
We provide holes along the bottom to speed up the heating of the room at the initial stage.
To regulate the temperature, you can install doors on them. We lay out the screen in half a brick, although this can be varied.
High temperatures are required, do it by quarter or increase the number of holes.
If you don’t like strong heat, make it into a brick: it will take a long time to warm up, but it will also keep warm afterwards.