Here you will learn:
- Structural features of furnaces
- Advantages and disadvantages
- Types of long-burning stoves
- Making your own oven
- Making a potbelly stove
- We make “bubafonya”
- Increasing efficiency
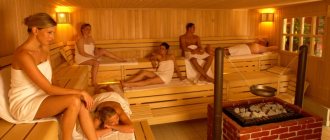
Wood stoves are actively used to heat premises for various purposes - these can be living rooms, outbuildings, garages and much more. Gas cannot be carried everywhere, which supports the demand for solid fuel units. After all, firewood is a fairly cheap source of heat, and in some cases even free. If we make a long-burning stove with our own hands and install it indoors, we will have at our disposal an easy-to-use unit.
In this review we will look at:
- Operating principle of long-burning furnaces;
- Their advantages and disadvantages;
- the most efficient wood stove designs;
- how to make a good stove with your own hands.
After reviewing the information presented and the homemade drawings, you can independently assemble a slow burning stove for a garage, cottage, outbuilding and any other buildings.
Structural features of furnaces
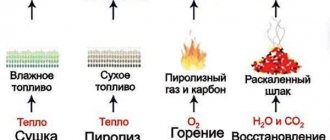
A long-burning stove is convenient because it can burn on one stack of wood several times longer than traditional stoves and fireplaces. This is directly related to its design features - it is equipped with a large firebox, and some of them burn wood under certain conditions, with minimal access of oxygen to the combustion chamber and subsequent combustion of pyrolysis gases.
Sealing the seams will prevent combustion products from entering the heated room.
Long-burning stoves have large fireboxes - a large amount of firewood and other types of warm fuel are placed here. Due to this, the frequency of approaches for laying fuel is reduced. Classic stoves and boilers with miniature combustion chambers require new portions every 2-3 hours. In the daytime you can still put up with this, but at night a person wants to sleep, and not bother with adding firewood.
The worst thing is if everyone works during the day - there is simply no one to put logs in the stove. During this time, the temperature in the heated rooms will become quite low, so the evening will have to be spent not on rest, but on kindling in order to create comfortable conditions. However, at night you will have to do the same thing as during the day - throw more and more portions of logs into the insatiable firebox of the wood-burning stove.
The operating principle of a long-burning furnace depends on its design:
- Units with a large firebox - their long operation is explained by the use of large combustion chambers, into which a lot of firewood is loaded;
- Pyrolysis units - here solid fuel is burned with a minimum amount of oxygen and forms pyrolysis gas;
- Units without pyrolysis, but with limited combustion intensity, are “bubafonya” stoves made from a barrel, which have a simple but very original device.
The stoves themselves can be made from a variety of materials - stone, refractory brick or metal.
The key to longer burning of your stove is the use of normal firewood, and not rotten logs with low calorific value. Beech, oak, hornbeam and some varieties of fruit trees burn the longest.
Advantages and disadvantages
Let's look at the main pros and cons of homemade long-burning heating stoves. Let's start, as usual, with the positive features:
Compactness and relative mobility are the main advantages of potbelly stoves.
- Cheap - most often they are assembled from cheap sheet metal, old capacious gas cylinders, barrels and much more. All this can be found in ruins and in old enterprises. Some people may rummage around in their garage or shed - there will probably be unnecessary metal there for a homemade long-burning stove;
- Ease of assembly - no one requires ultra-precise adherence to the chosen scheme. For example, the same pyrolysis stove-stove can have a variety of sizes;
- High efficiency - a properly assembled long-burning stove can provide heat to large rooms without requiring frequent approaches to add fuel.
There are also certain disadvantages:
- Not the most attractive appearance - homemade products really cannot please users with good appearance;
- Some types of stoves cannot be used in residential premises - the same “bubafonya” will create a lot of smoke and stink before it reaches operating mode;
- A long-burning furnace with a water circuit will be difficult to implement - you need to somehow ensure that heat is drawn into the heating circuit.
Despite some obvious disadvantages, homemade long-burning wood-burning stoves are in definite demand.
A long-burning stove is an excellent unit for heating greenhouses. Heating them with electricity or gas is expensive or completely impossible, but by purchasing cheap firewood, you can provide greenhouses with life-giving warmth throughout the winter.
Preparing materials for work
An old metal barrel or gas cylinder is not always at hand. For this reason, homemade stoves are most often made from sheet iron.
To work you will need to prepare the following set:
- Sheet metal, the quantity of which depends on the selected dimensions of the structure.
- A drawing or diagram that can be found in the public domain.
- Steel corners, the thickness of which is 5 mm.
- For the chimney you will need a metal pipe with a diameter of up to 18 cm.
To connect parts into a single structure, a welding machine is required. For cutting metal, it is better to use a grinder and a set of appropriate discs.
Types of long-burning stoves
If you have planned to build a long-burning stove with your own hands, you have all the tools and you are not afraid of difficulties, then you will certainly need the information from the next section of our review - in it we will talk about the varieties of these stoves.
Potbelly stove
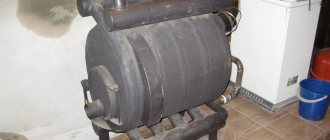
The simplest of all stoves is the potbelly stove.
It is an iron stove assembled from an old gas cylinder or from sheet metal. In order to ensure long-term combustion, its internal volume is made very large - this is most easily realized in models made of sheet steel, you just need to select a drawing that is suitable in size. This stove can operate on wood, coal, or compressed solid fuel. It is easy to use, easy to melt and produces a large amount of heat. It is also characterized by unpretentiousness. If you need a simple stove for your dacha, feel free to choose a potbelly stove - it will be the simplest and most affordable option.
Wood stove fireplace made of brick or stone
This option is good because we can implement long-term combustion in it and work on the design. The network contains drawings of similar stoves with large combustion chambers and afterburners - these are so-called pyrolysis units. They burn not only fuel, but also gases formed during pyrolysis . A brick unit will be bulky, but very effective. Here are its advantages:
- Long-term heat retention through the use of brick or stone;
- Excellent appearance - just find a suitable project and make neat masonry;
- Possibility of working in residential premises, unlike the same “bubafoni”.
The disadvantage is that to assemble such a long-burning stove you will need experience in bricklaying.
Bubafonya stove
The presented long-burning stove has impressive dimensions, runs on wood and has an extremely simple design - depending on the volume, it can burn for up to 20-24 hours, without requiring frequent approaches to laying firewood.
To make it, you will need a pair of metal containers with lids (100-200 liter barrels are suitable), pipes for the chimney and air supply, as well as a channel to create a weighted piston. The “Bubafonya” long-burning stove is most often used for heating non-residential buildings - garages, greenhouses with garden crops growing in them, technical premises and utility rooms. Some craftsmen equip it with heating circuits, which allows them to heat living rooms without the risk of filling them with acrid smoke.
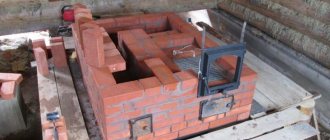
Step-by-step instructions for making a brick stove for a garage
A brick oven for a garage is a compact heat generator. To build a medium-sized brick stove you will need: - Bricks - 300 pieces. - Stove door. — Grate. - Grate door. - Valve. — Cast iron stove.
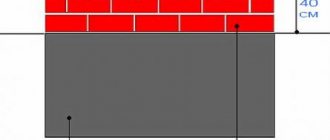
For the product they take ordinary brick. To assemble the firebox, refractory bricks are taken. Silicate samples in the manufacture of fireboxes are a useless element. It is better to line the firebox with fireclay bricks. Was it worth laying the foundation? If the entire system weighs more than half a ton, then definitely. If the mass is less, then there is no need to fill the foundation. In our case, we will pour the foundation.
Brick laying is carried out according to the existing order. First, lay out the starting row - the base. Then, according to the order, they lay out row by row. We place the necessary iron parts of the structure in pre-designated places. The parts are attached with ordinary wire, which is then laid in rows of bricks. On top, if necessary, you can install a stove for heating food. At the end, according to the order, we lay out the chimney.
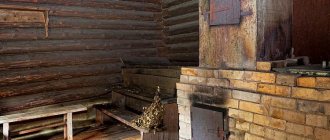
Next, we make the seams on the walls. An important point is drying the finished product. It is done gradually. In various sections of the firebox, light garbage, paper, newspaper, and wood chips are burned for about half an hour. This way the stove gradually dries out from the inside. When there are no wet marks left outside, and there is no condensation on steel products, you can start burning wood. Simple conclusions arise. You need a garage oven made of bricks in case of constant activity (for example, a car service).
To maintain a constant temperature, the easiest mode. It is enough to throw in a few sticks of firewood or add coal. Oxygen is burned into the room in a minimal amount. The cost of such a design, when made by hand, is low. The temperature in the box remains stable for a long time. As a result of the efforts, a wood-burning stove for a brick garage was obtained.
Making a potbelly stove
Long-burning potbelly stoves are good because they are made from any available materials - these are various barrels, old capacious cans, pieces of large-diameter pipes or simply sheet metal. We chose sheet steel as the starting material - it is a more convenient material to process. You can adapt a barrel for this, but doing work in its internal volume is not very convenient.
All sizes are presented rather as guidelines, a kind of averaged best option. You, in turn, can deviate from the dimensions of the parts to create a stove that satisfies your specific wishes.
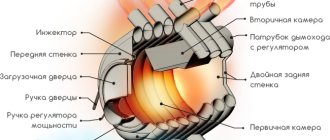
The design of a long-burning furnace is quite clear from the drawing presented above. Here are its main components:
- Combustion chamber - wood burns in it with the formation of pyrolysis gas;
- Afterburner – combustion of pyrolysis products occurs in it;
- Doors of the combustion chamber and ash pan - they are purchased in the store, but you can make them yourself;
- Chimney - in most cases it is a pipe with a diameter of 100-150 mm.
You can deviate from the drawing in one direction or another. But remember that as the size decreases, the burning time decreases and the power of the long-burning stove decreases.
The lower the power, the smaller the heated area. Therefore, it is best to provide a small reserve.
To make a long-burning stove like a potbelly stove, we need sheet steel with a thickness of at least 3 mm - this will ensure a long service life of the heating equipment. If the steel is thin, it will begin to burn through - after a couple of seasons, holes will form in it. Therefore, special attention is paid to the thickness of the steel. The optimal thickness is 3-5 mm.
For our example, we will take the classic scheme of a potbelly stove, modify it and get at our disposal an effective wood-burning stove for a home. At the initial stage, we prepare the side sheets - in our drawing they have dimensions of 450x450 mm. Next, we make the lower walls, front and rear walls - their dimensions are 200x450 mm. As a result, we should get a rectangular box. But don’t rush to weld it together - there is a lot of work ahead.
First you need to make a base - this is the bottom wall and two side ones. We weld them together, weld the grate at a height of 80 mm from the bottom. Now we need to prepare the front wall of the long-term heating oven - we weld both doors into it, and then weld it to our structure.
We prepare two metal sheets measuring 200x370 mm. We weld the first of them to the front and side walls at a height of 160 mm from the top. Next, we prepare the back wall - we weld small metal tubes into it, which should fit into the space between the two inner sheets that form the afterburning chamber - secondary air will be supplied through them. Then we weld the back wall and a second metal sheet at a height of 80 from the top (welded to the side and rear walls).
The damper is used to regulate air flow. It is this that improves the efficiency and quality of traction.
Our DIY long-burning stove is almost ready - all that remains is to figure out the top cover. We make a hole in it with a diameter of 100 mm and weld a piece of pipe for the future chimney. Now it remains to find out whether you need a hob or not - it is also welded into the top cover. At the last stage, we install the lid in place and weld it - the stove is ready, now it can be installed on a non-combustible base, attached to the chimney and started.
When starting the long-burning stove presented above, let it burn, then cover the ash pit so that the wood barely smolders and the generation of pyrolysis gas begins.
Another interesting long-burning pyrolysis furnace is shown in the following figure. It is made from a barrel or a piece of large diameter pipe and is equipped with a suitable lid. In the lower part, at a distance of 80-100 mm from the bottom, a metal disk with a hole in the middle is welded. A door is welded between the disk and the bottom, on the side wall. The resulting space forms our firebox. We weld a chimney with a diameter of 70-100 mm in the upper part.
In terms of low cost of use, such a stove is a real gift, since there is no shortage of sawdust in a private home.
The resulting long-burning furnace receives heat by burning pyrolysis gases generated when heating sawdust. The sawdust itself is poured into the main volume, and to prevent it from spilling into the firebox, it is compacted using a wooden cone. When the stove starts, a fire is lit in the firebox, the cone is removed - after a while the unit will begin to produce heat.
Exploitation
A stove of this type, like any top-combustion heat generator, operates with maximum heat output only when the chimney is well heated. Therefore, before loading the main portion of fuel into the combustion chamber, the device must:
- warm up the chimney well. For these purposes, you can use any quickly flammable fuel, such as paper balls, sawdust or shavings. It should burn not in the firebox, but in the ash pit. The level of heating of the chimney can be judged by the attenuation of the sound or a change in its tone. Next, you can start adding the main fuel to the firebox. It is no longer necessary to set it on fire; it should flare up from the coals remaining from the burnt “fast” fuel;
- manually regulate the flow of air into the combustion chamber. A rocket stove in a garage is not capable of adjusting itself to changing environmental conditions and the quality characteristics of the fuel, so it must be adjusted manually. After loading the main fuel batch, the ash door should be opened completely, and when a characteristic hum appears in the furnace, it should be closed enough so that the tone of the sound in the furnace is reduced to a rustling sound. As the wood burns, the door needs to be closed more tightly, achieving the same rustling sound. If this is not done, then excess air will enter the furnace and cool the intermediate gas mixture. In this case, the pyrolysis process immediately stops and the oven begins to make a roaring sound.
Only dry wood can be used as fuel for such a stove, since the appearance of an excessive amount of moisture when burning wet wood can provoke reverse draft and interfere with the creation of the temperature necessary to begin the pyrolysis process.
To ensure the safety of users during operation, the following rules must be observed:
- do not use liquid fuels for kindling and do not add them to the stove during the burning period;
- avoid contact between open areas of the contact body and the surfaces of the furnace, since the cylinders and its other metal parts will become very hot during combustion;
- It is prohibited to place the device near flammable surfaces;
- Clean the chimney at least once a week, and preferably after each use of the device.
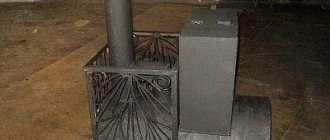
We make “bubafonya”
If you are making a stove for heating premises for household or technical purposes, you should pay attention to the stove under the slightly funny name “bubafonya”. It has a simple but original design that provides a lot of thermal energy. It works like this:
- The lid is removed, firewood is loaded (small chips are placed on top);
- Kerosene-soaked rags are placed on top of the firewood and in the spaces between them;
- The rags are set on fire and the wood is set on fire;
- A piston is installed in the oven, the lid is closed - the unit begins to generate heat.
In order to understand the essence of this unusual long-burning stove, you just need to look at its diagram. The unit consists of three main parts - a body, a chimney, a heavy piston and a cover.
This picture clearly demonstrates the scheme and principle of operation of the “bubafoni”.
“Bubafonya” is simple to make; the easiest way is to build it from two whole metal barrels (without holes) with a volume of 150-200 liters. Thick steel is not particularly needed here, since due to the limited supply of oxygen, combustion will be slow and low-temperature. Let's see how to make such a long-burning stove with your own hands. Here are step-by-step instructions:
- We cut off the lid from the main barrel and prepare the combustion chamber;
- We weld a piece of pipe with a diameter of 100-150 mm into the side wall of the combustion chamber (in the upper part, according to the figure) - this will be the chimney;
- We prepare the top cover - we make a hole 40-50 mm wide in it, through which the piston pipe will pass. Bend the edges of the lid outward with gentle blows of the blade, tamp the edges of the barrel (combustion chamber) inward - the lid should fit tightly onto our barrel;
- We are preparing the piston of our long-burning furnace - we take a pipe with a diameter of about 40-50 mm (it should fit into the hole in the lid), weld the lid from the second barrel to it from below, and you cannot weld the pipe itself - air will pass through it. We weld pieces of a thick L-shaped channel to the bottom of the piston cover so that the piston itself is as massive as possible. The diameter of the piston itself must be such that it can be easily inserted into the combustion chamber (there should be gaps about 5 mm wide between the walls and the piston, through which combustion products will escape).
Our self-made long-burning stove is ready - all that remains is to install it on a non-combustible base and test it. How this stove is set on fire is described a little higher.
Some models of these long-burning stoves operate on one load of firewood for up to 20-24 hours or more, generating a large amount of heat.
Smoke outlet
For this you need a pipe with a diameter of 150 mm. It will be constantly involved in thermal conductivity, so it requires steel and no insulation. The pipe is mounted on the side or on the stove. Pipes inside the house go along long lines and to the farthest point. This will increase the amount of heat received.
Following the information on the drawings, chimney pipes must always be equipped with valves (rotary or along a guide). With them you can influence the process of warming up and smoke removal by closing the chimney at the time of combustion.
Increasing efficiency
Additional sheets of iron can be replaced by a wall made of bricks. It heats up more slowly, but it releases heat longer.
The long-burning stoves we reviewed are distinguished by their high efficiency - the fuel in them burns slowly, and in the same potbelly stove there is also the production of pyrolysis gases, which provide additional heat. Let's now figure out how to increase the efficiency of our self-assembled equipment. In all three stoves we can increase the thickness of the metal - thereby it will accumulate heat and slowly release it into the environment. The easiest way to do this is with sheet metal potbelly stoves, choosing thicker steel.
We can also equip all three stoves with long horizontal sections of chimneys. The thing is that any solid fuel stoves (including long-term combustion ones) send a large amount of heat into the atmosphere. By equipping the chimney with a long horizontal section, we will leave some of this heat in the room - the approximate length of the section is 3-4 meters.
As for potbelly stoves, we can equip these long-burning stoves with additional metal plates that wrap around the body from the back and sides (distanced from it by 40-50 mm). Between the body and the plates, cold air will be sucked in, heated up and sent upward - that is, we made the most ordinary convector. If desired, other ovens can be equipped with such convectors.
There are a couple more upgrade options. The first option is to cover the corner in which the long-burning stove is located with galvanized iron, so that the generated heat is reflected into the room and does not go into the walls. The second option is to line the stove with heat-intensive bricks or natural stone.
How to install Buleryan
The main stages of installing a Buleryan heater
- When choosing a place to install the stove, the main thing is to ensure free air convection for better heating of the room.
- The boiler gets very hot during operation, you need to provide a fireproof place for it.
- Under the boiler and in front of the firebox, it is necessary to place a metal sheet on the floor to prevent fire.
- It is recommended to install the stove no closer than 30 cm to the wall and with a distance of at least 60 cm from furniture and other objects.
- if the boiler is located in the corner of the room, then it is advisable to protect the walls with fireproof materials (metal, stone, brick).
- We put the Buleryan stove 20 cm from the floor for natural air convection, for this we mount a stand.
Boiler stand Buleryan
Chimney device
Types of chimney installation: one of them is classic (or traditional). This installation method is used at the initial stage of building a room. The chimney pipe is located vertically and passes through all ceilings.
Types of chimney devices
This method excludes the horizontal arrangement of any nodes. The second method is used at any time, at any stage of the construction of the premises, even after the construction is completely completed. This method is called coaxial; it works more efficiently than the traditional one, as it ensures high-quality removal of combustion products and is less fire hazardous.
Distributing heat throughout the rooms of the house
For the most effective use of the Buleryan stove, in order to heat not one room, but several or the entire house, corrugated pipes can be connected to the heat exchange pipes coming from the stove.
Corrugated pipes are distributed in rooms
The pipes are routed accordingly through the walls of the premises, if necessary through the ceiling. Decorative grilles are installed in the rooms to receive warm air.
Heat distribution between rooms in a large house
However, it should be taken into account that the air leaving the furnace has a fairly high temperature; when passing pipes through partitions and ceilings, the conditions that are provided for the installation of chimneys must be observed. The photo below shows several wiring options.
Heat distribution from a common box
Galvanized or corrugated pipes are used for wiring.
Efficient heat distribution between rooms
Improving the stove design
Buleryan stone finishing
Very often, Buleryan is a design element, especially when it comes to a country house or a chalet-style house.
Brick screen for Buleryan stove
But if we are talking about a homemade device, its aesthetic parameters are of course inferior to products made in production.
Buleryan in the interior of a country house
The most successful way of decoration is to use brick or decorative stone.
Buleryan in the interior
To do this, it is not at all necessary to completely cover the stove with bricks; it will be enough to decorate the walls around the boiler or make a background wall-screen behind which the stove itself will be.
Decoration of the Buleryan stove
The photographs show interesting design options for our heater.
Buleryan boiler in a country house