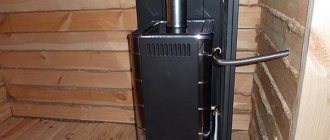
A sauna tank on a pipe is a kind of stove-stove, familiar from old films. Hot water when taking a bath procedure is a natural attribute, which means that in the absence of a central water supply it is necessary to heat it. At the same time, the chimney in the bathhouse is designed to eject hot smoke from the firebox to the outside. Thus, significant thermal energy is lost uselessly. A water tank on a bath pipe allows you to combine these two processes, and the chimney begins to perform useful and necessary work.
A sauna tank on a pipe helps save space in the sauna
Materials for making tanks
The type of material used to make the sauna tank determines the durability and reliability of the structure, the speed of heating and cooling of the liquid. Water heating devices are made of stainless steel, cast iron and metal.
Stainless steel
The most popular material for the manufacture of tanks for heating water in a bathhouse is stainless steel. It is resistant to corrosion, fire, high humidity, deformation and damage.
In addition, stainless steel products have high thermal conductivity, hygiene and resistance to temperature changes.
The stainless steel tank can be presented in cylindrical and rectangular shape.
Proper care of stainless steel products guarantees efficient operation and a long service life.
Made of cast iron
Cast iron remains the traditional material for making water tanks. It has good performance characteristics - low thermal conductivity, resistance to corrosion, deformation, mold and overheating.
The disadvantages of cast iron products include their impressive weight and complexity of installation.
In cast iron tanks, water heats up slowly, but also cools down over a long period of time. Therefore, one volume is enough to satisfy hot water needs for the whole day.
Made of metal
The cheapest option is metal tanks, which are susceptible to corrosion, rotting and deformation. Such characteristics can negatively affect the quality of water and the durability of the product.
It is strictly forbidden to paint metal devices with moisture-resistant paint, which can release toxic substances when heated.
Less popular are enameled tanks, which are sensitive to mechanical damage. If there are chips in the enamel, such devices are not recommended. To protect the heaters from possible corrosion, their surface is treated with a special heat-resistant compound.
Stainless steel tanks of the remote type are considered the most practical and reliable. Such designs are distinguished by their attractive appearance and safe operation.
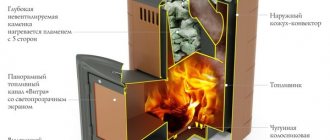
Bath stoves and their features
If necessary, a sauna stove with a heating circuit can be quite versatile both in terms of operating mode and the fuel used in it. Such a furnace can be used either in a continuous combustion mode, or in a cyclic mode, with periodic loading of combustible material. Natural gas, wood, charcoal or fuel pellets can be used as fuel. In addition, electric stoves of appropriate power can be used to heat the bath and heat the water.
Continuous combustion furnaces are usually made from steel. Such a furnace heats up quickly and cools down quickly when the fuel supply to it is stopped. Sometimes the surface of steel stoves is lined with decorative non-flammable material, which increases its safety and heat capacity.
Stoves used in cyclic mode for heating a room must have a high heat capacity and the ability to retain heat for a long time after the fuel supply has stopped. They are made from refractory bricks, which have a large mass and high heat capacity. Such an oven, after heating, can maintain a high temperature for quite a long time. The disadvantages of such furnaces include a long time to reach the operating mode, that is, a long time for heating the furnace in a cold state.
To organize the supply of hot water to the bathhouse, as well as for heating the premises, stoves equipped with forced circulation systems of hot water, as well as heat exchangers, are used.
Difference by type
The simplest designs of heat exchangers are coils with ends removed from the tank: one takes in liquid at room temperature, the other releases hot liquid.
More complex ones are a system consisting of two metal tanks with anti-corrosion properties - cylindrical and rectangular in shape with connecting pipes.
There are two ways:
- This photo shows an option for installing a heat exchanger in a steam room and a tank in a wash room.
The second option is to install a heat exchanger with a tank inside the steam room.
Advantages of installing a heat exchanger in a steam room
- high water heating speed;
- saving free space in the steam room;
- Wide range of options for installing the tank - in a steam room or in a shower room.
Video description
The video will show what a sauna stove with a heat exchanger is:
Siphon type
Quite effective, but not very popular method. A storage tank is installed at some elevation from the surface of the furnace. From its bottom, at an angle, a pipe with a sealed end goes into the hearth. In this case, you cannot do without boiling.
It starts at the end of a sealed pipe. The water turns into steam bubbles, which begin to rise to the top. In a cold environment, they burst and heat the surrounding water. Additional heating also occurs due to the usual convention of warm water rising to the surface and cold water taking its place.
What are bath water tanks made of?
First, let's talk about what the tank can be made of.
In addition, stainless steel containers are quite heat-resistant and durable and are not negatively affected by sudden temperature changes. However, there is one drawback: the prices for stainless steel bath tanks exceed the cost of their steel “brothers” made of enameled steel. To be fair, we note that this can be neglected: a stainless steel container will last longer than its steel counterparts.
In modern production conditions, enameled steel tanks also have a long service life. Parameters such as resistance to corrosion and high temperatures indicate a fairly high quality of products: the tanks in the bathhouse do not rust.
But still, enameled steel cannot be compared with stainless steel (although it is successfully used in the production of tanks). The only thing in which steel containers are superior to their stainless counterparts is price: the cost of enameled products is approximately 1.5-2 times lower.
Stainless steel and steel sauna tanks are by far the most popular, although there are other options (for example, cast iron sauna tanks).
Boiler for a bath
Boilers are effective in regions where there is no firewood. Gas and solid fuel options are popular. It is better to prefer solid fuels on peat. Unlike coal, they do not pollute the surrounding area.
There are two options with boilers. Either connect the tank to the heat exchanger in the bathhouse (the heat exchanger is placed in the combustion chamber of the boiler), or install the tank on the boiler itself.
Information. Unlike stoves, boilers are not assembled from bricks, but are purchased ready-made. The design with a heat exchanger has maximum efficiency; by the way, it can be implemented without a ready-made expensive boiler. This is discussed below.
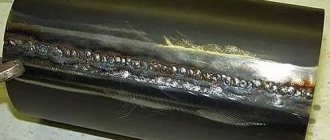
You can use homemade boilers for a bath from a pipe, but this requires good quality welding work, which is the main difficulty. A common option is to manufacture the boiler and tank from large-diameter stainless pipes.
Wood-burning sauna boilers with a tank are produced ready-made. Structurally, they are designed in the same way as a regular sauna stove and differ in size. Their water capacity is usually larger, and the area for installing stones for soaring is smaller.
Purpose
To obtain hot water in the wash room of your bath complex, several types of structures have been developed that operate on different types of fuel. But the most inexpensive is installing a heating tank on the heater and obtaining hot water together with heating the steam room.
The advantages of such a device are due not only to the reduction in the cost of hot water when heated with gas or electricity. This design avoids the risk of fire and electric shock when using these types of fuel.
Autonomous water heating systems are especially in demand for summer cottages and households in places with no natural gas supply. In this case, such tanks can be used for heating water and for household needs. The main thing is to choose the right tank for the volume and type of installation and install it correctly.
Selecting the boiler power
It is important to take care of the installation of an RCD (residual current device). This will prevent accidental electric shock to bathhouse visitors.
This will prevent accidental electric shock to bathhouse visitors.
Based on the design features and range of water heaters, we can state the following:
- If you don’t have gas, then the heaters and boilers using this fuel will “pass” by your bathhouse. If you are the happy owner of a gas bath, then you can no longer consider other options.
- Electric water heaters are expensive, but there are no problems with installing the device. It is cut into the water supply and plugged into an outlet. And that’s it – you can use it. Moreover, an electric boiler is a “one-time” device - this device will prepare the next portion of hot water after 3-4 hours. In addition, instantaneous and electric storage water heaters are afraid of excessive humidity in the bathhouse “atmosphere”.
- If you are a supporter of budget solutions and want to have a supply of hot water until the heater goes out, then you will undoubtedly like wood-burning water heaters. In this case, the water in the tank is heated by the stove itself, which imposes some restrictions on the process of installing such water heaters. They are installed during the construction of the heater. But if you haven’t missed the moment, then you won’t find anything better.
Well, now let's talk about volume:
- Large companies need an appropriate amount of water. Therefore, for a company of 4-5 people, you need either an instantaneous water heater or a boiler with a capacity of 100-150 liters.
- One or two people or a company of three people will get by with a 50-80 liter boiler.
- The bathhouse for one “user” is equipped with a 30-liter boiler.
water heaters “Success”,
which are tanks with a capacity of 40 to 250 liters, heated by heating elements at 1.5-2 kW.
Water heater “Success” 125 l
The tank is made of sheet steel, at least a millimeter thick, and the heating element is equipped not only with a thermostat, but also with a mechanical temperature regulator.
Less sociable bathhouse owners will be interested in
model GARANTERM ER 150 V
Water heater GARANTERM ER 150 V
electric boiler for 150 liters, boiling water heating element for 1.5 kW. This dressing can serve a company of 3-4 people, who can not only rinse off in front of the steam room, but also take a full-fledged hot shower. Moreover, the heater body, as well as the outlet fittings, are made of stainless steel, and moisture-resistant polyurethane foam is used as a heat insulator.
The cost of the heater is 10-11 thousand rubles.
model Ermak KVS-10-2-90
Water heater model Ermak KVS-10-2-90
wood-burning storage water heater made of stainless steel with a capacity of 90 liters. This boiler boils water using both wood and heating elements with a power of up to 2.5 kW. Moreover, this boiler has relatively modest dimensions - the wood-burning firebox is built directly into the storage tank of the heater.
The cost of a stainless steel model is 15,000 rubles.
What designs can be used
You can place the tank in the bathhouse in different ways. The main types used are:
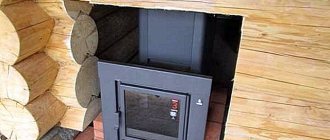
Built-in design. In this case, the chimney pipe runs inside the tank. This structure is considered stationary, non-removable and is installed during the manufacture of the chimney. The tank can be made in the form of a pipe (cylindrical version) or have a rectangular cross-section
It is important to securely seal the bottom entrance of the pipe to prevent water from leaking out of the tank. To use water, outlets are made from the tank directly into the shower stall or intermediate tank
Given the elevated location of such a tank, water flows by gravity.
The device of a heater with a tank on the chimney
- Hanging structure. Such a system is removable, i.e. installed on an existing chimney. The tank is placed close to the chimney pipe and securely attached to the column. Such containers can be purchased or made by yourself. This design is typical when a gutter is formed on the back wall, repeating the shape and diameter of the chimney, which makes it possible to bring the surfaces as close as possible and ensure high-quality heating.
Design of a hanging tank for a bath
- Remote design. In principle, the water container itself can be placed in any convenient place (for example, in a shower). In this case, the energy of the chimney heats the coolant, which is sent to heat the water container. When such a heat exchanger is mounted on a bath pipe, the installation height of the tank must be selected so as to ensure gravity flow of the coolant according to the laws of physics, i.e. the warm flow rushes upward, and the cooled flow – downward. This design provides for the presence of additional elements in the form of a heat exchanger, but it also allows you to place the tank itself in the right place.
Water circulation diagram with a remote design of the tank and stove in the bathhouse
Depending on the design, the tank can be placed at different height levels. 3 options can be implemented:
- At the stove level: the base of the tank is placed on the top of the stove, which means no additional brackets are required. The main disadvantage is that the height does not allow gravity flow of water for showering. In this case, it is scooped by hand.
Tanks at furnace level
- On the chimney column. This design is located at a certain height, which eliminates the previous drawback. Mounting the tank requires special brackets, and the weight of the structure is limited.
- Attic level. Here there is a reliable support for the tank in the form of a ceiling. The problem arises in a cold attic, where you will have to think about external thermal insulation.
Diagram of installing a water tank on a chimney at the attic level
When calculating the parameter, they usually proceed from the following requirement: 10 liters per person for a bath procedure and 5 liters per person when taking a shower. In addition, a reserve should be created for unforeseen circumstances.
There are various forms of water tanks for a bath on a chimney
The dimensions of the container also depend on the design and dimensions of the chimney. The most common type is a sauna tank with a 115 mm pipe. Naturally, a bath tank for a 150 mm pipe is made of a larger diameter, regardless of the need.
The choice of volume of a metal water tank depends on the number of family members. Formula for determining the volume of a cylindrical tank
Deciding on the amount of water
There are standard recommendations according to which the water tank for a bath should be selected at the rate of 20 liters per steam room visitor. No more than 5-7 liters are spent on spraying the heater, the rest is used in the washing department. In reality, taking into account cleaning and washing the premises, at least 25 liters of water are used.
As a result, a small steam room in a bathhouse for 3-4 people will require at least 100 liters of boiling water. It is clear that no one will make a hundred-liter tank for a single visit to the steam room, and no one will put a barrel in a bathhouse for cold water either. Unless the owners built a real Russian stove with a heater in the bathhouse, and the process of bathing gatherings in a group lasts for the whole day.
For your information! This amount of water in the bathhouse will heat up for at least 2-2.5 hours, while heating a steam room takes a maximum of 1-1.5 hours.
Therefore, the size of the water tank is determined depending on the conditions of the steam room:
- For small steam rooms with an area of 2-4 m2, choose a water container with a volume of up to 40 liters. Usually, in such a layout, a tank on a pipe or attachment-type devices are used for a bathhouse;
- Paired rooms with an area of up to 7 m2 are equipped with tanks with a capacity of up to 60-70 liters. In this case, a mounting-type container is mounted on the firebox or a backpack tank is attached to the chimney with a hanging cylinder;
- Large steam rooms with an area of 8 m2 or more are equipped with hanging-type heating tanks.
It is clear that you can put a tank of cold water in the utility room of the bathhouse and periodically top up the supply as the boiling water is consumed.
Advice! If possible, try to equip the tank in the bathhouse with a cold water supply from an external source.
This somewhat complicates the heating design, but makes it as safe and comfortable to maintain as possible. Anyone who has had to perform the duties of a stoker or bathhouse attendant knows how unsafe the process of manually filling a container placed above a hot stove can be. The most common option is to install a barrel of cold water in the attic of the bathhouse.
Remote large capacity
The water tank for the bathhouse is remote; if a large container is used, it is installed on the floor. For baths with several sinks and showers, a pump must be installed.
It creates the required pressure, which makes it possible to use any modern plumbing fixtures, spray showers, hydromassage cabins and much more.
When installing the pump, care must be taken to ensure that it does not cause excessive noise.
It is reduced by the use of plastic pipeline fittings and the pipes themselves.
Also, the pump installation should be carried out outside the bathhouse.
Nowadays pipes are inexpensive, and you can make an elbow for the pump in any convenient place, for example, in a plumbing hatch, next to the water meter or in the utility room of the bathhouse.
The “water tank with heat exchanger” type arrangement for a bathhouse is suitable for heating the largest volumes of water. The tank capacity can exceed hundreds of liters. In other heating systems, such options are difficult to implement.
Information. All pipes, connecting fittings and pump must be heat-resistant (if plastic is used). For metal, ordinary ½ or ¼ inch steel pipes are optimal.
Material for production
Steel types are also considered productive today. This kind of substance has many advantages; it is resistant to changes in temperature and pressure, retains and conducts heat well. It is resistant to rust, corrosion and deformation. Cast iron products for water have similar properties, although it is worth noting that they are much heavier in weight, despite the fact that they maintain temperature for a long time and take a long time to build up the required level of heat.
As experience shows, devices have long been widely used in practice, but they also have their own characteristic disadvantages. If you install the container incorrectly, the water will boil faster than the room begins to fill with steam. Subsequently, the steam room produces moist, heavy air, which does not act as effectively on the body as dry steam.
How to weld a water tank with your own hands
The simplicity of the design and mechanism of action allows you to make a sauna tank with your own hands. Thus, you can not only save money, but also quench the thirst of the inventor. First of all, you need to decide on the shape of the container and the material. You can choose a large diameter pipe or sheet material of a suitable size.
To make a sauna tank at home you will need the following set of tools:
- grinder with cutting and cleaning wheels;
- locksmith tools;
- welding machine;
- drill with metal drills;
- fitting;
- solvent and primer, brush;
- protective clothing and respiratory and eye protection.
Step-by-step production:
- First you need to prepare the material. The metal is cleaned of dust and all kinds of contaminants.
- Using a grinder, cut out blanks of the required size - in total there should be 6 planes-edges, which will form the tank - four vertical, a bottom and a lid.
- The side parts are installed on the bottom edge and secured by welding.
- All parts must be mutually perpendicular to ensure the stability of the structure.
- The edges are first ground to the correct shape.
- After making sure that the workpiece has right angles and bevels or there are no gaps, you can begin welding the seam around the perimeter of the bottom from the inside.
- When the first seam has cooled, the slag is beaten off and welded to the second one.
- The same applies to the seams between the vertical edges.
- Next, they are welded from the outside along the seam. In this way, the necessary tightness is achieved. The cover will be removable, so the welding work is completed.
- Using a drill, holes are made for pipes of the required diameter.
- Holes for mounting are also drilled.
- After securing all fittings and pipes, you can check the tank for leaks by filling it with water.
- If there are no leaks or fistulas, you can install the structure in place and begin operation. Otherwise, welding work will have to be repeated on each seam until the inaccuracies are eliminated.
The last stage will be finishing work. The surface of the tank must be degreased with a solvent, and the seams must be cleaned with a file. After the solvent has dried, a heat-resistant primer is applied.
Securing the remote tank and installing the heat exchanger
Remote sauna tank
For a sauna stove, a tank with a volume of 80-120 liters is sufficient. This container must be hung on the wall of the bathhouse so that the level of the tank is higher than the stove.
Scheme for connecting the tank and installing the furnace with heat exchanger
Connection diagram
Step 1. Choose a place to mount the tank. This can be either a steam room or a shower room behind an adjacent wall. We determine the mounting height using recommendations for the slope of inlet/outlet pipes.
Layout of the furnace and tank
Step 2. Most experienced craftsmen do not recommend hanging the remote tank directly on the wooden wall of the bathhouse. Therefore, we measure the width of the tank, saw the rail into several sections of the appropriate size, and fasten the sections to the wall of the bathhouse with nails.
Step 3. The tank must have technological holes for attaching it to the wall. We secure the tank with self-tapping screws or dowels, checking horizontal and vertical. The structure can be further strengthened with brackets, fixing them under the bottom of the tank.
Brackets under the tank bottom
Step 4. The remote water tank has three or four pipes. Two of them are intended for connection to the heat exchanger, the third is for filling the tank with water (it may not be there), through the fourth hot water is supplied to consumers. A check valve is connected to the pipe through which the tank will be filled with water. If the system is open (water is added manually through an open tank lid), then a non-return safety valve is not needed.
A faucet with or without a shower hose is connected to the pipe from which heated water will flow.
Step 5. There are two pipes left, to which you should connect corrugated steel pipes or install a copper network. Connections are made using fittings. It is permissible to use metal-plastic pipes, connecting them with adapters to the pipes of the tank and heat exchanger. All threaded connections are sealed with thread sealant.
Flexible water supply
Prices for metal-plastic pipes
metal-plastic pipes
Step 6. A tap is connected to the pipeline that leads from the tank to the heat exchanger to drain water from the system. The operation of draining the liquid will need to be performed every time after completing bath procedures, otherwise during cold weather the water may freeze in the pipes.
Furnace heat exchanger installation diagram
Step 7. A heat exchanger is hung on the wall of the furnace (or its fittings are brought out through the technological openings of the furnace, and the coil is located inside so that in the future there is no contact of the body metal with an open flame). The fasteners are tightened. Flexible corrugated hoses or pipes are supplied and connected to the heat exchanger with fittings. If necessary, holes are drilled in the wall with a diameter slightly larger than the diameter of the pipes.
Drilling holes
Pulling liners through holes in the wall
Connecting the line to the heat exchanger
Step 8. The system must be tested for leaks by supplying water under pressure.
Sauna stove with heat exchanger connected
An example of connecting a remote tank to the heat exchanger of a sauna stove
An example of connecting a remote tank to the heat exchanger of a sauna stove
Step 9. If you have a metal stove, then you can put it into operation. The brick kiln will have to be completed, finishing, testing and other preparatory work must be done. However, metal stoves can also be lined with bricks (they are placed on edge) on two or three sides. Such a screen additionally accumulates heat, increasing the efficiency of the furnace.
Rules for installing a heat exchanger on a sauna stove
The following rules must be followed:
- The heat exchanger must consume no more than 10% of the total energy produced by the furnace, then the latter will operate with good efficiency.
- The pipes must be laid so that the water flows by gravity, that is, at a 250-degree slope on the direct supply and 30-degree on the return one.
- It is important to reserve power for cooling after fuel burns.
- It is necessary to provide a sufficient volume of water for each individual model, because if there is too little of it, it will boil quickly, which can lead to the formation of deposits on the walls and a fire hazard, and if there is too much, you will have to wait a long time before taking a shower.
How to connect a heat exchanger if the tank is in a steam room:
- The entrance to the hot water tank should be at least 5 cm higher than the upper register fitting. This is necessary for better circulation.
- The upper register is from 1.4-1.5 m from the floor, despite the fact that the podium under the stove is 15 cm. The bottom of the tank in the steam room should be at least 1.5 m, and preferably higher.
- If the tank is 0.5 m high, then we have a total installation of 2.0 m. That means there is still half a meter to the ceiling. And here the question arises: how to fill the liquid. If there is a running water supply, then water will flow without problems.
Second connection option: we place the tank lower, and place the fitting for the supply circuit on the side. But there is a nuance: if the water level is below the upper fitting, there will be no circulation. It will stand in the heat exchanger and periodically reach a boil, but in the tank it will remain cool.
If you need to place the tank in the wash room, you should follow the same principles as when placing it in the steam room.
Advantages and disadvantages
When heating a bathhouse, you do not need to waste resources on heating water
A tank of sufficient capacity will provide residents with heated water for hygiene procedures and household needs. The liquid in the container eliminates the problem of dry air. Compared to water heating devices running on gas or electricity, the advantage of using a tank is that there is no additional consumption of resources. Connecting the reservoir to the stove will also help out in the event of a temporary shutdown of the supply of main resources.
The disadvantages of tanks depend on the material and type of construction. In steel containers, water cools quickly; cast iron containers are heavy. Installing a tank on a pipe requires special skills. The heating rate is affected by the thickness of the walls of the product.
Remote, built-in or on a pipe?
Tanks for baths can be built-in, remote, or on a pipe - and each has its own pros and cons. Compare and evaluate which one is right for your bath.
Advantages of a tank built into the oven
Once upon a time, water tanks for the bathhouse were only built into the stove - so that the lower part of the boiler was placed in the upper part of the firebox - the hottest one. And the bottom of the tank in this case is in direct contact with the stove fire. Water can be drawn from such a container directly, or it can be discharged through the built-in tap.
Remote tank for a bath: pros and cons
Thanks to the ability to install a heat exchanger in the oven, the tank itself does not need to be tied to a specific place - it can even be installed in a washing room. According to the known laws of physics, cold water will fall into the heat exchanger, and hot water will rise back.
Tank on a pipe - hot water without problems!
But it happens that the bathhouse is used not for two or three hours, but for the whole day - for example, when they wash in it, but the time after the fire has already passed. Then the ideal option is a tank on a pipe in which the water will be constantly heated to the desired temperature. This is on the pipe through which the smoke comes out of the stove - and its temperature can reach 500? C. Such tanks can be quite large - after all, the heating area of the pipe is quite large, and the water will heat up quickly and evenly.
There is one more advantage of this design - in such a bathhouse, smoke leakage through a crack in the pipe is impossible, because The tank in this case serves as a kind of fuse.
Process Features
The chimney pipe is a mandatory element of a sauna stove, through which the combustion products of fuel (smoke) are discharged and the necessary draft is provided to maintain combustion in the firebox. The smoke rising through this pipe heats it to a temperature of more than 450-500 degrees, which forces measures to be taken to isolate the chimney from the elements of the bath structure.
Since ancient times, the question has arisen about how to profitably use the removed heat. When carrying out bath procedures, you need hot water for washing after visiting the steam room. For these purposes, there is always a container (tank), which provides the required volume of water.
Nuance! Using the heat of a chimney is considered an effective and economical way to heat it. Fundamentally, the issue is resolved by placing the tank at the top of the chimney pipe or by heating the coolant using the heat of smoke.
A water tank installed on a pipe effectively saves heat from smoke removal, thereby heating the water.
What is the advantage of a tank on a pipe? The following positive aspects can be highlighted:
- heating occurs quickly and does not require additional fuel;
- the high temperature in the tank is automatically maintained during the entire heating time of the furnace;
- The tank-pipe for sauna stoves can have a significant volume, because it is possible to use the chimney along its entire length.
Tanks-pipes for the chimney can be of various lengths and designs
What materials are used
The sauna tank is made of metal, but the specific material is selected taking into account financial capabilities, volume and heating characteristics. The most popular designs are:
- Cast iron. Main advantages: high strength, durability, while the water temperature remains for a long time after the furnace has stopped firing. At the same time, the cast iron container warms up slowly, and most importantly, it has a large mass, which requires reliable support when installing the structure.
- Steel. The cheapest and most accessible material used in economical structures. The water in a steel tank heats up quickly, but also cools quickly after the fire stops. The most important disadvantage is corrosion destruction, which requires protective covers. One of the common options for eliminating this drawback is the use of enamel tanks. However, when choosing this material, it should be taken into account that with local damage to the enamel, accelerated corrosion begins at the source of damage.
- Stainless steel. A tank on a pipe for a stainless steel bath is considered the most common design, because... optimally combines cost and durability. The material is more expensive than ordinary steel, but is not subject to corrosion and has a long service life. At the same time, stainless steel can be welded, and you can make a tank from it yourself.
The remote design of the tank is in more gentle conditions. Extreme temperatures (400-500 degrees) only affect the heat exchanger located on the chimney. The walls of the tank itself do not heat above 70-80 degrees, which means it can be made from different materials. In addition, it is usually placed on the wall, where the risk of damage is reduced. In such conditions, decorated enamel containers become very popular. Supply pipes for a remote tank in a bathhouse can be made of metal, composite material and heat-resistant plastic
It is important to ensure their thermal insulation
Remote heat exchanger for a bath
The simplest and most affordable way to make a tank for a bath is the built-in version, when it is hung on the chimney. It’s not for nothing that such a system is called a samovar in everyday life, because it uses the same principle, i.e. heating the water with hot smoke rising through the inner pipe. Such a tank is installed during the construction of the stove or installed by dismantling a section of the chimney.
In the selected location, a pipe is mounted on brackets, so that the gap between the outer diameter of the chimney pipe and the inner body of the tank pipe provides the required volume. The base is welded at the bottom of the tank body, and all gaps are sealed with heat-resistant sealant. To drain water, an outlet with a tap is welded (Fig. 1). The upper part of the tank is closed with a lid.
Figure.1 Installation diagram of a bath tank
In principle, the tank body can be made in a rectangular shape for the required capacity. The wall thickness is selected taking into account the volume. To make a small tank with a volume of about 50-55 liters, you can use a metal sheet with a thickness of 0.9-1.2 mm, and for a container of more than 70-80 liters you will have to use metal with a thickness of at least 1.5 mm.
If there is a water supply to the bathhouse, then a remote system is more suitable. It is shown in Fig. 1. In this case, a coil is mounted on the chimney. The hot water exits towards the remote tank from above, and the coolant returns, respectively, from below. During installation, it is necessary to install the necessary shut-off equipment (valves, taps, taps).
When installing a tank in a bathhouse on a chimney pipe, you will need the following tools and equipment: a welding machine and electrodes with a diameter of 2.5-3 mm, a grinder, a hacksaw, an electric drill, a hammer drill, a hammer, pliers, a set of keys, a caliper, a tape measure.
The sauna tank on the chimney pipe allows you to have a supply of hot water without unnecessary fuel consumption.
Such a system uses the energy of futile smoke, which gives a significant economic effect. A system of different designs can be made and installed with your own hands.
Pros and cons of different designs
Depending on the circumstances, individual advantages may outweigh the disadvantages. It is clear that if the tank is located on the stove or attached to the side, then three unpleasant things follow from this:
- Constant heating of water will lead to the formation of steam, but it will not be the steam heated over 100 degrees, which is called light - it is obtained only from overheated stones. And the usual heavy steam will pour out of the container, which makes it difficult to stay in the steam room.
- Using heated water for washing is problematic if the steam room is not combined with a steam room. You will have to carry hot water to the washroom and wash the way your ancestors washed).
- In tanks built on the side of the stove, heating occurs the worst, because the walls of the stove do not heat up as much as the top or chimney. Plus, over time, the wall of the tank itself will lose thermal conductivity due to scale, and the wall of the furnace will lose its thermal conductivity due to scale. Therefore, the water does not warm up well, remains cold at the bottom, and must be stirred manually.
However, such structures also have advantages - they are easy to fill with water precisely because the container is not located high. But this is if there is no cold water supply either. Otherwise, the plus is leveled out.
By the way! The larger the contact area between the container with water and the oven, the faster the heating. But this is not always worth striving for - why do you need clouds of heavy steam in an unheated bathhouse?
Of course, you still have the opportunity to set up a shower from any tank. And, although stove makers do not recommend using a pump, the forced circulation of liquid in the system will calmly take water from either the manual or the attached tank. The main thing is not to forget to add more.
We ourselves consider the optimal system to be one in which the tank is mounted on the chimney. Whether it will be a large tank or a heat exchanger depends on how you are more accustomed or more comfortable to wash. Well, or whether there is a pump in the system or not.
Photo: samovar-type heat exchanger
However, the optimal system also has its drawbacks. In particular, traders admit that the connection between the tank and the pipe at the inlet below can suffer greatly from overheating, for example, in a situation where water is poured after the stove has been lit. Then the seam splits and needs to be welded. Another drawback is that the pipe burns out when the furnace heats up too much.
Pay attention to the size of the filler hole. For some tanks it is large, it even has a hinged lid, while for others it is small, round
Still, you will have to fill tens of liters, and also wash the inside of the tank from time to time!
On a note! The stove should not be heated to the limit of its capabilities. This shortens the service life of the metal, which inevitably oxidizes and turns into scale, and then it crumbles and holes remain. The bottom piece of the chimney will also burn out if you heat it like this. If you don't want this, insert a piece of black structural steel pipe of the required diameter inside. It will take away some of the heat and add strength to the structure.
Useful video
This video explains in more detail about strengthening the chimney with pipe cutting:
You can learn more about the disadvantages of a hinged and chimney-mounted tank from the following videos:
https://www.youtube.com/watch?v=S5TRvRjgmLs
Types of tanks
All tanks are divided into types according to two criteria: installation method and material of manufacture. According to the installation method, tanks are:
- built-in;
- remote;
- samovar type (mounted on a chimney).
According to the material of manufacture:
- cast iron;
- stainless steel;
- made of enameled steel.
Each type has models that differ in shape, volume, and wall thickness. Most containers are equipped with standard taps and have shower outlets, but there are also those from which water is drawn through the top using a ladle. In order not to make a mistake when choosing, you should familiarize yourself in detail with the advantages and disadvantages of all these types.
Built-in tanks
Built-in tanks
The most economical and convenient option. The tank is installed during the laying of the furnace. Its lower part is located inside the firebox, due to which the water is heated directly by the flame. Hot water is drawn through the top using a ladle or using a built-in tap.
Brick oven with water tank
Due to direct contact with fire, the walls and bottom of the container must be as thick as possible, therefore the most preferred material for such a tank is cast iron with a thickness of 5 mm. Stainless steel tanks with wall thicknesses of 1 and 1.5 mm are considered no less popular. Enameled steel containers are not suitable for this installation method. Cast iron tanks are bowl shaped, stainless steel tanks are usually cube or cylinder shaped.
Cast iron water tanks
Advantages of built-in tanks:
- water heats up quickly;
- the water temperature is maintained for a long time;
- free space is saved since the tank does not protrude beyond the stove;
- easy installation.
Flaws:
- the heat transfer of the furnace decreases, since the main part of the heat is spent on heating water;
- the dimensions of the tank are limited by the size of the furnace;
- the tank must have thick walls, which increases its weight and cost.
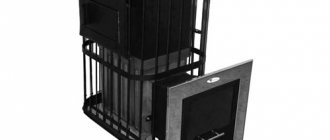
Metal tanks for sauna stoves
This method is convenient in cases where no more than 4 people are steaming in the bathhouse at the same time, or people wash separately. For example, if 3-4 people take turns steaming in a bathhouse, this takes quite a lot of time, and accordingly, it will take longer to maintain the water temperature by adding firewood. The built-in tank allows you to save on fuel while remaining hot for a very long time. But for large companies, this option is not the most optimal, since it does not provide the required amount of water.
Remote tanks
Remote tanks
The remote tank is located at a distance from the firebox and is connected by pipes to a heat exchanger built into the furnace. Without this, its operation is impossible. Most often, such a tank is installed in a washing room or mounted on the wall of a steam room next to the stove, if its dimensions are larger than the area of the firebox. When choosing a location for a container, it is necessary to take into account that the length of the pipes should not exceed 2.5-3 m. Remote tanks can be made of stainless steel or enameled, cylindrical, rectangular or even triangular in shape - for installation in the corner of the room.
Triangular shaped water tank
Advantages:
- the tank is installed where it is more convenient;
- Large containers can be used;
- there is no direct contact with fire, so the tank can be enameled and with thinner walls.
If 6-8 people regularly steam in a sauna, a remote tank is an excellent option.
Flaws:
- without maintaining a fire in the firebox, the water quickly cools;
- the oven cannot be used without water in the circuit;
- more complex installation compared to a built-in tank.
Remote tank connection diagram
Tank on a pipe or “Samovar” design
This option involves installing a tank around a chimney, and in some models the pipe is located outside the tank, in others - inside.
Hot water tank on a pipe
Design option for a water tank on a pipe
In height, the tank can occupy the space from the stove to the ceiling, partially extend into the attic, or be attached only to a small section of the chimney above the stove. The most convenient container shape is cylindrical, but there are many models with rectangular, triangular and oval sections. Heating of water is carried out using smoke passing through a pipe, which has a very high temperature.
Oval shaped water tank
Advantages:
- fast and uniform heating of water;
- does not reduce the heat output of the furnace;
- space saving;
- you can install a container of any volume;
- the water stays hot for a long time.
This tank is suitable for any bathhouse and any number of people. It all depends on the size of the container.
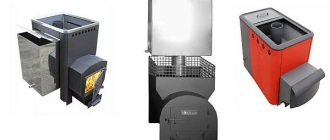
Stoves with water tanks on a pipe
Flaws:
- installation complexity;
- increased soot deposition on the walls of the chimney.
When installing the tank, it is necessary to select the correct fastening elements in order to securely fix the tank in a vertical position. In addition, you will need to install pipes for supplying cold water and discharging hot water, and install a faucet.
Samovar type tank
Tank on the chimney
What it is
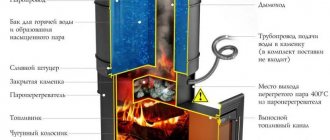
The device is used to heat water in the bath. Its operating principle is based on the physical properties of hot water, expanding and rising upward, while cold water remains below.
Typically the heat exchanger is small in size, so the liquid in it heats up quickly. Two pipes are connected to it - below and above. Thus, hot water through the upper pipe, replaced by cold water from below, rises into the tank, which can be located either in the steam room or in an adjacent room, usually in the sink. In this case, low-temperature water is constantly added to the heating device through the lower pipe without forced supply.
Options for heating water in a bath from a stove
The following models are distinguished:
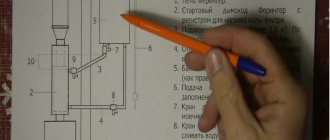
1. Samovar-type container - installed on the outlet pipe of the chimney. Heating occurs due to the heat of the flue gases escaping into the chimney. A tap for dispensing hot water is connected to the fitting at the bottom of the tank. If you don’t have a washing machine, then this option will be an excellent solution for heating. We recommend paying attention to the following operating conditions:
- the use of a samovar-type tank is allowed only with bathhouse stoves;
- It is prohibited to operate an empty tank while the stove is operating;
- If you want to get a “Finnish sauna”, this option for heating water will not suit you, since if the steam room is heated for a long time, the liquid will begin to boil, which is why heavy steam is formed.
2. A samovar-type heat exchanger (small in size with the ability to connect to a tank), which can be located anywhere. It is convenient because, if available, the tank can be placed in the washing room. One of the obvious advantages over other options is that it quickly heats the water.
3. Heat exchanger, which is installed on the starting chimney.
4. Starting chimney + tank-backpack - an option with being in a steam room and the absence of controlled convection to warm up the room. The container comes into contact with the wall of the chimney pipe, due to which the liquid is heated. Among the disadvantages, it can also be noted that this model does not have protection from hard infrared radiation, and in case of strong heating, the water begins to boil.
5. Convector chimney with a heater built into it.
Features: the register is located inside a pipe from which 2 identical ¾-inch fittings with internal thread come out. Using pipes, the device is connected to a tank hanging in a convenient place.
May be:
- Built into the oven - when scale appears, it loses efficiency.
- Located near the chimney (on it) - it provides heating to the required temperature more slowly, but nothing settles on its inner surface, it is easy to access, and its repair is not difficult.
The choice depends on the user: what to give preference to, performance or ease of maintenance, saving usable space or fuel.
How and how to connect the external tank to the heat exchanger
Remember that the elements in contact with the stove become hot, their surface temperature exceeds 100 0C. Therefore, the pipes must be made of stainless steel (cast iron will not work, as it is susceptible to corrosion). But ordinary pipes are allowed to be made of metal-plastic; they can even be replaced with flexible hoses. The main thing is that the diameter is 1 inch or 3/4, otherwise the circulation will be poor.
Use tangit for seals, and paronite for fittings. Feel free to replace factory elements with non-standard ones, but made of heat-resistant material. Don't forget about the drain valve - it is simply necessary to preserve the system for the cold season or to quickly remove stagnant liquid. Otherwise, during frosts, the remaining water will freeze and burst the pipes.
Coil installation method
You can install a coil heat exchanger on the chimney of a sauna stove or potbelly stove in a garage or shed. It will serve for heating or for heating water.
To work you will need:
- aluminum or copper tube up to 3 m long;
- 2 3/4″ fittings and a flexible hose for hot water;
- boiler with a float valve for filling with water and a valve for its use;
- tap for draining coolant from the system.
The system installation technology looks like this:
- The first step is to bend the tube so that its cross-section remains unchanged. For copper pipes less than 28mm in diameter, you can use a pipe bender without heating them. But steel, aluminum and products with large diameters require preheating with a blowtorch.
- For bending, you can use dry sand, filling the pipe with it and closing it with plugs on both sides. A spiral bend is made according to the sample, after which sand is poured in and the pipe is washed under water pressure.
- At the end parts of the tube, threads are cut for adapters for fittings, and then connected to the system.
- The resulting coil is mounted on the chimney. If you solder it with tin to the pipe, the heat transfer will be better. Preliminary degreasing is carried out with orthophosphoric acid.
- A storage tank is hung on a support or on the wall a little above the coil. Connect it to the heat exchanger with a flexible connection and install a tap at the bottom of the tank.
How to make a stove for a bath of a suitable size with a coupling of 400, 500, 530 mm
The choice of a homemade device depends on the dimensions of the paired compartment and the priorities of the owner. The manufacture of any type of structure is regulated by the standards PPB 01–93 and SNiP 41–01-2003. Regardless of whether the oven is horizontal or vertical, a number of general rules apply:
- For a heater you will need a sheet of 30x35 cm. The distance from the top of the heater to the bottom of the tank is at least ten centimeters.
- The back wall is completely welded, and a door is mounted on the facade.
- A coupling made of steel strip with a thickness of 400, 500 or 530 mm is attached to the top. Its width is approximately 5 cm. Half is welded to the body, and the protruding part is used for assembly.
- When installing the chimney, leave a third of the top area of the tank unsealed so that you can fill in water. A door with a handle is attached to the bay opening.
- A tap with a valve is welded at the bottom of the tank.
Important! The heater is filled with cobblestones only to half the space. You can equip the entrance hole with an iron rod to prevent cobblestones from falling out
Vertical homemade device
In a design built on a vertical principle, the grate is located above the heater.
The diameter of the stove will depend on the caliber of the selected pipe.
When installing a vertical sauna stove with your own hands, adhere to the following algorithm:
- Cut off a piece of pipe approximately 0.8 m long.
- Clean the cut edges.
- The bottom is welded from below - a circle of the same diameter as the pipe itself.
- Cut out the vent opening at the bottom.
- The grate bars are installed. They are located slightly above the blower hole.
- A slit for the combustion compartment is cut above the grate.
A hole is made on top of the stove for the chimney. All openings are equipped with doors adjusted to size. After the work is done, the stove is sanded and coated with paint.
Do-it-yourself horizontal design: photo
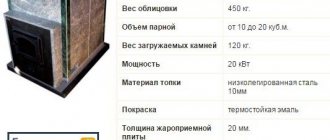
A distinctive feature of this type of device is that the firebox is moved from the steam room to the dressing room, which makes ignition easier and faster. But horizontal ovens require much more space.
Photo 2. A horizontal stove with a brick lining, located in the dressing room, requiring a fairly large space for installation.
To manufacture the device, a piece of pipe measuring 0.8 m is taken and the openings are sanded. A grate is installed below. A metal sheet sufficient to cut out a rectangle of the required size is suitable for it. The middle is cut out of the material, while the edges are left not too narrow. Then the metal rods are welded. The finished grate is mounted to the body.
Photo 3. Homemade horizontal sauna stove with a water tank and a compartment for stones.
For the rear section of the device, a metal rectangle slightly larger than the diameter of the pipe is suitable. If you plan to install a heater, you need to take this into account when cutting and add a larger allowance.
The sheet for the facade will be approximately the same size. Holes for the firebox and air vent are cut out in it. The mold is then welded to the front of the pipe. A square hole of approximately 12x12 cm is cut out from the top of the body. This will be the chimney. Next, the doors are hung.
Photo 4. Small metal sauna stove with a firebox and blower, with a hole for the chimney.
Before painting, the unit is thoroughly cleaned of plaque and rust. As a finish, you can line the structure with brick.
Attention! If you are painting the stove, at the end of the procedure, heat it outside!
HOW TO MAKE A WATER TANK WITH YOUR OWN HANDS
Making a tank backpack is not much of a problem. A drawing of one of the options for a future water heater is shown below.
For manufacturing you will need two pieces of steel pipes. A pipe with a diameter of 125 mm is used for the inner wall. For the outer part, you can use a workpiece with a diameter of 175-250 mm.
In addition, you will need to cut out two bottoms and two walls from thin sheet metal. A neck is welded in the upper part, and a fitting is cut into the bottom for connecting the tap. All work is performed only using a carbon dioxide semi-automatic machine. The backpack tank is attached to the chimney using metal loops.
Making a stove from an iron barrel
To create this unpretentious product, first cut out the bottom and get rid of the top, leaving a cylinder. Then you need to install a grate on the bricks. The inside of the barrel is lined with bricks, which are placed edgewise. The remaining 2/3 of the area is laid with stones. At the final stage, a chimney is made.
For safety, the structure is closed with a lid. Although this is correct, it is not very convenient, because the lid will have to be removed from time to time when more steam is needed.