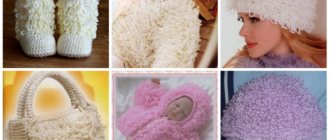
A washcloth is considered an elementary product that can be knitted with your own hands. This thing can be easily mastered by a beginner. A beautiful, comfortable, properly thought out and executed washcloth will make the skin care process complete. This product can be knitted from different yarns.
Despite the apparent simplicity of the product, many variations of its design are known. There are some nuances when performing each option.
Anyone who is interested in this handmade item will benefit from getting acquainted with the techniques and principles of operation, popular models and methods of creating them with their own hands.
Crochet Basics
For those who have already mastered them, scroll on. For those just starting to figure it out, here are some tips:
Air loop
Double crochet
Single crochet
Connecting post
Follow the links and watch the step-by-step description with video
- How to learn to crochet
- Adding and decreasing stitches with crochet. Long loops
Capron
Women's tights that have become unusable can find a second life. Describing such crafts from scratch does not take much time. Creating nylon graters is very simple.
Note!
- Patterns for knitting overalls for a newborn: step-by-step master class
- How to crochet a mouse and a rat: video master class on crocheting the 2020 symbol
- How to knit a warm hat with ears for a newborn boy and girl - video tutorials with patterns, instructions for beginners
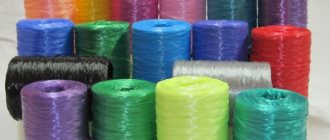
Which yarn to choose for knitting a washcloth
There are no exact instructions here. Although specialized threads exist. These are sold in stores, but they cost from 200 rubles.
If you want to knit a “purchased” option, then go to a fixed price, they sell twisted thread for only 50 rubles. One skein is enough to knit a washcloth.
True, there is a nuance here: a ready-made washcloth with elongated loops is sold right there, only 5 rubles more expensive. Buy or knit yourself - it's up to you.
- A polypropylene thread is ideal (the one mentioned above). It is hard and synthetic. Dries quickly.
- Wool. It's always nice to use natural materials. You can even buy untreated thread, which is a little prickly - a scrub effect.
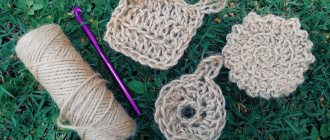
- Twine or jute thread. Rough, it is used for bath sponges.
- Plush yarn. Soft, pleasant to the body. Foams well.
- Yarn-grass. It will give volume and be just as soft and tender.
- Cotton. The most versatile fiber.
Any leftover yarn with any composition. Don’t think that a washcloth can only be knitted from a special material. Absolutely any yarn that is available will do. Here it is important to understand what is right for you: whether you want to wash with a synthetic washcloth or prefer natural fibers. But there is no difference in knitting.
Which yarn won't work?
Mohair, angora - all “fluffy” threads. To knit a washcloth, it is better to take non-fluffy yarn that will not deform if it comes into frequent contact with water.
Video lesson:
Good day, dear readers!
Yes Yes Yes! I was not mistaken and your vision is fine. Oddly enough, today’s article is dedicated to the fair sex. Dear ladies, is your husband/brother/matchmaker/godfather/father-in-law/boss/friend a true connoisseur of velvet steam and a fragrant broom? In this case, red girls, you are incredibly lucky!
Why? Yes, because on the eve of this or that holiday you do not need to rack your brains over a gift. True “gourmets” of the sauna ceremony have a “burning passion” for accessories intended for use in the steam room.
So, for example, the most important item in the bathhouse is Her Majesty - the Washcloth. Her role is very difficult to overestimate. It has a cleansing, exfoliating, warming, anti-cellulite, activating, anti-inflammatory effect. No need to laugh. Gone are the days when a man had to be powerful, smelly and hairy.
In general, lovely ladies, a washcloth is a wonderful gift for a lover of bath procedures. I think there will be no difficulties in purchasing it, since the market is replete with all sorts of bath products. However, if you want to amaze a man to the depths of his soul, do not buy it, but make it yourself. And I’ll tell you how to knit a washcloth.
From this article you will learn:
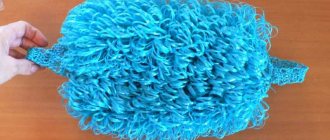
Crochet washcloth with elongated loops
The most common knitting option. This model took one skein of yarn from the fixed price. There are different colors available.
Once you understand how elongated loops are knitted, you can knit any type of washcloth this way. That is, by applying the pattern you like and adding elongated loops to it.
A crocheted washcloth for beginners with elongated loops is a rectangular product with two handles (you can hang a washcloth on them, and you can use them to thoroughly wash your back). This is a classic that came to us from the Soviet Union. Probably every family member had one in every apartment.
You will need:
- Hook No. 2
- Skein of polypropylene thread, 300 m.
We cast on 40 air loops , close the knitting in a circle using a connecting loop.
We knit one row with single crochets.
Knitting with polypropylene thread will seem unusual at first. The yarn falls apart into fibers and does not obey. Therefore, take hook No. 2 - it fits perfectly.
Let's make the first handle of our washcloth. To do this, knit 70 vp from the first loop. and using a connecting loop, secure it on the opposite side of the washcloth (in the 20th st. b/n). We knit a row of single crochets in the opposite direction - to the first loop of the washcloth. This will be the handle.
Knit 4 more rows of single crochets.
Extended loops
Knitting is much easier than it seems. Initially, handicraft textbooks advise using a ruler:
I make such loops using my thumb - it’s easier and faster. Watch a video of knitting a washcloth with elongated loops:
Knit this way for a length of 20 centimeters. Want more? – Then buy two skeins of thread.
We knit in a spiral. That is, we do not make a connecting loop at the end of each row. We knit in a circle. For convenience, you can hang a marker on the first loop. Essentially, we finish knitting when the thread comes to an end.
At the end, knit 5 rows of single crochets.
Next: 70 vp, attach the tie to the opposite side and knit in the opposite direction. – the second handle of the washcloth.
Cut off the tip and secure it to the wrong side.
If you knit elongated loops as shown in the video, they will not stretch or get tangled. You will get a “purchased” option.
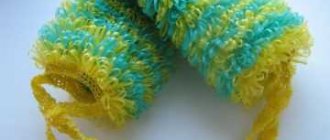
Crochet oval washcloth made of plush yarn
For those who like to take a bath with a lot of foam. This is a straight “cinematic” version of a crocheted washcloth.
The washcloth is oval, knitted according to the oval pattern:
We dial 11 v.p. and 3 more v.p. rise.
We knit 5 double crochets in the 4th loop from the hook.
And then 9 treble stitches in each next loop. In the last chain stitch of the row we knit 6 treble stitches.
Another 9 treble crochets in each loop (already on the second side of the oval). Finish the row with a connecting loop in the 3rd ch. rise (which was knitted at the beginning).
The knitted rows are hard to see in the photo, so take a look here , it tells you simply and step-by-step how to crochet an oval.
Our washcloth will require 6 rows according to the pattern.
Then knit two handles from ch. as shown in the photo.
If desired, you can knit two identical oval fabrics and sew them together - the washcloth will be denser.
Crochet washcloth mitten
We will knit two identical triangular fabrics, sew them together, leaving room for the thumb (we will tie it at the end).
We dial 40 v.p. + 2 v.p. rise.
12 rows - double crochets (straight and reverse rows). We start each row with 2 ch. rise.
Decreases
2 v.p. lifting, 1 st.s/n, skip 1 column. And symmetrically at the end make the same decrease: skip one column, 2 treble crochets.
Making such decreases by skipping two columns in each row (at the beginning and at the end) diagonally will be more beautiful.
That is, 2nd r. decreases: 2 ch. lifting, 2 treble s/n, skip one column. At the end of the row, the same decrease is symmetrical.
3 r.: 2 ch. lifting, 3 treble s/n, skip one column.
Knit in this way until the diagonals of the decreases converge into one column in the middle.
Next are two rows - double crochets.
Knit the second fabric for the washcloth in the same way.
Sew them together on both sides, leaving room for the thumb (try it on as it will be more convenient).
Along the perimeter of the hole, crochet single crochet stitches and knit 3 rows in the round. Then make one decrease in the same place in each row - just skip one single crochet until the finger is completely closed. Pull the remaining loops together with a needle and fasten to the wrong side.
Assembly
The washcloth mitten itself is quite spacious. We did this on purpose. Now let’s try it on our hand so that it doesn’t dangle, but also doesn’t put pressure.
We knit 6 rows around the perimeter of the washcloth using single crochets.
From the outside (depending on which hand you will put it on), turn it over and sew it on the front side (just make a couple with a stitch with a needle).
Tie a loop of chain stitches.
A crocheted washcloth mitten with elongated loops is knitted according to the same pattern, only instead of double crochets, knit single crochets with elongated loops.
How to knit a loop for a washcloth
What is a pool vacuum cleaner?
This equipment, without going into too much technical specifications, is a pump for distillation and purification of water with several filters. From the main pump unit there is a long hose with a handle and a brush, through which dirt and plaque are collected. By wiping the bottom and walls of the pool with a brush, bristles or the rubber base of the brush, you remove dirt from the surface, which, along with the water, goes into the hose and reaches the pump, where it is cleaned by passing through a filter or several filters. Depending on the power and general purpose of the pool vacuum cleaner, the filters inside it can even be changed several times during one pool cleaning, it all depends on the severity of the contamination.
A pool vacuum helps with removing sediment as well as buildup that builds up along the waterline.
Most often, these are gray and yellow spots, or even a film that needs to be rubbed well so that it comes away from the walls and the bottom of the pool.
If you work with a pool vacuum cleaner correctly and systematically, it can serve you for quite a long time. In addition, each individual pool cleaning will take much less time.
Crocheted rectangular washcloth made of rope
Brutal men's option for a bath. Knitting is quite simple - double crochets alternate with an air loop.
At first it will be unusual to knit with such a thread, but soon you will get used to it.
Required:
- hook number 3
- rope or jute thread (sold in construction stores, fixed price, etc.)
Crochet washcloth video:
Dial 20 ch. + 2 v.p. rise.
3 v.p. rise + 1 v.p. + double crochet in every second ch. set.
Next row: 3 ch. rise + 1 v.p. and st.s/n in v.p. previous row.
Knit to the desired length. Moreover, you can use this rectangular washcloth both in this form and folded.
Attach the handle from v.p. at the end.
A washcloth crocheted from twine will be rough, but it will help against cellulite and improve blood circulation: the skin will immediately turn red. She needs to be led from the bottom up: from the heels to the torso. On the arms: from the hands to the shoulder, as if dispersing the blood in the opposite direction.
Rules for preparing for installation
To lay flexible tiles, prepare the following tools:
- construction hair dryer;
- scissors designed for cutting metal;
- small spatula;
- screwdriver;
- hammer.
Construction hairdryer
As for the materials, you will need the flexible tiles themselves, self-tapping screws, a special lining (you can use roofing felt), roofing nails (diameter 8-12 mm, length from 25 to 40 mm; approximate consumption of nails - 10 kg per 100 m sq. area), mastic for sealing joints, hydro-, steam- and heat-insulating material, as well as adhesive tape (double-sided is required).
Fragment of a roofing pie
Crochet square washcloth
The simplest knitting option. Take your favorite square pattern. Knit two identical fabrics, sew them together and make a hanger loop.
You can take a granny square .
Several layers of foam rubber or simple fabric are often placed inside for softness.
Crochet square patterns
Voting: which manufacturer of flexible tiles is the best?
Which tile manufacturer would you choose or recommend?
Katepal
28.57 % ( 2 )
Siplast
0.00 % ( 0 )
CertainTeed
0.00 % ( 0 )
Kerabit
0.00 % ( 0 )
Tegola
0.00 % ( 0 )
Icopal
0.00 % ( 0 )
Ruflex
0.00 % ( 0 )
Shinglas TECHNONICOL
42.86 % ( 3 )
Dock
28.57 % ( 2 )
Crochet round washcloth - shell
Knit two identical round fabrics, sew them and tie a loop. This is the simplest option.
Circle crochet patterns
Below you will see a master class on knitting a washcloth-shell. These are the same two canvases, but they are knitted with threads of different thicknesses, due to which a recess appears for the hand, and the washcloth itself resembles a shell.
We collect 6 vp, fasten them into a circle. 3 v.p. lifting and 15 treble s/n in this circle.
2nd row. 2 treble crochets in each double crochet of the previous row. At the end - a connecting loop in the 3rd ch. lifting (do this in each row).
3rd row. 3 v.p. lifting and 2 treble s/n in treble s/n of the previous row. Then twice, one treble s/n in each treble s/n before. row. We alternate until the end of the row according to the pattern.
4 row. 3 v.p. rise. One treble s/n in each treble s/n of the previous row 2 times. In the 3rd st.s/n - 2 st.s/n. That is, we knit 2 treble s/n in 2 treble s/n of the previous row, and in the next column - 2 treble s/n. and so on until the end of the row.
5 row. According to the drawing - all st.s/n
6th row as 3rd
7th row as 4th
Row 8 is like 5th.
For the second piece of washcloth (white, made of wool), knit it in exactly the same way. But this circle will be larger due to the fact that the thread is thicker.
We sew two motifs as shown in the video:
Finish with a loop-tie made of v.p.
TOP 10 best manufacturers of flexible tiles
| Photo | Name | Rating | Price | |
| #1 | Katepal | ⭐ 5 / 5 2 - votes | Find out more | |
| #2 | Siplast | ⭐ 4.9 / 5 | Find out more | |
| #3 | CertainTeed | ⭐ 4.9 / 5 | Find out more | |
| #4 | Kerabit | ⭐ 4.85 / 5 | Find out more | |
| #5 | Tegola | ⭐ 4.8 / 5 | Find out more | |
| #6 | Icopal | ⭐ 4.8 / 5 | Find out more | |
| #7 | Ruflex | ⭐ 4.7 / 5 | Find out more | |
| #8 | Shinglas TECHNONICOL | ⭐ 4.7 / 5 3 - votes | Find out more | |
| #9 | Dock | ⭐ 4.6 / 5 2 - votes | Find out more | |
| #10 | Onduline | ⭐ 4.55 / 5 | Find out more |
Which tile manufacturer would you choose or recommend?
Take the survey
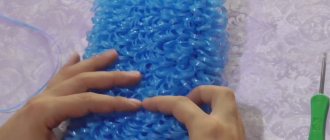
Voluminous double crochet washcloth
Everyone once had or has such a washcloth. This analogue is easy to knit with your own hands. The scheme is simple.
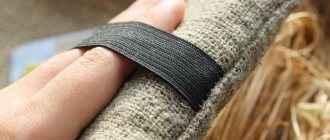
Let's take a hair elastic as a base.
This is not necessary; you can use a standard set of air loops.
We tie it with double crochets as shown in the video = 44 treble crochets
1 row. 2 treble s/n in each treble s/n of the previous row. = 88 st.s/n
We knit all subsequent rows in the same way: 2 double crochets in each column of the previous row. The photo shows a 7-row voluminous washcloth. You can knit more or less as you wish.
At the end, tie 50 vp. and attach the string to the washcloth.
Acrylic
Robust and reliable structure with an impressive service life. You can also knit a pole with your own hands from jute. You can use manila fiber, burlap, rayon and nylon.
Important! The tied pole, after completing work on it, must be boiled in hot water for about 10-15 minutes.
This way you will make it softer and eliminate possible “factory” bacteria and odors. It is important to choose a high-quality tool, starting from the rigmarole used. We recommend choosing hooks with a round end.
Crochet washcloth for beginners
Naomi Adelia yarn was used for this model. It has a textured thread already knitted, so the washcloth will be dense and beautiful.
Using hook number 8, cast on 12 chain stitches.
3 v.p. instep and 12 double crochets in each chain stitch.
Unfold the knitting. Again 3 ch. rise and 12 treble s/n in each column of the previous row.
Knit 16 rows with double crochets in length.
Fold the washcloth in the middle and sew along the edges.
You can put soap inside. Make a loop from thread without knitting air loops.
Loofah – ball with filler
Crocheting a washcloth can also be in the form of a ball. This is a very interesting option for those who love unusual and environmentally friendly things.
First we crochet the ball.
3 v.p. connect in a circle.
1 row. 1 v.p. rise (in each row) and 6 tbsp in this circle. Finish with a connecting loop in v.p. lifting (in each row).
2nd row. 2 st.b/n in each st.b/n of the previous row.
3rd row. St.b/n + 2 st.b/n. Alternate dc and 2 dc until the end of the row.
4 row. St.b/n, st.b/ + 2 st.b/n. Alternate according to the st.b/n, st.b/n + 2 tbsp.b/n
5 row. First, 3 times tbsp + 2 tbsp.
6th row. 4 times tbsp./n + 2 tbsp.b/n.
Knit in this way until you alternate 10 tbsp and 2 tbsp in the next stitch.
Then knit 20 rows according to the pattern, without adding single crochets. I changed the yarn in the middle of the wash ball.
Now let's make the ball smaller.
1 row. 10 tbsp, decrease (skip one tbsp).
2nd row. 9 st.b/n + decrease.
Knit this way, leaving a small hole for filling.
How to fill a bulky washcloth with a hook:
- Dry herbs. You can use mint, lavender, etc. Ideal for a bath.
- Hay. It will sting a little, but this has its own charm - the effect of a scrub for rough skin particles.
- Buckwheat husk. Massage effect and anti-cellulite prevention.
- Sintepon. Soft and voluminous. Suitable for those who love foam.
- cotton wool
On a note. A sponge ball with filler will take longer to dry than a regular one. Therefore, after use it is better to put it on the battery.
After this, tie the remaining rows of the ball, evenly distributing the filler. Make a loop.
Instructions for laying flexible tiles
The installation of this roofing material is well known to many craftsmen, since it has been used for a long time in low-rise construction. The installation process itself consists of several stages; let’s get acquainted with the features of each of them.
Stage No. 1. Installation of eaves overhang
To install the eaves overhang (or eaves trim as it is also called), follow the instructions below.
Step 1. Attach the strip to the edge of the roof with a small (10 cm) overhang beyond the border. Thanks to this, the part fits correctly with the gable strip. Both elements are necessary in order to protect the roof from the negative effects of environmental factors.
The cornice strip is applied to the installation site
Step 2. Secure the strip in place using roofing nails. Hammer them in a checkerboard pattern in increments of 15 cm. When connecting individual elements of the eaves overhang, be sure to do this with a slight overlap (from 10 to 15 cm).
The eaves strip is nailed in. Roofing nails are used for fastening. The plank is nailed in a checkerboard pattern.
Step 3. After this, trim the edge of the plank extending beyond the gable. Using tin snips, trim the piece to where it meets the edge (as in the photo).
The edge of the cornice strip is trimmed
Step 4. Take a hammer (preferably rubber) and bend the upper/lower edges of the overhang along the pediment. Additionally, secure the folded edges using a roofing nail.
It is better to use a rubber hammer to bend the edges of the strip.
Nail the folded edges
Stage No. 2. Laying underlay carpet
Thanks to the lining layer, better waterproofing of the material will be ensured.
Step 1. Lay the self-adhesive carpet parallel to the eaves strip, placing it on it and retreating from the edge of the strip approximately 2-3 cm. Glue the material so that each new section overlaps (at least 10 cm) with the previous one. Glue the strips from bottom to top to provide better protection against leaks. Carefully roll out the roll, simultaneously removing the protective film from it.
Rolling out the underlay carpet on the base
Step 2. Where the chimney pipe is located, cut the carpet according to its shape and glue it, moving it slightly over it.
Tile prices
tiles
How to cut underlayment in the chimney area
On a note! On the eaves overhang and in the valley, the lining carpet must be installed without fail! If the roof slope is 18 degrees or more, then the rest of the area need not be covered. If it is from 12 to 18 degrees, then the entire surface must be covered, otherwise the roof may leak.
Step 3. But above the self-adhesive lining, you can use a carpet that has mechanical fixation. Roll it out along the base with a 15cm overlap between the strips; a similar overlap is left between the material and the self-adhesive carpet laid earlier.
Individual strips are laid with an overlap of 15 cm
Step 4: Use a thermoset strip to overlap between the adhesive and mechanical fixing materials. This way the joints will be as tight as possible.
Longitudinal overlap of the carpet - 10 cm
Step 5. Fix the underlay carpet using a hammer and nails, driving them in at 20 cm intervals. It is recommended to use nails with a wide head.
Nails are used to secure the underlay carpet
Step 6. Coat all overlaps with a layer of bitumen-based mastic to improve the sealing of the joints. To do this, it is most convenient to use a metal spatula. The layer should be no more than 1 mm thick.
Application of bitumen mastic
The thickness of the mastic layer should be no more than 1 mm
Step 7: After installing the underlay rugs, cover the gable using a gable strip.
The gable strip is installed
Step 8. Trim the edge of the strip to match the shape of the roof.
This is how you need to trim the edge of the plank
Step 9. Secure the plank with nails, driving them in 15 cm increments in a checkerboard pattern.
Nails are also used to secure the gable strip.
Step 10. Lay the lining in the valley area so that it extends half a meter in each direction from the axial part. At the bottom, make a tongue on the carpet (as in the photo), through which rainwater will be drained.
An underlayment carpet is laid in the valley area
Stage No. 3. Laying directly flexible tiles
Now proceed to the most important stage - laying the bitumen shingles themselves. Apply markings in advance, thanks to which the coating will be laid evenly and neatly. Marking is especially important in the case of an unusual geometric roof shape.
Step 1. Start laying the first row of shingles 15 cm from the bend of the eaves strip. Trim the corner of the first sheet in advance - this will ensure the drainage of rainwater.
The first row of flexible tiles is being laid
The corner of the first sheet needs to be trimmed
Step 2. Apply a thin layer of mastic along the edge of the wrong side of the material. Also, apply it to the area that will be located on the gable trim.
The mastic is applied to the wrong side. The edge of the shingle is coated.
Step 3. Glue coated shingles in the desired location. Be sure to leave 1.5 cm free on both slats to ensure efficient and proper drainage of precipitation.
The edge of the shingle does not fit flush with the end strip.
Step 4: Nail the material in place using wide-headed roofing nails. When driving a nail, step back 2 cm from the edge.
The distance from the edge of the shingle is 2 cm
Step 5. Use 5 nails to secure each shingle of material (2 at the edges, 3 more evenly in the middle of the sheet).
The material is secured with nails
Step 6. Where the shingles meet the gable portion, coat each shingle in the remaining courses with asphalt mastic.
The mastic is applied in areas adjacent to the gable part of the roof
Step 7. When laying the second row, maintain a slight offset (from 15 cm to 85 cm) of the elements relative to the first. Also, when laying the second row, make a slight overlap on the first.
Then the second row of tiles is laid
Step 8. For the valley, use a special valley carpet. Roll it out to cover the entire valley. Coat the inside edges of the carpet with mastic approximately 10 cm from the edge.
Special valley carpet
Fixing the valley carpet
Step 9. Also secure the carpet with nails - drive them around the perimeter, observing a step of 20 cm.
Nails are driven in increments of 20 cm
Step 10. Lay shingles in the valley area in the same way as you did on the slopes.
Then flexible tiles are laid in the valley area
Step 11. Cut the material along the axis of the valley to approximately 10 cm, using a sharp knife.
The material is cut along the axis of the valley
Step 12. Also cut the corners along the axis of the valley, which is required to remove precipitation. Apply mastic to each shingle.
Prices for metal tiles
metal tiles
The corners of the material are cut off
Step 13. Design the second part of the valley in the same way. The result will be a gutter, the width of which will be 10-15 cm. Through this gutter, water will easily flow into the drainage system.
The other part of the valley is designed in a similar way. Leave a groove of 5-15 cm
Step 14. Finish the external break of the roof (the so-called rib) with ridge-eaves flexible tiles. Break several shingles into individual pieces.
Shingles need to be broken
Step 15. On the back of these elements there is a self-adhesive strip. Lay them along the edge of the roof with an overlap of several centimeters. Additionally, secure each of the elements with nails (a pair per side of the slope). Design the roof ridge in the same way.
Ridge-eaves flexible tiles
Laying elements overlapping
Video - How to lay shingles
Crochet baby washcloths
A knitted washcloth for a child should not only fulfill its main function, but also be interesting to the baby. To make the washing process a joy. For these purposes, needlewomen have come up with various patterns for knitting washcloths.
With a three-dimensional pattern
A do-it-yourself washcloth for children can be knitted according to a pattern. That is, you knit a simple fabric from single crochets, and on it you knit a fish, a duck, a bow or any other object with voluminous (lush/embossed) stitches.
Fish washcloth, knitting patterns
Knit one or two identical fabrics in the shape of a fish according to the pattern. You can use bright baby yarn. Do not decorate a baby washcloth with plastic eyes or other accessories to avoid scratches.
Children's washcloth toy
An interesting knitting option, but you need to think about how to fill it. You can use special granules that are sold in craft stores just for this purpose (filler for toys). They are made of plastic, will not get wet, and the washcloth will dry quickly.
There is enormous scope for creativity here: fish from the cartoon “The Little Mermaid”, yellow ducks, sharks, turtles, etc.
Using a nailer to attach shingles
Instead of a hammer, you can use a tool such as a nailer for installation, in other words, a pneumatic hammer for driving nails. Such instruments can be drum and rack.
Nailer for fastening flexible tiles
Carbon steel is used to make nails for the pneumatic hammer; in addition, they are nickel-plated. In our case, obviously, they must have a large cap.
Nails for nailers
A washcloth as a gift
Once upon a time we were told that hygiene items should not be given as gifts. This applied to washing gel, shampoo, even perfume, etc. Now we come to the conclusion that any sign of attention is pleasant. Especially if you made it yourself.
It is important not just to knit a washcloth, but to pack it correctly and present it presentably. There are special labels and boxes for these purposes. You can simply attach a handmade paper tag (sold on Aliexpress, crafts fair), or you can order an individual design if you want to knit under your own brand. This packaging is quite inexpensive.
For example, such a paper label will cost only 8 rubles.
And this box costs 25 rubles. Search on Instagram, there are many accounts there that offer products to handicrafts.
Agree, + 33 rubles per skein of yarn that you will spend on knitting a washcloth is not such a cost. And the gift will look amazing.
In the kit with a knitted washcloth you can add handmade soap, eco-friendly bath products, aromatic oils, and a eucalyptus broom.
By showing your imagination, you can come up with different combinations. It is not necessary to give this gift for any occasion. For example, when going on a visit, please your friend in this way. Washcloths crocheted from white yarn look especially beautiful - a symbol of tenderness, purity and femininity.
With washcloths, as with toothbrushes, everyone likes their own firmness: some need it very soft, while others need it hard. As an option: knit a product from soft plush and hard rope for a bath. There will be a set for all occasions.
Secrets of a simple but beautiful knitting of a bath accessory
Materials
Today the market is replete with all kinds of knitting materials. But the choice is not so easy to make. It is especially difficult for beginner needlewomen. I will talk about popular raw materials intended for knitting washcloths.
An excellent material is bast. It consists of linden fibers extracted from the inside of the tree and combined into threads. Washcloths knitted from natural raw materials:
- durable and wear-resistant;
- practical and environmentally friendly;
- lathers well and smells good;
- have a beneficial effect on the body;
- They cleanse the skin well of impurities and dead cells.
Thus, products made from bast must certainly be present in the bath suitcase of steam gourmets!
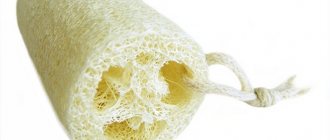
A good material for creating a bath accessory is a loofah. The washcloth is known for its rigidity, which is why it has an anti-cellulite, regenerating, cleansing, exfoliating and stimulating effect on the skin. In addition, the product has a long service life and washes well.